
Key Takeaways
- Node.js is a runtime environment and library for running JavaScript applications outside the browser, mostly used for real-time server applications due to its performance using non-blocking I/O and asynchronous events. It’s a popular choice for developers due to its ease and speed of developing real-time applications.
- The tutorial series will guide developers on how to set up Node.js on a Windows machine, develop a web frontend with Express, deploy a node express app to Azure, use Socket.IO to add a real-time layer, and deploy the entire application.
- The tutorial uses Visual Studio and the Node.js Tools for Visual Studio plug-in as a development environment. It also includes a guide on how to start a new Node.js project in Visual Studio and how to create a simple “Hello World” app in Node.js.
- Node.js plays a significant role in the advancement of WebSockets for real-time communication between the front and back ends of an application. This has pushed the boundaries of what is expected of web applications and allows developers to explore new ways of web creation.
This article is part of a web dev tech series from Microsoft. Thank you for supporting the partners who make SitePoint possible.
This Node.js tutorial series will help you build a Node.js-powered real-time chatroom web app fully deployed in the cloud. In this series, you will learn how to setup Node.js on your Windows machine (or just learn the concepts if you’re on Mac), how to develop a web frontend with Express, how to deploy a node express apps to Azure, how to use Socket.IO to add a real-time layer, and how to deploy it all together.
The tutorial will use the optional Visual Studio and the Node.js Tools for Visual Studio plug-in as a development environment—I have provided links to free downloads of both tools. This is a beginner- to intermediate-level article –you’re expected to know HTML5 and JavaScript.
Part 1 – Introduction to Node.js
Part 2 – Welcome to Express with Node.js and Azure
Part 3 – Building a Backend with Node.js, Mongo and Socket.IO
Part 4 – Building a Chatroom UI with Bootstrap
Welcome to Part 1 of the hands-on Node.js tutorial series. In this instalment, I will explain what Node.js is, why you should pay attention to Node.js, and how to set up your machine.
What is Node.js? Why Use It?
Node.js is a runtime environment and library for running JavaScript applications outside the browser. Node.js is mostly used to run real-time server applications and shines through its performance using non-blocking I/O and asynchronous events. A complete web ecosystem has been built around Node.js with several web app frameworks and protocol implementations available for usage. It’s definitely one of the easiest and fastest way to develop real-time applications on the web today.
Why use Node.js? One word: JavaScript. JavaScript is an extremely popular language and is credited with being one of the driving forces that turned the web into the dynamic wonderland that it is today.
JavaScript arose on the front end but — thanks to the V8 JavaScript engine and the work of Ryan Dahl — you can now run networked JavaScript applications outside of the browser precisely to build web apps. Node.js lets you unify the programming language used by your app. No longer do you need a different language for your backend—you can use JavaScript throughout. If your background is in building and design websites and web app frontends in HTML, CSS and JavaScript, you don’t need to pick up another language to develop complex data-driven back-ends for your apps.
Node.js plays a critical role in the advancement of WebSockets as a method for real-time communication between the front and back ends. The use of WebSockets and the libraries building on that protocol such as Socket.IO have really pushed what is expected of web applications and lets us developers explore new ways to create the web.
How to Set Up Node.js on Windows 8
To get started, you’ll need a reasonably up-to-date machine. I will be showing you how to install Node.js on Windows 8.1.
1. Install Node.js
First, download and install the Node.js runtime. Choosing the Windows Installer is one of the easiest ways to get started.
Alternatively, if you are a fan of Chocolatey, the package manager for Windows, you can install Node.js by running:
choco install nodejs.install
2. Confirm set-up
You should double-check that the Node.js executable has been added to your PATH system environment variable. Watch this video if you want to see how to change your environment variables on Windows 8 and Windows 8.1. You will want to make sure the following folder has been added to the PATH variable:
C:\Program Files (x86)\nodejs\
If you go to your Command Prompt and type in node –h, you should see the help documentation for the node.js executable displayed.
Along with Node.js, npm, the system used to manage node.js packages, should be installed and available on the Command Prompt as well. Simply type in npm –h, you should see the help documentation for npm displayed.
In case of an error…
If you encounter an error similar to this one…
Error: ENOENT, stat 'C:\Users\someuser\AppData\Roaming\npm'
…the resolution is to create a folder at the path specified above, as shown in this StackOverflow question. This is only an issue in the latest Node.js installer and should be resolved by next release. You can create the folder like so:
mkdir -r C:\Users\someuser\AppData\Roaming\npm
Select a Development Tool
With Node.js installed, it’s time to select a development tool. Feel free to use any editing tool you want. Throughout these tutorials, I will use Visual Studio to develop, debug, and deploy the chat engine; as well as Node.js Tools for Visual Studio (NTVS) –a free open-source plug-in for Visual Studio that supports developing Node.js applications.
What’s cool about NTVS is that it adds Node.js support for editing, Intellisense, performance profiling, npm, TypeScript, debugging locally and remotely (including on Windows/MacOS/Linux). It also makes it easy to quickly create web sites and deploy them to Microsoft Azure Web Sites or Cloud Services.
If you do not have Visual Studio, you can download a free copy of Visual Studio 2013 Community Edition. Then, download the free Node.js Tools for Visual Studio plug-in. You may also use Visual Studio 2012 Pro or higher (requires Update 4) or Visual Studio 2013 or higher (requires Update 2). The NTVS plug-in is compatible with both editions.
Start a new Node.js project in Visual Studio
Note: Screenshots show Visual Studio 2013 Ultimate.
Starting a new Node.js project is fairly straightforward.
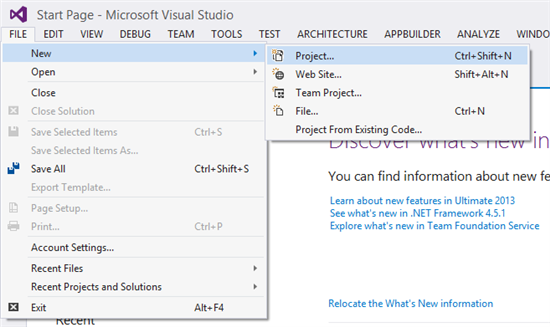
- Start Visual Studio. On the File menu, click New, and then click Project.
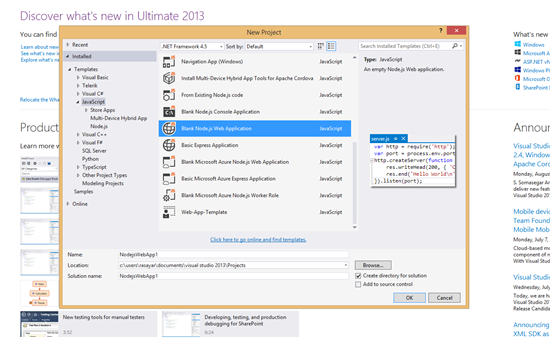
- In the New Project window, expand the Installed menu selection, expand Templates, and click JavaScript. In the main window, select Blank Node.js Web Application. Choose a location and name for your project, and then click OK.
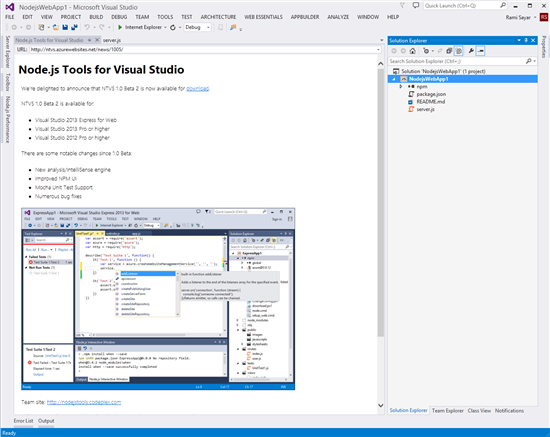
- You will be presented with the following screen. Feel free to explore Visual Studio at this point. You will want to open the generated
server.jsfile in the Solution Explorer (on the right typically but may be located elsewhere on your screen.) - You can now debug your node.js web application in your preferred browser.
A “Hello World” app in Node.js
Here’s the code used in the server.js file linked above.
var http = require('http');

var port = process.env.port || 1337;

http.createServer(function (req, res) {

  res.writeHead(200, { 'Content-Type': 'text/plain' });

  res.end('Hello World\n');

}).listen(port);
As is typical in other languages, the generated code example shows you how to output “Hello World” in the browser. Let me explain how the generated code in server.js works line by line. As stated in this tutorial series description, I am assuming you have a knowledge of JavaScript, HTML5 and how HTTP/the Internet works.
Line 1
var http = require(‘http’);
Node.js has a simple module and dependencies loading system. You simply call the function “require” with the path of the file or directory containing the module you would like to load at which point a variable is returned containing all the exported functions of that module.
Line 2
var port = process.env.port || 1337;
On this line, we want to determine on which port the HTTP server serving the HTML should run. If a port number is specified in the environment variables, we will use that one or we will simply use 1337.
Line 3
http.createServer(function (req, res) {
We want to create a server to handle HTTP requests. We will also pass the createServer function a function callback containing two parameters to a handle each individual request and return a response. Take a look at Michael Vollmer’s article if you’ve never encountered callback functions in JavaScript. The request received is passed in the req parameter and the response is expected to written to the res parameter.
Line 4
res.writeHead(200, { ‘Content-Type’: ‘text/plain’ });
Any HTTP response requires a status-line and headers, to learn more about HTTP headers and how they work check out this article. In this case, we want to return 200 OK as the status response and to specify the content-type as plain text. We specify this by calling the writeHead function on the response object.
Line 5
res.end(‘Hello World\n’);
Once we are done writing the response we want to call the end function. We can also pass the final content through the end function, in this case we want to send the string “Hello World” in plain text.
Line 6
}).listen(port);
We close off the callback and call the function listen at the port we defined earlier, this will start the server and start accepting requests sent to the defined port.
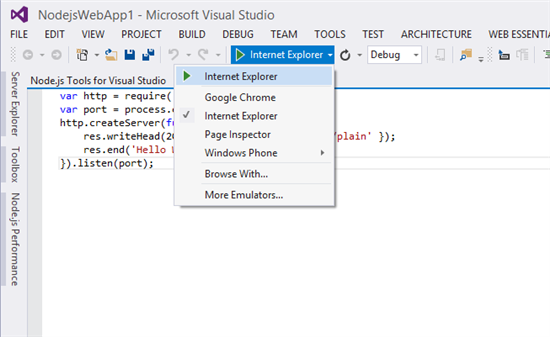
To see the result, you can start debugging by pressing on the button shown in the previous screenshot. You can see “Hello World” in the browser.
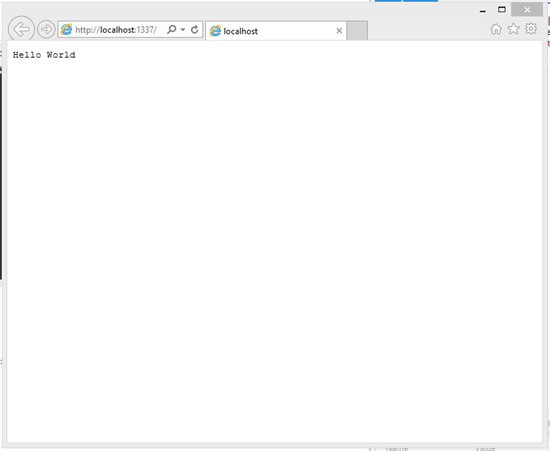
Voila! You have now successfully run a Node.js app on Windows 8.1 using Visual Studio 2013.
Stay Tuned for Part 2!
Part 2—How to Deploy Your “Hello World” into the Cloud is here. You can stay up-to-date on this and other articles by following my twitter account.
More learning for Node on Azure
For more in-depth learning on node, my course is available here on Microsoft Virtual Academy.
Or some shorter-format videos on similar node subjects:
This article is part of the web dev tech series from Microsoft. We’re excited to share Project Spartan and its new rendering engine with you. Get free virtual machines or test remotely on your Mac, iOS, Android, or Windows device at modern.IE.
Frequently Asked Questions (FAQs) about Building a Node.js-Powered Chatroom Web App
How can I integrate MongoDB with my Node.js chat application?
MongoDB is a popular NoSQL database that can be used to store chat messages and user data. To integrate MongoDB with your Node.js chat application, you will need to use a MongoDB driver like Mongoose. Mongoose provides a straight-forward, schema-based solution to model your application data and includes built-in type casting, validation, query building, and business logic hooks.
Can I use other databases apart from MongoDB for my chat application?
Yes, you can use other databases for your chat application. While MongoDB is a popular choice due to its scalability and flexibility, you can also use SQL databases like MySQL or PostgreSQL. The choice of database largely depends on your application requirements and personal preference.
How can I add authentication to my Node.js chat application?
Adding authentication to your chat application ensures that only authorized users can access it. You can use libraries like Passport.js for authentication. Passport.js is a flexible and modular authentication middleware for Node.js that can be used for authenticating requests.
How can I deploy my Node.js chat application?
There are several platforms that you can use to deploy your Node.js chat application. Some popular choices include Heroku, AWS, and Google Cloud. These platforms provide a range of services to help you deploy, manage, and scale your application.
How can I scale my Node.js chat application?
Scaling your chat application can be achieved in several ways. You can scale vertically by adding more power (CPU, RAM) to your existing server, or horizontally by adding more servers to your application. Node.js also has built-in support for clustering, which allows you to take advantage of multi-core systems.
Can I use React with my Node.js chat application?
Yes, you can use React with your Node.js chat application. React is a popular JavaScript library for building user interfaces. It can be used to build the frontend of your chat application, while Node.js handles the backend.
How can I handle real-time updates in my chat application?
Real-time updates in a chat application can be handled using WebSockets. Socket.IO is a popular library for real-time web applications. It enables real-time, bidirectional, and event-based communication between the browser and the server.
How can I test my Node.js chat application?
Testing your chat application ensures that it works as expected. You can use testing frameworks like Mocha or Jest to write tests for your application. These frameworks provide a range of features to help you write and manage your tests.
How can I handle errors in my Node.js chat application?
Error handling is an important part of any application. In Node.js, you can handle errors using middleware. Middleware functions are functions that have access to the request object, the response object, and the next function in the application’s request-response cycle.
Can I use TypeScript with my Node.js chat application?
Yes, you can use TypeScript with your Node.js chat application. TypeScript is a typed superset of JavaScript that adds static types to the language. It can help you write more robust code and catch errors early during development.