How to Use Web Fonts in WordPress
Recently, everybody seems to be talking about Lobster. Not the crustaceans from the ocean, but the Web Font. For those who haven’t heard of it, Lobster is a good example of a popular Google Font that is embedded into web pages.
Embedding fonts is not as new as you might think. Way back in 1998, CSS 2 introduced the @font-face rule. This, in theory, enabled designers to download any TrueType or PostScript font to a users computer for display in web pages. Unfortunately, at the time, only Internet Explorer 4 supported the rule. There was widespread fear that fonts that were expensive to licence would be pirated. Today, CSS 3 still doesn’t help with the piracy issue, but all web browsers support the rule. Screen resolutions have improved dramatically since that time too. So, if you haven’t embraced font embedding yet, now is the time to do so.
Key Takeaways
- Embrace the use of web fonts in WordPress to enhance visual appeal and ensure consistent typography across different devices and browsers.
- Utilize Google Fonts, Adobe Edge Web Fonts, and the Open Font Library to access a wide range of free and open-source fonts.
- Consider paid fonts from sources like Font Shop for high-quality and unique typography that can set your website apart.
- Implement fonts in WordPress using CSS methods such as @import, link, or JavaScript, or employ plugins for easier integration.
- Use font stacks in CSS to specify preferred fonts and provide fallback options, ensuring text is displayed effectively across different systems.
- Always back up your WordPress site before making changes to themes or adding new fonts to avoid losing data and ensure smooth updates.
Current Web Font Options
Before we talk about using web fonts in WordPress, let’s take a step back and look at fonts on the web in general.
The most basic level of support for fonts comes from the operating system that the user is using. This may offer dozens of fonts for a desktop or laptop system to only three fonts on Android.
Unfortunately, this remains a fairly pot luck system. We’re all aware of how poorly Helvetica looks on Windows-based machines when set at 16px and below, and that Arial can look less than fantastic on some older versions of OS X.
Many of these discrepancies have come about because the original Apple Mac operating system was tied to old printing press technology of 72 points per inch. 10 point fonts were thus allocated 10 pixels on the display. At the time, Apple offered vertical (portrait) monitors that were the same size as standard American paper, and a direct one-to-one comparison could be made from the screen to a printed version. Microsoft on the other hand, chose 96 PPI on the basis people would be sitting an additional 1/3 of the distance away from a computer monitor than they would from a printed page. Thus everything was rendered 1/3 larger on a Windows-based computer.
Things have come a long way since the 1990s when these technologies emerged, and we now have a myriad of different screen sizes and resolutions to deal with. Yet, unless you specify a font, the users’ device and browser will still make the choice of font for you.
Another issue is that some organisations limit the fonts on users computers. I once worked at an organisation whose computers only had Georgia and Verdana installed. This was so that letters and emails sent by employees could only be sent using a font that matched the corporate identity.
Making the Most of Built-in Fonts
Not withstanding the use of corporate fonts, most desktop and laptop computers – have fonts created for the Microsoft Core Fonts for the Web Project. This pack of fonts from 1996 included Andale Mono, Arial, Arial Black, Comic Sans MS, Courier New, Georgia, Impact, Times New Roman, Trebuchet MS, Verdana and Webdings. Although, versions of these fonts or their equivalents can be relied on as being on most desktops and laptops, the browser may not be relied on to display the fonts as you expect.
Such limitations can be minimised by using a font stack. This sets a CSS rule for the browser to use one of a number of fonts. It always includes a catch all of either serif (having small embellishments on the end of the strokes) or sans-serif (without the embellishments). Thus we may have font-family: Cambria, ‘Hoefler Text’, ‘Liberation Serif’, Times, ‘Times New Roman’, serif. The browser should look through your ‘stack’ and display text using the first defined font it finds in your list that is present on the users’ computer. If it can’t find any of those, it uses a fallback font that is defined, in this example, as serif.
The aim is to pick a range of fonts that render well on a range of browsers at a range of different resolutions and zoom levels.
There is an excellent discussion of font stacks by Canadian designer Amrinder Sandhu here.
Unfortunately, using a font stack doesn’t help if your viewers are using handheld devices. Android devices use Droid Sans, Droid Serif, and Droid Sans Mono, whilst Apple iOS devices use Helvetica Neue that has a wide range of styles and weights.
You would probably like to have more control over how your WordPress pages look than relying on the built-in fonts of a multitude of operating systems and versions. We can overcome this by embedding fonts.
Now, let’s look at the types of web fonts available.
Free Fonts
The vast majority of available fonts are licensed in some way. When you buy a computer, tablet, or mobile phone that has an operating system installed, part of the cost is the licensing of the fonts. However, there are a number of ways to use a wide range of free embedded fonts.
Embedded fonts are character sets that are downloaded to a users’ computer from a third party platform for the time that the page is active, and lost when the page is closed. That allows the serving company to retain control of the font, but allows you to display the font with out the need to pay to use it. There are a large number of companies serving fonts. The most well known are:
- Google Fonts, Probably the most popular free font service, the platform offers over 700 well-designed fonts, including Lobster.
- Adobe also offers fonts via their Edge Web Fonts platform. This interfaces directly with the Typekit service (see below), but filters the paid fonts leaving free Open Fonts.
- Another platform worth considering is the Open Font Library. This has over 600 fonts.
All the fonts on these platforms, and a number of others, use the Open Font Licence. The goals of the Open Font License (OFL) are to stimulate worldwide development of collaborative font projects, to support the font creation efforts of academic and linguistic communities, and to provide a free and open framework in which fonts may be shared and improved in partnership with others.
The advantage of Open Fonts is that they are freely available to use on your websites without the need to pay annual licence fees. The disadvantage is that your chosen font may not have a full range of styles and weights.
Paid Fonts
Despite the prevalence of free fonts, there are still a large number of font foundries offering premium fonts. For example, the Type Foundries Archive lists close to 300 creators and sites offering premium typefaces, although not all of them are offered for embedding into web pages.
Of the organizations offering premium fonts for web use, the German based Font Shop is perhaps the most popular marketplace for paid fonts. There are high quality fonts, as well as unusual sets of glyphs such as Ulrike Rausch’s set of kitchen fruit and vegetables, forks and knives, pots and home appliances, LiebeCook.
If you have an Adobe Creative Cloud account, you automatically get access to the Adobe’s Typekit service. Typekit offers over 450 fonts. The catch is that whilst the licence allows for you to use the fonts in print publications and on your personal non-commercial websites, if you are working for a client you may only use web fonts if you have an Adobe business account. Adobe suggests that you set up an account for the client during development and hand that over to them. This has the disadvantage that if the client fails to pay their account the site will revert to the fallback fonts in your defined font stack, i.e. the system fonts.
Getting the Font You Want in Your WordPress Pages and Posts
There are a number of plugins that let you use web fonts on your WordPress website, with Easy Google Fonts being one of the most popular. I’m not going focus on plugins in this article, but rather look at how to do this manually ourselves, by making changes to our theme. Additionally, some themes on the market come with various web font options.
The actual code will vary from service to service. I’ll outline the methods for Google Fonts, and Adobe Edge/Typekit. Other services work in similar ways. First though, remember to backup your site (or ideally work on a separate development copy), and work on copies of the files just in case something goes wrong. Styling changes should be made using Child Themes so that your changes are not overwritten each time the theme is updated.
Google Fonts
There are three methods (aside from plugins) for displaying external fonts on your WordPress pages and posts with Google Fonts: @import, link, and JavaScript.
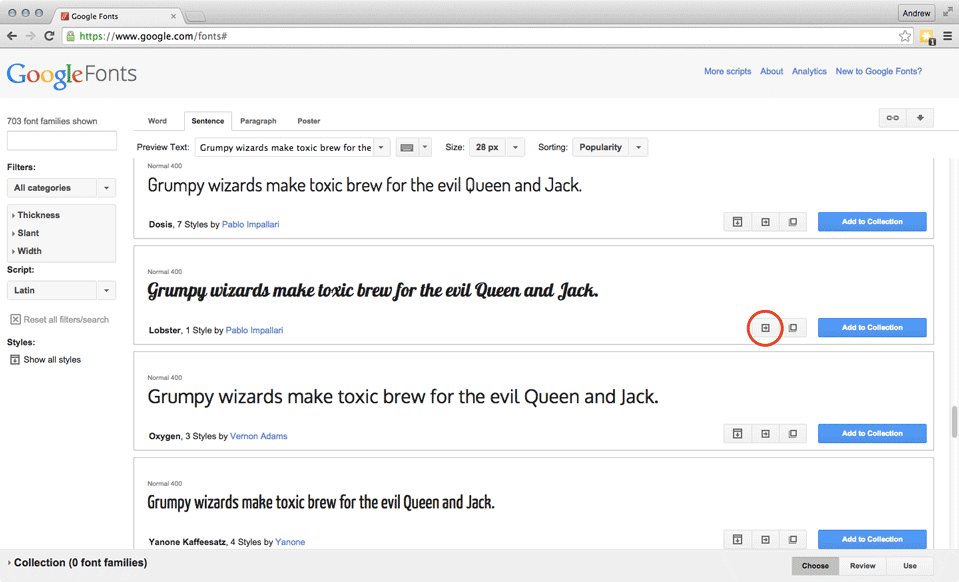
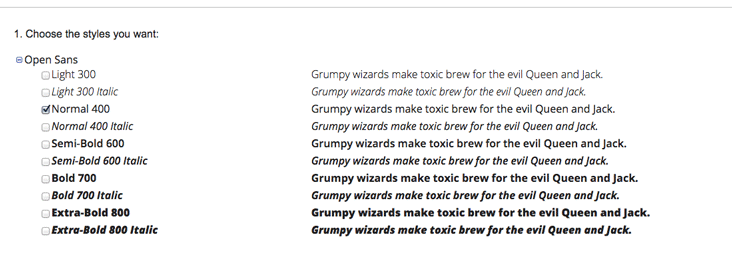
Once you have selected your font, click the Quick-use button. If offered check the required weights and styles, and the character set(s).
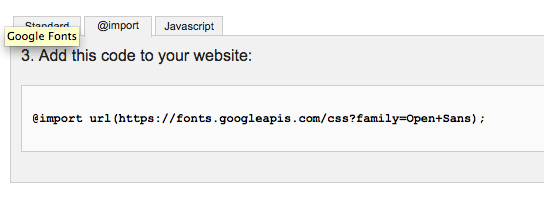
Next, you will need to choose the method of embedding. The easiest method is to add the @import rule to style.css file of the theme you wish to modify. It doesn’t seem to matter where you place the code within the style.css rules. However, @import will block any other content from downloading until it has finished its task. Therefore, if you’re planning on using this method for multiple fonts you should combine the requests into one @import rule.
The second method is equally simple, it uses the link method and the code is contained on the Standard tab. This time the code is placed into the header.php file. Place the code at the top of the file. You can then add the name of the font to your font stack. Remember to add it as the first font, followed by preferred system fonts, and the fallback font style.

Here it is worth noting that the Google Web Fonts blog states that if a script tag is present before the @font-face declaration, then Internet Explorer won’t display any page content until the font files have finished downloading. Therefore, if the files fail to download, the Internet Explorer user maybe left with a blank or partially loaded page. So place the @font-face declaration as early as possible in the file.
A further method is to enqeue the font in the functions.php file. The function shown below will load the required font styles and weights.

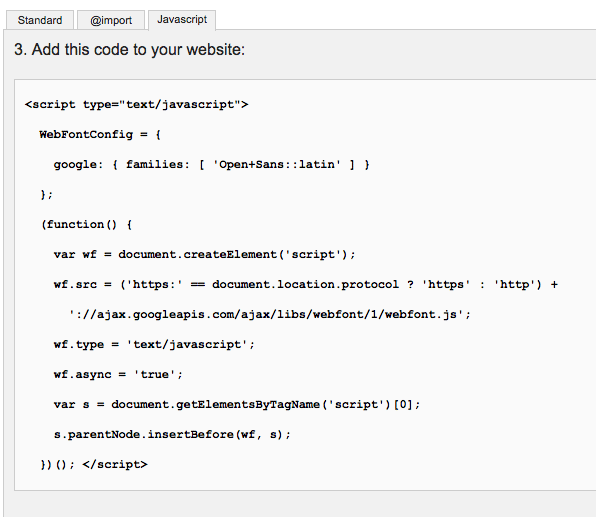
Finally, you can load the font using JavaScript. There are arguments for and against using JavaScript, but the number of users with JavaScript turned off is very small. The code is added in the header.php of the child theme, where it is placed between the <head> and </head> tags. Again Google suggest that it should be the first element, this way the fonts will load whilst the other parts of the page load and this should avoid the ‘flash of unstyled text’.
Adobe Edge Web Fonts and Typekit
Adding Adobe Typekit fonts to WordPress is a little less straightforward. Whilst you can use similar methods to those for Google Fonts, less experienced developers can use the Typekit Fonts for WordPress plugin. Once installed the plugin will appear in your Settings menu. Again, remember to backup WordPress before making these modifications.
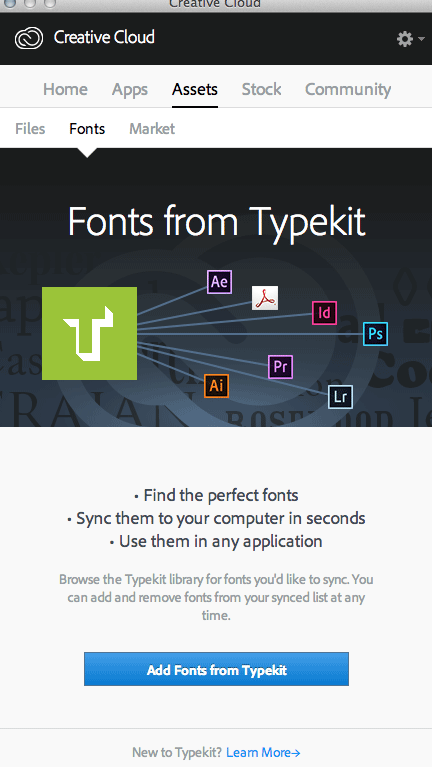
To use Typekit, login to your account via the Creative Cloud app. Once you’ve selected a font, Create a Kit. Give your kit a name, then add the domain name of the site you are using the font on. Once you’ve entered your site details, you’ll be given a piece of JavaScript. Copy and save this in a text file using a plain text editor such as TextEdit or Notepad.
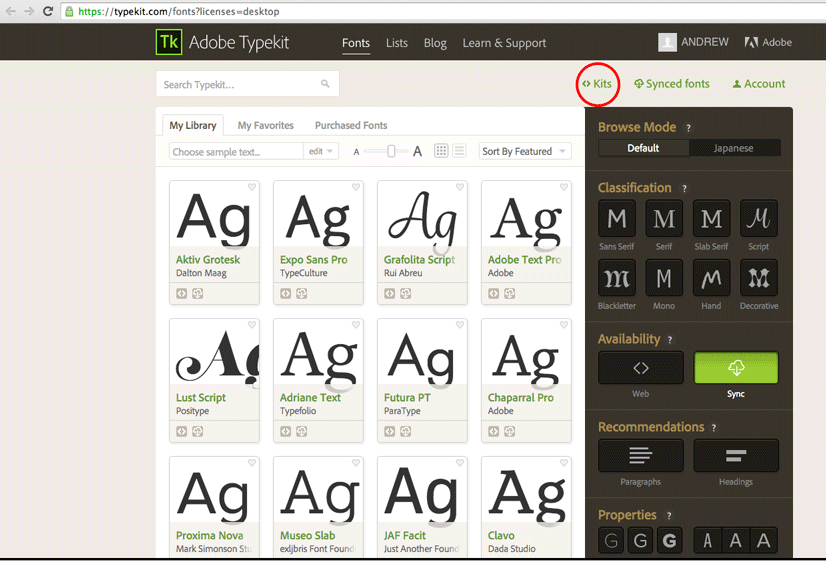
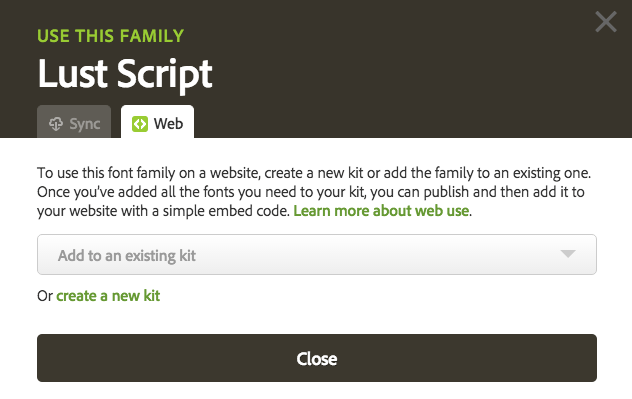
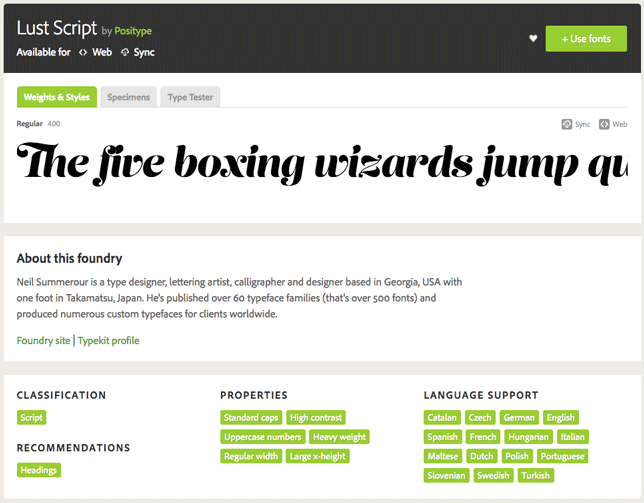
The next step is to select your font, add it to your site kit, and publish it. Add any further fonts you wish to use and publish them.
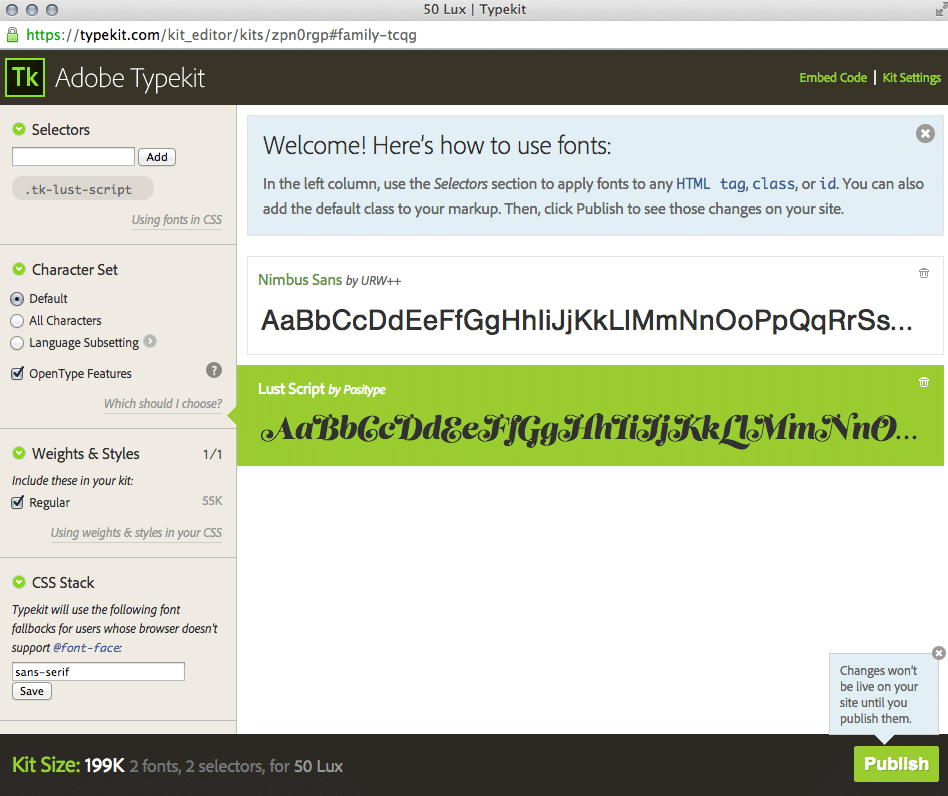
After the kit is published, go to the Typekit Fonts for WordPress plugin.
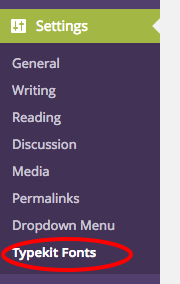
Add the piece of code that you saved in the text file.

Add the CSS code selectors as required. In the example, I’ve added post-title to show as H1 text (WordPress Page and Post titles are H1 text.). I’ve also added sub-title that is the H2 subheading in the main body text. Note that prior to naming your selectors, it is a good idea to check that the names are not already in use by your theme. You can do this by inspecting the elements using the Developer Tools in your browser. Don’t forget to refresh your screen following each change you make, it can take a few minutes for the font to become available on your site.

Finally, it’s also recommended that you always specify both the font-weight and font-style properties each time you use a font. Again, this helps you maintain control of the display of the font over the myriad of possible platforms.
Conclusion
Adding fonts to your site is an accepted method of producing enticing sites. It can also be a great way to make a commonly used WordPress theme stand out from all the others.
However, don’t be tempted to add a huge number of fonts just because you can – one of my first tasks in Visual Communications in high school was to count the number of fonts on cereal packets (there was over 25 fonts on a Corn Flakes packet!). Less is often more with fonts, and limiting yourself to two or three designs is usually the best practice, from not only a loading speed perspective, but also a visual design point of view.
Google offers a font-pairing feature in the pop out, the button is next to the Quick Use button to help you get started. Graphic design is a craft that takes years to master, but embedding a couple of good fonts will ensure that the design you choose will be seen by all your users.
Frequently Asked Questions about Using Web Fonts in WordPress
How can I add Google Fonts to my WordPress site?
Adding Google Fonts to your WordPress site is a straightforward process. First, you need to visit the Google Fonts website and choose the font you want to use. Click on the ‘Select this font’ button and copy the link provided. Then, go to your WordPress dashboard, navigate to Appearance > Theme Editor and find the header.php file. Paste the copied link within the head tags. Finally, you can use the font in your CSS by referencing the font-family.
Can I use custom fonts in WordPress?
Yes, you can use custom fonts in WordPress. You can do this by uploading the font files (usually .ttf or .otf) to your WordPress theme directory and then using CSS to apply the font to your website. Remember to check the license of the font before using it.
How can I change the font size in WordPress?
You can change the font size in WordPress by using CSS. Go to Appearance > Customize > Additional CSS in your WordPress dashboard and add a CSS rule to change the font size. For example, to change the font size of all paragraphs to 16px, you could use the following CSS: p { font-size: 16px; }.
What are web-safe fonts?
Web-safe fonts are fonts that are likely to be present on a wide range of computer systems, and thus are safe to use on your website. Examples of web-safe fonts include Arial, Times New Roman, and Courier New.
How can I use a web-safe font in WordPress?
To use a web-safe font in WordPress, you can simply reference the font in your CSS. For example, to use the Arial font for all paragraphs, you could use the following CSS: p { font-family: Arial; }.
What is the difference between serif and sans-serif fonts?
Serif fonts have small lines or strokes attached to the ends of larger strokes in a letter or symbol. Examples include Times New Roman and Georgia. Sans-serif fonts, on the other hand, do not have these small lines. Examples include Arial and Helvetica.
How can I use a serif font in WordPress?
To use a serif font in WordPress, you can reference the font in your CSS. For example, to use the Georgia font for all headings, you could use the following CSS: h1, h2, h3, h4, h5, h6 { font-family: Georgia; }.
Can I use different fonts for different parts of my WordPress site?
Yes, you can use different fonts for different parts of your WordPress site. You can do this by using CSS to apply different fonts to different HTML elements. For example, you could use one font for headings and another font for body text.
How can I preview a font in WordPress before applying it to my site?
You can preview a font in WordPress by using a plugin like Easy Google Fonts. This plugin allows you to preview fonts in the WordPress customizer before applying them to your site.
Can I use a font that is not available on Google Fonts or in the standard web-safe fonts?
Yes, you can use a font that is not available on Google Fonts or in the standard web-safe fonts. You can do this by uploading the font files to your WordPress theme directory and then using CSS to apply the font to your website. Remember to check the license of the font before using it.
Andrew Renaut was a professional photographer before moving into the world of museums. He worked on some of the first websites for museums in Australia and the UK. Andrew then taught Information Technology, Media, and Photography at senior secondary level for over a decade. Recently he has been producing 50 Lux magazine and doing WordPress development. You’ll find Andrew at lots of technology and photography events around Melbourne, Australia.


