Beginning Android: Launching the Android Virtual Device
Lesson 5: Launching the Android Virtual Device
An Android Virtual Device (AVD) is a device configuration that is run within the Android emulator. It works with the emulator to provide a virtual device-specific environment in which to install and run Android apps. This tutorial shows you how to launch the previously created AVD via the Android SDK’s AVD Manager tool.
Using AVD Manager to Launch an AVD
Assuming that you’ve created MyAVD, you’ll want to launch this AVD with the emulator. Begin by running the Android SDK’s AVD Manager tool, or run SDK Manager and select Manage AVDs from the Tools menu. You should see an Android Virtual Device Manager window that’s similar to Figure 12.

Android Virtual Device Manager presents a list of previously created AVDs, of which there is only MyAVD in Figure 12. Highlight this AVD, which enables the Start button, and click this button to begin the process of launching MyAVD. Figure 13 shows you the resulting Launch Options dialog box.

As well as identifying the skin and screen density of the AVD that’s about to be launched, Launch Options presents the following checkboxes:
- Scale display to real size causes the resolution of the emulator’s display to be scaled to match the screen size (in terms of inches and dots per inch) of the physical Android device being emulated, when checked.
- Wipe user data causes the AVD’s user-data partition to be deleted, when checked. (The emulated device preserves apps and state data across AVD restarts in a user- data partition. You might occasionally need to delete this partition while developing and testing an app, and you do so by checking Wipe user data.)
- Launch from snapshot causes the emulated device to be started from a previously saved snapshot of the device’s state, when checked. This checkbox defaults to being checked for an AVD created with snapshot enabled.
- Save to snapshot causes the emulated device’s state to be saved to a snapshot upon device exit, when checked. This checkbox defaults to being checked for an AVD created with snapshot enabled.
The final two checkboxes refer to a snapshot, which is a stored file of emulator state. The emulator launches much faster when launched from a snapshot.
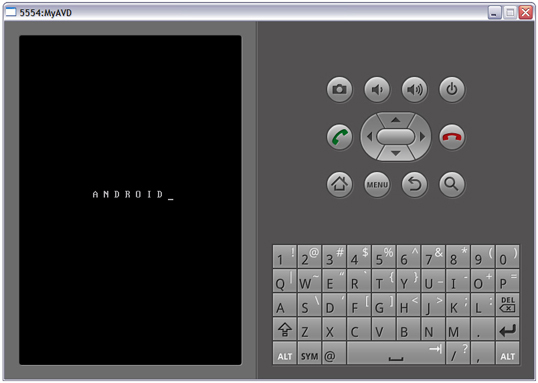
Keep the settings that are shown in Figure 13 and click the Launch button. On a Windows XP platform, you will see a few command windows flash by and then you’ll see Figure 14’s emulator window.

Figure 14 shows the emulator window with 5554:MyAVD in its titlebar. Value 5554 identifies a console port that you can use to query and control the AVD’s environment. Android supports a maximum of 16 concurrently executing AVDs, where each AVD is assigned an even-numbered port number that starts at 5554. (A discussion of the console is outside the scope of this lesson.)
Figure 14 also shows that the emulator window consists of a device screen on the left and phone controls/keyboard on the right. The device screen initially displays “A N D R O I D _”, and then displays the graphical logo shown in Figure 15 while the Android platform associated with the AVD is initializing.

Caution: If Figure 15’s ANDROID logo appears for more than 15-30 minutes, something has probably gone wrong. Reboot your computer, start AVD Manager, delete MyAVD, recreate this AVD, and relaunch MyAVD.
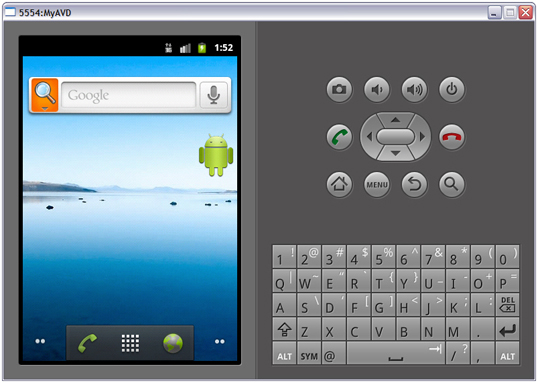
After several minutes, this logo is replaced with the home screen that’s shown in Figure 16.

The home screen is a special app that displays a wallpaper background. A statusbar appears above the home screen (and every app screen), presenting access to notifications, the amount of battery power that’s remaining, the current time, and other information.
The home screen can display widgets, which are miniature app views that can be embedded in this screen or the screen of any other app. Figure 16 reveals the Google Search widget near the top of the home screen. (This kind of widget isn’t the same as a textview or other user interface widget – see Lesson 3.)
At the bottom of the home screen is the app launcher. The app launcher consists of phone and globe icons providing rapid access to the commonly used phone and web browser apps. It also consists of a rectangular grid icon that (when clicked) takes you to an app launcher screen of app icons. You can click any of these app icons to launch the respective app.
Google has organized the home screen around multiple panes, with Figure 16’s pane being the default pane. Click the dots on either side of the app launcher to replace the current pane with the pane to its left or right. This is how you access additional content not visible on the default pane. The number of panes yet to be visited on either side is indicated by the number of dots to the left or right of the app launcher.
The phone controls reveal a house icon button that takes you back to the home screen when clicked. Also, the MENU button presents a context menu related to the current screen when clicked. Finally, the curved arrow (BACK) button reverts to the previous screen in a stack of screens that were previously visited.
While the AVD is running, you can interact with this device by using the mouse and pressing certain keys on the keyboard. Android lets you press various keys that correspond to device keys. Three of these keys are listed below:
- Home corresponds to the house icon button.
- F2 or Page Up corresponds to the MENU button.
- Esc corresponds to the curved arrow button.
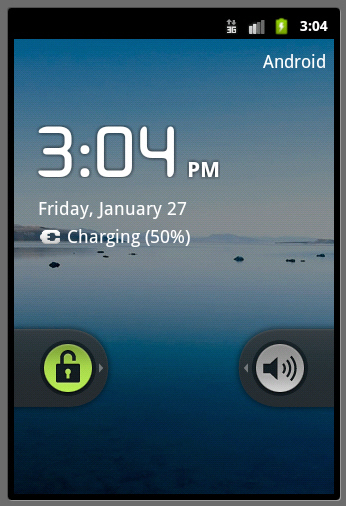
When the home screen appears, it may not look like the screen shown in Figure 16. Instead, it might look like the screen shown in Figure 17.

Figure 17 reveals a locked home screen. To unlock this screen and obtain the screen shown in Figure 16, you need to drag the greenish lock icon horizontally to the right until it touches the speaker icon. (To lock the screen at any time, click the phone control button that appears above the red phone button in Figure 16.)
Review
The following review questions help you test your mastery of Lesson 5’s material:
- How do you launch an AVD?
- Describe the layout of the emulated device’s window.
Frequently Asked Questions (FAQs) about Launching the Android Virtual Device
What are the system requirements for running the Android Virtual Device (AVD)?
The Android Virtual Device (AVD) is a tool provided by the Android SDK, and it requires a system with a minimum of 2GB RAM, though 4GB is recommended for optimal performance. The system should also have a recent, compatible version of Java installed, preferably Java 8 or later. Additionally, the system should have enough storage space to accommodate the Android SDK, the AVD data, and any applications that you plan to test.
How do I install the Android Virtual Device (AVD)?
To install the AVD, you first need to install the Android SDK. Once the SDK is installed, you can access the AVD Manager from the SDK Manager. From there, you can create and manage your virtual devices. Each virtual device represents a specific Android device configuration, including the Android version and hardware characteristics.
Why is my Android Virtual Device (AVD) running slowly?
The performance of the AVD can be affected by several factors. These include the system resources available on your computer, the configuration of the virtual device, and the applications running on the device. To improve performance, you can allocate more RAM to the AVD, use a simpler device configuration, or close unnecessary applications on your computer.
Can I test my apps on different Android versions using AVD?
Yes, the AVD Manager allows you to create virtual devices with different Android versions. This makes it possible to test how your app behaves on different versions of Android, without needing to have physical devices for each version.
How do I troubleshoot issues with the Android Virtual Device (AVD)?
If you’re experiencing issues with the AVD, there are several steps you can take. First, ensure that your system meets the requirements for running the AVD. Second, check that the AVD configuration matches the requirements of the app you’re testing. Finally, consult the Android Developer documentation and community forums for further assistance.
Can I simulate different hardware configurations with AVD?
Yes, the AVD Manager allows you to customize the hardware characteristics of your virtual devices. This includes the screen size and resolution, memory size, and supported sensors. This allows you to test how your app behaves on different types of devices.
How do I update the Android Virtual Device (AVD)?
The AVD is part of the Android SDK, so it’s updated whenever you update the SDK. To check for updates, you can use the SDK Manager, which is included with the SDK.
Can I use the Android Virtual Device (AVD) on a Mac?
Yes, the AVD is compatible with Mac OS X 10.5.8 or later, as well as Windows and Linux. However, the installation process and system requirements may vary between operating systems.
How do I delete a virtual device in AVD?
To delete a virtual device, you can use the AVD Manager. Simply select the device you want to delete and click the “Delete” button. Note that this will permanently delete the device and all its data.
Can I run multiple instances of the Android Virtual Device (AVD) simultaneously?
Yes, you can run multiple instances of the AVD simultaneously. However, each instance requires its own system resources, so the performance may be affected if your computer doesn’t have enough resources available.
Jeff Friesen is a freelance tutor and software developer with an emphasis on Java and mobile technologies. In addition to writing Java and Android books for Apress, Jeff has written numerous articles on Java and other technologies for SitePoint, InformIT, JavaWorld, java.net, and DevSource.

