How to Manage and Batch Install Your WordPress Plugins

Key Takeaways
- WPCore is a tool that allows you to manage collections of favorite WordPress plugins and enables batch installation of plugins, saving time and effort in setting up a new WordPress site.
- WP Install Profiles (WPIP) plugin and Plugin Favorites are alternatives to WPCore that also allow users to install groups of plugins in one go, while Must-use plugins (mu-plugins) are automatically enabled on all sites in the installation and can’t be disabled.
- Despite the convenience of batch installation, it’s important to remember that installing too many plugins can slow down your site and potentially cause conflicts, so careful management and regular updates of plugins are crucial for the security and performance of your site.
According to Forbes, over 60 million websites globally are powered by WordPress. Numbers like this show that WordPress is no doubt a leading contender when it comes to Content Management Systems (CMS).
The application of WordPress has gone past just a blogging platform; it has evolved over the years to become a platform for virtually any website of choice, all of which is due to the flexible backbone upon which WordPress was developed.
One of the platform’s most loved features is the use of Plugins – tools that extend the functionality of WordPress.
If you have been a continuous user of WordPress, either in building your network of blogs or developing websites for clients, you should have a collection of plugins reserved for installation on every WordPress site.
WordPress lacks the ability to install multiple plugins at once. Therefore, we are left with no option than to install our can’t-do-without plugins one at a time.
If you find this as frustrating as I do, WPCore will definitely get you excited.
Introduction to WPCore
One of my investigations on Google led me to WPCore – a simple tool for managing collections of your favorite WordPress plugins. WPCore also gives you the ability to batch install your WordPress plugins.
WPCore works in four simple steps:
- Create a collection and add your favorite WordPress plugins.
- Visit any of your WordPress sites and install the WPCore plugin.
- Drop the collection key into the WPCore plugin settings within WordPress.
- WPCore automatically pulls in all the plugins from your collection and installs them on your site.
Follow me as I walk you through the steps above.
Create a Collection
Head over to WPcore.com, register and login to your account.
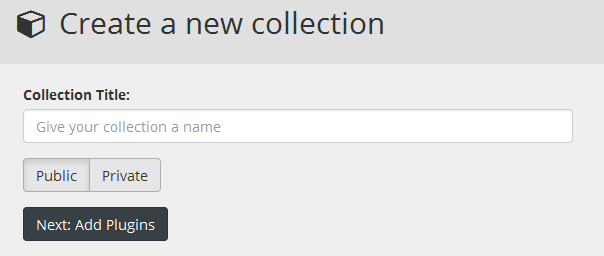
Click on the New Collection navigation menu to create your plugin collection.
Enter the collection name/title, set the visibility to public or private and hit the Add Plugins button to begin collating the plugins.
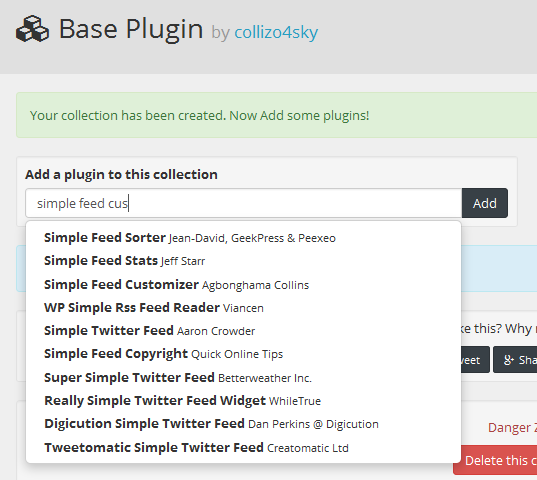
Start entering the plugin names and click the Add button to include them in the collection.
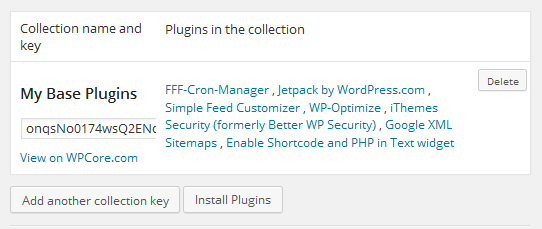
Take note of the collection Key displayed at the top right-hand corner. This will come in handy when installing the plugin collection in WordPress.
Installing the Plugin Collection to WordPress
While still on the WPcore website, click on the Download Plugin link to download the plugin.
Go to your WordPress dashboard, upload and activate the plugin.
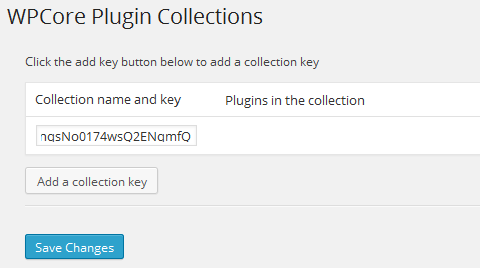
On the plugin settings page, add the collection key and submit.
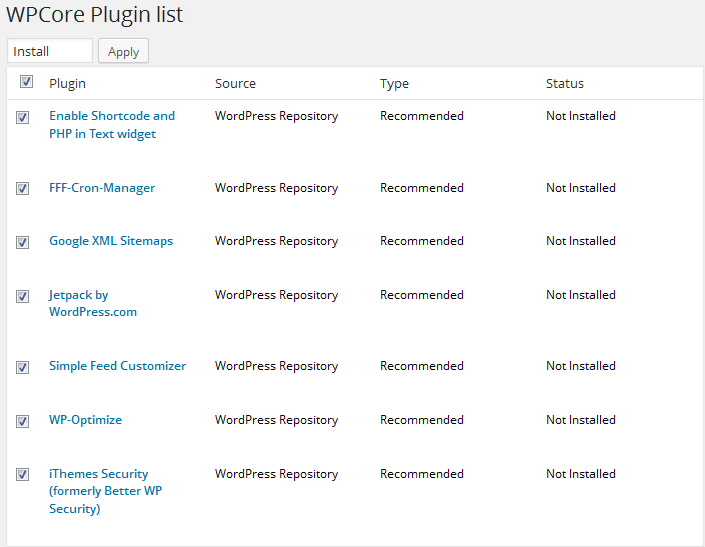
The plugins in your collection will be listed ‘ready to be installed’.
Hit the install button to take you to the installation page.
On the installation page, check all the plugins, select install from the drop-down menu, and hit the apply button to initiate the plugins installation.
Watch as WPCore installs the plugins all at once.
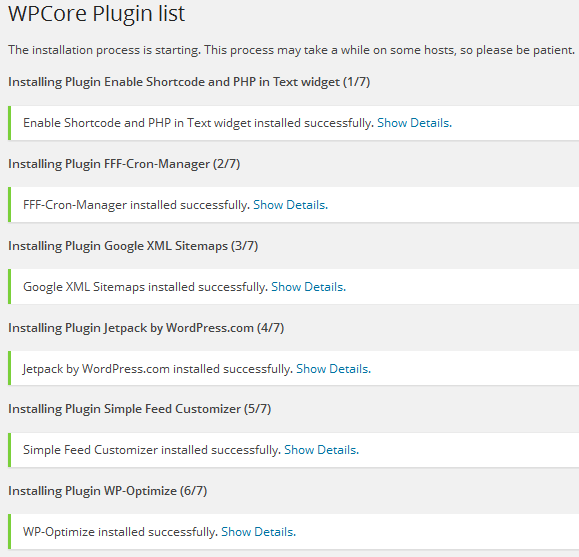
See how easy it is to install multiple plugins in a single click without having to do it one at a time?
WP Install Profiles Plugin
Similar to WPCore is the WP Install Profiles (WPIP) plugin.
It allows users to define groups of plugins, called profiles.
Once a profile has been entered, WPIP will send calls to the WordPress Plugin Directory, download the plugin files and unzip them to the site’s plugins folder.
Additionally, WPIP saves the profile in a downloadable format, so you can upload it to your next site and download the same plugins with a single click.
To bulk-install multiple WordPress plugins using WPIP, get the plugins repository URL slugs, add them to the Install these plugins text area field, and then click the submit button to begin the plugin installation.

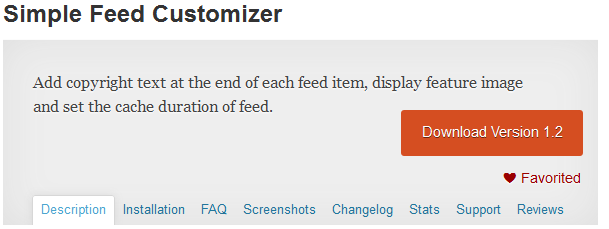
To get the URL slug of plugin for example: Simple Feed Customizer with the repository URL – https://wordpress.org/plugins/simple-feed-customizer/, the simple-feed-customizer part is the URL slug.
You could use the slug with or without hyphens (e.g. simple-feed-customizer = simple feed customizer).
Aside from WPcore and WPIP, you can significantly reduce the time and pain in installing your plugin collection one at a time via WordPress Plugin Favorites and Must Use Plugins features.
Plugin Favorites
The ability to favorite a plugin was added to the plugin repository in 2012. Version 3.5 introduced the ability to display, and easily install, a user’s favorite plugins from the Add New plugins page of the dashboard.
To favorite a plugin:
- You must be logged in to the official WordPress Plugins Repository.
- While you are viewing a plugin’s page, click the
Favoritelink below the plugin’s download button.
Once you favorite a plugin, it will show up in your public profile, as well as your rating of the plugin, if applicable.
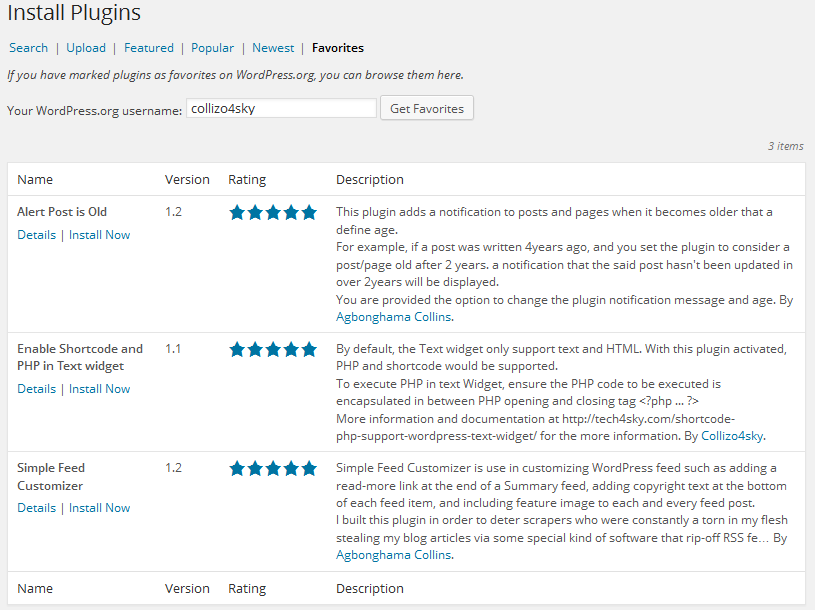
To install plugins from your list of favorites, within the WordPress dashboard:
Go to Plugins > Add New.
Under Favorites, type in your WordPress.org username and click the Get Favorites button.
Install the plugins you want installed on the site.
Using Favorite could save you time searching for your commonly used plugins.
Must Use Plugins
Must-use plugins (a.k.a. mu-plugins) are plugins installed in a special directory inside the WordPress content folder. They are automatically enabled on all sites in the installation.
Must-use plugins do not show in the default list of plugins on the Plugins page of wp-admin – they appear in a special Must-Use section – and cannot be disabled, except by removing the plugin files from the must-use directory, which is found in wp-content/mu-plugins by default.
To install a mu-plugin, follow the steps below:
- FTP/SFTP to your server and navigate to your WordPress installation folder.
- If there is no
mu-pluginsfolder inwp-content, create one. - Copy the folders of the plugins you want to make mu-plugins to the
wp-content/mu-plugins. - Unlike regular plugins, you don’t need to activate them before they start working.
If you are using WordPress Multi-User, you could save yourself the stress of having to install the same set of plugins in your network of sites when you use Must-use plugins.
Wrap Up
A significant chunk of the time in setting up a new WordPress site is spent installing plugins.
You can save a lot of time when they are installed in bulk, rather than having to do it one at a time.
Apart from the procedures mentioned in this article, how do you install your favorite plugins when starting a new WordPress blog or website? We’d love to hear about it in the comments.
Frequently Asked Questions (FAQs) about Batch Installing WordPress Plugins
How can I manage my WordPress plugins more efficiently?
Managing WordPress plugins efficiently involves understanding how to install, activate, deactivate, and delete them. You can do this manually for each plugin, but if you have multiple plugins to install, a batch installation can save you time. Using a plugin like WP Core or Multi Plugin Installer, you can install multiple plugins at once. These tools allow you to create a collection of your favorite plugins and install them in one go, making the process more efficient.
Can I bulk install plugins on WordPress.com?
Unfortunately, WordPress.com does not support the bulk installation of plugins. This feature is only available on self-hosted WordPress sites. If you’re using WordPress.com, you’ll need to install plugins one at a time.
How do I manage WordPress plugins on DreamHost?
DreamHost provides a one-click install option for WordPress, but managing plugins is similar to other hosting platforms. You can install, activate, deactivate, or delete plugins from your WordPress dashboard. For bulk installation, you can use a plugin like WP Core or Multi Plugin Installer.
What are some recommended plugins for bulk installation?
Some popular plugins for bulk installation include WP Core, Multi Plugin Installer, and WPCore Plugin Manager. These plugins allow you to create a collection of your favorite plugins and install them all at once.
How do I use the WP Core plugin for bulk installation?
To use WP Core, you first need to create a collection of plugins on the WP Core website. Once you’ve created your collection, you’ll receive a unique collection key. You can then install the WP Core plugin on your WordPress site, enter your collection key, and all your plugins will be installed at once.
Can I bulk install premium plugins?
Yes, you can bulk install premium plugins. However, you’ll need to have the plugin files available on your computer. You can then use a plugin like Easy Theme and Plugin Upgrades to upload and install multiple plugins at once.
Is there a limit to how many plugins I can install at once?
There’s no set limit to how many plugins you can install at once. However, keep in mind that installing too many plugins can slow down your site and potentially cause conflicts.
Can I bulk install plugins on a multisite network?
Yes, you can bulk install plugins on a multisite network. However, each site on the network will still need to activate the plugins individually.
What should I do if a plugin fails to install?
If a plugin fails to install, you can try installing it manually by uploading the plugin file to your WordPress site. If you’re still having trouble, the plugin may not be compatible with your version of WordPress or with other plugins on your site.
How do I keep my plugins updated?
Keeping your plugins updated is crucial for the security and performance of your site. You can update plugins manually from your WordPress dashboard, or you can use a plugin like Easy Updates Manager to manage updates automatically.
Collins is a web developer and freelance writer. Creator of the popular ProfilePress and MailOptin WordPress plugins. When not wrangling with code, you can find him writing at his personal blog or on Twitter.