


Key Takeaways
- Docker’s Remote API can be accessed and manipulated using the Ruby language, specifically using the ‘docker-api’ gem, which provides an object-oriented interface to the API.
- Docker images can be created, manipulated, and inspected using Ruby commands, such as ‘Docker::Image.create’ for creating an image and ‘Docker::Image.all’ for viewing all images on the Docker server.
- Docker containers can be created and managed using Ruby commands, such as ‘Docker::Container.create’ for creating a container and ‘Docker::Container.get’ for accessing an existing container.
- An image can be created from a Docker container using the ‘container.commit’ Ruby command, which can be useful for preserving a configured environment.
![]()
Docker is a really nifty tool to have under your belt. It’s been used by many developers to ease the process of development. We have done many topics for Docker, you can check them here. If you have not yet installed Docker on your machine, you can find out how via those articles or on Docker’s site.
In this post, I am going cover Docker’s Remote API. If you used Docker up to this point, it’s likely been via the command-line interface which is actually a client that uses the Remote API. By the way, I presume that you understand all the basics of Docker. If not, please read the articles I link to above.
Before we can interact with the API we have to configure Docker to listen on a specific TCP port. Let’s edit the Docker config file:
Path: /etc/init/docker.conf
Add this line:
DOCKER_OPTS='-H tcp://0.0.0.0:4243 -H unix:///var/run/docker.sock'
Restart docker:
service docker restart
Now we can connect to our Docker server using port 4243. Let’s test our connection to the server before proceeding. This can be accomplished with the command line tool curl
curl -X GET http://139.59.148.228:4243/images/jsonThis will print all the images we have on our Docker server. I tend to prefer to use a REST Client when dealing with more data:
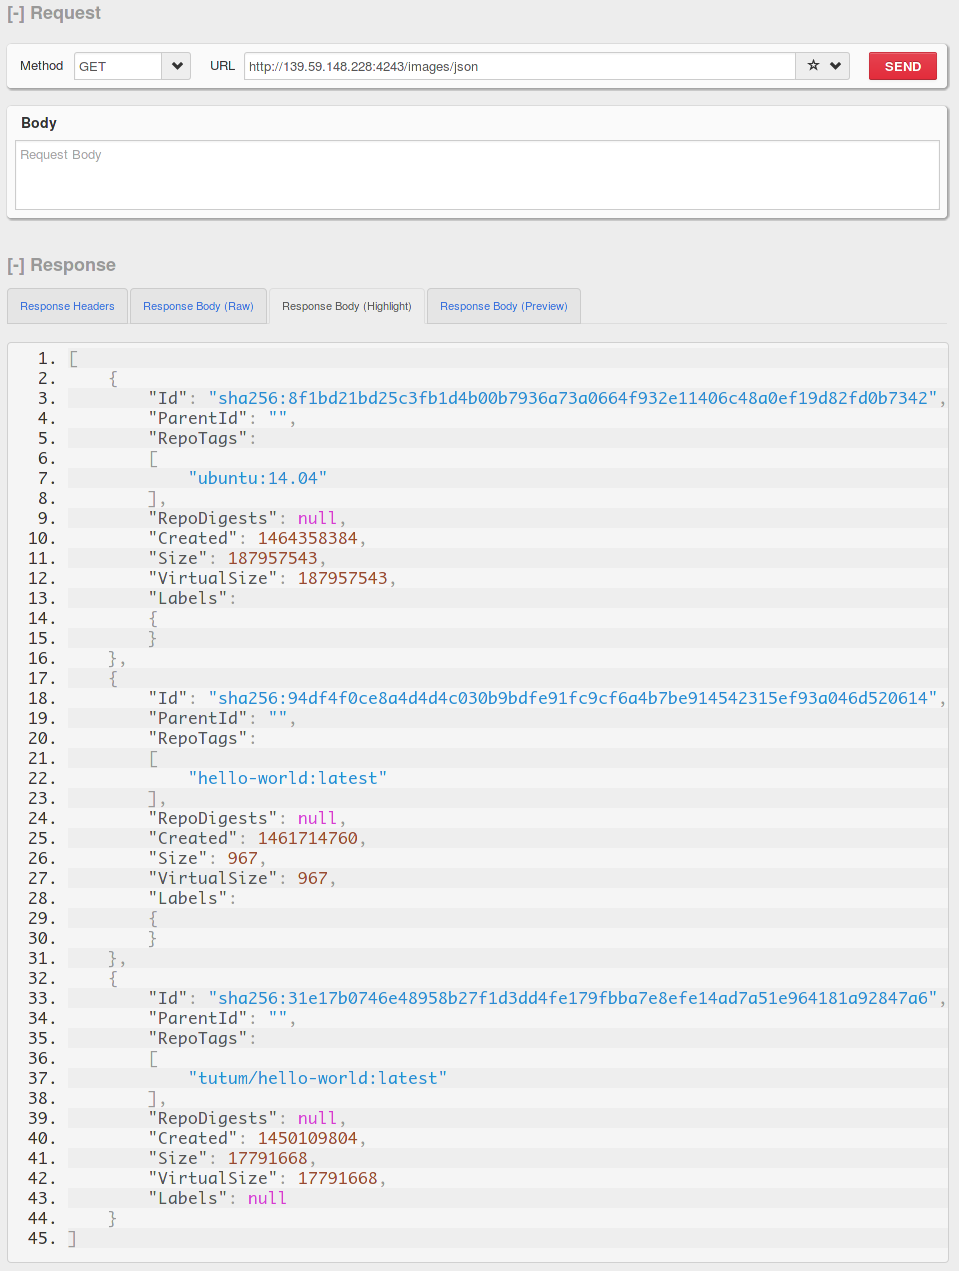
This confirms that we can access our Docker server.
Ruby
Let’s get to the Ruby part. We are going to use the docker-api gem. This will allow us to have an object oriented interface to the Docker Remote API.
We can install it directly from our terminal:
gem install docker-api
Or add it to the Gemfile:
gem "docker-api" # followed by a `bundle install`
We will use IRB (Interactive Ruby Shell) throughout the tutorial, but any of the examples can be done in a Ruby file.
First step is to import the docker-api gem:
require 'docker-api'
Point it to our docker server:
Docker.url = 'tcp://139.59.148.228:4243/'
Let’s test our connection now, this can be easily done by using the version method:
Docker.version
 => {"Version"=>"1.11.1", "ApiVersion"=>"1.23", "GitCommit"=>"5604cbe", "GoVersion"=>"go1.5.4", "Os"=>"linux", "Arch"=>"amd64", "KernelVersion"=>"3.13.0-85-generic", "BuildTime"=>"2016-04-26T23:30:23.291099901+00:00"}
The server responds with some information for the host system of the Docker server.If you get an error complaining “Connection Refused” like so:
Excon::Errors::SocketError: Connection refused - connect(2) for 139.59.148.228:42432 (Errno::ECONNREFUSED)
Then you probably have a problem with the server. Note: Check if you are connecting to the right port and make sure if you have a firewall configuration that allows connections to that particular port.
Docker Images
Manipulating with images is very easy:
image = Docker::Image.create('fromImage' => 'rails:4.2')
This might take some time depending on the network connection, it will pull the Rails image from Docker Hub.
Something worith noting here: we are separating Rails and the version (4.2) we want. This is a Docker image name and tagging convention that works for many other docker images, such as ruby:latest or debian:latest.
Let’s make sure we have the image on the server. SSH into your Docker server (this is likely just your local box) and run:
$ docker images
Quick tip: if you have downloaded a lot of images you can run:
$ docker images | grep ruby
This will now only list images that have the word ruby. The output might look something like this:
ruby latest 2d43e11a3406 2 weeks ago 729.1 MB`
The information shown is:
- The name of the repository
- The tag or the version of the image, this can be specified as a number or name like
ruby:latestorruby:1-wheezy - The image ID
- The creation date
- the size.
This confirms that we have successfully pulled an image. Now let’s see what images we have in our Docker server via the API. If we execute the Image.all method we will get a JSON representation of our images:
Docker::Image.all
=> [#<Docker::Image:0x00000001834e28 @id="sha256:299e53ed9d2a9d07391855b2f49a823af145c1cf66bd711968b3b2ccc29d49d8", @info={"ParentId"=>"", "RepoTags"=>["rails:4.2"], "RepoDigests"=>nil, "Created"=>1464136334, "Size"=>837203335, "VirtualSize"=>837203335, "Labels"=>{}, "id"=>"sha256:299e53ed9d2a9d07391855b2f49a823af145c1cf66bd711968b3b2ccc29d49d8"}, @connection=#<Docker::Connection:0x0000000176c6f8 @url="tcp://139.59.148.228:4243/", @options={}>>, #<Docker::Image:0x00000001834cc0 @id="sha256:31e17b0746e48958b27f1d3dd4fe179fbba7e8efe14ad7a51e964181a92847a6", @info={"ParentId"=>"", "RepoTags"=>["tutum/hello-world:latest"], "RepoDigests"=>nil, "Created"=>1450109804, "Size"=>17791668, "VirtualSize"=>17791668, "Labels"=>nil, "id"=>"sha256:31e17b0746e48958b27f1d3dd4fe179fbba7e8efe14ad7a51e964181a92847a6"}, @connection=#<Docker::Connection:0x0000000176c6f8 @url="tcp://139.59.148.228:4243/", @options={}>>]
Containers
Creating and running instances of these images as containers is also possible:
container = Docker::Container.create('Image' => 'ubuntu', 'Tty' => true)
This will create a container with the Ubuntu image we have on our server. Note the 'Tty' => true part thatl checks that our container is running via SSH. If we don’t add the Tty parameter, then our container will exit, since it’s just a process and it will die (exit).
=> #<Docker::Container:0x000000025f6bb0 @id="5bbf21e99459052a816cd74006aec00a53cf9bd0814d5517804257a5869f3329", @info={"Warnings"=>nil, "id"=>"5bbf21e99459052a816cd74006aec00a53cf9bd0814d5517804257a5869f3329"}, @connection=#<Docker::Connection:0x00000002541b98 @url="tcp://139.59.148.228:4243/", @options={}>>
The container is created, we need to start it:
container.start
Time to check and see if our container is running. Go back to the shell session and run this command:
$ docker ps
ba13a1bfb728        ubuntu              "/bin/bash"              1 minutes ago       Up 52 seconds                           pedantic_torvalds
We have have confirmed that our Docker container is running. Now from the API back in irb:
container.top
=> [{"UID"=>"root", "PID"=>"28267", "PPID"=>"28248", "C"=>"0", "STIME"=>"12:43", "TTY"=>"pts/5", "TIME"=>"00:00:00", "CMD"=>"/bin/bash"}]
We get a simplified return value representing the running container. There are also some other methods you can use for stopping, restarting, and pausing the container. Check out the documentation for more details on them.
Requesting a Container
What if we have an existing container and we want to attach to it? Simply request the container by ID or name:
container = Docker::Container.get('500f53b25e6e')
This will get the container using the ID. If we want to request it by name, first run the docker ps command in the terminal to get the list of containers running and their names:
| CONTAINERID | IMAGE | COMMAND | CREATED | STATUS | PORTS | NAMES |
|---|---|---|---|---|---|---|
| 5e2ff2107855 | rails:4.2 | “irb” | 4 days ago | Up 4 days | sick_austin |
In this example if we want to request our rails container the name of it is sick_austin. The name will always be different, even if you have two containers from the same image. Each container will have a different name.
container = Docker::Container.get('sick_austin')
This will print a lot of information back about the container; what kind of ruby version we are running, bundler version, and even network information.
Now we could easily stop the container (don’t do this just yet…we still have work to do):
container.stop
We can also pass commands to the container and catch the output, like the ls command which will return the list of directories:
container.exec(['ls'])
[["bin\nboot\ndev\netc\nhome\nlib\nlib64\nmedia\nmnt\nopt\nproc\nroot\nrun\nsbin\nsrv\nsys\ntmp\nusr\nvar\n"], [], 0]`
Creating an Image From a Container
Creating an image from a container is very useful. Say we have a scenario where we have worked in a special environment with a lot of configuration and we would like to create an image out of that.
First, let’s make a change to our container. In our example, we have created this really important configuration file named sitepoint.conf.
container.exec(["touch", "sitepoint.conf"])
We are using the same exec method we used before, passing in two parameters touch and sitepoint.conf. touch is a Linux command that will create an empty file, and the other parameter is the name of the file we want to create.
We should check now that our configuration file is in our container:
container.exec(["ls")
[["bin\nboot\ndev\netc\nhome\nlib\nlib64\nmedia\nmnt\nopt\nproc\nroot\nrun\nsbin\nsitepoint.conf\nsrv\nsys\ntmp\nusr\nvar\n"], [], 0]
We can see that sitepoint.conf is listed on our server:
Creating the Image
The commit method will create the image from the container:
container.commit
Now, if we list our docker images, we’ll see our new image. I am doing it via the SSH session for a better preview:
$ docker images
Which will return:
| REPOSITORY | TAG | IMAGE ID | CREATED | SIZE |
|---|---|---|---|---|
| <none> | <none> | “8eee633c7cb6” | 2 seconds ago | 837.2 MB |
| rails | 4.2 | “299e53ed9d2a” | 3 weeks ago | 837.2 MB |
| rails | 4.2 | “299e53ed9d2a” | 3 weeks ago | 837.2 MB |
| ubuntu | latest | “2fa927b5cdd3” | 3 weeks ago | 122 MB |
| rails | 4.2 | “299e53ed9d2a” | 3 weeks ago | 837.2 MB |
The one on top is the copied image of our container, which is identifiable by the date when it was created. Also, there is no repository or tag for the newly created image.
Create a new container that launches a bash prompt using the new image’s ID:
$ docker run -i -t 8eee633c7cb6 /bin/bash
We have an interactive shell now inside the container and can use the ls command:
$ ls
bin  boot  dev  etc  home  lib  lib64  media  mnt  opt  proc  root  run  sbin  sitepoint.conf  srv  sys  tmp  usr  var
There’s the sitepoint.conf file, alive and well. This confirms that we have built a new container from the image we created above.
Conclusion
Having access to our Docker server from different environments can be a great help to automate our workflow. This allows for creative solutions and new ideas for Docker. There are still some things that need to be covered such as securing the connection to the API, you can read more on that here. Now, go forth and automate your Docker workflow using Ruby and the Remote API.
Frequently Asked Questions on Automating Docker with the Remote API and Ruby
How can I start using Docker with Ruby?
To start using Docker with Ruby, you need to install Docker on your machine. Once installed, you can use the Docker API gem to interact with Docker. This gem provides a Ruby client for interacting with the Docker Remote API. You can install it by adding gem 'docker-api' to your Gemfile and running bundle install. After that, you can start a new Docker container with Ruby by using the Docker::Container.create method.
What are the benefits of Dockerizing a Ruby on Rails application?
Dockerizing a Ruby on Rails application has several benefits. It ensures that the application runs in the same environment across different stages of the development process, reducing the chances of encountering bugs due to environment differences. It also simplifies the process of deploying the application, as Docker containers can be easily moved between different machines.
How can I use the Docker Remote API?
The Docker Remote API allows you to interact with Docker programmatically. You can use it to start, stop, and manage Docker containers, among other things. To use the Docker Remote API, you need to send HTTP requests to the Docker daemon. The Docker API gem provides a convenient way to do this in Ruby.
What is the Docker API gem?
The Docker API gem is a Ruby client for the Docker Remote API. It provides a convenient way to interact with Docker programmatically in Ruby. You can use it to start, stop, and manage Docker containers, among other things.
How can I install the Docker API gem?
You can install the Docker API gem by adding gem 'docker-api' to your Gemfile and running bundle install. After that, you can require it in your Ruby code with require 'docker'.
How can I start a new Docker container with Ruby?
You can start a new Docker container with Ruby by using the Docker::Container.create method. This method takes a hash of options that specify the configuration of the container. After creating the container, you can start it with the start method.
How can I stop a Docker container with Ruby?
You can stop a Docker container with Ruby by using the Docker::Container#stop method. This method takes an optional hash of options that can be used to specify a timeout.
How can I manage Docker containers with Ruby?
You can manage Docker containers with Ruby by using the Docker API gem. This gem provides methods for starting, stopping, and managing Docker containers. For example, you can use the Docker::Container.all method to get a list of all running containers.
How can I deploy a Dockerized Ruby on Rails application?
You can deploy a Dockerized Ruby on Rails application by pushing the Docker image to a Docker registry and then pulling it on the target machine. After that, you can start the application with Docker.
How can I debug a Dockerized Ruby on Rails application?
You can debug a Dockerized Ruby on Rails application by attaching a shell to the running Docker container. This can be done with the docker exec -it <container_id> /bin/bash command. Once inside the container, you can use standard Ruby debugging tools.