Key Takeaways
- Building an RSS Reader in Rails involves creating two models: Feed and Entry. The Feed contains the list of added feeds and Entry contains the content of each feed.
- The feed content is updated via a rake task that syncs the feed content with the database. This task can be scheduled to run at periodic intervals.
- The Entries model is displayed via two actions: index and show. The Entries index page displays the list of entries from a specific feed.
- While the RSS Reader built in this tutorial is basic, it provides the necessary functionality. Developers can expand on this foundation with their own design and additional features.

This article was peer reviewed by Thom Parkin. Thanks to all of SitePoint’s peer reviewers for making SitePoint content the best it can be!
An RSS feed is a data format used by websites (mainly blogs) to deliver content to users. Most websites, including SitePoint, publish a feed as another means of content distribution. A feed is a stream where the updated content is published in one of the standardized formats and can be consumed by readers, like RSS clients.
Consuming an RSS feed lets you follow many of your favorite websites and gather updated information in a single place. There are social media and email newsletters that serves this purpose, but the flexibility is what makes feeds distinct. There are many feed readers that enables you to enter all the feed URLs you want to follow and to read them in a single place. Today, we are going to build one such reader to serve your reading pleasure. We will also cache the contents for offline reading.
Let’s get started.
Bootstrapping the App
We are going to build the application in Rails 4. Though it may work with older versions, it’s recommended to keep up with the latest version to avoid any dependency issues. Let’s create our Rails app by running the following command:
rails new feedreader -d postgresql
Note: This presumes you have PostgreSQL running on localhost. If not, feel free to omit the -d flag and use SQLite.
Once the Rails generators are finished, cd into the directory and create the database:
rake db:create
Let’s also add the gem dependencies we will use in this app. Since this is fairly minimal app, we will need only two gems, feedjira for feed processing and twitter-bootstrap-rails for a little bit of styling. The bootstrap part is completely optional and you can ignore it if you want to use your own design.
Add the following gems to the Gemfile:
gem 'feedjira'
gem 'twitter-bootstrap-rails'
and run bundle install.
Once the installation is complete, run the bootstrap generator:
rails generate bootstrap:install static
This will add the necessary bootstrap files and add required requires. With that, our bootstrapping is complete. If you’re using version control, which is recommended, now is the time to commit the changes.
Creating Models
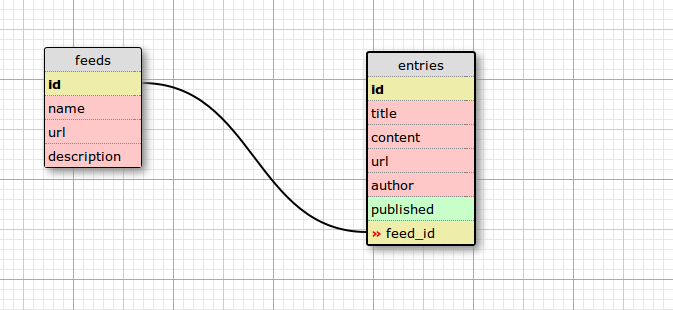
It’s time to create the models for our app. The structure is simple, as we have only two models: Feed and Entry. Feed contains the list of added feeds and Entry contains the content of each feed. This will be the schema for our app:
 Let’s create the Feed model first. It is simple enough to just scaffold. Run the following commands to scaffold and migrate:
rails g scaffold feed name url description:text
rake db:migrate
This creates the necessary model, controller, and view files related to Feeds. We don’t have to do any modification on any of the files, just add the root path in the config/routes.rb file:
root 'feeds#index'
That’s it. Start the server and add your favorite feeds. It’s probably a good idea to commit your changes at this point into git:
git add -A
git commit -m "Add Feed scaffold"
Next, let’s create the Entry model which will hold all the content. Since we’re going to store the entries via a rake task, there is no need for full fledged components. We can create the Entry model directly by running the following command:
rails g model entry title published:datetime content:text url author feed_id:integer
rake db:migrate
After the migration is done, add the relationship to both the models:
## models/feed.rb
class Feed < ActiveRecord::Base
    has_many :entries, dependent: :destroy
end

## models/entry.rb
class Entry < ActiveRecord::Base
    belongs_to :feed
end
With that, we’ve completely sett up the models. Now it’s time to create that rake task to fill the Entry model from the Feeds that have been added:
Updating Feed Content
As I’ve mentioned before, we’ll have a rake task as an entry point for all the data in the Entries table. This task could be scheduled to run in periodic intervals to sync the feed content with our database. Start by creating a rake task inside lib/tasks called sync.rake. Once the file is created, add the following content to it:
namespace :sync do
  task feeds: [:environment] do
    Feed.all.each do |feed|
      content = Feedjira::Feed.fetch_and_parse feed.url
      content.entries.each do |entry|
        local_entry = feed.entries.where(title: entry.title).first_or_initialize
        local_entry.update_attributes(content: entry.content, author: entry.author, url: entry.url, published: entry.published)
        p "Synced Entry - #{entry.title}"
      end
      p "Synced Feed - #{feed.name}"
    end
  end
end
The rake task loops through all the Feeds stored in the database and fetches the latest content for each one. From that, loop through the new Entries, creating or updating it in the database. We are updating every time to keep up with any change in the source content.
After you have added this, try running the rake task:
bundle exec rake sync:feeds
You can see the contents have been added to the Entry table. This is easily verified by logging into the Rails console:
$ rails console
> Entry.count
Alright, now for the final step. Let’s create the controller for Entries.
Displaying the Feed
Start by generating the controller for our Entries model. We need only two actions: index and show, which can be specified it to the generator itself:
rails g controller entries index show
After the above command is executed, the controller and view files are created. Head over to routes.rb and change the following lines and add it under the feeds resources:
get 'entries/index'
get 'entries/show'
to
resources :feeds do
  member do
   resources :entries, only: [:index, :show]
  end
end
We have nested Entries under a specific feed here. Head over to the Entries controller and add the following:
# app/controllers/entries_controller.rb
class EntriesController < ApplicationController
  before_action :set_feed, only: :index

  def index
    @entries = @feed.entries.order('published desc')
  end

  def show
    @entry = Entry.find(params[:id])
  end

  private
  def set_feed
    @feed = Feed.find(params[:id])
  end
end
We are fetching respective feed by ID for the Entries index page to display the list of entries from that feed. Let’s also make the necessary changes to the views:
# app/views/entries/index.html.erb
<div class="container">
  <% @entries.each do |entry| %>
    <div class="panel panel-default">
      <div class="panel-body">
        <%= link_to entry.title, entry %> - <i> published <%= time_ago_in_words(entry.published) %> ago.</i>
      </div>
    </div>
  <% end %>
</div>

# app/views/entries/show.html.erb
<div class="container">
  <h3><%= link_to @entry.title, @entry.url %></h3>
  <i>published on <%= @entry.published %> by <%= @entry.author %></i>
  <p>
    <%= @entry.content.html_safe %>
  </p>
</div>
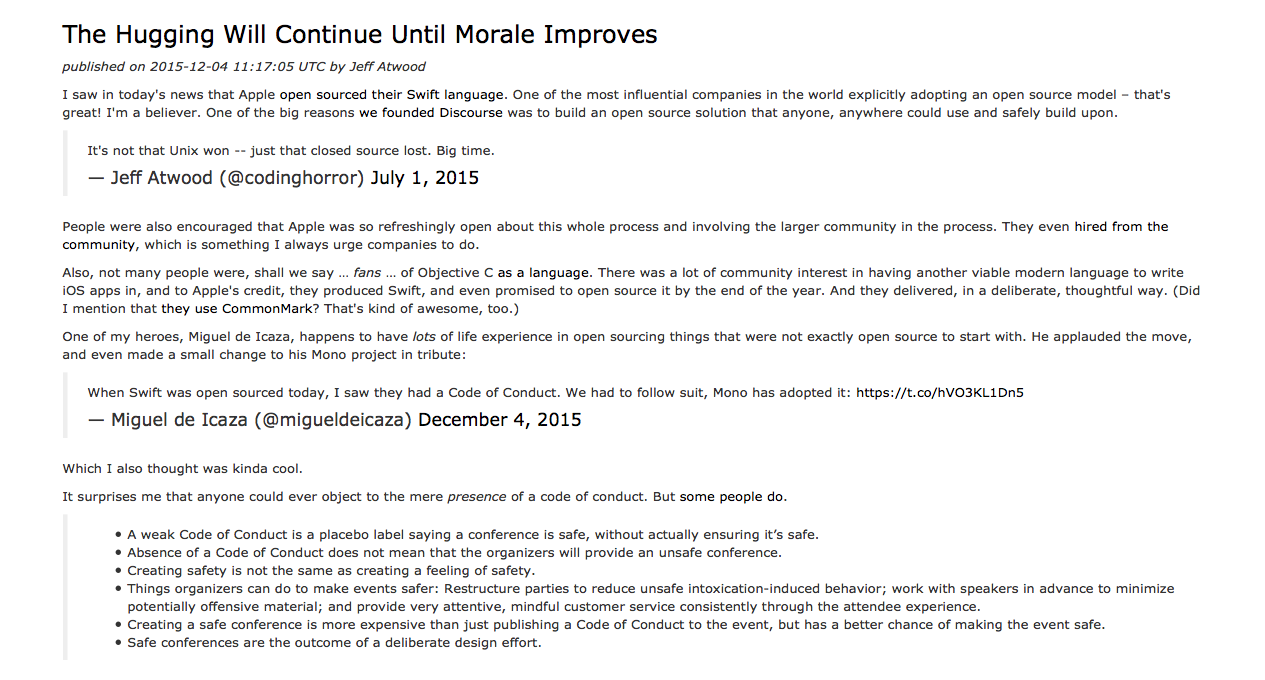
The code above is trivial. We’re displaying the Entry customized as per our needs. One thing to note is, we have used html_safe in the Entries show view since the feed will be HTML formatted. This allows us to render the HTML in the Entry. With that change, we have finished our tiny little feed reader that just works. Save the changes, and start the server.
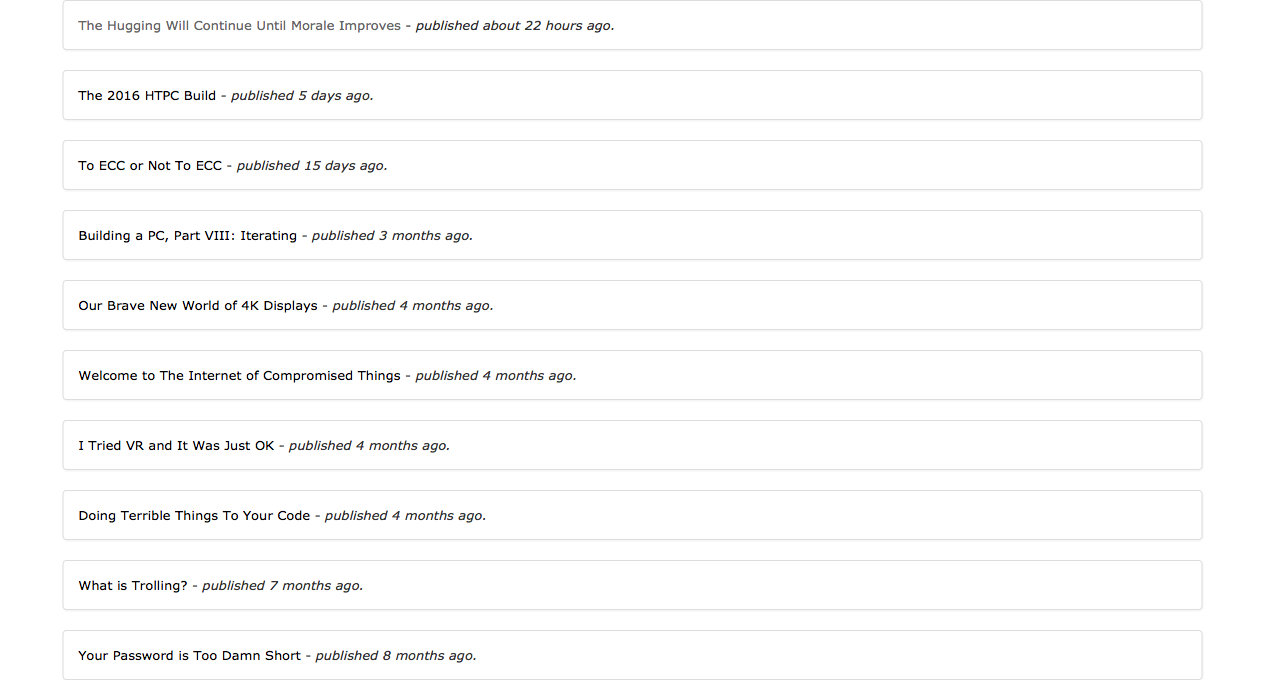
Our finalized app looks something like this after adding the URL and running the rake task:


I know this is not the best looking feed reader, but it lets you to build one. We’ve got the functionality, now use your imagination for the design.
Conclusion
All the sample code used in this tutorial is available in Github feel free to fork and poke.
Thank you for taking time reading this tutorial and I hope it served your purposes. Until next time.
Frequently Asked Questions (FAQs) about Building an RSS Reader in Rails
How can I add images to my RSS feed in Rails?
Adding images to your RSS feed in Rails can enhance the visual appeal and provide more information about the content. To do this, you can use the ‘enclosure’ tag in your RSS builder. The ‘enclosure’ tag has three required attributes: url, length, and type. The url attribute points to the location of the image, the length attribute specifies the size of the image in bytes, and the type attribute specifies the MIME type of the image. Here’s an example:xml.enclosure url: @post.image_url, length: @post.image_size, type: "image/jpeg"
Remember to replace ‘@post.image_url’ and ‘@post.image_size’ with the actual URL and size of your image.
How can I create multiple RSS feeds for different models in Rails?
If you have different models in your Rails application and you want to create separate RSS feeds for each, you can do so by creating separate builder files for each model. For example, if you have a ‘Post’ model and a ‘Comment’ model, you can create ‘post.rss.builder’ and ‘comment.rss.builder’ files. In each builder file, you can define the structure of the RSS feed for the corresponding model. Then, in your controller, you can define separate actions for each feed, like so:def post_feed
@posts = Post.all
respond_to do |format|
format.rss { render :layout => false }
endenddef comment_feed
@comments = Comment.all
respond_to do |format|
format.rss { render :layout => false }
endend
In your routes file, you can define routes for each feed:get 'post_feed', to: 'feeds#post_feed', format: 'rss'get 'comment_feed', to: 'feeds#comment_feed', format: 'rss'
Now, you can access the feeds at ‘/post_feed.rss’ and ‘/comment_feed.rss’.
How can I customize the structure of my RSS feed in Rails?
Rails provides a lot of flexibility in customizing the structure of your RSS feed. You can define your own tags and attributes in the builder file. For example, if you want to add a ‘category’ tag for each item in your feed, you can do so like this:xml.item do
xml.title @post.title
xml.description @post.description
xml.pubDate @post.created_at.to_s(:rfc822)
xml.link post_url(@post)
xml.guid post_url(@post)
xml.category @post.categoryend
Remember to replace ‘@post.category’ with the actual category of your post.
How can I add pagination to my RSS feed in Rails?
Pagination can be useful if you have a lot of content and you want to limit the number of items in each feed. You can use the ‘will_paginate’ or ‘kaminari’ gem to add pagination to your feed. After installing the gem, you can modify your controller action like this:def feed
@posts = Post.paginate(page: params[:page], per_page: 10)
respond_to do |format|
format.rss { render :layout => false }
endend
Now, you can access different pages of your feed by appending ‘?page=n’ to the feed URL, where ‘n’ is the page number.
How can I secure my RSS feed in Rails?
If you want to restrict access to your RSS feed, you can add authentication to your feed. One way to do this is by using HTTP Basic Authentication. You can add this to your controller action like this:def feed
authenticate_or_request_with_http_basic do |username, password|
username == "admin" && password == "password"
end
@posts = Post.all
respond_to do |format|
format.rss { render :layout => false }
endend
Now, only users who enter the correct username and password can access the feed.
How can I add custom fields to my RSS feed in Rails?
If you want to add custom fields to your RSS feed, you can do so in the builder file. For example, if you want to add a ‘author’ field for each item in your feed, you can do so like this:xml.item do
xml.title @post.title
xml.description @post.description
xml.pubDate @post.created_at.to_s(:rfc822)
xml.link post_url(@post)
xml.guid post_url(@post)
xml.author @post.authorend
Remember to replace ‘@post.author’ with the actual author of your post.
How can I validate my RSS feed in Rails?
It’s important to validate your RSS feed to ensure it conforms to the RSS specification. You can use online tools like the W3C Feed Validation Service to validate your feed. Simply enter the URL of your feed and the tool will check it for errors and compliance with the RSS specification.
How can I add a search feature to my RSS feed in Rails?
If you want to allow users to search your RSS feed, you can add a search feature to your application. You can use the ‘ransack’ gem to add search functionality. After installing the gem, you can add a search form in your view and modify your controller action to filter the items based on the search query.
How can I add a subscription feature to my RSS feed in Rails?
If you want to allow users to subscribe to your RSS feed, you can add a subscription feature to your application. You can use the ‘feedjira’ gem to parse the feed and the ‘whenever’ gem to schedule updates. Users can then subscribe to the feed and receive updates whenever new content is added.
How can I test my RSS feed in Rails?
Testing is an important part of development. You can use Rails’ built-in testing framework to test your RSS feed. You can write tests to check the response status, the content of the feed, and the structure of the feed. You can also use tools like Postman to manually test your feed.
Vinoth is a Server Administrator turned Full stack web developer. He loves to try his hands on multiple programming languages but his primary programming language of choice is Ruby. He is currently a Software Engineer @ Intelllex building the server side of things. You can find more about him at avinoth.com.
