Get More out of SQL Server’s Web Assistant Wizard

Key Takeaways
- SQL Server’s Web Assistant Wizard allows users to publish database data online without any Web development or query building expertise, making it a useful tool for beginner programmers.
- The Wizard’s advanced options enable users to tweak the HTML output and SQL queries, allowing for customization of the layout and the data subset used in the application.
- For more sophisticated HTML developers, using a template can be more beneficial than the Wizard’s built-in options. The template should be predefined by the user and indicate where the Wizard should insert the database data.
- Knowledge of SQL enhances the power of the Wizard, as it allows the user to use either stored procedures or Transact-SQL statements to manipulate data sources. This enables the publication of more complex information.
In my previous article, Publish Dynamic Data with SQL Server’s Web Assistant, you learned that you don’t need any HTML skills to share your database data on the Internet.
The Wizard can take care of all the formatting and lead you through the creation of a Web page step by step. In addition, you can point SQL Server’s Web Assistant Wizard at the tables that contain the data you want to retrieve or monitor. Thus, query skills are not required either.
Indeed, one of the key benefits of the Web Assistant Wizard is that you can publish database data online without any Web development or query building expertise. The Wizard is straightforward enough to assist even the beginning programmer. But as we’ll see in this article, HTML and SQL skills come in pretty handy when you need to use the more advanced options of the Wizard.
In this article, I will explain two advanced options of the Web Assistant Wizard:
- tweak the HTML output
- tweak the SQL queries
Why Use Advanced Options?
At first glance, the Web Assistant Wizard can take care of all your work. So, why would anyone want to use its advanced options?
The Web Assistant Wizard automatically can create a simply laid-out HTML page with simple data. And that’s where its capabilities stop. In theory, this might be fine, but in the real world you’ll discover the need to use either a different layout, or a certain subset of data, in your application. For instance, you may only want to use the data from orders that were handled by certain employees in a certain period. Through the Wizard, you can delve deeper into the standard layout and table queries that the tool can produce.
Tweak the HTML Output
The Wizard’s default options will produce an HTML page that looks something like this:
The Wizard allows you to change some settings. We’ll assume for sake of example that you’ve followed the first six steps in my original article, Publish Dynamic Data with SQL Server’s Web Assistant Wizard.
Through this process, we examined the prerequisites, the data to publish, the scheduling mechanism and the changes the Wizard should monitor. In Step 7 of that article, we observed the HTML page that SQL Server should generate to reflect your data.
In Step 7, the following screen marks the beginning of the layout configuration:
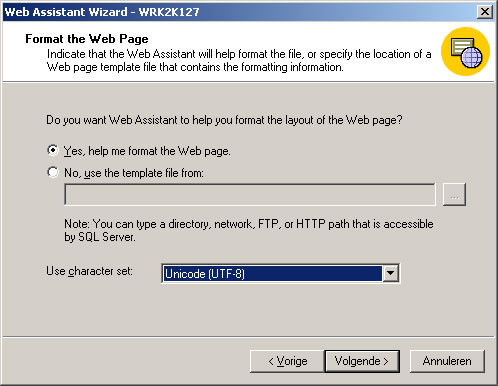
I will discuss the template function later on in this article, so for now choose, “Yes, help me format the Web page”. You can leave the character set option to its default, unless you’re using nonstandard characters such as Chinese or Eastern European. When you click Next, you’ll reach the title layout option.
Define Title Layout
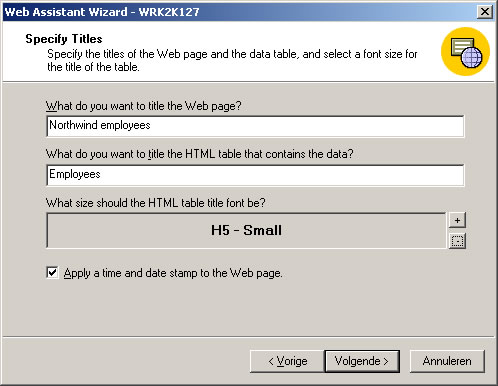
If you fill in the text as shown in the example above, on your Web page, the words “Northwind Employees” will appear in your browser’s title bar. The title text leading the table will contain the word, “Employees”. Despite the fact I don’t like big letters, we decide here that the table title should be “H1 – Largest”.
Format the Table

SQL Server will publish the data in a table. In this screen, you can decide if you want to show the column names or not, whether you’d like to add extra font options to the table text (the possibilities consist of: fixed or proportional, bold, italic) and if whether you’d like to show a border around each table cell.
In this example, I chose to alter all default options.
Add Hyperlinks
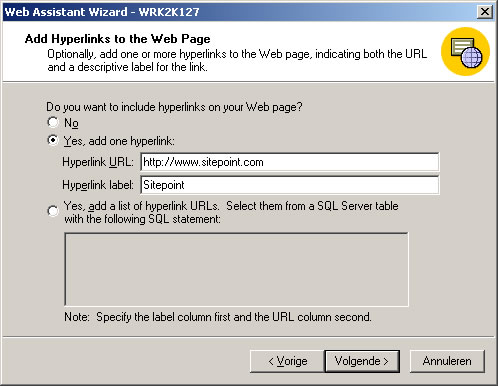
This step is quite out of place in this process. It actually has nothing to do with changing the layout of the data, but enables you to add one or more hyperlinks to the page. Most of the time, you will add a link to your corporation’s home page at this point.
It is possible to add multiple links, but in all honesty, the solution Microsoft has provided for this is really far-fetched. You’ll have to predefine and fill a separate table, which you can access in the bottom field with a query that should look something resembling “SELECT label, url FROM hyperlinks”.
In this case, I just filled in the SitePoint URL and a label description, and clicked Next.
Limit Rows
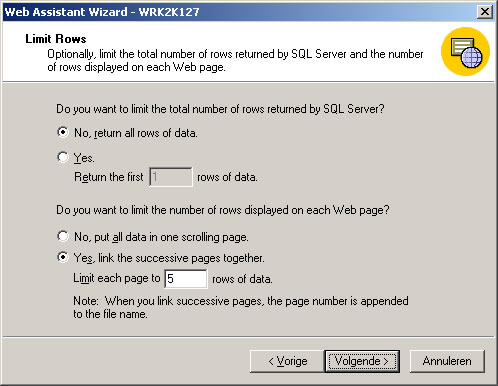
Database tables can consist of thousands of rows. Usually the last thing you’ll want is to publish endlessly scrolling Web pages with tons of information. In this step, the Web Assistant Wizard provides you with the possibility to break the data into multiple pages. Additionally, the Wizard will automatically add a hyperlink that links to the next page.
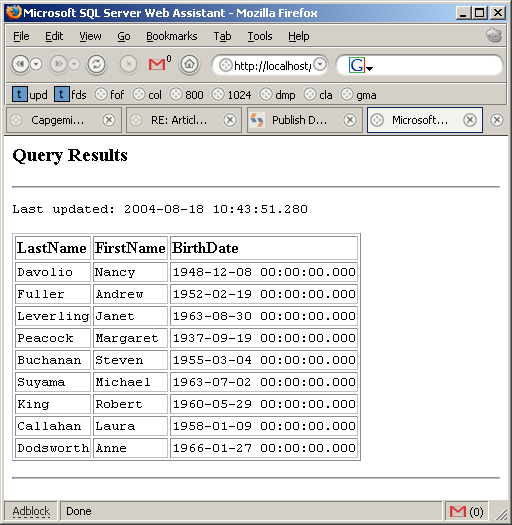
Check the Result
This is the last step. Click Finish on the confirmation page to let the Wizard generate the HTML file(s). If you navigate to the file, you’ll see the following result:
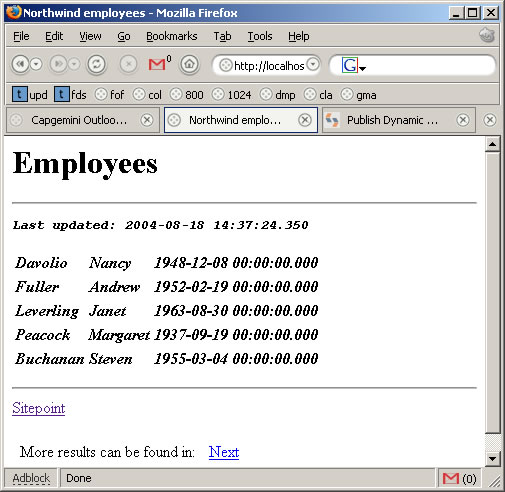
Here, you can see all the changes we’ve made:
- the text “Northwind Employees” in the browser’s title bar
- the large “Employees” title text above the table
- the first five rows presented in a proportional, bold, italic font
- the link to SitePoint
- a reference to the next rows
Tweak the HTML Output Using a Template
For the skilled HTML developer, this method may be preferable to the previous one.
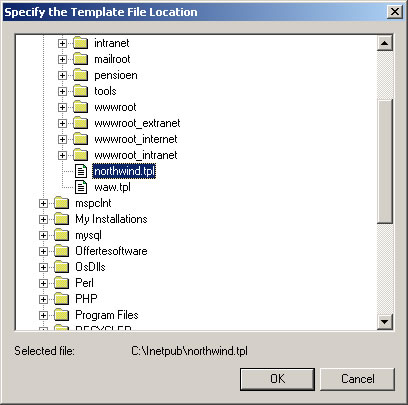
Let’s look at the “Format the Web Page” screen again. You’ll notice the “No, use the template” option:
If you go for this option, the Web Assistant Wizard will let you navigate to a template that should be predefined by you. This can be done in very easily. The only thing you have to keep in mind is that you’ll have to tell the Wizard where to insert the database data. The Wizard will look for three tags:
<%begindetail%>
This tag marks the beginning of a record. Everything you include after this tag will be repeated for each record.
<%insert_data_here%>This tag marks a field value in a record. You’ll have to repeat the tag for all fields in your result set.
<%enddetail%>This tag marks the end of a record.
An example template will clarify this:
<html>

<head><style>h1 {font: bold 15px Verdana} li {font: 12px Verdana}</style></head>

<body>


<h1>Employees</h1>


<ol>

<%begindetail%>


<li><%insert_data_here%>, <%insert_data_here%></li>


<%enddetail%>

</ol>


</body>

</html>
Copy and paste this code into a text file and save it as northwind.tpl. Now, resume the “Format the Web Page” screen by checking “No, use the template”, then select the northwind.tpl file you just saved to disk.
Wrap it all up by choosing Next, Next and Finish. If you reload your HTML file in your browser now, you’ll see the following results:
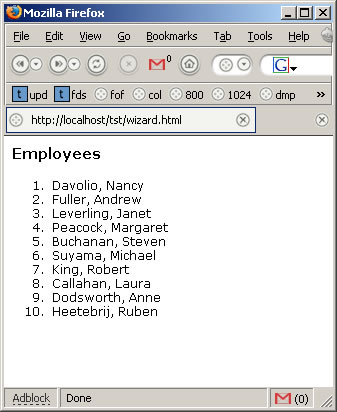
You can play around with the template to get the layout results you want. Take into account that adjusting and saving the template is not enough to see the layout change. The underlying HTML file will only change when the data changes.
Tweak the SQL Queries
If you haven’t got any SQL query knowledge, the Web Assistant Wizard is very convenient. But if you know your way around SQL, the Wizard can be ten times as powerful.
Let’s rewind to Step 4 of my original article, in which we picked the data that SQL Server should publish for you. We opted for the first and most straightforward option: we just pointed SQL Server to the right table and let it do the hard labour for us. But if you want to manipulate your data sources just a little bit more, you’ll need to use either stored procedures or Transact-SQL statements.
It would be far beyond the scope of this article to explain how to create Stored Procedures or how the Structured Query Language syntax works. Please refer to David Clark’s Stored Procedures on PHP and Microsoft SQL Server to learn more about the matter.
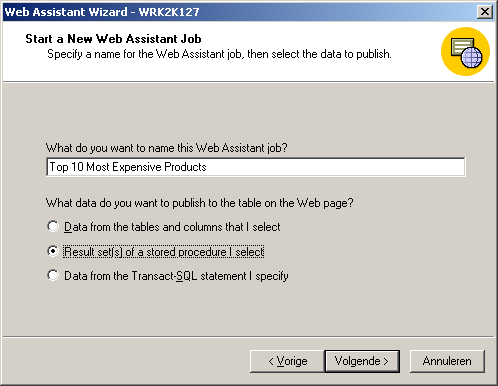
If you choose “Result set(s) of a Stored Procedure I select” here, the Wizard will let you pick a predefined Stored Procedure as your data source.

The Northwind database consists of some example Stored Procedures. Choose “Ten Most Expensive Products”, for instance, and follow the screen flow to the end. Your HTML result should look like the following table.
If you opt for “Data from the Transact-SQL statement I select”, the Wizard will show you a text area in which you can type your own T-SQL query.
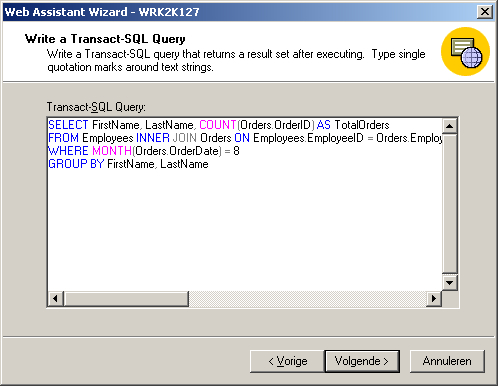
If you enter the following example code in this screen, the Wizard will generate for you a Web Page that contains an overview of the orders each Northwind employee has shipped in the month of August.
SELECT FirstName, LastName, COUNT(Orders.OrderID) AS TotalOrders

FROM Employees INNER JOIN Orders ON Employees.EmployeeID = Orders.EmployeeID

WHERE MONTH(Orders.OrderDate) = 8

GROUP BY FirstName, LastName
Wrapping Up
If you’re a skilled HTML and/or SQL programmer, the possibilities to tweak the SQL Server Web Assistant Wizard’s result are sky-high. In this article, we studied two of the more advanced options that the Wizard offers.
First, we examined how we could influence the layout of the results page along the way. We could make use of the wizard’s built-in options like changing the font characteristics, but, preferably, we’d bring our own pre-defined HTML template into play.
Next, we had a look at how we could manipulate SQL’s source data in order to publish more complex information. The Web Assistant Wizard offers you two advanced alternatives to settling on a single table. Either let SQL Server use any predefined Stored Procedure, or enter your own T-SQL queries directly into the Wizard.
With either of these options, you can clearly make the Web Assistant Wizard even more powerful. Good luck!
Frequently Asked Questions about Web Assistant Wizard
What is a Web Assistant Wizard and how does it work?
A Web Assistant Wizard is a software tool designed to simplify complex tasks on the web. It works by guiding users through a series of steps to complete a specific task, such as setting up a website or managing online content. The wizard provides instructions and options at each step, allowing users to customize the process according to their needs. It’s like having a personal assistant that helps you navigate the complexities of the web.
How can a Web Assistant Wizard benefit my business?
A Web Assistant Wizard can significantly streamline your business operations. It can automate repetitive tasks, reduce errors, and increase efficiency. By simplifying complex tasks, it allows you to focus on more strategic aspects of your business. It can also improve user experience on your website, leading to higher customer satisfaction and retention.
What skills do I need to use a Web Assistant Wizard?
Using a Web Assistant Wizard does not require any specific technical skills. The wizard is designed to be user-friendly and intuitive. Basic computer literacy and familiarity with the web are usually sufficient. However, some wizards may offer advanced features that require a basic understanding of web development or programming.
Can I customize a Web Assistant Wizard to suit my needs?
Yes, most Web Assistant Wizards are highly customizable. You can choose the tasks you want the wizard to perform, the steps it should guide users through, and the options it should offer at each step. Some wizards even allow you to customize the user interface to match your brand identity.
How secure is a Web Assistant Wizard?
The security of a Web Assistant Wizard depends on the specific software and the measures implemented by the provider. Reputable providers prioritize security and implement robust measures to protect user data. These may include encryption, secure data storage, and regular security audits.
How does a Web Assistant Wizard compare to hiring a human assistant?
A Web Assistant Wizard can perform many of the tasks that a human assistant can, but at a fraction of the cost. It can work 24/7 without breaks, and it doesn’t make mistakes due to fatigue or distraction. However, a human assistant can provide a personal touch and handle tasks that require human judgment or creativity.
Can a Web Assistant Wizard help with SEO?
Yes, some Web Assistant Wizards offer features that can help with Search Engine Optimization (SEO). These may include keyword research, content optimization, and link building. By improving your website’s SEO, a Web Assistant Wizard can help increase your online visibility and attract more traffic.
What kind of support is available for a Web Assistant Wizard?
The level of support available for a Web Assistant Wizard depends on the provider. Most providers offer comprehensive support, including user manuals, tutorials, and customer service. Some also offer community forums where users can share tips and solutions.
How much does a Web Assistant Wizard cost?
The cost of a Web Assistant Wizard varies depending on the specific software and the features it offers. Some wizards are free, while others require a subscription or a one-time purchase. It’s important to consider the value that the wizard can bring to your business when evaluating its cost.
How can I get started with a Web Assistant Wizard?
Getting started with a Web Assistant Wizard is usually straightforward. Most wizards offer a setup wizard that guides you through the process of configuring the software for your needs. You may also need to install a browser extension or a desktop application, depending on the specific software.
Ruben is a senior software engineer and team manager for Capgemini in the Netherlands. He is specialized in Web development and Visual Basic applications.

Published in
·Cloud·Debugging & Deployment·Development Environment·PHP·Programming·Web·April 26, 2014