Mastering Database Storage and Retrieval in Android

Key Takeaways
- SQLite is a relational database technology that is frequently used in Android app development due to its integration with the Android system. It allows developers to store and retrieve data in an organized way, enhancing the value of their apps.
- Creating a database in SQLite on Android involves creating a subclass of the SQLiteOpenHelper class. This class provides the functionality to create a database and calls a function that can be overridden by the derived class.
- Data can be added to the database using the insert function on the SQLiteDatabase class. Values can be retrieved from the database either by running a raw SQL query or using the query function on the SQLiteDatabase.
- Android provides Cursor adapters, such as the SimpleCursorAdapter, to attach a cursor with a ListView. This allows data retrieved from the database to be displayed in the app’s user interface.
Data has always been the most important part of any mobile application. Developers need to store substantial amounts of data in an organized fashion in order for their apps to be truly valuable to their users. In Android, you can store your data using quite a few different methods, both in active memory and in written files. Many apps also have a remote web service that provide the data for the app in question. Android also supports data storage in a local database, and the operating system provides a good infrastructure for storing and retrieving data. In most cases, the most simple and straightforward way to acquire and preserve user data is via SQLite databases.
SQLite
SQLite is a relational database technology that’s used most often when the developer requires an embedded database in a small system. SQLite is included with the Android system and can be easily used in your Android app. For more details on SQLite, you can visit http://www.sqlite.org and http://en.wikipedia.org/wiki/SQLite
Creating a Database in Android
In order to write data to a database, we need to create our database first. To create a database in SQLite in Android, you need to create a subclass of the class SQLiteOpenHelper. This class provides the functionality to create a database and calls a function that can be overridden by the derived class. The SQLiteOpenHelper constructor accepts four arguments, which are
- Context – This is the context that will be used to create the database. (Here you can pass the Activity object.)
- Name – The name of the new database file.
- Factory – A cursor factory (you can usually pass this as null)
- Version – The version of the database. This number is used to identify if there is an upgrade or downgrade of the database.
Below, we I’ve created a class (MyDatabaseHelper) that is going to derive from SQLiteOpenHelper:
public class MyDatabaseHelper extends SQLiteOpenHelper{
private static final String DATABASE_NAME="MyFriendsDatabase";
public MyDatabaseHelper(Context context) {
super(context, DATABASE_NAME, null, 1);
}
@Override
public void onCreate(SQLiteDatabase database) {
database.execSQL("CREATE TABLE friends (_id INTEGER PRIMARY KEY AUTOINCREMENT, name TEXT, phonenumber INTEGER);");
}
@Override
public void onUpgrade(SQLiteDatabase db, int oldVersion, int newVersion) {
db.execSQL("DROP TABLE IF EXISTS friends");
onCreate(db);
}
}
In the constructor above, we pass the name of the database that we want to create called as “MyFriendsDatabase.” We also override the following methods:
onCreate
This method is called when we create the database. It is passed the SQLiteDatabase reference, which we can use to perform various operations on the database. In this method, we use the function execSQL to execute an SQL query to create a table called “friends,” which has three columns. The first column, (_id) is required to generate a unique id for each column. This is necessary in case you are going to use classes like SimpleCursorAdapter (more on this later in the article). The second and third columns (name and phone number) are the data fields that we actually want to store.
onUpgrade
This method is called whenever the database is upgraded. In this method, SQLiteDatabase and the oldVersion number and newVersion number are passed.
In this function, we simply drop the “friends” table if it exists and create a new one, but there could be more complex logic based on the tables you are creating in the database and what you would want to happen on an upgrade.
Adding Values within the Database
Once the database is created, now let’s examine how we can add values to the database. We are going to use the insert function on the SQLiteDatabase class. The insert function takes three arguments: the name of the table in which to insert values, the name of one of the column of the table, and a reference to a ContentValues
In class MyDatabaseHelper below, we will write a function to insert values into the database.
public void addFriend(String name,int phonenumber)
{
ContentValues values=new ContentValues(2);
values.put("name", name);
values.put("phonenumber", phonenumber);
getWritableDatabase().insert("friends", "name", values);
}
In this function, we take the input arguments as the name and the phonenumber. Then, we create a new object of ContentValues, we put the values for name and phonenumber within that new object. Once we have done that, we get the SQLiteDatabase reference for writing using the function getWritableDatabase, which is a member of SQLiteOpenHelper. Once we have the reference of the SQLiteDatabase, we call the insert function, which takes the arguments as the table name, one of the columns of the table, and the ContentValues. This will enter a new row in your friends database table.
If I want to use MyDatabaseHelper to create a database and add some data values, the code would be as follows:
public void onCreate(Bundle savedInstanceState) {
super.onCreate(savedInstanceState);
setContentView(R.layout.main);
databaseHelper = new MyDatabaseHelper(this);
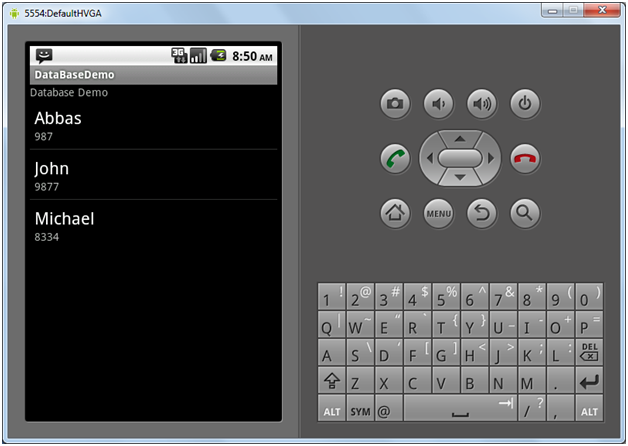
databaseHelper.addFriend("Abbas", 987);
databaseHelper.addFriend("John", 9877);
databaseHelper.addFriend("Michael", 8334);
}
Here in our activity, we create a new object (MyDatabaseHelper) and then add some values in the table by calling the function addFriend.
Running Raw Queries on a Database
Once we have added the data into the database, we will now see how the data can be retrieved. To retrieve the data, there are two possible methods.
Runing a raw SQL query
We can directly run an SQL query like SELECTto retrieve the records from the database.
To run a raw SQL query, you have the function rawQuery, which takes the SQL statement as a string as its first parameter and the selection arguments as its second parameter. So, if we have to write a function in MyDatabaseHelper to retrieve all records from table friends, it would be as follows:
public Cursor getFriends()
{
Cursor cursor = getReadableDatabase().rawQuery("select * from friends", null);
return cursor;
}
To Run Queries on Database
We can also run queries on the database using the function query on the SQLiteDatabase. The query function lets you query on one table and also specify some selection and ordering criteria. The query function takes several arguments: the name of the table, the name of the columns of the table to retrieve, the selection criteria, the arguments for selection criteria, the group by clause, the having clause, the order by clause, and the limit.
If we have to write the same function above to retrieve all friends using query, it would be as follows:
public Cursor getFriends()
{
Cursor cursor = getReadableDatabase().query("friends",
new String[] { "_id", "name", "phonenumber"},
null, null, null, null, null);
return cursor;
}
The Database Cursor
The result of a query is returned in form of a Cursor object, which basically helps by caching the result of the query in an efficient way and providing functions to access the data.
If we want to fetch the data of all friends from the Cursor returned by the getFriends function, we would write the following code:
Cursor AllFriends = databaseHelper.getFriends();
AllFriends.moveToFirst();
while (!AllFriends.isAfterLast()) {
String Name = AllFriends.getString(1);
int number = AllFriends.getInt(2);
AllFriends.moveToNext();
}
The cursor has functions such as moveToFirst, which moves the cursor to the first record, moveToNext, which moves the cursor to the next record, and isAfterLast, which checks if the Cursor has moved passed the last record.
The cursor also has functions like getInt, getString, etc., which take the index of the column and return the value.
Deleting Values from the Database
To delete values from the database, you can either run raw query or use the delete function on SQLiteDatabase. The delete function takes three arguments: the table name, the where clause, and the where clause arguments. The function to delete all values from the database is as follows:
public void deleteAll()
{
getWritableDatabase().delete("friends", null, null);
}
Using Cursor Adapter to Display Data Values.
Android provides us with Cursor adapters, which let us attach a cursor with a ListView. The class SimpleCursorAdapter is one of these adapters, and it’s quite useful. If we want to show the list of friends in a list view, the code would be as follows:
Cursor AllFriends = databaseHelper.getFriends();
String[] from = { "name", "phonenumber" };
int[] to = { android.R.id.text1, android.R.id.text2 };
ListAdapter adapter=new SimpleCursorAdapter(this,android.R.layout.simple_list_item_2,
AllFriends
, from,
to);
ListView myList=(ListView)findViewById(android.R.id.list);
myList.setAdapter(adapter);
Once we do this, the list of friends will appear on the Android device as shown below.
Conclusion
Data is the most important part of today’s competitive apps. A well-built app must store and retrieve data efficiently and with ease, so that it can function smoothly and please users. Android provides several forms of good support to store data in databases for your Android apps. It provides all the functionality to create and update SQLite databases and database tables. Make sure to make the most of it when designing your next Android app!
Frequently Asked Questions (FAQs) about Using Database in Android
What are the different types of databases available for Android development?
Android supports several types of databases for data storage. The most commonly used is SQLite, a lightweight relational database that is integrated into the Android system. Other options include Shared Preferences, which is used for storing key-value pairs, and Room, a persistence library that provides an abstraction layer over SQLite. There are also NoSQL databases like Firebase and Realm that are popular for Android development.
How can I create a database in Android?
Creating a database in Android involves defining a subclass of SQLiteOpenHelper and overriding its onCreate() and onUpgrade() methods. The onCreate() method is where you define your database schema by executing SQL statements. The onUpgrade() method is used to handle schema changes when you upgrade your database version.
How can I perform CRUD operations in an Android database?
CRUD operations (Create, Read, Update, Delete) in an Android database are performed using SQL commands. For instance, you can use the INSERT command to create new records, SELECT to read data, UPDATE to modify existing records, and DELETE to remove records. These commands are executed using the execSQL() or rawQuery() method of SQLiteDatabase.
What is the role of Content Providers in Android database management?
Content Providers in Android are used to share data between different applications. They encapsulate your data and provide a well-defined API to read and write data, regardless of where the data is stored. Content Providers are particularly useful when you want to provide access to your database to other applications.
How can I secure my Android database?
Securing your Android database involves several practices. First, you should always use parameterized queries or prepared statements to prevent SQL injection attacks. Second, sensitive data should be encrypted using strong encryption algorithms. Third, you should implement proper access controls to prevent unauthorized access to your database.
What is the Room persistence library in Android?
Room is a persistence library introduced by Google that provides an abstraction layer over SQLite. It simplifies database operations by allowing you to use annotations to define your database and tables, and it automatically generates the necessary SQL code. Room also integrates with LiveData and RxJava, making it easier to observe changes in your database and perform operations on a background thread.
How can I migrate my Android database to a new version?
Migrating your Android database to a new version involves defining a new version number and implementing the onUpgrade() method in your SQLiteOpenHelper subclass. In this method, you can execute SQL statements to modify your database schema, such as adding or dropping tables or columns.
How can I backup my Android database?
Backing up your Android database can be done using Android’s Auto Backup feature, which automatically backs up app data to Google Drive. You can also manually backup your database by copying the database file to external storage or a remote server.
How can I use Firebase as a database in Android?
Firebase is a NoSQL cloud database that can be used in Android for storing and syncing data in real-time. To use Firebase, you need to add the Firebase SDK to your project, create a Firebase project in the Firebase console, and initialize Firebase in your app. You can then use the Firebase API to perform CRUD operations.
How can I test my Android database?
Testing your Android database involves writing unit tests for your database operations. You can use the Android testing framework, which provides classes like AndroidJUnitRunner and InstrumentationTestRunner for running tests. You can also use mocking libraries like Mockito to simulate database responses.
Abbas is a software engineer by profession and a passionate coder who lives every moment to the fullest. He loves open source projects and WordPress. When not chilling around with friends he's occupied with one of the following open source projects he's built: Choomantar, The Browser Counter WordPress plugin, and Google Buzz From Admin.