A few years back, if you wanted your photos to have a specific style or effect for your photographs, you would have gone straight to a professional photographer. However, today’s technology makes it possible to achieve the same results without paying handsomely to get the desired photo effect, even after the fleeting photo opportunities have come and gone.
Our very own Photoshop makes that job not only easy to do, but surprisingly enjoyable as well. Photoshop allows users to with the right know-how to make large improvements and enhancements to their imagery, as we’ll demonstrate. There are countless effects, styles and actions available, and if you have something particular in your mind and the right technique on hand, you can make your effect a reality… or at least a digital reality. Colors can be brought to life, or they can be subdued to create a vintage look. Photoshop helps you achieve your desired effect easily, and there’s no limit to your creativity with this amazing tool at your disposal.
Today, I am going to show you how to make some strong, time-efficient improvements to your photos in Photoshop. Along the way, you will learn few handy techniques to accentuate an image. We’ll use various adjustment layers and filters to do this job. So, let’s get started!
Resources:
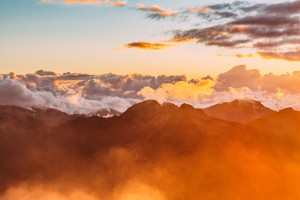
Image by masha.kushnir
Final result:

Step 1
Open the image that you want to improve in Photoshop. I am going to use the gorgeous image below by masha.kushnir. Duplicate it — we’ll work on this copy now to preserve the original image.

Step 2
First of all, we’ll use the spot healing brush tool to clear the skin of any imperfections. Use “Normal” mode for the spot healing brush and select “Content-Aware” as the source sampling type. We’ll use an 8-10px soft round brush to do this job. Use the brush over the clear skin near the spot and press the “Alt” key to sample that area. Now, apply the brush over the blemish in question — it will replace the spot with normal skin sampled earlier. Label this new layer as “Clear”.

Step 3
Next, we’ll smooth out the skin. Duplicate the “Clear” layer. Select the smudge tool with 5% strength and use varying sizes of the soft round brush to apply the smudge tool along the natural facial curves in the directions shown below. Label this new layer as “Smudged”.
You can adjust the opacity of smudged layer to 50-80% if you want to show the skin texture. For this particular image, I am proceeding with 100% opacity.

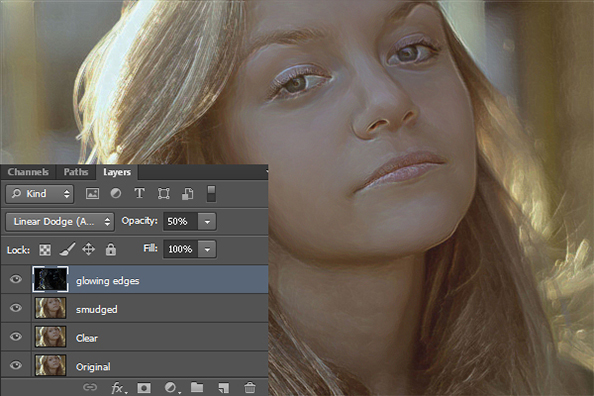
Step 4
Duplicate the smudged layer and label it as “Glowing Edges”. Now, go to “Filter” >“Filter Gallery” > “Stylize” > “Glowing Edges.” Apply the following settings here.
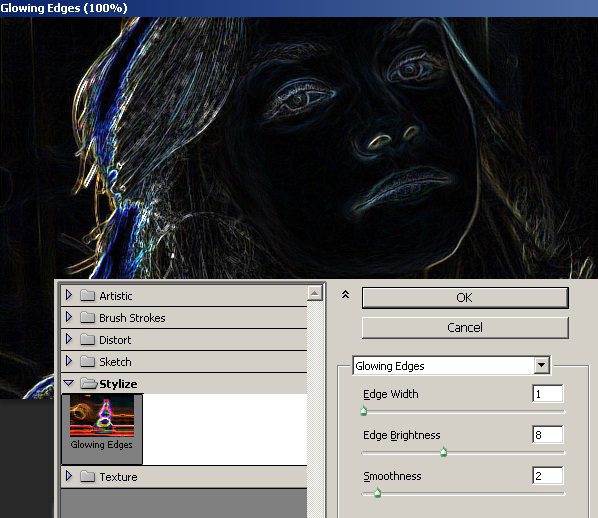
Change the blending mode to “Linear Dodge” and set opacity to 50%.
Step 5
Next, duplicate the original smudged layer and bring it above the glowing edges layer. Now, go to “Filter” > “Sharpen” > “Unsharp mask.” Use the following settings here to sharpen the image.

Step 6
Next, we’ll mask the sharpening effect over the skin to keep it smooth. To do this, click on the “Add Layer Mask” icon, which is present in the bottom of layers panel. Now, press “D” to select the default colors and fill the mask with black using the paint bucket tool. Filling the mask with black would hide the sharpening effect. Now, pick a suitable size soft round brush and paint white over the area you want to sharpen. I’ve applied a white soft brush all over the image, leaving the skin as shown below. If you go wrong while painting white, just paint over that area with black to hide the effect within your layer mask.

Step 7
To blend the facial skin color, you can try this technique. However, its optional — you can skip this step if you feel that the skin tone of your image already suits you. Create a new layer above the others and label it as “white mask”. Select a 50-60px soft round brush and paint with white over the face on this new layer. Reduce the opacity of this layer slightly, as illustrated in the image below.

Select a soft round eraser tool and roughly erase the white mask over the eyes, eye brows, nostrils, lips, etc.

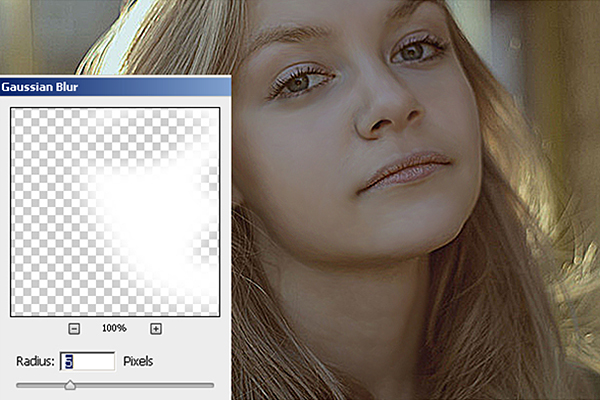
Step 8
Now, apply a 5px Gaussian blur filter on the white mask and reduce its opacity to 5-8%. This may vary from image to image.
Step 9
To improve the shading and lighting over the face, we’ll use the burn and dodge tools. Create a new layer and go to “Edit” > “Fill” — use “50% gray”. Label this layer as “Shading” and change its blending mode to “Soft light”. Now, we’ll use the burn tool to darken the shaded parts of the image and the dodge tool over the highlights. You need to use varying size brushes for this job. However, use low settings (Midtones) for both the burn and dodge tools and exposure — between 5-10%.
Here is how I used these tools, showing you first in normal blending mode, so you know where exactly I burned and dodged the image.

Then, after changing its blending mode to “Soft light”.
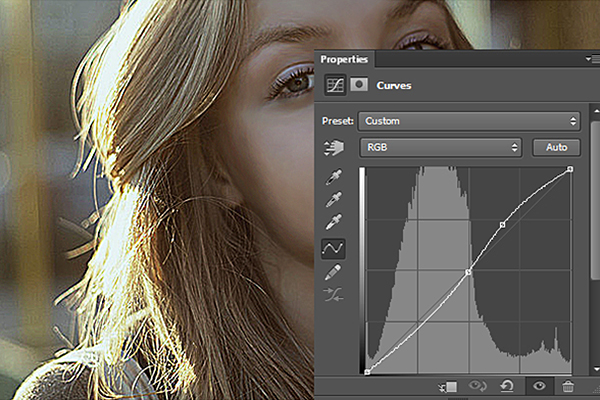
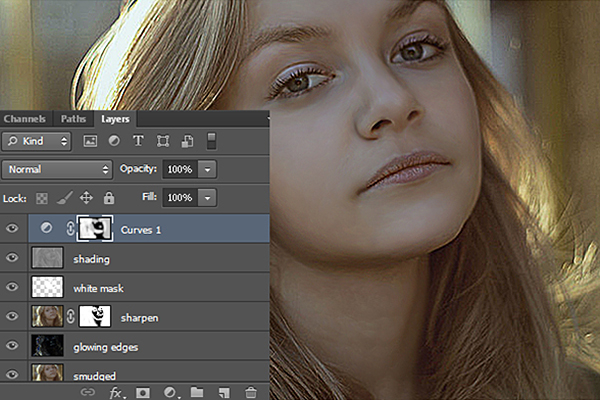
Step 10
Next, click on the icon to “Create new fill or adjustment layer” and select “Curves”. Apply the following settings here.
Step 11
Now, fill the curves mask with black using the paint bucket tool to hide the effect and then paint with white over the areas where you want to increase the contrast.
Step 12
Create a “Color balance” adjustment layer. Apply the following settings for midtones, shadows, and highlights.


Step 13
Next, create an “Exposure” adjustment layer and apply the following settings to it.
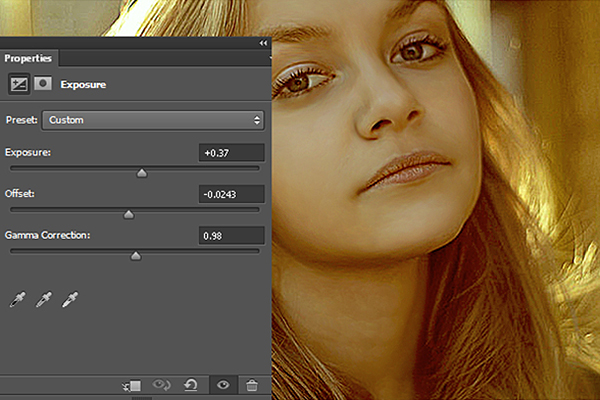
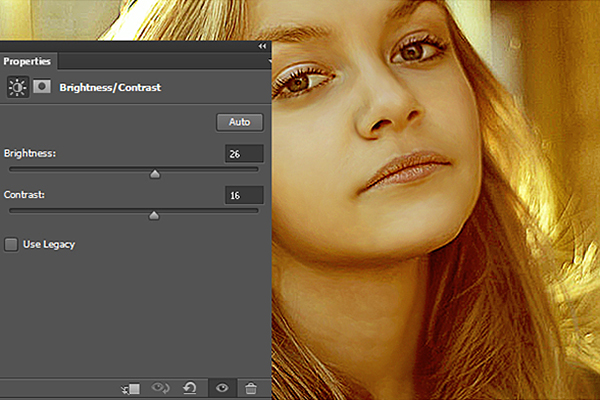
Step 14
To further brighten the image, create a “Brightness/Contrast” adjustment layer with the following settings.
Step 15
Duplicate the smudged layer and place it above the rest of the layers, label it as “High pass”. Now, go to “Filter” > “Other” > “High Pass”. Use a 1.5px radius. Change the blending mode of this layer to “Linear Light”. Hide this effect over the skin by adding a mask, as we did in step 11 with the curves.

Step 16
Lastly, create a “Hue/Saturation” adjustment layer and increase the saturation of the image.

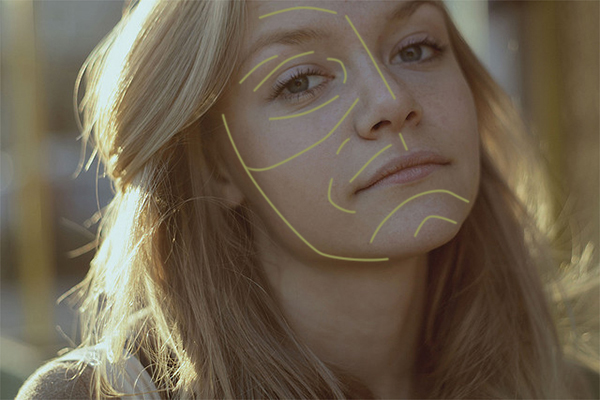
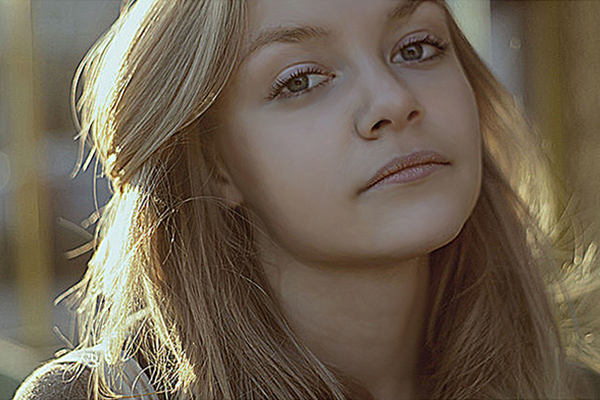
Original image:
Retouched:
That’s it! I hope you enjoyed the tutorial and learned something useful. I would love to see your results.
Frequently Asked Questions about Enhancing Images in Photoshop
How can I make my photos look professional in Photoshop?
To make your photos look professional in Photoshop, you can start by adjusting the brightness and contrast. This can be done by selecting ‘Image’ > ‘Adjustments’ > ‘Brightness/Contrast’. You can also use the ‘Levels’ and ‘Curves’ tools for more advanced adjustments. Additionally, you can enhance the colors in your photo by adjusting the saturation or using the ‘Color Balance’ tool. Lastly, don’t forget to sharpen your image to make it look crisp and clear. This can be done by selecting ‘Filter’ > ‘Sharpen’.
What are some tips for beginners using Photoshop to enhance images?
If you’re a beginner, start with basic tools like the ‘Crop’ tool to improve composition, and the ‘Spot Healing Brush’ to remove any unwanted spots or blemishes. You can also use the ‘Adjustment Layers’ feature to make non-destructive edits to your image. This means you can always undo your changes if you’re not happy with them. Lastly, don’t be afraid to experiment with different tools and filters to see what they do. The more you practice, the more comfortable you’ll become with the software.
How can I sharpen my images in Photoshop without making them look grainy?
To sharpen your images without making them look grainy, you can use the ‘Unsharp Mask’ or ‘Smart Sharpen’ tool. These tools allow you to adjust the amount of sharpening, radius, and threshold, giving you more control over the final result. It’s important to sharpen your image subtly and not overdo it, as this can lead to a grainy appearance.
Can I enhance the colors in my photos using Photoshop?
Yes, you can enhance the colors in your photos using Photoshop. The ‘Vibrance’ and ‘Saturation’ tools can be used to intensify or tone down colors. You can also use the ‘Color Balance’ tool to adjust the colors in your image. If you want to change a specific color in your image, you can use the ‘Selective Color’ tool.
How can I remove unwanted objects from my photos in Photoshop?
Photoshop offers several tools to remove unwanted objects from your photos. The ‘Spot Healing Brush’ tool is great for removing small objects or blemishes. For larger objects, you can use the ‘Clone Stamp’ tool or the ‘Content-Aware Fill’ feature. These tools work by replacing the unwanted object with pixels from another part of your image.
Can I use Photoshop to add text to my photos?
Yes, you can add text to your photos in Photoshop. The ‘Text’ tool allows you to add text, choose a font, adjust the size and color, and apply effects like drop shadow or stroke. You can also use the ‘Layer Styles’ feature to add more advanced effects to your text.
How can I create a blurred background effect in Photoshop?
To create a blurred background effect in Photoshop, you can use the ‘Lens Blur’ filter. This filter allows you to adjust the amount of blur, the shape of the blur, and the position of the focal point. You can also use the ‘Gaussian Blur’ filter for a simpler blur effect.
Can I use Photoshop to create a black and white photo?
Yes, you can use Photoshop to create a black and white photo. The ‘Black & White’ adjustment layer allows you to convert your image to black and white and adjust the tones of specific colors. You can also use the ‘Channel Mixer’ tool for more advanced black and white conversions.
How can I reduce noise in my photos using Photoshop?
To reduce noise in your photos, you can use the ‘Reduce Noise’ filter in Photoshop. This filter allows you to adjust the strength of the noise reduction, preserve details, reduce color noise, and sharpen details. It’s important to use this filter subtly to avoid losing too much detail in your image.
Can I use Photoshop to resize my photos without losing quality?
Yes, you can resize your photos in Photoshop without losing quality. The ‘Image Size’ dialog box allows you to adjust the dimensions of your image while maintaining its aspect ratio. To preserve the quality of your image, make sure the ‘Resample’ option is set to ‘Automatic’ or ‘Preserve Details’.
Anum is Web and Graphic designer. Addicted to Photoshop and crazy for pixel perfection. She is also an active blogger, sharing her passions, skills and creative details on her blog Websoulz. She loves to connect with the community, sharing the latest design gossips and rolling her eyes on boring trends.