Note: to quickly get up and running with Homestead, see this quick tip. For an explanation on what it is, read below.
Laravel Homestead is, in a nutshell:
an official, pre-packaged Vagrant “box” that provides you a wonderful development environment without requiring you to install PHP, a web server, and any other server software on your local machine.
In other words, it automatically does what we’ve done before manually through Vagrant and PuPHPet in articles like these.
So what makes it different from your run-of-the-mill Vaprobash/Vagrant/PuPHPet setup? Let’s see.
1. It Works
Unlike the other popular solutions out there for simplifying Vagrantfile setups, Homestead seldom fails to boot, and if it does, it’s fixed within minutes. If you’ve dealt with GUI Vagrant solutions, you’ve likely noticed how rare it is to get it all up and running after the very first vagrant up. It’s always something like an outdated or over-updated Puppet, out of date Ubuntu repos, or some other cryptic error that requires vigorous “foruming” to deconstruct. Homestead simply… works.
Homestead installs on Ubuntu 14.04. with PHP 5.5, so as new as it gets without diving into beta/RC territory, Nginx (because we’ve all given up on Apache by now, right?), MySQL and Postgres so you’re instantly ready for Heroku as well (their default is Heroku Postgres), Node (for all your static resource compilation needs, background tasks, and other less business critical things), Redis, Memcached and Beanstalkd (for all your caching and queueing needs), Laravel Envoy (for all your remote server task needs) and Fabric + Hipchat Extension so you can do application deployment through Hipchat (also known as chatops).
2. It’s Otwell Approved
Homestead being official, as in, made by Taylor Otwell, the father of Laravel, means it’s automatically assumed to hold to certain standards. While the Laravel community isn’t without its drama (who cares what a class is called? If a revolutionary new framework calls a model a potato, a facade, or a rocketship, it’s perfectly fine as long as the potato/facade/rocketship works), it’s the exclusivity of Taylor’s involvement with it that gives it a note of simplicity and quality that’s much needed in today’s PHP world. We’ve seen far too many open source projects ruined by team egos, zealous contributors, or incompetent jacks-of-all-trades and it’s my personal opinion that Taylor’s almost exclusive involvement in Laravel’s betterment is what makes it shine above the rest and truly allows it to compete with Phalcon in quality.
Homestead is his own project, termed the “official local development environment”, and he’ll do everything he can to keep it high quality and make sure it always works. Anything less, and it’s a smudge on his reputation. In PHP these days, there’s no better guarantee of a project’s long term reliability, than it being (mostly) owned by a person who cares that much about quality.
3. It’s Fast to Set Up
Setting Homestead up is a piece of cake. Following the instructions on the documentation page, all you need to do is add the homestead box to your Vagrant (if you don’t have it yet) and clone the repo.
There’s an extra step we’re not used to – setting up SSH. This is simple to do as well, and requires editing your Homestead.yaml file after cloning the repo. Just point the relevant lines to your SSH key(s) and you’re good to go. In my case, I had to change this:
---
ip: "192.168.10.10"
memory: 2048
cpus: 1

authorize: /Users/me/.ssh/id_rsa.pub

keys:
    - /Users/me/.ssh/id_rsa

folders:
    - map: /Users/me/Code
      to: /home/vagrant/Code

sites:
    - map: homestead.app
      to: /home/vagrant/Code/Laravel/public

variables:
    - key: APP_ENV
      value: local
to
---
ip: "192.168.10.10"
memory: 2048
cpus: 1

authorize: C:\Users\Bruno\.ssh\id_rsa.pub

keys:
    - C:\Users\Bruno\.ssh\id_rsa

folders:
    - map: D:\VM\vagrant_boxes\homestead\Homestead
      to: /home/vagrant/Code

sites:
    - map: homestead.app
      to: /home/vagrant/Code/Laravel/public

variables:
    - key: APP_ENV
      value: local
After we run vagrant up, everything should fall into place:

As you can see, my procedure produced some errors, but it still ended up working just fine:
4. Ports
Homestead opens certain important ports by default which make maintaining and managing your database and other installed software on the VM from the host machine a breeze. For example, to connect to the installed MySQL database with MySQL Workbench installed on your host machine (in my case Windows), you just input the required credentials into the connection window:
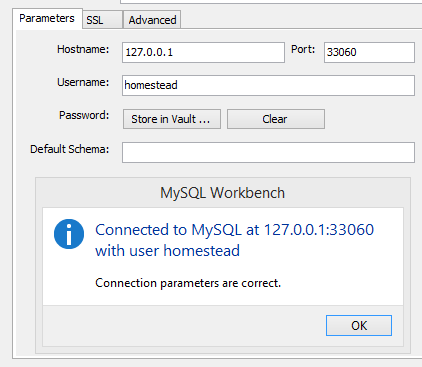
The default MySQL and Postgres ports simply have a zero appended to them (i.e. 33060 for MySQL instead of 3306) which lets you connect to localhost (127.0.0.1:33060) and grants access to the DB on the VM.
The potential downside to this is the fact that you can’t have multple boxes running at the same time without changing ports due to conflicts. It would be better if the database connections were simply open, and one could connect to the IP of the VM as usual, but that’s easily fixed if need be – just see some of my previous vagrantfiles for what that looks like.
5. Best Practices and Common Ground
Due to Homestead being official, you can rest assured you’ll have a huge community available at all times for any assistance in the matter, should you encounter any problems. You’ll have the same starting point as everyone else using Homestead, and problems will automatically become much easier to diagnose.
6. Easy to add sites
Due to the simplicity of the configuration file one can tweak when fine tuning Homestead, adding new sites (vhosts) is a breeze – you don’t even have to deal with individual vhost configurations in nginx files.
By default, the Homestead.yaml file registers a single vhost called “homestead.app” and that one serves as the default site for the VM’s server configuration. You can access it directly by going to the IP of the VM in your browser, on the regular port 80: http://192.168.10.10. However, you might want to have additional applications or projects running and accessible name-wise through your host machine’s browsers. That’s where the “sites” block comes in. By defining another site like so:
sites:
    - map: homestead.app
      to: /home/vagrant/Code/Laravel/public
    - map: homestead2.app
      to: /home/vagrant/Code/H2/public
you register a new vhost. Then, if you add that new site’s name to your hosts file (on any platform) you can access the new site by name through your browser, only you need to do so through port 8000 now: http://homestead2.app:8000.
This procedure allows you to add as many vhosts to your VM as you wish, serving multiple projects from a single box as needed.
Missing Features
Among some of the missing features, I’d name the following:
- Homestead is missing a global composer installation, which means you have to obtain it manually for every project
- The aforementioned ports issue – it would be better if ports were simply open, so one could connect to the IP of the VM, and not the localhost IP via a specific port. This would avoid port conflicts and would let one have multiple Homestead VMs running at the same time
- There is no Laravel. Homestead would do well to include the basic Laravel project by default in the default vhost, so one can start developing instantly without having to create a new one from scratch
- HHVM support would be neat, in the spirit of Vaprobash
Conclusion
Laravel Homestead is among the best and most stable PHP Vagrant environments yet. It’s extremely fast to boot, contains very few dependencies which can break during up time, and configures a modern, up to date PHP environment for one to immediately start hacking in.
Are you using it? Let us know.
Frequently Asked Questions (FAQs) about Laravel Homestead
What is Laravel Homestead and why should I use it?
Laravel Homestead is a pre-packaged Vagrant box that provides a wonderful development environment without requiring you to install PHP, a web server, and any other server software on your local machine. It is highly beneficial because it offers a consistent development environment across multiple operating systems. This means that all team members can work in the same environment, regardless of whether they are using Mac, Windows, or Linux.
How do I install Laravel Homestead?
To install Laravel Homestead, you first need to install VirtualBox 6.x, VMWare, Parallels or Hyper-V as the provider. Then, install Vagrant. Once these are installed, you can add the Laravel Homestead box to your Vagrant installation using the command ‘vagrant box add laravel/homestead’. Finally, you can install Homestead by cloning the repository onto your host machine.
What are the system requirements for Laravel Homestead?
Laravel Homestead requires Vagrant and a Hypervisor like VirtualBox, VMWare, or Parallels. It also requires at least 1GB of RAM, but it is recommended to allocate 2GB or more if possible. The host machine should have a 64-bit processor and a decent amount of disk space for storing your project files and databases.
How do I configure Laravel Homestead?
Laravel Homestead is configured through the Homestead.yaml file. This file allows you to map your project directories to the Homestead environment, configure shared folders, and set up Nginx sites. You can also specify the PHP version, database type, and other settings in this file.
How do I update Laravel Homestead?
To update Laravel Homestead, you can use the ‘vagrant box update’ command. This will update the Vagrant box to the latest version. However, remember to backup your Homestead.yaml file and any other important data before updating, as the update process may overwrite these files.
Can I use Laravel Homestead with other PHP frameworks?
Yes, Laravel Homestead is not limited to Laravel projects. You can use it with any PHP project that can run on a PHP 7.4 or PHP 8.0 server. This includes frameworks like Symfony, CakePHP, Yii, and others.
How do I troubleshoot issues in Laravel Homestead?
Laravel Homestead provides several tools for troubleshooting. You can use the ‘vagrant up’ command with the ‘–debug’ flag to get detailed logs. You can also SSH into the Homestead box and check the Nginx, PHP, and MySQL logs for any errors.
How do I connect to databases in Laravel Homestead?
Laravel Homestead comes pre-installed with MySQL, Postgres, SQLite, and Memcached. You can connect to these databases using the default credentials provided in the Homestead documentation. You can also use tools like Sequel Pro or MySQL Workbench to connect to these databases.
Can I run multiple projects in Laravel Homestead?
Yes, Laravel Homestead supports running multiple projects. You can map multiple project directories in the Homestead.yaml file and configure separate Nginx sites for each project. Each project will have its own URL and can be accessed independently.
How do I uninstall Laravel Homestead?
To uninstall Laravel Homestead, you can use the ‘vagrant destroy’ command. This will remove the Homestead box and all its data from your machine. However, remember to backup any important data before running this command, as it will delete all your project files and databases.
 Bruno Skvorc
Bruno is a blockchain developer and technical educator at the Web3 Foundation, the foundation that's building the next generation of the free people's internet. He runs two newsletters you should subscribe to if you're interested in Web3.0: Dot Leap covers ecosystem and tech development of Web3, and NFT Review covers the evolution of the non-fungible token (digital collectibles) ecosystem inside this emerging new web. His current passion project is RMRK.app, the most advanced NFT system in the world, which allows NFTs to own other NFTs, NFTs to react to emotion, NFTs to be governed democratically, and NFTs to be multiple things at once.