

In this tutorial we will build an application using CouchDB as our backend and Angular as the front end technology of choice. CouchDB is a NoSQL database, and Angular one of the newer JavaScript MVC frameworks. The exciting and awesome thing is that CouchDB is a database with an HTTP API – our client application will talk directly to the database: the CouchDB will act as the only backend we need for our client application!
We will focus on a small app to track our expenses. There will be a commit for every step, and sometimes the commit also includes tests. The tests will not be a topic in this tutorial, but if you are interested in it you should have a look! You will find the whole code that is used in this tutorial in a repository on GitHub.
Key Takeaways
- CouchDB provides a robust NoSQL database solution with an HTTP API, allowing direct interaction from the client-side Angular application without needing an intermediary server layer.
- Angular’s dependency injection (DI) simplifies managing application dependencies, enhancing modularity and testability of components.
- Utilizing Angular’s two-way data binding synchronizes the model and view efficiently, ensuring the UI is consistently updated with the backend CouchDB data.
- Validation is crucial both on the client and server-side, with Angular handling front-end validation and CouchDB managing document validation to maintain data integrity.
- The tutorial demonstrates the ease of setting up a full-stack application with Angular and CouchDB, focusing on expense tracking functionalities and providing a scalable solution through directives and data binding techniques.
Why CouchDB?
Some of you might say that we could use client side alternatives instead. IndexedDB or Local Storage are technologies that work locally on the client to persist data. But using a database server has several advantages: we can connect with many clients to our app. Your partner could update the expenses list while you are on your own in another supermarket, also adding expenses.
Using CouchDB brings advantages: CouchDB “speaks” HTTP natively, so we will not need another layer between our database and app. Our JavaScript application can talk directly with the CouchDB database using a RESTful interface provided by CouchDB!
And, if we would want to use replication for our database, it would be as easy as slicing bread: as CouchDB is designed for creating distributed database systems.
Requirements
For this Tutorial you will need to install the latest release of CouchDB (1.6) and the latest stable Node.js (currently 0.10.x) release.
Installing Node.js & Yo
As a Mac user you can get an official installer on the Node homepage. Another way to manage Node.js installations on Linux and OSX is the awesome nvm from Tim Caswell.
We will install Yo to scaffold our app. Yo will ask us some questions during the process of creating our skeleton. Yo asks if we want to use SASS, and if you are unsure just answer “no” – but we definitely want to include Bootstrap and the preselected Angular-Modules.
In our shell we type:
npm install -g yo generator-angular grunt-cli couchapp

mkdir expenses && cd expenses

yo angular expenses
As part of our scaffolding, Yo created a Gruntfile (Gruntfile.js) for us. Grunt is a task runner in JavaScript with a lot of already written plugins to automate tasks and make your life easier.
With the command grunt serve a development server gets started and http://127.0.0.1:9000 should open in a browser after the grunt tasks have finished. An example of this is shown in the following image.
Installing CouchDB
There are awesome docs for installing CouchDB on a lot of platforms – there are packages for all major operating systems and on OSX you can use brew to install CouchDB.
First steps with CouchDB
Let’s start our first CouchDB instance and create a database:
couchdb & # start a CouchDB

curl -X PUT http://127.0.0.1:5984/expenses # create the database expenses
CouchDB answers with:
{"ok":true}
We just created our first database by using HTTP!
Let’s explore the HTTP API of CouchDB further: we can now insert the first document, let’s say we want to track some popcorn we bought (we will need these calls to CouchDB later for our application).
curl -X POST http://127.0.0.1:5984/expenses -H "Content-Type: application/json" -d '{"name": "Popcorn", "price": "0.99"}'
CouchDB answers:
{"ok":true,"id":"39414de82e814b6e1ca754c61b000efe","rev":"1-2b0a863dc254239204aa5b132fda8f58"}``
We can now access the document using a GET request and the id that CouchDB assigned to our document, as we did not provide a specific id:
curl -X GET http://127.0.0.1:5984/expenses/39414de82e814b6e1ca754c61b000efe
CouchDB answers:
{"_id":"39414de82e814b6e1ca754c61b000efe","_rev":"1-2b0a863dc254239204aa5b132fda8f58","name":"Popcorn","price":"0.99"}
After that, we insert another document:
curl -X POST http://127.0.0.1:5984/expenses -H "Content-Type: application/json" -d '{"name": "Washing powder", "price": "2.99"}'
Configuration: CORS with CouchDB
Our client will communicate via HTTP from another location than CouchDB itself. To make this work in our browser we have to enable CORS (Cross-Origin Resource Sharing) in CouchDB.
In this case we want to modify the local.ini for our local custom changes. It’s possible to modify the configuration via HTTP. In the section https we enable CORS and then we configure our origins with a wildcard:
curl -X PUT http://localhost:5984/_config/httpd/enable_cors -d '"true"'

curl -X PUT http://localhost:5984/_config/cors/origins -d '"*"'
With those two commands, we are changing the local.ini of CouchDB. You can find out where the local.ini is located using couchdb -c.
Important! Please note that you might want to change the origin section if you deploy the app to production. All settings provided here are just for development!
Angular and Dependency Injection
In app/scripts/app.js we will find the main JavaScript file of our application which is in fact a so called Angular module. This module loads some other modules as dependencies (e.g. ngCookies). In this file we also find the client side routing for our application using the $routeprovider.
The $routeprovider in this file is a good example of Angular’s dependency injection (DI). By defining the name of the service you want to use, Angular injects it into the given function scope. You can find further information regarding Angular’s dependency injection in the docs.
As we want to have the data needed to connect to our CouchDB in one central place, let’s try to make use of DI with a constant. We use chaining to add them to our module:
.constant('appSettings', {

  db: 'http://127.0.0.1:5984/expenses'

});
The only controller we have so far, which was created during the initial scaffold, is the MainCtrl located in app/scripts/controllers/main.js. The MainCtrl gets defined and the $scope is injected. We will see how to use the scope later.
We can now add appSettings to the function arguments to inject them, like we saw before with the $routeprovider:
.controller('MainCtrl', function ($scope, appSettings) {

  console.log(appSettings);

});
You should now be able to log output on the debug console of your browser. Congratulations! You have successfully used dependency injection. You can find the full commit at: https://github.com/robertkowalski/couchdb-workshop/commit/d6b635a182df78bc22a2e93af86162f479d8b351.
Fetching Results
In the next step we will inject the $http service to fetch the data from our CouchDB and update the view. While traditional databases are working with data that is decomposed into tables, CouchDB is using unstructured documents, which can be aggregated, filtered and joined using map and reduce functions with a concept called views. A view gets defined by a design document, a special kind of document.
You can write the view on your own and send it to CouchDB via curl, use the graphical interface at http://localhost:5984/_utils or via a tool like CouchApp – there are a lot of tools like CouchApp (npm install -g couchapp) to make development and deploying of views easier.
This is what our view will look like:
{

  "_id":"_design/expenses",

  "views": {

    "byName": {

      "map": "function (doc) {

        emit(doc.name, doc.price);

      }"

    }

  }

}
The _id is important for us as it defines the path where we will query the view later. The _id property gets prefixed by _design as we are creating a design document. We name our view byName and it just includes a basic map function, which will emit the name property of each document in our database as key and the price as value.
Let’s send it to CouchDB using curl:
curl -X POST http://127.0.0.1:5984/expenses -H "Content-Type: application/json" -d '{"_id":"_design/expenses","views": {"byName": {"map": "function (doc) {emit(doc.name, doc.price);}"}}}'
CouchDB responds with:
{"ok":true,"id":"_design/expenses","rev":"1-71127e7155cf2f780cae2f9fff1ef3bc"}
We now have a view that we can query at:
http://localhost:5984/expenses/_design/expenses/_view/byName
If you are interested in tools like CouchApp (hint: you have to use it later), here is a commit which shows how to use it (use npm run bootstrap to deploy the design document).
Do you remember our curl requests in the beginning? We will now implement them in JavaScript. Angular provides the $http service, which can be injected as shown below:
.controller('MainCtrl', function ($scope, $http, appSettings) {
We then add a function to fetch our items using the $http service:
function getItems () {

  $http.get(appSettings.db + '/_design/expenses/_view/byName')

    .success(function (data) {

      $scope.items = data.rows;

    });

}

getItems();
The $http service returns a promise, which will provide us the JSON data from the CouchDB view. We are adding the data to $scope.items. Using $scope we can set and update values in our view. If a value changes on our model, the view gets automatically updated. The two-way binding of Angular synchronizes our data between the view and the model. It will immediately update the view after the controller changes the model and also updates the model, when the values in the view change.
Let’s add some HTML with an expression to display our items in app/views/main.html, after we deleted most of the boilerplate markup:
<div>{{ item[0].key }}</div>

<div>{{ item[0].value }}</div>
We will see the first item that we have added in the section “First steps with CouchDB”:
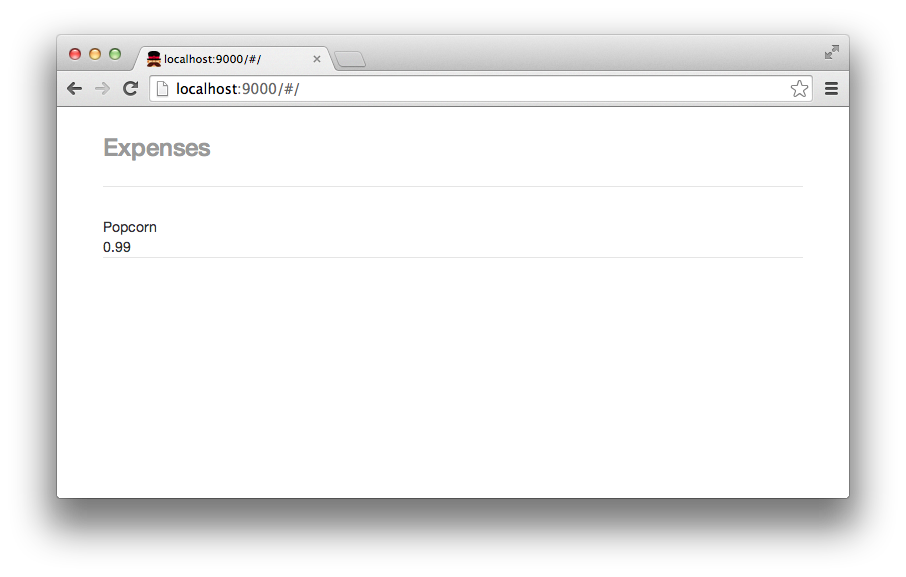
The commit for this part is available on GitHub.
Using Directives: ng-repeat
We should now see the first item, but what for all other items?
We can use the ng-repeat directive here, which will build the markup from longer lists for us. In general we can say that a directive in Angular attaches behavior to a DOM element. There are a lot of other predefined directives in Angular, and you can also define your own directives. In this case we are adding ng-repeat="item in items" to an outer div, which will then iterate on our array items from $scope.items.
The classes pull-left and pull-right are part of the Bootstrap CSS and provides us floating elements. As the elements are floating, we are applying a clearfix which is also included in Bootstrap:
<div ng-repeat="item in items">

  <div class="clearfix">

    <div class="pull-left">{{ item.key }}</div>

    <div class="pull-right">{{ item.value }}</div>

  </div>

</div>
If you refresh the page the items gets rendered in your DOM inspector as:
<!-- ngRepeat: item in items -->

<div ng-repeat="item in items" class="ng-scope">

  <div class="clearfix">

    <div class="pull-left ng-binding">Popcorn</div>

    <div class="pull-right ng-binding">0.99</div>

  </div>

</div>

<!-- end ngRepeat: item in items -->

<div ng-repeat="item in items" class="ng-scope">

  <div class="clearfix">

    <div class="pull-left ng-binding">Washing powder</div>

    <div class="pull-right ng-binding">2.99</div>

  </div>

</div>

<!-- end ngRepeat: item in items -->
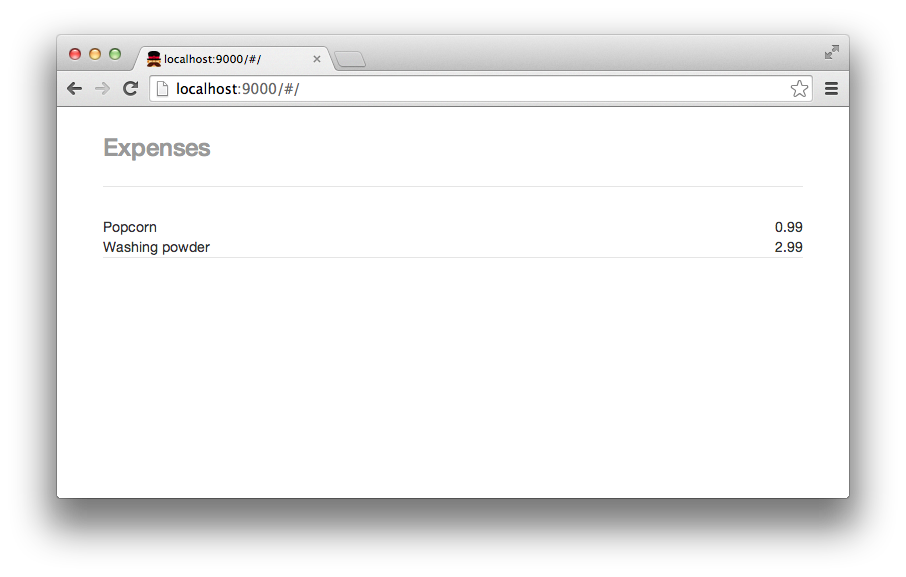
We have a nice small list now, but there is still no way to submit new items with our app besides using curl. The app up to this point is available in this commit, and is show in the following figure.
Creating the Form for Submitting Items
We will add a form with two inputs: one for the item name and another one for the price. The form also gets a button for submitting our items.
The divs with the class="row" from Bootstrap are used to style our app in a responsive way. The Bootstrap classes like form-control and btn btn-primary are used to style the button and inputs.
The form also gets a novalidate attribute: it disables the native form validation of the browser so we can validate our form using Angular later:
<form class="form-inline" role="form" novalidate>

  <div class="row">

    <div class="form-group">

      <label class="sr-only" for="item-name">Your item</label>

      <input

        class="form-control"

        id="item-name"

        name="item-name"

        placeholder="Your item" />

    </div>

    <div class="form-group">

      <label class="sr-only" for="item-price">Price</label>

      <input

        class="form-control"

        id="item-price"

        name="item-price"

        placeholder="Price" />

    </div>

  </div>

  <div class="row">

    <button

      class="btn btn-primary pull-right"

      type="submit">Save</button>

  </div>

</form>
The commit for the form is at https://github.com/robertkowalski/couchdb-workshop/commit/d678c51dfff16210f1cd8843fbe55c97dc25a408.
Saving Data in CouchDB
Using ng-model we can observe and access the values of the inputs in our controller, and then send them to CouchDB. For our price input we’ll add the attribute ng-model="price":
<input

  class="form-control"

  ng-model="price"

  id="item-price"

  name="item-price"

  placeholder="Price" />
The input for the name will get the attribute ng-model="name". It looks like this:
<input

  class="form-control"

  ng-model="price"

  id="item-price"

  name="item-price"

  placeholder="Price" />
We are also adding a small status box under our last item. We will need it to display errors.
<div class="status">

  {{ status }}

</div>
We can now access the values in our controller with $scope.price and $scope.name. The scope is connecting the view to our controller. Looking at the Model-View-Controller (MVC) pattern, the scope would be our model. Angular is sometimes also called a MVVM (Model-View-View-Model) Framework – all these JavaScript MVC frameworks are often called MVW (Model-View-Whatever) as there are alot of small differences between them.
But how do we submit the form?
A common way to send the form is to define a function on the $scope combined with a ng-submit directive in the view. Our function will build the JSON that we want to send to CouchDB. After the JSON is created, processForm will call postItem which will send the JSON to the CouchDB:
$scope.processForm = function () {

  var item = {

    name: $scope.name,

    price: $scope.price

  };

  postItem(item);

};
function postItem (item) {

  // optimistic ui update

  $scope.items.push({key: $scope.name, value: $scope.price});

  // send post request

  $http.post(appSettings.db, item)

    .success(function () {

      $scope.status = '';

    }).error(function (res) {

      $scope.status = 'Error: ' + res.reason;

      // refetch items from server

      getItems();

    });

}
A lot happens in our function postItem:
Before sending the HTTP request to the database, we are doing an optimistic update of the user interface, so the user sees the update immediately and our application feels snappier. For that we are adding the item to the other items on the scope. Angular will update the view for us.
Then we are doing the POST-request for our item in the background, and on success we are removing any (previous) error messages from our status field.
In case of an error we are writing an error message to the view. CouchDB will tell us why the error happened in the reason property of the JSON that gets returned. To get a consistent view again, we refetch the list of our items after we received the error.
On our form we can now add the directive ng-submit which will call our function on the scope when we submit the form:
<form class="form-inline" role="form" novalidate ng-submit="processForm()">
And that’s it! Angular helps us a lot keeping our view up to date! Check out the latest commit.
Adding Validation
You might have noticed that we can put all kinds of values in our expenses application. People could add invalid strings like foo to the prices and send it to the server. So let’s add some server side validation: CouchDB is able to validate documents on their update. We just have to add a validate_doc_update field with a function to our design document. This function should throw an exception in the case of invalid data.
The function has four arguments, as shown below:
validate_doc_update: function (newDoc, oldDoc, userCtx, secObj) {

  // ...

}
newDoc is the document that will get created or used for the update. There are also the arguments oldDoc, userCtx and secObj for more complex validations, but we will just use newDoc for our validation:
If you have not used the already mentioned CouchApp yet, I would really suggest that you do so now, as it makes working with larger design documents a lot easier. Here’s the design document for CouchApp:
var ddoc = {

  _id: '_design/expenses',

  views: {},

  lists: {},

  shows: {},

  validate_doc_update: function (newDoc, oldDoc, userCtx, secObj) {

    if (newDoc._deleted === true) {

      return;

    }

    if (!newDoc.name) {

      throw({forbidden: 'Document must have an item name.'});

    }

    if (!newDoc.price) {

      throw({forbidden: 'Document must have a price.'});

    }

    if (!/\d+\.\d\d/.test(newDoc.price)) {

      throw({forbidden: 'Price must be a number and have two decimal places after a dot.'});

    }

  }

};
// _design/expenses/_view/byName

ddoc.views.byName = {

  map: function (doc) {

    emit(doc.name, doc.price);

  }

};
module.exports = ddoc;
The fields name and price can’t be undefined in our validation. Additionally, we are testing the format of the price using a regular expression. If we just want to delete the document, we don’t need any of our validations. We are updating our design document using the following command:
couchapp push couchdb/views.js http://localhost:5984/expenses
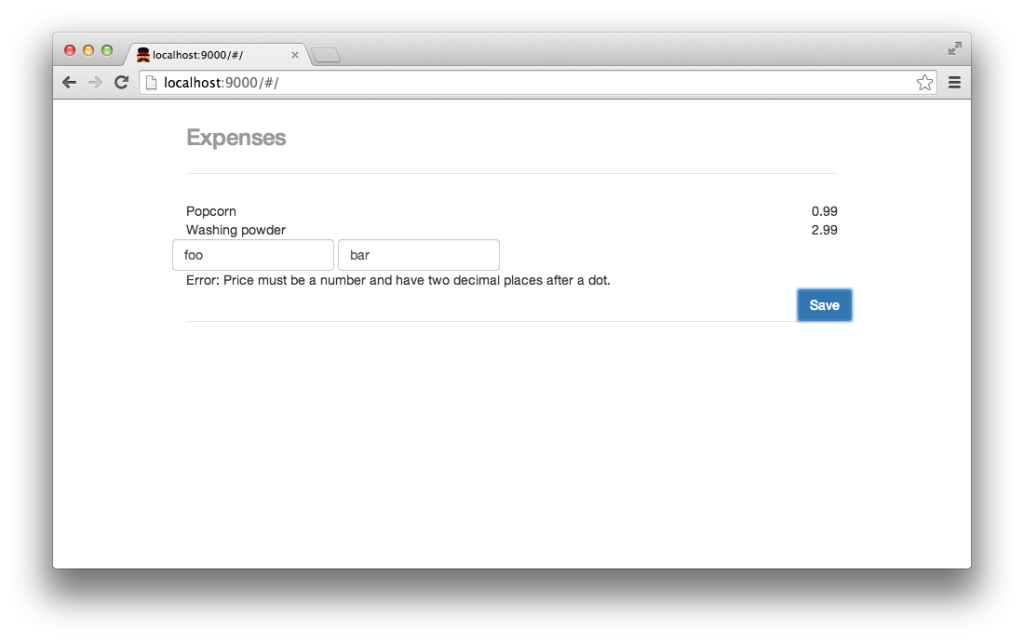
When we try to save invalid values now, we should see errors, as shown in the following figure:
Here is the relevant commit.
Adding Validation to the Front End
It’s awesome that we have some validation on the server now, but wouldn’t it be even more awesome if we wouldn’t need a request to validate our document? Let’s add some validation using Angular.
Both of our inputs are required, so they get a required attribute. Do you remember our regular expression in the validate function of our design document? The directive ng-pattern checks our input using a regular expression:
<input

  class="form-control"

  ng-model="price"

  id="item-price"

  name="item-price"

  placeholder="Price"

  required

  ng-pattern="/\d+\.\d\d$/"/>
Using name-of-the-form.$invalid we can test if one of our inputs is invalid. As our form has the name-attribute form we will use form.$invalid. We can combine this value with a directive like ng-disabled, which will disable our submit button in the case of a form that has invalid or missing values:
<button

  class="btn btn-primary pull-right"

  type="submit"

  ng-disabled="form.$invalid">Save</button>
That’s it! With just a few lines of HTML we got great validations. Check out the latest commit, including tests.
Conclusion
We’ve learned how to build a small app using CouchDB and Angular. Angular and CouchDB did a lot of the heavy lifting for us. We had a look at:
- The CouchDB HTTP interface
- CouchDB views & validations
- Angular’s dependency injection
- Angular’s two-way data binding
- Directives in Angular
- Using validation in Angular
Angular and CouchDB are great tools for development and they help us alot on our way to a working application. I hope you got a first insight into CouchDB and Angular and if you are interested, there are still many topics you can have a look at:
- Hosting the application on the CouchDB itself
- Updating documents
- Writing your own directives
- Replication
- Using reduce functions in our view
- Testing Angular apps
Frequently Asked Questions (FAQs) about Tracking Expenses with CouchDB and Angular
How can I host CouchDB along with my website?
Hosting CouchDB along with your website depends on the hosting provider you choose. Some providers offer specific support for CouchDB, while others may require you to install and manage it yourself. You can also use a cloud-based CouchDB service, which allows you to work with CouchDB without having to host it on your own server. This can be a more convenient option, especially if you’re not familiar with server management.
How can I use JavaScript, Node.js, and CouchDB together?
JavaScript, Node.js, and CouchDB can be used together to create a full-stack web application. JavaScript is used for client-side scripting, Node.js for server-side scripting, and CouchDB as the database. You can use the Node.js ‘nano’ module to interact with CouchDB. This module provides a simple and intuitive API for communicating with CouchDB databases.
How can I install Node.js?
Installing Node.js is a straightforward process. You can download the installer from the official Node.js website and follow the installation instructions. The installer includes both Node.js and npm, the Node.js package manager. After installation, you can verify that Node.js and npm are installed correctly by running ‘node -v’ and ‘npm -v’ in your command line.
What are some hosting recommendations for CouchDB?
There are several hosting providers that offer support for CouchDB. These include IBM Cloudant, Amazon AWS, and Microsoft Azure. These providers offer managed CouchDB services, which means they handle tasks like server management, backups, and scaling. This allows you to focus on developing your application without having to worry about database management.
Where can I find free Node.js hosting?
There are several providers that offer free Node.js hosting, including Heroku, Glitch, and Vercel. These providers offer a free tier that is suitable for small applications or for development and testing. However, for larger applications or for production use, you may need to upgrade to a paid plan.