

In this guide, we’ll look at how we can write automated tests in Angular 5 projects. Angular Testing is a core feature available in every project that was set up with either the Angular CLI or the Angular quick start project.
The subject of Angular testing is vast, as it’s a complex and very involved topic. It would require several chapters or a full-length course to cover it fully. So in this guide, I’ll show you just the basics to get you started.
Key Takeaways
- Angular Testing Basics: Angular 5 projects come equipped with testing capabilities that can be automated using the Angular CLI or Angular quick start project.
- Testing Technologies: Key technologies for Angular testing include TestBed for configuring test modules, Jasmine for writing test cases, Karma for executing tests in a browser, and Protractor for end-to-end testing.
- Unit Testing Components: Components can be tested in isolation or within the Angular environment to check interactions with templates and dependencies. TestBed and async utilities facilitate this process.
- Testing Components with Dependencies: When components depend on other components, services, or modules, TestBed configurations need to include mock services or specific schemas like NO_ERRORS_SCHEMA to isolate the unit tests.
- End-to-End Testing Strategy: Protractor enables real browser interaction tests, simulating user actions to verify the complete functionality of the application.
- Code Coverage Tools: Utilize tools like Karma’s coverageIstanbulReporter to generate code coverage reports, helping teams understand the extent of their testing and to identify untested parts of the application.
- Additional Utilities for Enhanced Testing: Leveraging tools like ng lint for code linting and Visual Studio Code for intelligent code editing can improve code quality and consistency across development teams.
Prerequisites
At the time of writing, Angular 5.2 is the current stable version — which is what we’ll be using here. This guide assumes you at least have a solid grasp of Angular 4+ fundamentals. It’s also assumed you at least understand the concept or have some skills writing automated tests.
We’ll base our testing examples on Angular’s official beginner tutorial to demonstrate how to write tests for components and services. You can find the completed code with tests on our GitHub repository. At the end of this guide, you should have the skills to implement several passing tests in Angular 5.
Angular Testing Technologies
As you already know, an Angular project is made up of templates, components, services and modules. They all run inside what’s known as the Angular environment. While it’s possible to write isolated tests, you won’t really know how your code will interact with other elements within the Angular environment.
Luckily, we have several technologies that can help us write such unit tests with the least amount of effort.
1. Angular Testing Utilities
This is a set of classes and functions that are needed to build a test environment for Angular code. You can find them on Angular’s api documentation. The most important of all is the TestBed. It’s used to configure an Angular module just the same way as the @NgModule — except that it prepares the module for testing. It has a configureTestingModule function where you provide all the necessary dependencies for your component to function in a test environment. Here’s an example of the dashboard component being prepared to run in a test environment. Several dependencies are needed by this component for the test to run:
TestBed.configureTestingModule({
  imports: [ RouterTestingModule ],
  declarations: [ DashboardComponent ],
  schemas: [ NO_ERRORS_SCHEMA ],
  providers: [
    {
      provide: HeroService,
      useClass: MockHeroService
    }
  ],
})
.compileComponents();
We’ll look more closely at what’s going on here a little further below.
2. Jasmine
Jasmine is the de facto framework for writing Angular tests. Basically, it’s a testing framework that uses the behavior-driven notation. Writing a test in Jasmine is quite simple:
describe('createCustomer' () => {

  it('should create new customer',(customer) => {
    ...
    expect(response).toEqual(newCustomer)
  });

  it('should not create customer with missing fields', () => {
    ...
    expect(response.error.message).toEqual('missing parameters')
  });

  it('should not create customer with existing record', () => {
    ...
    expect(response.error.message).toEqual('record already exists')
  });
});
The anatomy of a Jasmine test is made up of at least two elements: a describe function, which is a suite of tests, and an it function, which is the test itself. We normally use describe to indicate the function we’re focusing on — for example, createCustomer(). Then, within the suite, we create multiple it tests. Each test puts the target function under a different condition in order to ensure it behaves as expected. You can refer to the Jasmine docs for more information.
3. Karma
Karma is a tool for executing source code against test code inside a browser environment. It supports the running of tests in each browser it’s configured for. Results are displayed on both the command line and on the browser for the developer to inspect which tests have passed or failed. Karma also watches the files and can trigger a test rerun whenever a file changes. At the root of the Angular project, we have the file karma.conf that’s used to configure Karma. The contents should look something like this:
module.exports = function (config) {
  config.set({
    basePath: '',
    frameworks: ['jasmine', '@angular/cli'],
    plugins: [
      require('karma-jasmine'),
      require('karma-chrome-launcher'),
      require('karma-jasmine-html-reporter'),
      require('karma-coverage-istanbul-reporter'),
      require('@angular/cli/plugins/karma')
    ],
    client:{
      clearContext: false // leave Jasmine Spec Runner output visible in browser
    },
    coverageIstanbulReporter: {
      reports: [ 'html', 'lcovonly' ],
      fixWebpackSourcePaths: true
    },
    angularCli: {
      environment: 'dev'
    },
    reporters: ['progress', 'kjhtml'],
    port: 9876,
    colors: true,
    logLevel: config.LOG_INFO,
    autoWatch: true,
    browsers: ['Chrome'],
    singleRun: false
  });
};
Do check out Karma’s configuration documentation to learn how to customize it. As you can see, Chrome is listed as the browser to use for running tests. You’ll need to define an environment variable called CHROME_BIN that points to the location of your Chrome browser executable. If you’re using Linux, just add this line to your .bashrc file:
export CHROME_BIN="/usr/bin/chromium-browser"
In order for Karma to run your tests, you must ensure the test files end with .spec.ts. You should note that Karma was designed to mostly run unit tests. To run end-to-end tests, we’ll need another tool, Protractor, which we’ll look into next.
4. Protractor
Protractor is an end-to-end test framework for Angular. It runs your tests inside a real browser, interacting with it as real person would. Unlike unit tests, where we test individual functions, here we test the entire logic. Protractor is able to fill in forms, click buttons and confirm that the expected data and styling is displayed in the HTML document. Just like Karma, Protractor has its own configuration file at the root of your Angular project, protractor.conf:
const { SpecReporter } = require('jasmine-spec-reporter');

exports.config = {
  allScriptsTimeout: 11000,
  specs: [
    './e2e/**/*.e2e-spec.ts'
  ],
  capabilities: {
    'browserName': 'chrome'
  },
  directConnect: true,
  baseUrl: 'http://localhost:4200/',
  framework: 'jasmine',
  jasmineNodeOpts: {
    showColors: true,
    defaultTimeoutInterval: 30000,
    print: function() {}
  },
  onPrepare() {
    require('ts-node').register({
      project: 'e2e/tsconfig.e2e.json'
    });
    jasmine.getEnv().addReporter(new SpecReporter({ spec: { displayStacktrace: true } }));
  }
};
You can find the documentation for its configuration here. Unlike Jasmine/Karma tests, Protractor tests are located outside the src folder, in a folder called e2e. We’ll look into writing end-to-end tests later down the road. For now, let’s start writing unit tests.
Writing Unit Tests
As mentioned earlier, Angular comes with just about everything you need to write automated tests for your project. To start testing, just run this:
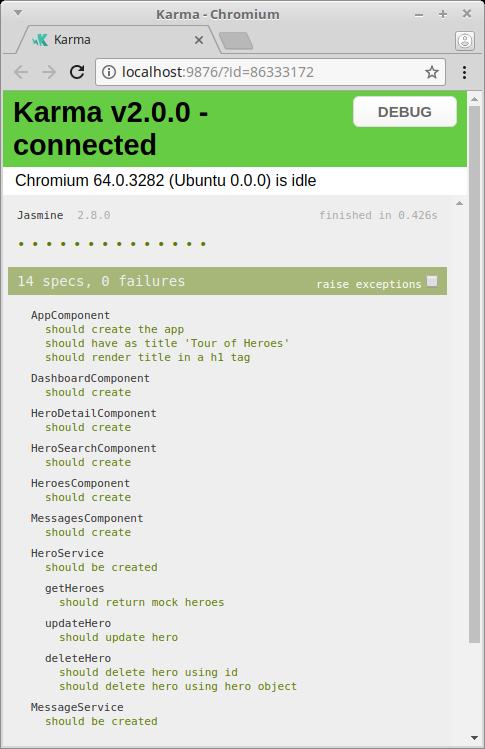
ng test
Karma will spin up and run all available tests. Assuming you just completed the “Tour of Heroes” tutorial, you should have a similar report like this:
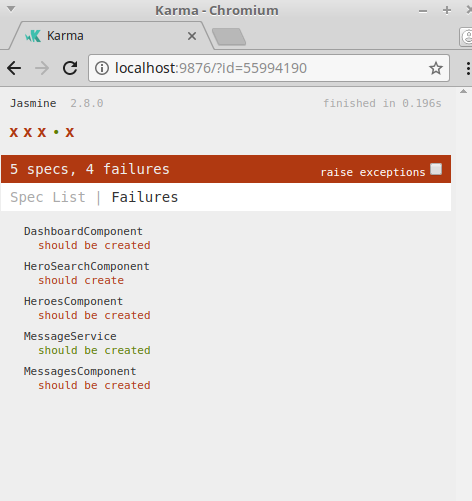
These tests get created when you generate components, services and classes using the Angular CLI tool. At the point of creation, the code in these tests were correct. However, as you added code to your component and services, the tests got broken. In the next section, we’ll see how we can solve the broken tests.
Testing a Component
Unit testing a component can go in two ways. You can test it in isolation, or you can test it within an Angular environment to see how it interacts with its template and dependencies. The latter sounds hard to implement, but using Angular Testing Utilities makes creating the test easier. Here’s an example of the test code that’s generated for you when you create a component using the Angular CLI tool:
import { async, ComponentFixture, TestBed } from '@angular/core/testing';

import { HeroesComponent } from './heroes.component';

describe('HeroesComponent', () => {
  let component: HeroesComponent;
  let fixture: ComponentFixture<HeroesComponent>;

  beforeEach(async(() => {
    TestBed.configureTestingModule({
      declarations: [ HeroesComponent ]
    })
    .compileComponents();
  }));

  beforeEach(() => {
    fixture = TestBed.createComponent(HeroesComponent);
    component = fixture.componentInstance;
    fixture.detectChanges();
  });

  it('should be created', () => {
    expect(component).toBeTruthy();
  });
});
In the first beforeEach() function, we’re using the TestBed.configureTestingModule function to create a module environment for testing the component. It’s similar to NgModules, except that in this case we’re creating a module for testing.
In the second beforeEach() function, we create an instance of the component-under-test. Once we do this we can’t configure the TestBed again, as an error will be thrown.
Finally we have the spec, should be created, where we confirm that the component has be initialized. If this test passes, it means the component should run properly within an Angular environment. However, if it fails, it’s likely the component has a certain dependency we haven’t included in the test configuration. Let’s look at how we can deal with different issues.
Testing a Component that Uses Another Component
While building a user interface in Angular, we often reference other components in a template file via the selector. Take a look at this example of dashboard.component.html:
<h3>Top Heroes</h3>
...
</div>

<app-hero-search></app-hero-search>
In this example, we’re referencing another component that has the selector app-hero-search. If you try to run the initial test as is, it will fail. This is because we haven’t declared the referenced component in the test environment. In a unit test, we put all our focus on the component that we’re testing. Other components are not of interest to us in a unit test. We have to assume they’re working as expected. Including referenced components in our test may contaminate the results. To solve this problem, we can either mock the referenced component or simply ignore it using the NO_ERRORS_SCHEMA directive. Here’s an example:
import { async, ComponentFixture, TestBed } from '@angular/core/testing';
import { NO_ERRORS_SCHEMA } from '@angular/core';

import { DashboardComponent } from './dashboard.component';

describe('DashboardComponent', () => {
  let component: DashboardComponent;
  let fixture: ComponentFixture<DashboardComponent>;

  beforeEach(async(() => {
    TestBed.configureTestingModule({
      declarations: [ DashboardComponent ],
      schemas: [ NO_ERRORS_SCHEMA
    })
    .compileComponents();
  }));

  beforeEach(() => {
    fixture = TestBed.createComponent(DashboardComponent);
    component = fixture.componentInstance;
    fixture.detectChanges();
  });

  it('should be created', () => {
    expect(component).toBeTruthy();
  });
});
Now this test shouldn’t have an issue with component dependencies. However, this test won’t pass just yet, as there’s another situation we have to deal with …
Testing a Component that uses a Module
Let’s examine hero-detail.component.html this time:
<div *ngIf="hero">
  <h2>{{ hero.name | uppercase }} Details</h2>
  <div><span>id: </span>{{hero.id}}</div>
  <div>
    <label>name:
      <input [(ngModel)]="hero.name" placeholder="name"/>
    </label>
  </div>
  <button (click)="goBack()">go back</button>
  <button (click)="save()">save</button>
</div>
Here we’re using the ngModel directive, which comes from the FormsModule library. In order to write a test that supports this module, we only need to import the FormsModule and include it in the TestBed configuration:
import { FormsModule } from '@angular/forms';
...
  beforeEach(async(() => {
    TestBed.configureTestingModule({
      declarations: [ HeroDetailComponent ],
      imports: [ FormsModule],
    })
    .compileComponents();
  }));
  ...
That should fix the issue with the FormsModule. However, there are a couple more dependencies we need to specify in our test environment.
Testing a Component that Uses Routing Module
Let’s examine hero-detail.component.ts constructor:
constructor(
  private route: ActivatedRoute,
  private location: Location,
  private heroService: HeroService
) {}
The component has ActivatedRoute and Location dependencies which deal with routing. In our test code, hero-detail.component.spec.ts, we could implement mock versions of the classes. However, I found the best solution was to import the RouterTestingModule like this:
import { RouterTestingModule } from ’@angular/router/testing’;
...
beforeEach(async(() => {
  TestBed.configureTestingModule({
    declarations: [ HeroDetailComponent ],
    imports: [ FormsModule, RouterTestingModule ],
  })
  .compileComponents();
}));
The RoutingTestingModule easily solves the ActivateRoute and Location dependencies in our test code. The RoutingTestingModule also handles other situations where routing is involved. Take a look at this code in dashboard.component.html:
<h3>Top Heroes</h3>
<div class="grid grid-pad">
  <a *ngFor="let hero of heroes" class="col-1-4" routerLink="/detail/{{hero.id}}">
    <div class="module hero">
      <h4>{{hero.name}}</h4>
    </div>
  </a>
</div>
Notice we have a directive called routerLink. It’s a directive provided by AppRoutingModule library. If run the dashboard test, it will fail due to this dependency. To fix it, just implement RoutingTestingModule in dashboard.component.spec.ts the same way we’ve done for hero-detail.component.spec.ts.
Let’s now look at how we can test components that depend on services.
Testing a Component that Uses Services
Every component needs at least a service to handle logic. There are a couple of ways of testing components that use services. Let’s look at message.service.ts, which is being used by message.component.ts:
import { Injectable } from ’@angular/core’;

@Injectable()
export class MessageService {
  messages: string[] = [];

  add(message: string) {
    this.messages.push(message);
  }

  clear() {
    this.messages = [];
  }
}
The MessageService has a very simple implementation. It doesn’t use any external dependency. While it’s recommended to exclude external logic from unit tests, we’ll make an exception here. I don’t see the need for complicating our tests. For that reason, I think its best to include the service in the test. Here’s the test code for message.component.spec.ts:
import { MessageService } from '@services/message.service';
...

beforeEach(async(() => {
  TestBed.configureTestingModule({
    declarations: [ MessagesComponent ],
    providers: [ MessageService ]
  })
  .compileComponents();
}))
Now let’s look at another service, hero-service.ts:
import { Injectable } from '@angular/core';
import { Observable } from 'rxjs/Observable';
import { of } from 'rxjs/observable/of';
import { HttpClient, HttpHeaders } from '@angular/common/http';
import { catchError, map, tap } from 'rxjs/operators';
...
@Injectable()
export class HeroService {

  private heroesUrl = 'api/heroes';

  constructor(
    private http: HttpClient,
    private messageService: MessageService) { }

    /** GET heroes from the server */
    getHeroes (): Observable<Hero[]> {
      return this.http.get<Hero[]>(this.heroesUrl)
      .pipe(
         tap(heroes => this.log(`fetched ${heroes.length} heroes`)),
         catchError(this.handleError('getHeroes', []))
       );
    }

    getHero(id: number): Observable<Hero> {
      const url = `${this.heroesUrl}/${id}`;
      return this.http.get<Hero>(url).pipe(
        tap(_ => this.log(`fetched hero id=${id}`)),
        catchError(this.handleError<Hero>(`getHero id=${id}`))
      );
    }
    ...
}
The HeroService class contains quite a bit of logic — about 104 lines in total. It has multiple dependencies, including one to another service. Also, all its functions are asynchronous. Such complex code has high potential of contaminating our unit tests. For that reason, we should exclude its logic. We do that by creating a mock version of hero.service.ts. Just create a new file and call it hero.service.mock.ts. Mock its functions such that its core logic is stripped away:
import { Observable } from 'rxjs/Observable';
import { of } from 'rxjs/observable/of';
import { Hero } from '@models/hero.model';

export class MockHeroService {
  getHeroes(): Observable<Hero[]> {
    return of([]);
  }

  getHero() {
    return of({});
  }
}
You can see how much simpler the mock version is. It now has zero chances of contaminating our unit tests. To include it in our component spec files, we implement it like this:
import { HeroService } from '@services/hero.service';
import { MockHeroService } from '@services/hero.service.mock';
...

  TestBed.configureTestingModule({
      declarations: [ HeroDetailComponent ],
      imports: [ FormsModule, RouterTestingModule ],
      providers: [
        {
          provide: HeroService,
          useClass: MockHeroService
        },
      ],
    })
    .compileComponents();
  }));
...
We use the providers option to inject the MockHeroService as our service. Implement this for all components’ test code using the service.
Testing a Service
Now that we’ve dealt with some of the common scenarios that occur while testing components, let’s look at how we can test services. Services perform the core logic of our applications, so it’s very important we test their functions thoroughly. As mentioned earlier, Angular testing is a deep subject, so we’re just going to scratch the surface here.
Open hero.service.ts and examine the functions. Let me highlight a couple:
...
  /** GET heroes from the server */
  getHeroes (): Observable<Hero[]> {
    return this.http.get<Hero[]>(this.heroesUrl)
    .pipe(
       tap(heroes => this.log(`fetched ${heroes.length} heroes`)),
       catchError(this.handleError('getHeroes', []))
     );
  }

  /** UPDATE: update selected hero on the server */
  updateHero (hero: Hero): Observable<any> {
    return this.http.put(this.heroesUrl, hero, httpOptions).pipe(
      tap(_ => this.log(`updated hero id=${hero.id}`)),
      catchError(this.handleError<any>('updateHero'))
    );
  }
...
Each function is made up of a few lines of code, but a lot is going on. To fully test each, we need to consider a number of scenarios. When we execute getHeroes(), the server may possibly
- send back list of heroes
- send back an empty list
- throw an error
- fail to respond.
You may be able to think of more possible scenarios to add to the list. Now that we’ve considered possible scenarios, it’s time to write the tests. Here’s an example of how to write a spec for HeroService:
import { TestBed, inject } from '@angular/core/testing';
import { HttpClientModule, HttpClient, HttpResponse } from '@angular/common/http';
import { HttpClientTestingModule, HttpTestingController } from '@angular/common/http/testing';

import { HeroService } from './hero.service';
import { MessageService } from './message.service';
import { Hero } from '@models/hero.model';

const mockData = [
  { id: 1, name: 'Hulk' },
  { id: 2, name: 'Thor'},
  { id: 3, name: 'Iron Man'}
] as Hero[];

describe('HeroService', () => {

  let service;
  let httpTestingController: HttpTestingController;

  beforeEach(() => {
    TestBed.configureTestingModule({
      imports: [
        HttpClientTestingModule
      ],
      providers: [HeroService, MessageService]
    });
    httpTestingController = TestBed.get(HttpTestingController);
  });

  beforeEach(inject([HeroService], s => {
    service = s;
  }));

  beforeEach(() => {
    this.mockHeroes = [...mockData];
    this.mockHero = this.mockHeroes[0];
    this.mockId = this.mockHero.id;
  });

  const apiUrl = (id: number) => {
    return `${service.heroesUrl}/${this.mockId}`;
  };

  afterEach(() => {
    // After every test, assert that there are no more pending requests.
    httpTestingController.verify();
  });

  it('should be created', () => {
    expect(service).toBeTruthy();
  });

  describe('getHeroes', () => {

    it('should return mock heroes', () => {
      service.getHeroes().subscribe(
        heroes => expect(heroes.length).toEqual(this.mockHeroes.length),
        fail
      );
      // Receive GET request
      const req = httpTestingController.expectOne(service.heroesUrl);
      expect(req.request.method).toEqual('GET');
      // Respond with the mock heroes
      req.flush(this.mockHeroes);
    });
  });

  describe('updateHero', () => {

    it('should update hero', () => {
      service.updateHero(this.mockHero).subscribe(
        response => expect(response).toEqual(this.mockHero),
        fail
      );
      // Receive PUT request
      const req = httpTestingController.expectOne(service.heroesUrl);
      expect(req.request.method).toEqual('PUT');
      // Respond with the updated hero
      req.flush(this.mockHero);
    });
  });

  describe('deleteHero', () => {

    it('should delete hero using id', () => {
      const mockUrl = apiUrl(this.mockId);
      service.deleteHero(this.mockId).subscribe(
        response => expect(response).toEqual(this.mockId),
        fail
      );
      // Receive DELETE request
      const req = httpTestingController.expectOne(mockUrl);
      expect(req.request.method).toEqual('DELETE');
      // Respond with the updated hero
      req.flush(this.mockId);
    });

    it('should delete hero using hero object', () => {
      const mockUrl = apiUrl(this.mockHero.id);
      service.deleteHero(this.mockHero).subscribe(
        response => expect(response).toEqual(this.mockHero.id),
        fail
      );
      // Receive DELETE request
      const req = httpTestingController.expectOne(mockUrl);
      expect(req.request.method).toEqual('DELETE');
      // Respond with the updated hero
      req.flush(this.mockHero.id);
    });
  });
});
This is just a sample of how we should write a test for a service that interacts with the HttpClientModule. Examine each test and take note that we’re using HttpTestingController class to intercept requests. In this test, we’re controlling the inputs and outputs to create different scenarios. The main purpose of these tests is to ensure that our service methods are able to handle each scenario gracefully. Note that we haven’t fully implemented all the tests required for hero.service.spec.ts, as it’s beyond the scope of this guide.
There are more topics that we still need to look at before the end of this guide.
End-to-end Angular Testing
Unit tests ensure components and services run correctly in a controlled test environment. However, there’s no guarantee that components and services will interact with each other within the Angular environment. That’s why we need to perform end-to-end testing. An end-to-end test is one that simulates human testing. In other words, the tests are designed to interact with our application the same way we do — via the browser interface.
For our tour of heroes application, there’s a number of use cases we can test for, such as ensuring that —
- five heroes are displayed on dashboard component
- all heroes are displayed on heroes component
- navigation links aren’t broken
- a new hero can be created
- the hero can be updated
- the hero can be deleted.
And you can keep on adding to this list as more features get implemented. An end-to-end test ideally has two parts.
The first part is a helper file that provides helper functions specific to a component. Here’s an example of app.po.ts:
import { browser, by, element } from 'protractor';

export class AppPage {
  navigateTo() {
    return browser.get('/');
  }

  getParagraphText() {
    return element(by.css('app-root h1')).getText();
  }
}
Once you’ve defined your helper functions, you can easily access them while writing an e2e test. Here’s an example of e2e/app.e2e.spec.ts:
import { AppPage } from './app.po';

describe('angular-tour-of-heroes App', () => {
  let page: AppPage;

  beforeEach(() => {
    page = new AppPage();
  });

  it('should display welcome message', () => {
    page.navigateTo();
    expect(page.getParagraphText()).toEqual('Welcome to app!');
  });
});
To run this test, simply execute the following command:
ng e2e
You might need an internet connection if this is the first time you’re executing this command. Once the test is complete, you’ll most likely get a failed message that looks something like this:
angular-tour-of-heroes App
   ✗ should display welcome message
     - Expected 'Tour of Heroes' to equal 'Welcome to app!'.
Let’s fix the error as follows. I’ve also added one more test just to make sure the redirection we specified in app-routing.module.ts works:
import { AppPage } from './app.po';
import { browser  } from 'protractor';

describe('angular-tour-of-heroes App', () => {
  let page: AppPage;

  beforeEach(() => {
    page = new AppPage();
  });

  it('should redirect to dashboard', async () => {
    page.navigateTo();
    const url = await browser.getCurrentUrl();
    expect(url).toContain('/dashboard');
  });

  it('should display welcome message', () => {
    page.navigateTo();
    expect(page.getParagraphText()).toEqual('Tour of Heroes');
  });
});
Run the test again. We should now have passing tests:
angular-tour-of-heroes App
  ✓ should redirect to dashboard
  ✓ should display welcome message
Watching e2e tests run is an awesome feeling. It gives you the confidence that your application will run smoothly in production. Now that you have had a taste of e2e, its time to move on to another cool testing feature.
Code Coverage
One of our biggest question as developers is “have we tested enough code?” Luckily, we have tools that can generate “code coverage” to determine how much of our code is tested. To generate the report, just run the following:
ng test --watch=false --code-coverage
A coverage folder will be created at the root of your Angular project. Navigate inside the folder and you’ll find index.html. Open it using a web browser. You should see something like this:
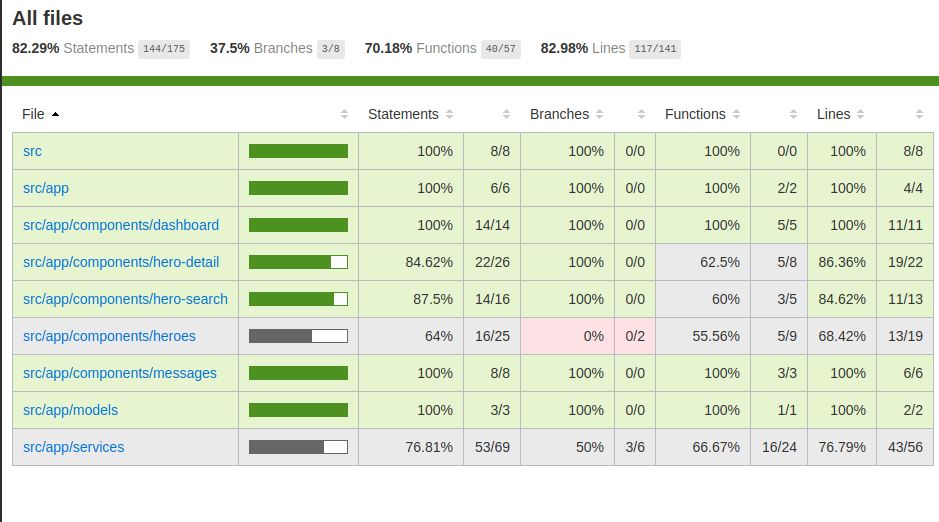
I won’t go into much detail here, but you can see some classes have been tested fully while others not completely. Due to time and availability of resources, it often isn’t always possible to implement 100% test coverage. However, you can decide with your team on what should be the minimum. To specify the minimum, use karma.conf to configure your code coverage settings like this:
coverageIstanbulReporter: {
  reports: [ 'html', 'lcovonly' ],
  fixWebpackSourcePaths: true,
  thresholds: {
    statements: 80,
    lines: 80,
    branches: 80,
    functions: 80
  }
}
The above threshold value specifies a minimum of 80% to be covered by unit tests.
Additional Utilities
We’ve now covered the basics of Angular testing. However, we can improve our code quality by going a few steps further.
1. Linting
Angular comes with a tool for performing code linting. Just execute the following code to do a lint check on your project:
ng lint
This command will spit out warnings about your code — for example, where you forgot to use a semicolon, or you used too many spaces. The command will also help identify unused code and certain mistakes in your statements. Using this command often will ensure that everyone in your team writes code using a consistent style. You can further customize the lint options in the tslint.json file.
2. Intelligent Code Editors
When it comes to code editors and IDEs, my personal favorites are Atom and Sublime Text. However, I recently discovered Visual Studio Code, which has more appealing features. It’s a free code editor that can run in Windows, macOS and Linux. It borrows a lot from Atom, except it has additional features I’d like to highlight:
- Intellisense
- Error highlighting
- Modern Angular extensions
Currently, neither Atom nor Sublime Text have these features, while they’re built into VSCode. You only need to install the required language extension. The Intellisense feature lists options for you as you type your code. It’s like autocomplete but with a specific list of syntactically correct options. With this feature it’s hard to make a syntax mistake. You also get to see a function’s documentation, allowing you to see the return type and the required inputs.
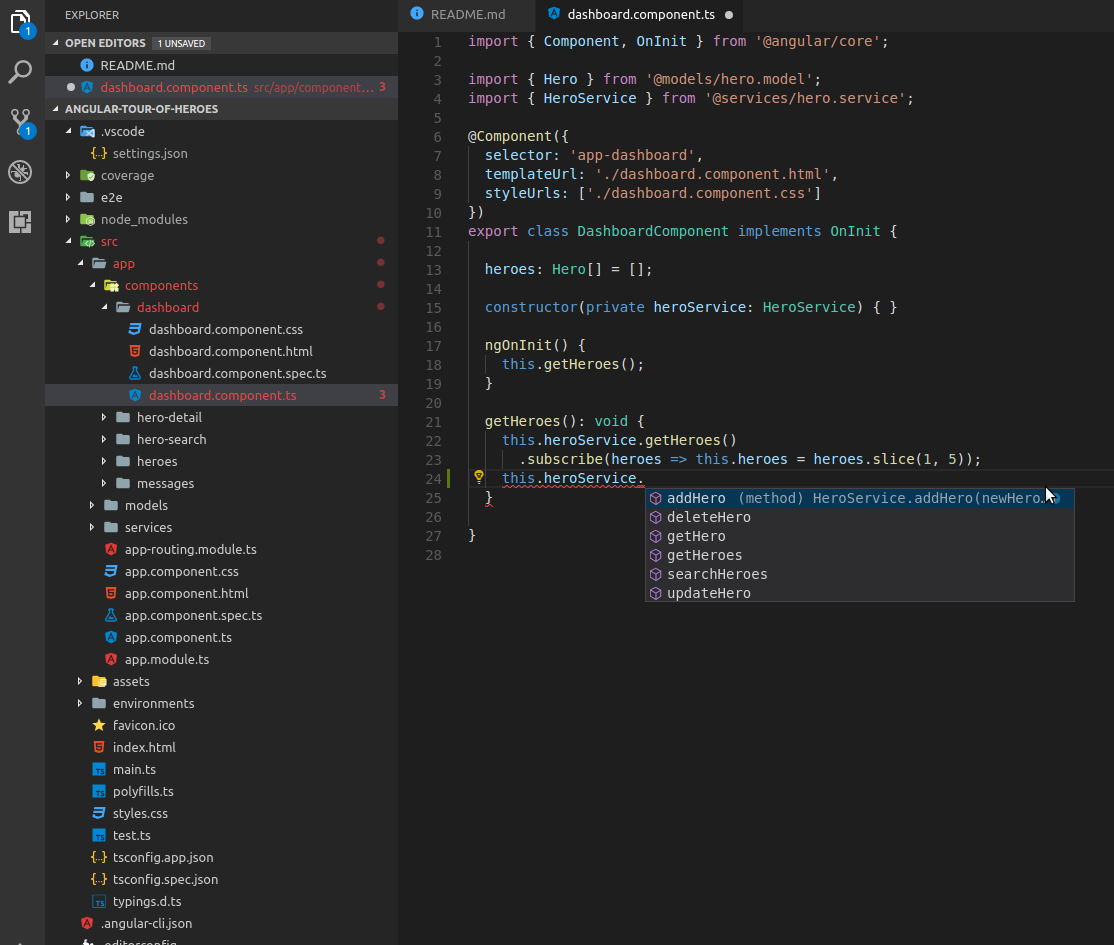
Visual Studio Code also has a proper error highlighting feature. It not only checks for syntax errors, but also ensures assignments have the right type. For example, if you try to assign an array to the result of an Observable function, an error will be highlighted for you. VSCode also has Angular extensions compatible with Angular 5.
Having an IDE that checks your code for errors as you type is great for productivity. It helps you spend less time fixing errors that you would otherwise have made. There may be other code editors that can accomplish the same, but for now I’m recommending Visual Studio Code for Angular projects.
3. Continuous Integration
Continuous Integration (CI) is the process of automating testing and builds. As developers, we often work in isolation for a couple of weeks or more. By the time we merge changes into the master branch, a lot of errors and conflicts are produced. This can take a lot of time to fix.
CI encourages developers to write tests and commit tasks often in smaller bits. The CI server will automatically build and run tests, helping developers catch errors early, leading to less conflicts and issues. There are many CI solutions available for Angular developers. Check out SitePoint’s tutorial on testing Jasmine and Karma on Travis.
Wrapping Up
We have access to tons of information about automated tests, along with frameworks for test-driven development, that help us to write tests. However, there are a couple reasons why we shouldn’t always write tests:
- Don’t write tests for a new application. The scope of the project will change rapidly, depending on what the client wants or how the market responds.
- Writing tests requires more time in addition to implementing features. It also requires time to maintain when the feature scope changes. If your budget is low, it’s okay to skip writing tests. Be practical with the resources you have.
So that leaves the question of when it is the right time to write tests. Here are some pointers:
- You’ve completed the prototype phase and you’ve pinned down the core features of your application.
- Your project has sufficient funding.
Now, assuming you’ve decided to enforce TDD, there are plenty of benefits to be reaped:
- Writing code that can be tested means you’re writing better quality code.
- As a developer, you’ll have more confidence releasing your latest version into production.
- Writing tests is a way of documenting your code. This means future developers will have an easier time upgrading legacy code.
- You don’t need to hire someone for quality control, as your CI server will do that work for you.
If you decide to skip tests completely for your product-ready application, be prepared to face angry and disappointed customers in the future. The number of bugs will increase exponentially as your codebase increases in size.
Hopefully this has been a useful introduction to Angular testing for you. If you want to learn more, I recommend you stick first to the official Angular 5 documentation. The majority of information out there is for older versions of Angular, unless stated otherwise.
Let us know any cool tips you have on Angular testing!
Frequently Asked Questions (FAQs) about Angular Testing
What is the importance of Angular Testing?
Angular Testing is a crucial part of the development process. It helps to ensure that the application is working as expected and that any changes or updates do not break existing functionality. It allows developers to identify and fix bugs early in the development cycle, which can save time and resources in the long run. Moreover, it provides a safety net that allows developers to refactor and enhance their code with confidence, knowing that any potential issues will be caught by the tests.
How does Angular Testing differ from other types of testing?
Angular Testing is specifically designed for Angular applications. It uses the Angular testing framework and tools like Jasmine and Karma, which are integrated into the Angular CLI. This allows for a seamless testing experience, with features like test isolation and mock services that make it easier to test Angular components and services. Unlike other types of testing, Angular Testing focuses on the specific characteristics and behaviors of Angular applications.
What are the key components of Angular Testing?
Angular Testing involves several key components. TestBed is the primary API for writing unit tests for Angular applications. It creates a dynamic test module where you can override providers, directives, etc. Jasmine is a behavior-driven development framework for testing JavaScript code. It provides functions to help with structuring your tests and making assertions. Karma is a test runner that executes your tests in various browsers.
How do I write a basic Angular test?
Writing an Angular test involves a few steps. First, you need to set up the testing environment using TestBed. Then, you create a test component and a test module. After that, you write the test cases using Jasmine’s it function, where you define the expected behavior and make assertions using expect function. Finally, you run the tests using Karma.
How do I test Angular services?
Angular services can be tested by injecting them into a test component or by using TestBed to create a testing module where the service is provided. You can then call the service methods and make assertions about their expected behavior. If the service has dependencies, you can use mock objects or stubs to isolate the service from its dependencies.
How do I test Angular components?
Angular components can be tested by creating a test component and a test module using TestBed. You can then interact with the component’s template and make assertions about its DOM structure and behavior. If the component has dependencies, you can use mock objects or stubs to isolate the component from its dependencies.
How do I test Angular directives?
Angular directives can be tested by creating a test component that uses the directive. You can then interact with the component’s template and make assertions about the directive’s behavior. If the directive has dependencies, you can use mock objects or stubs to isolate the directive from its dependencies.
How do I test Angular pipes?
Angular pipes can be tested by creating a test component that uses the pipe. You can then make assertions about the transformed value that the pipe returns. If the pipe has dependencies, you can use mock objects or stubs to isolate the pipe from its dependencies.
How do I debug Angular tests?
Debugging Angular tests can be done using the browser’s developer tools. You can set breakpoints in your test code and inspect the state of your application at those points. Karma also provides a debug mode that allows you to pause the execution of your tests and step through your code.
How do I run Angular tests?
Angular tests can be run using the Angular CLI. The ng test command will start Karma and run your tests. You can also configure Karma to run your tests in different browsers and to generate code coverage reports.