


Choosing the right payment solution for your app could be tricky, especially if you’re running a global marketplace. The prospect of dealing with country-specific regulations is not something I look forward to while getting on a new project. Also, there is a lot of boilerplate that you have to handle to get recurring billing to work. Stripe seems to understand the pain thousands of developers face every day and solves it pretty well. In this article, I will demonstrate how to integrate Stripe into your Rails app. Read on.
Key Takeaways
- Stripe provides a solution for handling recurring billing, avoiding the need to deal with country-specific regulations and extensive boilerplate coding. It can be integrated into a Rails app using a Stripe API key.
- Stripe allows for the creation of charges and subscriptions with simple code. It also provides a secure way to handle user’s credit card information, using a stripeToken for reference, without ever sending the card number.
- Building a pricing page involves retrieving all the plans from Stripe’s plan module and displaying them. Stripe doesn’t charge the card at this point but sends the customer data with the stripeToken to the specified endpoint.
- Stripe communicates with the app through webhooks for recursive payments. It broadcasts events to the Rails app, which can then be handled accordingly. In production, it is advisable to mask the endpoint with a random hash to prevent unauthorized access.
Setting Up
Before we begin, you will need a Stripe API key. You can obtain one by signing up with Stripe with your bank details. There are two different set of keys, one for your test and one for production.
Let’s begin by setting up the Stripe client. Add this to your Gemfile:
gem 'stripe', :git => 'https://github.com/stripe/stripe-ruby'
and bundle install.
Once you are done installing your dependencies, you need to setup your API keys. In production, you would store these keys in an environment variable and take it out of the codebase. But for brevity’s sake, I’m going to set them in an initializer. Kindly refrain from throwing pitchforks at me… :)
# config/initializers/stripe.rb

#todo remove the key info from this file and have env variable

#todo recreate new API keys when do that

if Rails.env == 'production'

  Rails.configuration.stripe = {

    :publishable_key => MY_PUBLISHABLE_KEY,

    :secret_key      => MY_SECRET_KEY

  }

else

  Rails.configuration.stripe = {

    :publishable_key => TEST_MY_PUBLISHABLE_KEY,

    :secret_key      => TEST_MY_SECRET_KEY

  }

end
Stripe.api_key = Rails.configuration.stripe[:secret_key]
With that out of the way, let’s setup our payment page.
Creating Your First Charge
Payment forms are ridiculously complex to build. There are tons of scenarios to consider and one misstep can put you out of business. Stripe has a simple solution for this problem. All you have to do is to copy the following snippet into your payment page and Stripe will take care of everything from getting the user’s credit card details to making the payment:
# views/stripe_checkout.haml

= form_tag('/stripe_checkout',{method: :post}) do

  %script{src: "https://checkout.stripe.com/checkout.js",

          class: "stripe-button",

          'data-key'=> "#{Rails.configuration.stripe[:publishable_key]}",

          'data-amount'=> 10.0,

          'data-email' => "customer@example.com",

          'data-currency' => 'USD'}
NOTE: You should use a test card in development mode. You can find more details here.
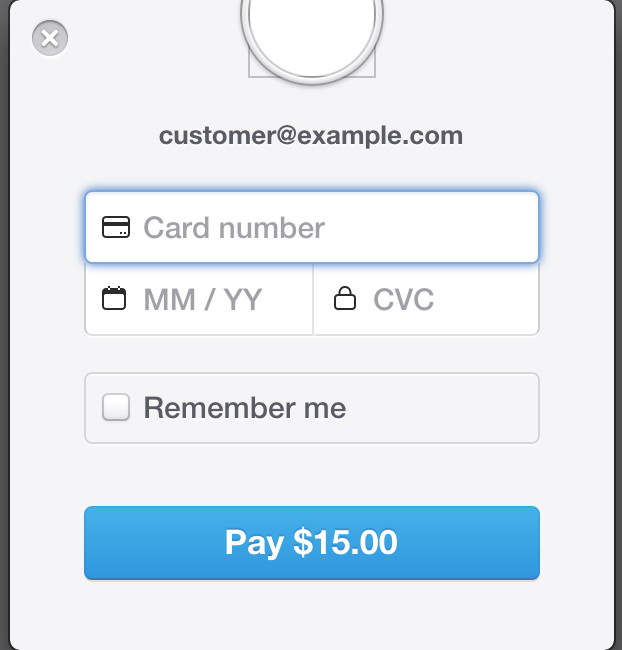
Fire up this view in a browser and you’ll see a ‘Pay with Stripe’ button. On click, it opens a modal for taking the user’s credit card information and authorizes it. The user’s card has not been charged yet, Stripe has merely authorized the card and said the card is valid. This happens in the background and, once Stripe is done with the necessary checks, it will post to the /stripe_checkout endpoint we’ve specified in the form.
Stripe callback to the controller:
def stripe_checkout

  @amount = 10

  #This will create a charge with stripe for $10

  #Save this charge in your DB for future reference

  charge = Stripe::Charge.create(

                  :amount => @amount * 100,

                  :currency => "usd",

                  :source => params[:stripeToken],

                  :description => "Test Charge"

  )

  flash[:notice] = "Successfully created a charge"

  redirect_to '/subscription'

end
and routes.rb,
post 'stripe_checkout' => 'subscription#stripe_checkout'
When we receive the callback from Stripe, it sends a stripeToken with it. This is a hashed reference to the user’s credit card and has a short lifetime. We can use the Stripe::Charge module to create a charge with this token before it expires. At no point will Stripe send us the card number. This way, we don’t have to worry about the security of user’s credit card data.
Congratulations, you’ve created your first charge in under 10 lines of code.
Setup a Subscription
Stripe makes it really simple to integrate subscriptions into your app. First, you’ll need to create a bunch of plans in your dashboard. Let’s build a simple form which will talk to Stripe and do that for us.
# views/index.html.haml

%h1 Create a new subscription

= form_tag('/subscription',{method: :post}) do

  .form-group

    %label Plan name

    %input{:type => 'text', :name => 'name'}

  .form-group

    %label Plan interval

    = select_tag 'interval', options_for_select(['month', 'year']), multiple: false, :include_blank => true,  class: "form-control"

  .form-group

    %label Plan Value

    %input{:type => 'text', :name => 'amount'}
  %button{:type => "submit"} Submit to Stripe
and the controller:
# controllers/subscriptions_controller.rb

class SubscriptionController < ApplicationController

  require "stripe"
  def create

    subscription = Stripe::Plan.create(

      :amount => (params[:amount].to_i)*100,

      :interval => params[:interval],

      :name => params[:name],

      :currency => 'usd',

      :trial_plan => null

      :id => SecureRandom.uuid # This ensures that the plan is unique in stripe

    )

    #Save the response to your DB

    flash[:notice] = "Plan successfully created"

    redirect_to '/subscription'

  end

end
Here, we use Stripe’s client to create a plan for us. The parameters include the amount, interval, currency, and name of the plan. Stripe will save the amount in cents, so make sure to multiply the user’s input by 100. If you wish to offer a trial period before actually charging the customer, send a trial_plan along with the request. Remember, these plans cannot be modified, so if you need to edit the amount or trial period, create a new plan.
Once the plan is created in Stripe, it will return a plan object:
{

  interval: "month"

  name: "Pro"

  created: 1429342808

  amount: 1500

  currency: "usd"

  id: fb2488b5-5e83-49b5-9071-781ca04489c4

  object: "plan"

  livemode: false

  interval_count: 1

  trial_period_days: null

  metadata:

  statement_descriptor: null

}
Ideally, you should save this into the database to avoid unecessary roundtrips with Stripe. But for this article, we’re a going to bypass that and fetch the plans directly.
Building a Pricing Page
We can use the plan module in Stripe to retrieve all the plans:
#controllers/subscription_controller.rb

#......

def plans

  @stripe_list = Stripe::Plan.all

  @plans = @stripe_list[:data]

end

#......
and in your views:
.plan-container

  %ul

    - @plans.each do |plan|

      %li.plan

        .header

          =plan[:name]

        .price

          =(plan[:amount]/100)

        = form_tag('/subscription_checkout', {method: :post, plan: plan}) do

          %input{type: "hidden", name: "plan_id", value: plan[:id]}

          %script{src: "https://checkout.stripe.com/checkout.js",

                  class: "stripe-button",

                  'data-key'=> "#{Rails.configuration.stripe[:publishable_key]}",

                  'data-amount'=> (plan[:amount]),

                  'data-email' => "customer@example.com",

                  'data-currency' => plan[:currency],

                  'data-image' => '/assets/sitepoint.png'}
and in the routes:
post 'subscription_checkout' => 'subscription#subscription_checkout'
As we discussed earlier, Stripe does not charge the card at this point. It sends the customer data with the stripeToken to our endpoint.
#controllers/subscription_controller.rb

#......

def plans

  @stripe_list = Stripe::Plan.all

  @plans = @stripe_list[:data]

end
# This is the callback from stripe

def subscription_checkout

  plan_id = params[:plan_id]

  plan = Stripe::Plan.retrieve(plan_id)

  #This should be created on signup.

  customer = Stripe::Customer.create(

          :description => "Customer for test@example.com",

          :source => params[:stripeToken],

          :email => "test@example.com"

        )

  # Save this in your DB and associate with the user;s email

  stripe_subscription = customer.subscriptions.create(:plan => plan.id)
  flash[:notice] = "Successfully created a charge"

  redirect_to '/plans'

end
#......
Stripe subscriptions are usually associated with a customer, so it can charge them recursively. Stripe::Customer is the equivalant of our User model. It’s a normal practice, especially if you run a subscription service, to create a Customer with Stripe right at signup and associate it with the user. But for brevity sake we’re creating a customer at the time of subscription.
Web Hooks
While Stripe will automatically take care of the billing, it happens asyncronously and our app won’t know whether the charge succeded or not. In the case of recursive payments, Stripe interacts with our app through webhooks. Let’s see how to setup web hooks in our Rails app.
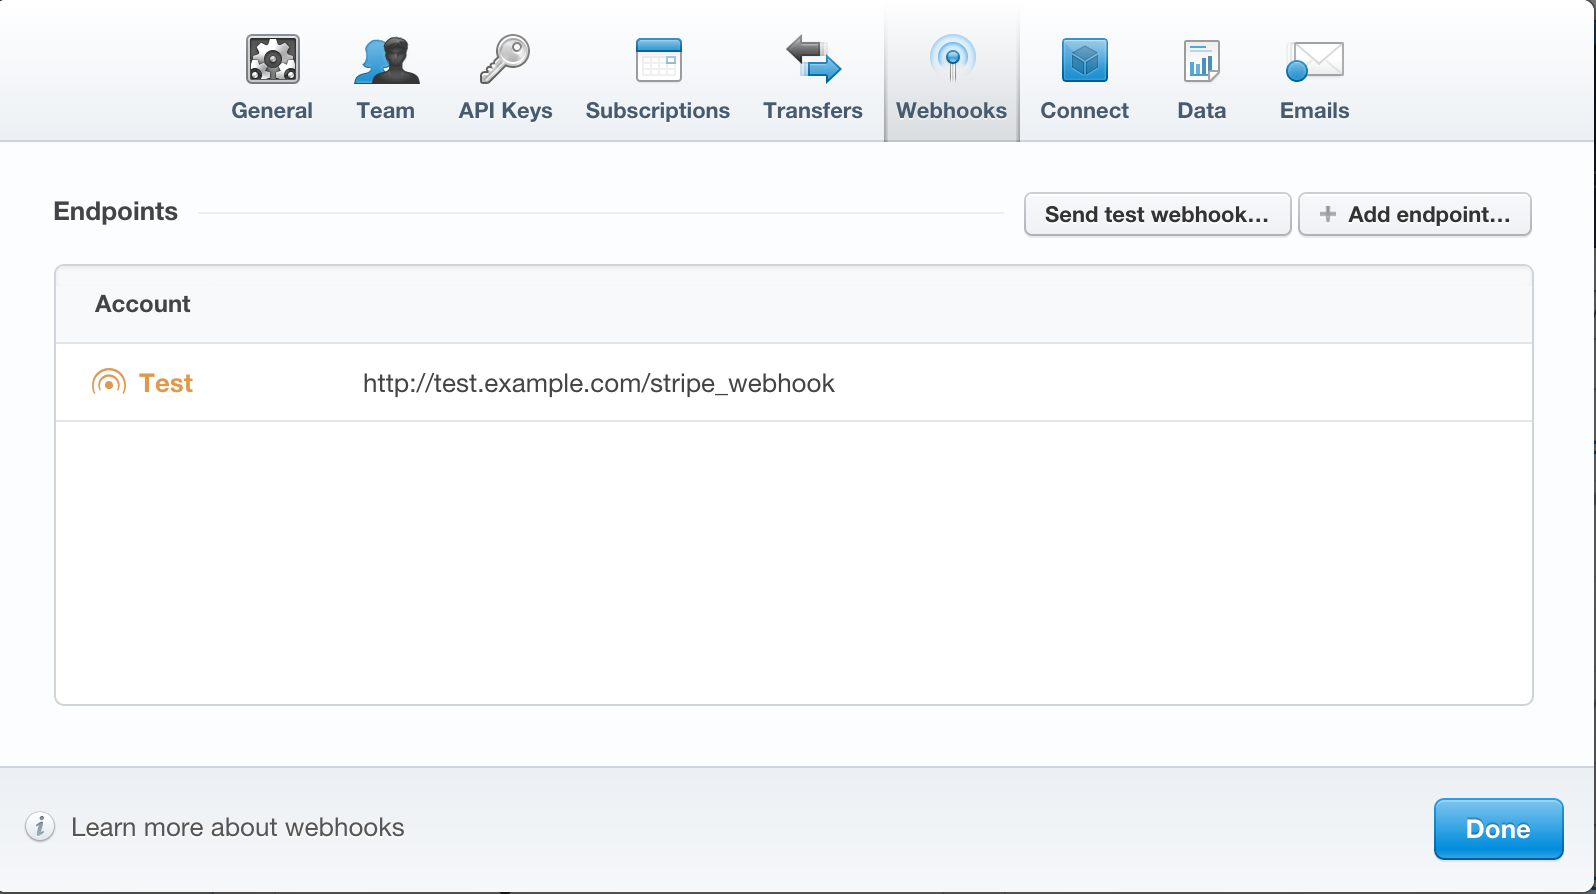
First, open the Stripe dashboard and add this endpoint to the webhook tab:
And add this to your routes.rb:
post 'webhooks' => 'subscriptions#webhooks'
and add this to the controller:
# controllers/subscription_controller.rb

# Method responsbile for handling stripe webhooks

# reference https://stripe.com/docs/webhooks

def webhook

  begin

    event_json = JSON.parse(request.body.read)

    event_object = event_json['data']['object']

    #refer event types here https://stripe.com/docs/api#event_types

    case event_json['type']

      when 'invoice.payment_succeeded'

        handle_success_invoice event_object

      when 'invoice.payment_failed'

        handle_failure_invoice event_object

      when 'charge.failed'

        handle_failure_charge event_object

      when 'customer.subscription.deleted'

      when 'customer.subscription.updated'

    end

  rescue Exception => ex

    render :json => {:status => 422, :error => "Webhook call failed"}

    return

  end

  render :json => {:status => 200}

end
Stripe is now ready to broadcast events to our Rails app. The above code receives the Stripe event and orchestrates it to the right methods. You can see each specific event type here.
NOTE: In production, you probably want to mask this endpoint with a random hash or it might be easy for a third party to mimic Stripe’s events to get unauthorized access to your app.
Wrapping Up
Stripe is a wonderful tool. It saves developer time and helps businesses focus on their core competence. Feel free to add our Stripe expereinces in the comments.
All the code snippets used in this article is available on Github.
Frequently Asked Questions (FAQs) about Stripe Subscriptions with Rails
How Can I Integrate Stripe Subscriptions with Rails for Recurring Payments?
Integrating Stripe subscriptions with Rails for recurring payments involves several steps. First, you need to set up Stripe and create a new Rails application. Then, you need to configure Stripe in your Rails application by adding the Stripe gem to your Gemfile and setting up your Stripe API keys. After that, you need to create a subscription model and controller, and set up routes for your subscription actions. Finally, you need to create views for your subscription actions and handle Stripe webhook events.
What Are the Benefits of Using Stripe Subscriptions with Rails?
Using Stripe subscriptions with Rails offers several benefits. First, it allows you to easily manage recurring payments for your online business. Second, it provides a secure and reliable payment processing solution. Third, it offers a flexible and customizable subscription model that can be tailored to your business needs. Fourth, it integrates seamlessly with Rails, making it easy to implement in your application.
How Can I Handle Stripe Webhook Events in Rails?
Handling Stripe webhook events in Rails involves creating a webhook endpoint in your Rails application that Stripe can send events to. You can then use the Stripe event data to update your application state accordingly. For example, if a subscription is cancelled, you can update your subscription model to reflect this change.
How Can I Test Stripe Subscriptions in Rails?
You can test Stripe subscriptions in Rails by using Stripe’s test mode and test cards. This allows you to simulate different subscription scenarios and ensure that your application handles them correctly. You can also use Rails testing tools like RSpec and Capybara to write automated tests for your subscription functionality.
How Can I Customize Stripe Subscriptions in Rails?
You can customize Stripe subscriptions in Rails by modifying your subscription model and views. For example, you can add additional fields to your subscription model to store custom subscription data. You can also customize your subscription views to provide a unique user experience.
How Can I Handle Subscription Renewals with Stripe and Rails?
Subscription renewals with Stripe and Rails are handled automatically by Stripe. When a subscription is due for renewal, Stripe will attempt to charge the customer’s card. If the charge is successful, the subscription will be renewed. If the charge fails, Stripe will send a webhook event to your application, which you can handle to update your subscription model and notify the customer.
How Can I Manage Multiple Subscriptions with Stripe and Rails?
You can manage multiple subscriptions with Stripe and Rails by creating multiple subscription models in your Rails application. Each subscription model can represent a different subscription plan. You can then use Stripe’s API to create and manage subscriptions for each plan.
How Can I Handle Failed Payments with Stripe and Rails?
You can handle failed payments with Stripe and Rails by listening for the invoice.payment_failed webhook event. When this event is received, you can update your subscription model to reflect the failed payment and notify the customer.
How Can I Offer Free Trials with Stripe Subscriptions in Rails?
You can offer free trials with Stripe subscriptions in Rails by setting the trial_period_days attribute when creating a subscription. This will start the subscription immediately, but the customer won’t be charged until the trial period is over.
How Can I Cancel Stripe Subscriptions in Rails?
You can cancel Stripe subscriptions in Rails by calling the cancel method on a subscription object. This will cancel the subscription at the end of the current billing period. If you want to cancel the subscription immediately, you can use the cancel_now method.

