

Key Takeaways
- Storing data locally in a Cordova app can be achieved using HTML5 storage combined with other mechanisms provided by plugins such as Web Storage API, Web SQL Database, IndexedDB, Cordova File Plugin, and Cordova SQLite Plugin.
- The Web Storage API allows for the storage of key/value pairs as local and/or session storage, which is easier to read and write data to, though it has a limited storage capacity.
- The Cordova SQLite plugin allows the Cordova app to access the underlying native SQLite database by providing an API identical to the Web SQL API, with no quota limit and the ability to sync data to iCloud on iOS.
- A simple note-taking app can be created using HTML5 Web Storage and the Cordova SQLite Plugin, demonstrating how to add, delete, update, and clear local storage.
- SQLite is used in Cordova applications to store data locally, particularly useful for offline functionality or when the app needs to store a large amount of data. It is stored in the device’s file system and Cordova has a built-in SQLite plugin for CRUD operations.
Storing Data Locally in a Cordova App
Most mobile apps will need to store data locally and HTML5 introduced new options for storing data locally. To store data locally in an Cordova app we can use HTML5 storage combined with other mechanisms provided by plugins.
In this tutorial, I will introduce different ways of storing data locally and we will see how to use HTML5 Web Storage with the Cordova SQLite Plugin by creating a simple note taking app.
Different Ways to Store Data Locally
Let’s get straight into the different ways to store data locally:
Web Storage
The Web Storage API let’s us store key/value pairs as local and/or session storage. Local storage is persistent whereas session storage gets deleted when the app quits. Web storage can store 2-10 MB of data, the exact quota limit depends on the platform.
You cannot store a lot of data in web storage but it’s easier to read and write data to it.
For example: If your app consists of multiple HTML files, you can use web storage to pass small amounts of data between them.
Web SQL Database
The Web SQL API stores and queries data using SQL. You can store 50-200 MB of data in Web SQL Database, the exact quota limit depends on the platform. Once the limit is reached the WebView asks the user to grant permission to use more local space. This API is not supported by all platforms but you can use WebSQL Cordova Plugin to polyfill it.
IndexedDB
IndexedDB provides APIs to store and retrieve data in the form of objects, again the exact quota limit depends on the platform. Once the limit is reached, the WebView asks the user to grant permission to use more local space. This API is not supported by all platforms but you can use the IndexedDB Cordova Plugin to polyfill it.
Cordova File Plugin
This Cordova plugin implements the HTML5 Filesystem APIs for reading and writing data to files, so use this plugin if you want to store binary objects.
Cordova SQLite Plugin
This Cordova plugin lets the Cordova app access the underlying native SQLite database by providing an API identical to the Web SQL API. It has no quota limit and can sync the data to iCloud on iOS.
For most cases you will only need the Web Storage API and SQLite plugin.
Note: To store images locally you don’t have to use a file plugin. Some developers use the Base64 encoding schema to store images in SQLite. But for video, audio and other large files, encoding and decoding consumes a lot of time and memory therefore it’s recommended to store them in files and use the file URL to display them.
Overview of Web Storage
Although you might be familiar with web storage APIs, they’re worth revisiting.
How is how to add, delete, update and clear local storage:
if(localStorage != undefined)
{
  console.log("Local Storage is supported");

  //add
  localStorage.setItem("Website", "SitePoint");

  //update or overwrite
  localStorage.setItem("Website", "SitePoint.com");

  //remove
  localStorage.removeItem("Website");

  //remove all
  localStorage.clear();
}
else
{
  console.log("No support");
}
How is how to add, delete, update and clear session storage:
if(sessionStorage != undefined)
{
  console.log("session Storage is supported");

  //add
  sessionStorage.setItem("Website", "SitePoint");

  //update or overwrite
  sessionStorage.setItem("Website", "SitePoint.com");

  //remove
  sessionStorage.removeItem("Website");

  //remove all
  sessionStorage.clear();
}
else
{
  console.log("No support");
}
The Cordova SQLite Plugin
SQLite is an embedded DBMS based on the SQL language. A SQLite database with full API is provided by iOS, Android and Windows Phone.
The SQLite Cordova plugin provides a simple API to create databases and run queries on SQLite. This plugin exposes an API similar to the Web SQL API. You need to be familiar with SQL (Such as MySQL) to write queries.
Here is how to create a database and run SQL queries on the database.
// Wait for plugin to load
document.addEventListener("deviceready", onDeviceReady, false);

// Cordova is ready
function onDeviceReady()
{
    var db = window.sqlitePlugin.openDatabase({name: "demo.db"});

    db.transaction(function(tx) {

        //create table
        tx.executeSql("CREATE TABLE IF NOT EXISTS demo (id integer primary key, data text, data_num integer)", [], function(tx, res){

            //insert data
            tx.executeSql("INSERT INTO demo (id, data, data_num) VALUES (?,?,?)", [1, "test", 100], function(tx,res){

                //retrieve data
                tx.executeSql("SELECT * FROM demo WHERE id = ?", [1], function(tx, res){
                    for(var iii = 0; iii < res.rows.length; iii++)
                    {
                        alert(res.rows.item(iii).id);
                        alert(res.rows.item(iii).data);
                        alert(res.rows.item(iii).data_num);
                    }
                })

            });

        });

    }, function(err){

        //errors for all transactions are reported here
        alert("Error: " + err.message)

    });
}
Here we first create the database, then call the transaction method of the database object with a callback. Inside the callback we run the SQL queries. The queries are executed using the executeSql function which returns the response asynchronously.
If any of the queries fail, then the second callback passed to the transaction method is invoked. Callback of the executeSql will not be fired if the query fails.
To delete a database, use this code:
//delete database
window.sqlitePlugin.deleteDatabase({name: "demo.db"}, function(){
    alert("Successfully deleted database");
}, function(){
    alert("Error while delete database");
});
Creating a Note Taking App
Let’s get started with building a note taking app. This app will let users add and view notes.
You can find the final project on GitHub.
Starting
I won’t cover installing and creating a Cordova Application, if you haven’t done this before, read the getting started guide. Instructions to run and build the application are available on the same page.
Give the application an appropriate name and add the platforms you want to support. I am using Cordova’s Device plugin and SQLite third-party plugin in this tutorial. Run this command inside the Cordova project directory to install them:
cordova plugin add cordova-plugin-device
cordova plugin add cordova-plugin-sqlite
Make sure that the index.html file in the www directory looks like this, changing as relevant:
<!DOCTYPE html>
<html>
    <head>
        <meta name="viewport" content="user-scalable=no, initial-scale=1, maximum-scale=1, minimum-scale=1, width=device-width">
        <title>Note</title>

        <link rel="stylesheet" href="https://code.jquery.com/mobile/1.4.5/jquery.mobile-1.4.5.min.css">

    </head>
    <body>

        <!-- put jQuery mobile pages here -->

        <script type="text/javascript" src="cordova.js"></script>
        <script src="https://code.jquery.com/jquery-2.1.4.min.js"></script>
        <script src="https://code.jquery.com/mobile/1.4.5/jquery.mobile-1.4.5.min.js"></script>
        <script type="text/javascript">
            //put JS code here
        </script>
    </body>
</html>
I added jQuery and jQuery Mobile from CDNs. You can embed these files locally so that the app works without an Internet connection.
Initialize App
When the app loads we need to create the database object and check if the table to store data exists or not. If the table doesn’t exist then we need to create it.
Here is the code to initialize the app. Place this code in the script tag of the index.html page:
var db = null;

document.addEventListener("deviceready", function(){
    db = window.sqlitePlugin.openDatabase({name: "note.db"});
    db.transaction(function(tx) {
        tx.executeSql("CREATE TABLE IF NOT EXISTS note (name text primary key, data text)");
    }, function(err){
        alert("An error occurred while initializing the app");
    });
}, false);
Here we create a table with two columns, name and data. Every note will have a unique name to identify it.
Creating the Home Screen
Let’s create a home screen which will display when the app loads. On the home screen will be two buttons for adding and displaying notes.
Place this code in the body tag of the index.html page:
<div data-role="page" id="home">
    <div data-role="header">
        <h1>Home</h1>
    </div>

    <div data-role="main" class="ui-content">
        <p>
            <a target="_blank" href="#add" style="text-decoration: none"><button>Add Note</button></a>
            <a target="_blank" href="#display" style="text-decoration: none"><button>Display Notes</button></a>
        </p>
    </div>
</div>
Here is how the page now looks:

Adding a Note
When the user clicks on the Add Note button we need to display another page with two fields, a field to enter the note name and another to enter the note data.
Place this code in the body tag of the index.html page:
<div data-role="page" id="add">
    <div data-role="header">
        <a target="_blank" href="#home" class="ui-btn ui-icon-home ui-btn-icon-left">Home</a>
        <h1>ADD</h1>
      </div>

      <div data-role="main" class="ui-content">
        <input type="text" id="name" placeholder="Enter Name" />
        <textarea id="note-text" placeholder="Place text here"></textarea>
        <a target="_blank" href="javascript:add()" style="text-decoration: none"><button>Add Note</button></a>
      </div>
</div>
When the user clicks the Add Note button, the add() function is invoked which stores the data in the table.
Place this code in the script tag of index.html page:
function add()
{
var name = document.getElementById("name").value;
var text = document.getElementById("note-text").value;
if(name == "")
{
alert("Please enter name");
return;
}
if(text == "")
{
alert("Please enter text");
return;
}
db.transaction(function(tx) {
tx.executeSql("INSERT INTO note (name, data) VALUES (?,?)", [name, text], function(tx,res){
alert("Note Added");
});
}, function(err){
alert("An error occured while saving the note");
});
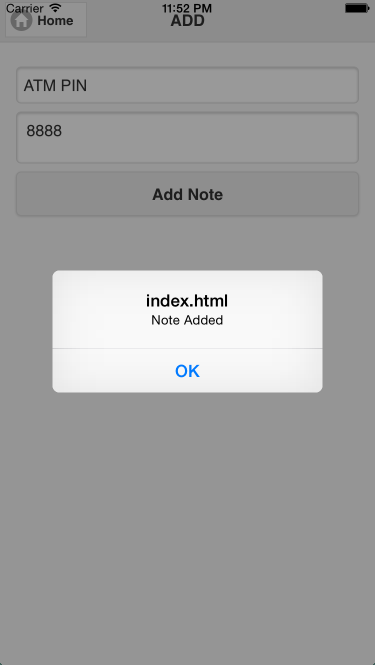
}Here we make sure that the input fields are not empty and then add a row to the table.
Here is how the page looks now:
Displaying the Notes List
On the home page we have a button called Display Notes. When the user clicks the button we need to change to a page which displays all the notes.
Place this code in the body tag of the index.html page:
<div data-role="page" id="display">
    <div data-role="header">
        <a target="_blank" href="#home" class="ui-btn ui-icon-home ui-btn-icon-left">Home</a>
        <h1>NOTES</h1>
      </div>

      <div data-role="main" class="ui-content">
        <ul id="data-list">
        </ul>
      </div>
</div>
Next we need to retrieve all the notes from the database and populate this page. Place this code in the script tag of index.html page:
$(document).on("pagebeforeshow", "#display", function(){
    db.transaction(function(tx) {
        tx.executeSql("SELECT (name) FROM note", [], function(tx,res){
            for(var iii = 0; iii < res.rows.length; iii++)
            {
                document.getElementById("data-list").innerHTML = document.getElementById("data-list").innerHTML + "<li><a href='javascript:displayNote(\"" + res.rows.item(iii).name + "\")'>" + res.rows.item(iii).name + "</a></li>";
            }
        });
    }, function(err){
        alert("An error occured while displaying saved notes");
    });
});
We only return the name column as that is all we are displaying. Then we populate the content area with a list of names.
Here is how the page looks now:

Displaying a Single Note
When a user clicks on a note in the notes list we need to display the complete data of the note.
To do this, we need another page. Place this code in the body tag of the index.html page:
<div data-role="page" id="single-note">
    <div data-role="header">
        <a target="_blank" href="#display" class="ui-btn ui-icon-home ui-btn-icon-left">All</a>
        <h1 id="note-title"></h1>
      </div>

      <div data-role="main" class="ui-content">
        <p id="note-data"></p>
      </div>
</div>
To populate the name and data fields we invoke a function which retrieves all the data about the note from the database when a user clicks on a note.
Place this code in the script tag of index.html page:
function displayNote(name)
{
    db.transaction(function(tx) {
        tx.executeSql("SELECT * FROM note WHERE name = ?", [name], function(tx,res){
            var name = res.rows.item(0).name;
            var data = res.rows.item(0).data;

               document.getElementById("note-title").innerHTML = name;
               document.getElementById("note-data").innerHTML = data;

               $.mobile.changePage("#single-note");
        });
    }, function(err){
        alert(err.message);
        alert("An error occured while displaying the note");
    });
}
Here is how a single note looks:

Conclusion
The app is functional and can be deployed to iOS, Android and Windows Phone, but is basic. The next steps to create a full app would be letting users edit and delete notes.
This tutorial demonstrated the SQLite plugin and Web Storage, but selecting a storage mechanism for an app is a complex decision to make. What other options have you tried and how did they work for you?
Frequently Asked Questions (FAQs) about Storing Local Data in a Cordova App
What is the significance of SQLite in Cordova applications?
SQLite is a software library that provides a relational database management system. In the context of Cordova applications, SQLite is used to store data locally. This is particularly useful in scenarios where the app needs to function offline or when the app needs to store a large amount of data. SQLite databases are stored in the device’s file system, and Cordova has built-in SQLite plugin which makes it easier to perform CRUD operations.
How can I install the SQLite storage plugin in my Cordova project?
To install the SQLite storage plugin in your Cordova project, you need to use the Cordova command line interface. The command to install the plugin is cordova plugin add cordova-sqlite-storage. After running this command, the plugin will be added to your project, and you can start using it to store data locally.
How can I create a database in my Cordova application?
Creating a database in a Cordova application involves calling the openDatabase function and passing the name of the database, the version, a description, and the size. This function will create the database if it doesn’t exist or open it if it does. Here’s an example of how to create a database:var db = window.sqlitePlugin.openDatabase({name: 'my.db', location: 'default'});
How can I perform CRUD operations in my Cordova application?
CRUD operations in a Cordova application involve executing SQL queries on the database. You can use the executeSql function to run these queries. Here’s an example of how to insert data into a table:db.transaction(function(tx) {
tx.executeSql('INSERT INTO myTable VALUES (?,?)', ['Alice', 'Bob']);}, function(error) {
console.log('Transaction ERROR: ' + error.message);}, function() {
console.log('Populated database OK');});
How can I handle errors when working with SQLite in Cordova?
When working with SQLite in Cordova, you can handle errors by providing an error callback function to the transaction function. This function will be called if an error occurs when executing the SQL queries. Here’s an example of how to handle errors:db.transaction(function(tx) {
tx.executeSql('INSERT INTO myTable VALUES (?,?)', ['Alice', 'Bob']);}, function(error) {
console.log('Transaction ERROR: ' + error.message);});
How can I ensure data consistency when performing multiple operations?
To ensure data consistency when performing multiple operations, you can use transactions. A transaction is a set of operations that are executed as a single unit. If any operation within the transaction fails, the entire transaction is rolled back, and none of the operations are applied. This ensures that your database remains in a consistent state.
How can I search for data in my SQLite database?
To search for data in your SQLite database, you can use the SELECT SQL query. You can use the WHERE clause to specify the conditions that the data must meet. Here’s an example of how to search for data:db.transaction(function(tx) {
tx.executeSql('SELECT * FROM myTable WHERE name = ?', ['Alice'], function(tx, rs) {
console.log('Record found: ' + rs.rows.item(0).name);
}, function(tx, error) {
console.log('SELECT error: ' + error.message);
});});
How can I update data in my SQLite database?
To update data in your SQLite database, you can use the UPDATE SQL query. You can use the WHERE clause to specify the conditions that the data must meet. Here’s an example of how to update data:db.transaction(function(tx) {
tx.executeSql('UPDATE myTable SET name = ? WHERE name = ?', ['Bob', 'Alice']);}, function(error) {
console.log('Transaction ERROR: ' + error.message);}, function() {
console.log('Updated row');});
How can I delete data from my SQLite database?
To delete data from your SQLite database, you can use the DELETE SQL query. You can use the WHERE clause to specify the conditions that the data must meet. Here’s an example of how to delete data:db.transaction(function(tx) {
tx.executeSql('DELETE FROM myTable WHERE name = ?', ['Alice']);}, function(error) {
console.log('Transaction ERROR: ' + error.message);}, function() {
console.log('Deleted row');});
How can I ensure that my SQLite database is secure?
To ensure that your SQLite database is secure, you should encrypt your database. You can use the SQLCipher plugin to encrypt your SQLite database. This plugin provides transparent 256-bit AES encryption of database files.