

This article is part of a series on building a sample application — a multi-image gallery blog — for performance benchmarking and optimizations. (View the repo here.)
Let’s continue optimizing our app. We’re starting with on-the-fly thumbnail generation that takes 28 seconds per request, depending on the platform running your demo app (in my case it was a slow filesystem integration between host OS and Vagrant), and bring it down to a pretty acceptable 0.7 seconds.

Admittedly, this 28 seconds should only happen on initial load. After the tuning, we were able to achieve production-ready times:

Key Takeaways
- Server-side optimization can significantly improve the performance of an application, as demonstrated by the successful reduction of a multi-image gallery blog’s initial load time from 28 seconds to 0.7 seconds through on-the-fly thumbnail generation.
- PHP-FPM and its Process Manager Setting can be altered to manage the number of processes spawned, with options for dynamic, ondemand and static settings. Static settings, while resource-intensive, can reduce spawning overhead time cost and improve performance by 20%.
- The use of Nginx and fastcgi caching can offer substantial improvements in server performance, reducing the median time per request to 170 milliseconds and the percentage of failed requests from 17% to 0.53%.
- While the static and dynamic content of a website can be significantly improved through Nginx caching, it is important to note that the main bottleneck with an application will not be hardware resources, even if they are modest.
Troubleshooting
It is assumed that you’ve gone through the bootstrapping process and have the app running on your machine — either virtual or real.
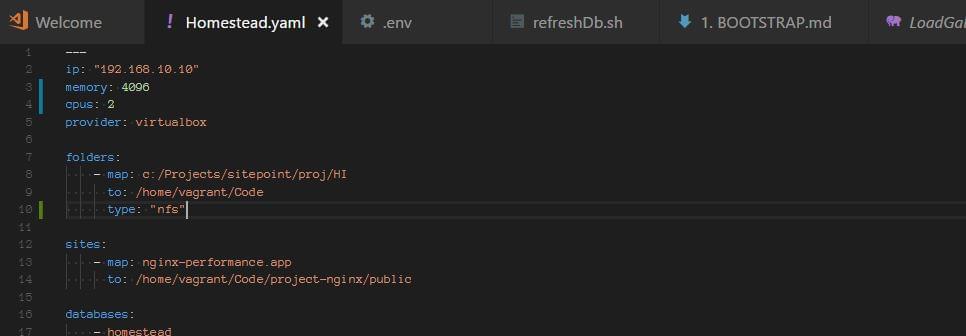
Note: if you’re hosting the Homestead Improved box on a Windows machine, there might be an issue with shared folders. This can be solved by adding type: "nfs" setting to the folder in Homestead.yaml:
You should also run vagrant up from a shell/powershell interface that has administrative privileges if problems persist (right-click, run as administrator).
In one example before doing this, we got 20 to 30 second load times on every request, and couldn’t get a rate faster than one request per second (it was closer to 0.5 per second):
The Process
Let’s go through the testing process. We installed Locust on our host, and created a very simple locustfile.py:
from locust import HttpLocust, TaskSet, task

class UserBehavior(TaskSet):
    @task(1)
    def index(self):
        self.client.get("/")

class WebsiteUser(HttpLocust):
    task_set = UserBehavior
    min_wait = 300
    max_wait = 1000
Then we downloaded ngrok to our guest machine and tunneled all HTTP connections through it, so that we can test our application over a static URL.
Then we started Locust and swarmed our app with 100 parallel users:

Our server stack consisted of PHP 7.1.10, Nginx 1.13.3 and MySQL 5.7.19, on Ubuntu 16.04.
PHP-FPM and its Process Manager Setting
php-fpm spawns its own processes, independent of the web-server process. Management of the number of these processes is configured in /etc/php/7.1/fpm/pool.d/www.conf (7.1 here can be exchanged for the actual PHP version number currently in use).
In this file, we find the pm setting. This setting can be set to dynamic, ondemand and static. Dynamic is maybe the most common wisdom; it allows the server to juggle the number of spawned PHP processes between several settings:
pm = dynamic
; The number of child processes to be created when pm is set to 'static' and the
; maximum number of child processes when pm is set to 'dynamic' or 'ondemand'.
; This value sets the limit on the number of simultaneous requests that will be
; served.
pm.max_children = 6
; The number of child processes created on startup.
; Note: Used only when pm is set to 'dynamic'
; Default Value: min_spare_servers + (max_spare_servers - min_spare_servers) / 2
pm.start_servers = 3
; The desired minimum number of idle server processes
; Note: Used only when pm is set to 'dynamic'
; Note: Mandatory when pm is set to 'dynamic'
pm.min_spare_servers = 2
; The desired maximum number of idle server proceses
; Note: Used only when pm is set to 'dynamic'
; Note: Mandatory when pm is set to 'dynamic'
pm.max_spare_servers = 4
The meanings of these values are self-explanatory, and the spawning of processes is being done on demand, but constrained by these minimum and maximum values.
After fixing the Windows shared-folders issue with nfs, and testing with Locust, we were able to get approximately five requests per second, with around 17–19% failures, with 100 concurrent users. Once it was swarmed with requests, the server slowed down and each request took over ten seconds to finish.
Then we changed the pm setting to ondemand.
Ondemand means that there are no minimum processes: once the requests stop, all the processes will stop. Some advocate this setting, because it means the server won’t be spending any resources in its idle state, but for the dedicated (non-shared) server instances this isn’t necessarily the best. Spawning a process includes an overhead, and what is gained in memory is being lost in time needed to spawn processes on-demand. The settings that are relevant here are:
pm.max_children = 6
; and
pm.process_idle_timeout = 20s;
; The number of seconds after which an idle process will be killed.
; Note: Used only when pm is set to 'ondemand'
; Default Value: 10s
When testing, we increased these settings a bit, having to worry about resources less.
There’s also pm.max_requests, which can be changed, and which designates the number of requests each child process should execute before respawning.
This setting is a tradeoff between speed and stability, where 0 means unlimited.
ondemand didn’t bring much change, except that we noticed more initial waiting time when we started swarming our application with requests, and more initial failures. In other words, there were no big changes: the application was able to serve around four to maximum six requests per second. Waiting time and rate of failures were similar to the dynamic setup.
Then we tried the pm = static setting, allowing our PHP processes to take over the maximum of the server’s resources, short of swapping, or driving the CPU to a halt. This setting means we’re forcing the maximum out of our system at all times. It also means that — within our server’s constraints — there won’t be any spawning overhead time cost.
What we saw was an improvement of 20%. The rate of failed requests was still significant, though, and the response time was still not very good. The system was far from being ready for production.

However, on Pingdom Tools, we got a bearable 3.48 seconds when the system was not under pressure:
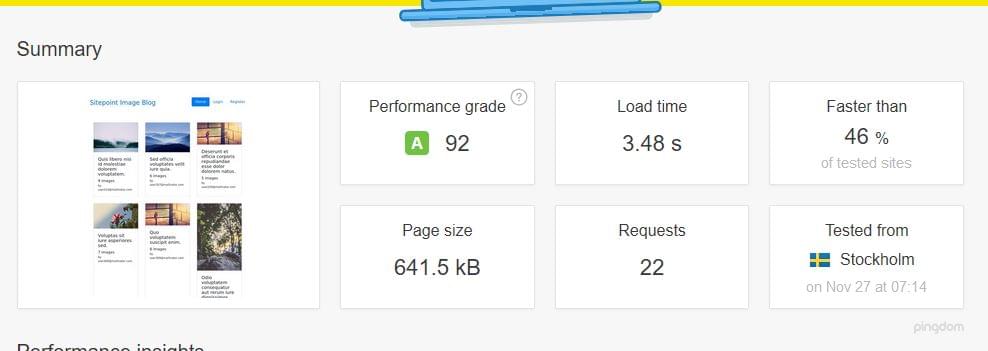
This meant that pm static was an improvement, but in the case of a bigger load, it would still go down.
In one of the previous articles, we explained how Nginx can itself serve as a caching system, both for static and dynamic content. So we reached for the Nginx wizardry, and tried to bring our application to a whole new level of performance.
And we succeeded. Let’s see how.
Nginx and fastcgi Caching
proxy_cache_path /home/vagrant/Code/ng-cache levels=1:2 keys_zone=ng_cache:10m max_size=10g inactive=60m;
proxy_cache_use_stale error timeout http_500 http_502 http_503 http_504;
fastcgi_cache_path /home/vagrant/Code/ngd-cache levels=1:2 keys_zone=ngd_cache:10m inactive=60m;
fastcgi_cache_key "$scheme$request_method$host$request_uri";
fastcgi_cache_use_stale error timeout invalid_header http_500;
fastcgi_ignore_headers Cache-Control Expires Set-Cookie;
add_header NGINX_FASTCGI_CACHE $upstream_cache_status;

server {
    listen 80;
    listen 443 ssl http2;
    server_name nginx-performance.app;
    root "/home/vagrant/Code/project-nginx/public";

    index index.html index.htm index.php;

    charset utf-8;

    proxy_cache ng_cache;

    location / {
        try_files $uri $uri/ /index.php?$query_string;
    }

    location = /favicon.ico { access_log off; log_not_found off; }
    location = /robots.txt  { access_log off; log_not_found off; }

    access_log off;
    error_log  /var/log/nginx/nginx-performance.app-error.log error;

    sendfile off;

    client_max_body_size 100m;

    location ~ \.php$ {
        fastcgi_split_path_info ^(.+\.php)(/.+)$;
        fastcgi_pass unix:/var/run/php/php7.1-fpm.sock;
        fastcgi_index index.php;
        include fastcgi_params;
        fastcgi_param SCRIPT_FILENAME $document_root$fastcgi_script_name;

        fastcgi_intercept_errors off;
        fastcgi_buffer_size 16k;
        fastcgi_buffers 4 16k;
        fastcgi_connect_timeout 300;
        fastcgi_send_timeout 300;
        fastcgi_read_timeout 300;


      fastcgi_cache ngd_cache;
      fastcgi_cache_valid  60m;
    }

    location ~ /\.ht {
        deny all;
    }

    ssl_certificate     /etc/nginx/ssl/nginx-performance.app.crt;
    ssl_certificate_key /etc/nginx/ssl/nginx-performance.app.key;
}
We opened our Nginx virtual host file and added the above settings. Let’s explain them.
proxy_cache_path /home/vagrant/Code/ng-cache levels=1:2 keys_zone=ng_cache:10m max_size=10g inactive=60m;
As explained in Apache vs Nginx Performance: Optimization Techniques, proxy_cache_path is used for caching of static assets — like images, style sheets, JavaScript files. The path itself needs to exist; we need to create those directories. levels designates depth of the directories inside that path/folder. Traversing can be costly for the request time, so it’s good to keep it small. Keys zone is a name; every virtual host can (and should) use a separate one. Max size means maximum size of the cache, and inactive means the time items will be kept in cache even if they aren’t requested.
After that time of inactivity, the cache for a resource will be repopulated.
proxy_cache_use_stale and fastcgi_cache_use_stale are interesting, as they can provide the “always online” feature we can see with CDN providers like Cloudflare: if the back end goes offline, Nginx will serve these resources from cache. This failure-proofs our website to a degree.
All the fastcgi_cache_* settings are for the PHP-generated (dynamic) content, and proxy_cache_* settings are for the static files.
fastcgi_cache_key defines a key for caching.
fastcgi_ignore_headers disables processing some response header fields from the FastCGI backend.
There’s another interesting setting we could have used:
fastcgi_cache_purge
This defines requests which will be able to purge the cache. Nginx (its ngx_http_fastcgi_module) gives us quite the comprehensive toolset for caching. One example of using the above directive would be:
fastcgi_cache_path /data/nginx/cache keys_zone=cache_zone:10m;

map $request_method $purge_method {
    PURGE   1;
    default 0;
}

server {
    ...
    location / {
        fastcgi_pass        backend;
        fastcgi_cache       cache_zone;
        fastcgi_cache_key   $uri;
        fastcgi_cache_purge $purge_method;
    }
}
Here, PURGE REST request would be able to delete things from cache.
It’s also possible to revalidate the cache under some conditions.
In our configuration, we didn’t use all the intricacies and capabilities of Nginx, but it’s good to know they’re there if we need them.
We added Nginx headers to our responses, to be able to tell whether the resource was served from cache or not:
add_header NGINX_FASTCGI_CACHE $upstream_cache_status;
Then, we can inspect and dissect our page load time to see what works and what doesn’t:
To warm up the cache, we’ll need to go through the requests for each of the resources.
fastcgi_cache_methods can be useful for caching specific request methods, like POST. GET and HEAD are cached by default.
There’s also byte-range caching, which can be used for video-streaming optimization, as outlined here.
One could easily design a whole private CDN network with all the configurability that Nginx offers.
Having enabled the above configuration — both for the static and the dynamic content of our website — we started Locust, and swarmed our system with 100 parallel users. The difference in results was nothing short of amazing. The strain the server was under previously could not be felt now.
We can see that the median time per request was 170 milliseconds. That is around a hundredfold improvement. Requests per second were above 100.
We can also see, in the Average Response Time chart, that the initial requests saw spikes in response times, and after that, the response time declined more and more, to around 130ms.
Nginx caching brought us some great improvements. The main bottleneck with this application will not be hardware resources, even if they’re modest.

We can also see that the percentage of failed requests went from 17% to 0.53%.
We then went to Pingdom’s page test and tested our website:

We can see that we managed to bring page load time well below one second!
We also tested the single gallery page, which has additional “baggage” of related, and newest galleries:

We are attaching a HAR file report of this test for analysis.
Conclusion
In this article, some of the points covered in my earlier discussion on Nginx performance were tested, and other settings like process management, and the measure of its impact on page load time were discussed and analyzed.
Did we miss anything worth mentioning? Can you think of other Nginx settings we could apply to this app to improve the performance?
Frequently Asked Questions on Server-Side Optimization with Nginx and PM-Static
What is server-side optimization and why is it important?
Server-side optimization refers to the process of improving the performance of a server to ensure that it runs efficiently and effectively. This involves tweaking various server settings, optimizing code, and implementing various performance-enhancing strategies. The importance of server-side optimization cannot be overstated. It directly impacts the speed and performance of your website or application, which in turn affects user experience, search engine rankings, and ultimately, your bottom line.
How does Nginx contribute to server-side optimization?
Nginx is a powerful open-source web server that can also function as a reverse proxy, load balancer, and HTTP cache. It is known for its high performance, stability, rich feature set, simple configuration, and low resource consumption. Nginx contributes to server-side optimization by efficiently handling requests, reducing the load on your server, and improving the overall performance of your website or application.
What is PM-Static and how does it help in server-side optimization?
PM-Static is a process manager mode in PHP-FPM (FastCGI Process Manager) that is designed for maximum performance. Unlike other modes, PM-Static does not dynamically create or destroy child processes. Instead, it maintains a fixed number of child processes, which can significantly reduce the overhead associated with process creation and destruction. This makes PM-Static an excellent choice for server-side optimization, especially for high-traffic websites and applications.
How can I configure Nginx for optimal performance?
Configuring Nginx for optimal performance involves a number of steps. First, you need to ensure that Nginx is properly installed and running on your server. Next, you need to configure various Nginx settings, such as the number of worker processes, the number of connections per worker, and the types of files that Nginx should cache. You may also need to configure Nginx to use gzip compression, enable HTTP/2, and implement various other performance-enhancing strategies.
How can I tune PHP-FPM using PM-Static for maximum performance?
Tuning PHP-FPM using PM-Static involves configuring various PHP-FPM settings, such as the number of child processes, the maximum number of requests that each child process should handle, and the maximum amount of memory that each child process should use. You may also need to adjust various other PHP-FPM settings, depending on your specific needs and the resources available on your server.
How can I monitor and optimize server-side performance?
Monitoring and optimizing server-side performance involves using various tools and techniques to track server metrics, identify performance bottlenecks, and implement performance-enhancing strategies. This may include using server monitoring tools, analyzing server logs, implementing a content delivery network (CDN), optimizing database queries, and more.
What are some common challenges in server-side optimization and how can I overcome them?
Some common challenges in server-side optimization include dealing with high traffic volumes, managing server resources efficiently, and ensuring that your server is secure. Overcoming these challenges involves implementing various strategies, such as using a load balancer to distribute traffic, optimizing your code to reduce resource consumption, and implementing various security measures to protect your server.
How does server-side optimization impact SEO?
Server-side optimization can have a significant impact on SEO. A fast, efficient server can deliver web pages more quickly, which can improve user experience and increase the likelihood that users will stay on your site, engage with your content, and convert. Additionally, search engines like Google consider page load time as a ranking factor, so a well-optimized server can help improve your search engine rankings.
Can server-side optimization help reduce server costs?
Yes, server-side optimization can help reduce server costs. By optimizing your server, you can ensure that it runs more efficiently, which can reduce the amount of resources it consumes. This can help you save money on hosting costs, especially if you’re using a cloud hosting provider that charges based on resource usage.
What are some best practices for server-side optimization?
Some best practices for server-side optimization include regularly monitoring your server performance, keeping your server software up to date, optimizing your code, implementing a content delivery network (CDN), using a load balancer to distribute traffic, and implementing various security measures to protect your server.