


Key Takeaways
- Apache and Nginx are both capable web servers with distinct performance characteristics; Apache uses a process-driven model while Nginx benefits from an event-driven architecture, making it more efficient for handling multiple simultaneous connections.
- Essential optimization for Apache includes tuning the Multi-Processing Modules (MPM) like prefork, worker, and event to handle connections more efficiently, and disabling .htaccess where possible to reduce filesystem performance overhead.
- For Nginx, key performance enhancements involve setting the correct number of worker processes and connections, utilizing keepalive connections to reduce TCP overhead, and implementing caching strategies to serve content more rapidly.
- Both servers can be further optimized by adjusting server hardware configurations, such as increasing RAM and using SSDs, to accommodate the demands of web service processes.
- Using Apache and Nginx in tandem in a reverse proxy setup can leverage the strengths of both servers, with Nginx handling static content and load balancing while Apache processes dynamic content.
- Continuous monitoring and testing with tools like htop, New Relic, and specific load-testing software are crucial to identify bottlenecks and optimize server performance effectively.
Some years ago, the Apache Foundation’s web server, known simply as “Apache”, was so ubiquitous that it became synonymous with the term “web server”. Its daemon process on Linux systems has the name httpd (meaning simply http process) — and comes preinstalled in major Linux distributions.
It was initially released in 1995, and, to quote Wikipedia, “it played a key role in the initial growth of the World Wide Web”. It is still the most-used web server software according to W3techs. However, according to those reports which show some trends of the last decade and comparisons to other solutions, its market share is decreasing. The reports given by Netcraft and Builtwith differ a bit, but all agree on a trending decline of Apache’s market share and the growth of Nginx.
Nginx — pronounced engine x — was released in 2004 by Igor Sysoev, with the explicit intent to outperform Apache. Nginx’s website has an article worth reading which compares these two technologies. At first, it was mostly used as a supplement to Apache, mostly for serving static files, but it has been steadily growing, as it has been evolving to deal with the full spectrum of web server tasks.
It is often used as a reverse proxy, load balancer, and for HTTP caching. CDNs and video streaming providers use it to build their content delivery systems where performance is critical.
Apache has been around for a long time, and it has a big choice of modules. Managing Apache servers is known to be user-friendly. Dynamic module loading allows for different modules to be compiled and added to the Apache stack without recompiling the main server binary. Oftentimes, modules will be in Linux distro repositories, and after installing them through system package managers, they can be gracefully added to the stack with commands like a2enmod. This kind of flexibility has yet to be seen with Nginx. When we look at a guide for setting up Nginx for HTTP/2, modules are something Nginx needs to be built with — configured for at build-time.
One other feature that has contributed to Apache’s market rule is the .htaccess file. It is Apache’s silver bullet, which made it a go-to solution for the shared hosting environments, as it allows controlling the server configuration on a directory level. Every directory on a server served by Apache can have its own .htaccess file.
Nginx not only has no equivalent solution, but discourages such usage due to performance hits.
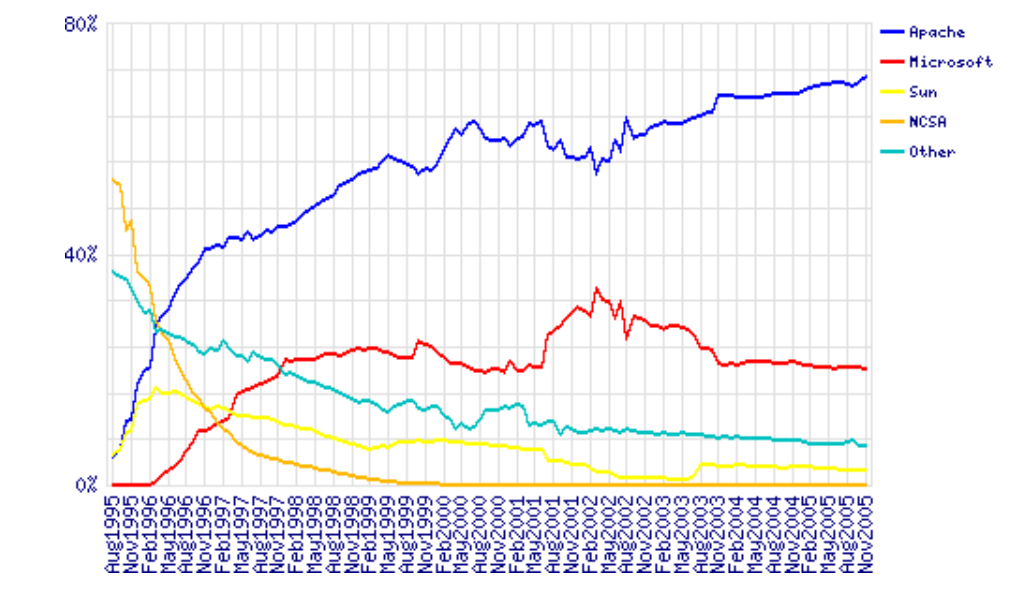
Server vendors market share 1995–2005. Data by Netcraft
LiteSpeed, or LSWS, is one server contender that has a level of flexibility that can compare to Apache, while not sacrificing performance. It supports Apache-style .htaccess, mod_security and mod_rewrite, and it’s worth considering for shared setups. It was planned as a drop-in replacement for Apache, and it works with cPanel and Plesk. It’s been supporting HTTP/2 since 2015.
LiteSpeed has three license tiers, OpenLiteSpeed, LSWS Standard and LSWS Enterprise. Standard and Enterprise come with an optional caching solution comparable to Varnish, LSCache, which is built into the server itself, and can be controlled, with rewrite rules, in .htaccess files (per directory). It also comes with some DDOS-mitigating “batteries” built in. This, along with its event-driven architecture, makes it a solid contender, targeting primarily performance-oriented hosting providers, but it could be worth setting up even for smaller servers or websites.
Hardware Considerations
When optimizing our system, we cannot emphasize enough giving due attention to our hardware setup. Whichever of these solutions we choose for our setup, having enough RAM is critical. When a web server process, or an interpreter like PHP, don’t have enough RAM, they start swapping, and swapping effectively means using the hard disk to supplement RAM memory. The effect of this is increased latency every time this memory is accessed. This takes us to the second point — the hard disk space. Using fast SSD storage is another critical factor of our website speed. We also need to mind the CPU availability, and the physical distance of our server’s data centers to our intended audience.
To dive in deeper into the hardware side of performance tuning, Dropbox has a good article.
Monitoring
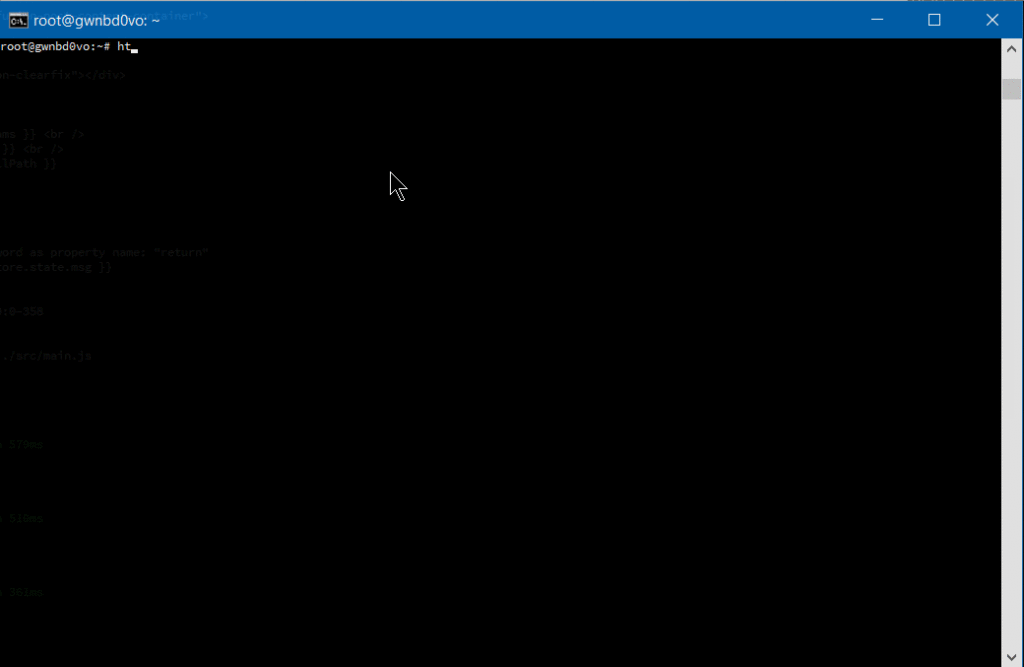
One practical way to monitor our current server stack performance, per process in detail, is htop, which works on Linux, Unix and macOS, and gives us a colored overview of our processes.
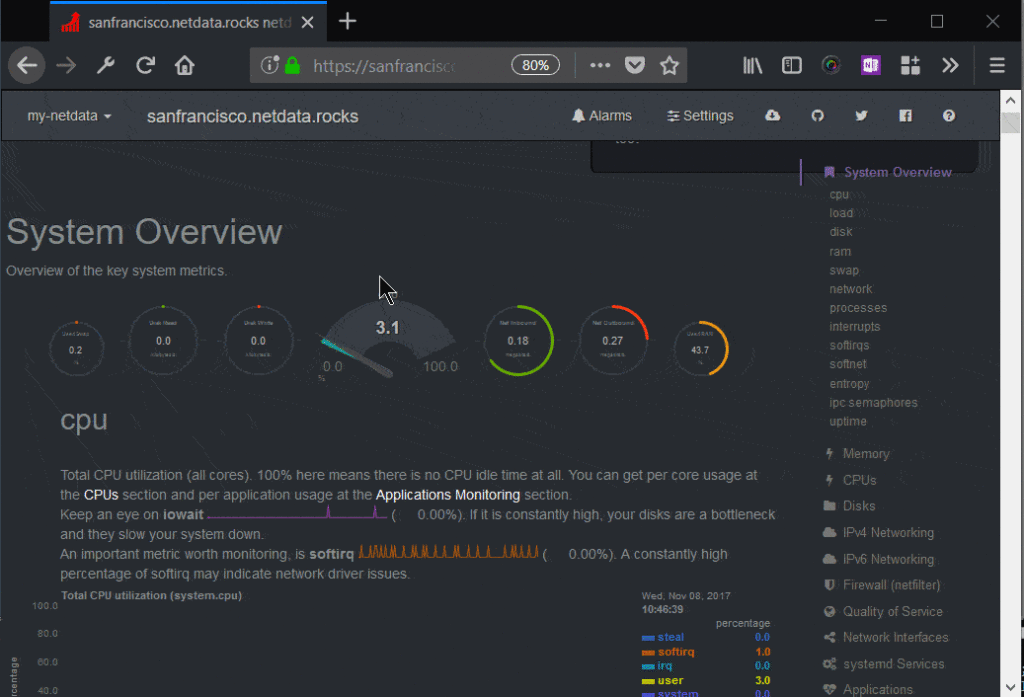
Other monitoring tools are New Relic, a premium solution with a comprehensive set of tools, and Netdata, an open-source solution which offers great extensibility, fine-grained metrics and a customizable web dashboard, suitable for both little VPS systems and monitoring a network of servers. It can send alarms for any application or system process via email, Slack, pushbullet, Telegram, Twilio etc.
Monit is another, headless, open-source tool which can monitor the system, and can be configured to alert us, or restart certain processes, or reboot the system when some conditions are met.
Testing the System
AB — Apache Benchmark — is a simple load-testing tool by Apache Foundation, and Siege is another load-testing program. This article explains how to set them both up, and here we have some more advanced tips for AB, while an in-depth look at Siege can be found here.
If you prefer a web interface, there is Locust, a Python-based tool that comes in very handy for testing website performance.
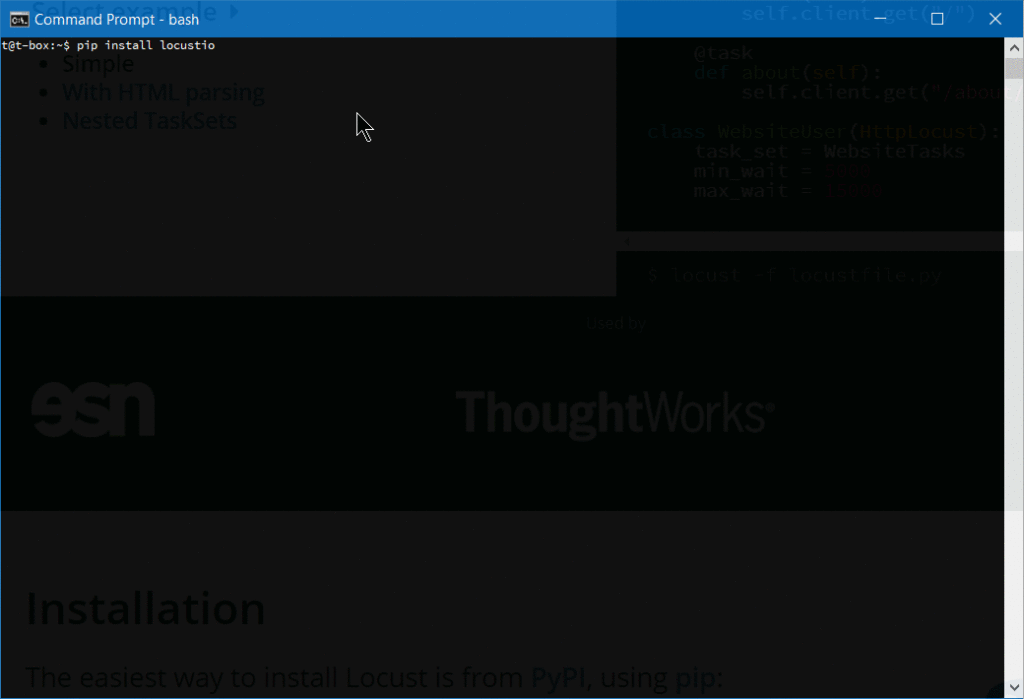
After we install Locust, we need to create a locustfile in the directory from which we will launch it:
from locust import HttpLocust, TaskSet, task

class UserBehavior(TaskSet):
    @task(1)
    def index(self):
        self.client.get("/")

    @task(2)
    def shop(self):
        self.client.get("/?page_id=5")

    @task(3)
    def page(self):
        self.client.get("/?page_id=2")

class WebsiteUser(HttpLocust):
    task_set = UserBehavior
    min_wait = 300
    max_wait = 3000
Then we simply launch it from the command line:
locust --host=https://my-website.com
One warning with these load-testing tools: they have the effect of a DDoS attack, so it’s recommended you limit testing to your own websites.
Tuning Apache
Apache’s mpm modules
Apache dates to 1995 and the early days of the internet, when an accepted way for servers to operate was to spawn a new process on each incoming TCP connection and to reply to it. If more connections came in, more worker processes were created to handle them. The costs of spawning new processes were high, and Apache developers devised a prefork mode, with a pre-spawned number of processes. Embedded dynamic language interpreters within each process (like mod_php) were still costly, and server crashes with Apache’s default setups became common. Each process was only able to handle a single incoming connection.
This model is known as mpm_prefork_module within Apache’s MPM (Multi-Processing Module) system. According to Apache’s website, this mode requires little configuration, because it is self-regulating, and most important is that the MaxRequestWorkers directive be big enough to handle as many simultaneous requests as you expect to receive, but small enough to ensure there’s enough physical RAM for all processes.
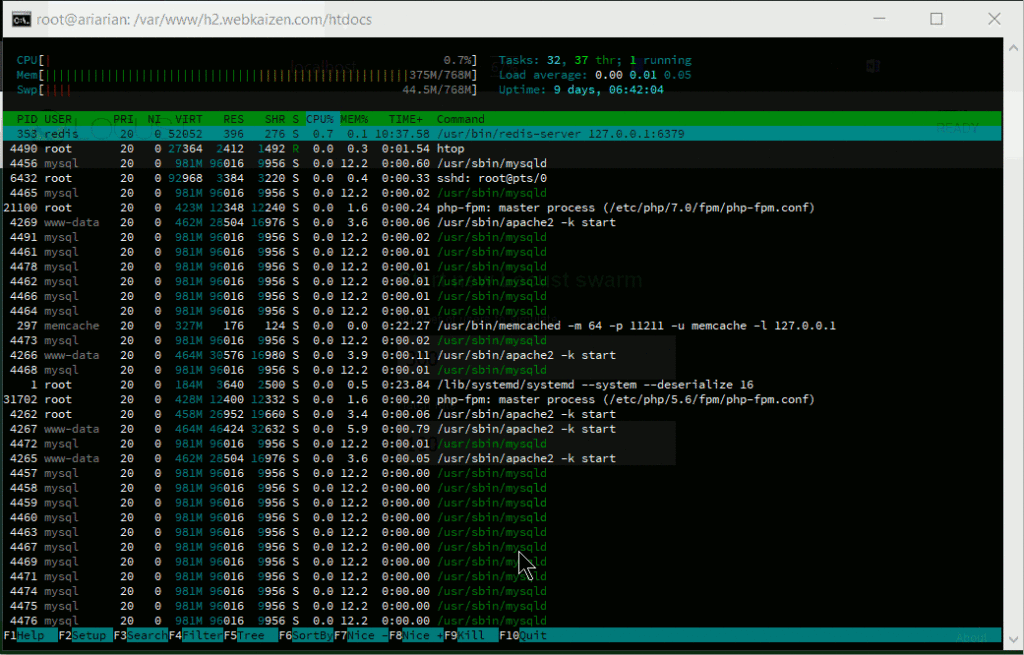
A small Locust load test that shows spawning of huge number of Apache processes to handle the incoming traffic.
We may add that this mode is maybe the biggest cause of Apache’s bad name. It can get resource-inefficient.
Version 2 of Apache brought another two MPMs that try to solve the issues that prefork mode has. These are worker module, or mpm_worker_module, and event module.
Worker module is not process-based anymore; it’s a hybrid process-thread based mode of operation. Quoting Apache’s website,
a single control process (the parent) is responsible for launching child processes. Each child process creates a fixed number of server threads as specified in the
ThreadsPerChilddirective, as well as a listener thread which listens for connections and passes them to a server thread for processing when they arrive.
This mode is more resource efficient.
2.4 version of Apache brought us the third MPM — event module. It is based on worker MPM, and added a separate listening thread that manages dormant keepalive connections after the HTTP request has completed. It’s a non-blocking, asynchronous mode with a smaller memory footprint. More about version 2.4 improvements here.
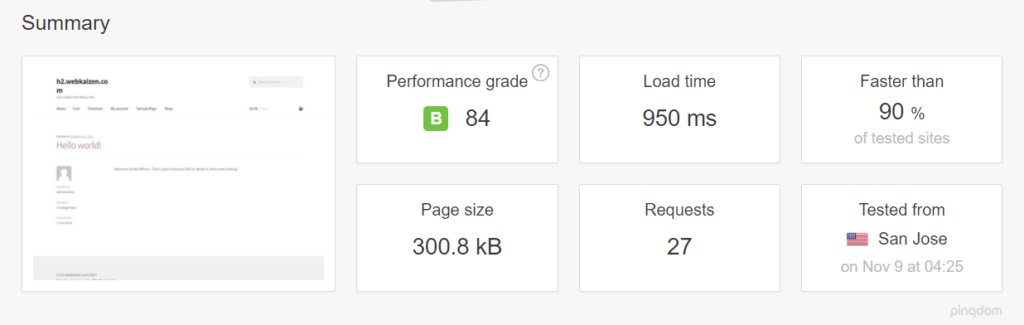
We have loaded a testing WooCommerce installation with around 1200 posts on a virtual server and tested it on Apache 2.4 with the default, prefork mode, and mod_php.
First we tested it with libapache2-mod-php7 and mpm_prefork_module at https://tools.pingdom.com:
Then, we went for testing the event MPM module.
We had to add multiverse to our /etc/apt/sources.list:
deb http://archive.ubuntu.com/ubuntu xenial main restricted universe multiverse
deb http://archive.ubuntu.com/ubuntu xenial-updates main restricted universe multiverse
deb http://security.ubuntu.com/ubuntu xenial-security main restricted universe multiverse
deb http://archive.canonical.com/ubuntu xenial partner
Then we did sudo apt-get updateand installed libapache2-mod-fastcgi and php-fpm:
sudo apt-get install libapache2-mod-fastcgi php7.0-fpm
Since php-fpm is a service separate from Apache, it needed a restart:
sudo service start php7.0-fpm
Then we disabled the prefork module, and enabled the event mode and proxy_fcgi:
sudo a2dismod php7.0 mpm_prefork
sudo a2enmod mpm_event proxy_fcgi
We added this snippet to our Apache virtual host:
<filesmatch "\.php$">
    SetHandler "proxy:fcgi://127.0.0.1:9000/"
</filesmatch>
This port needs to be consistent with php-fpm configuration in /etc/php/7.0/fpm/pool.d/www.conf. More about the php-fpm setup here.
Then we tuned the mpm_event configuration in /etc/apache2/mods-available/mpm_event.conf, keeping in mind that our mini-VPS resources for this test were constrained — so we merely reduced some default numbers. Details about every directive on Apache’s website, and tips specific to the event mpm here. Keep in mind that started servers consume an amount of memory regardless of how busy they are. The MaxRequestWorkers directive sets the limit on the number of simultaneous requests allowed: setting MaxConnectionsPerChild to a value other than zero is important, because it prevents a possible memory leak.
<ifmodule mpm_event_module>
        StartServers              1
        MinSpareThreads          30
        MaxSpareThreads          75
        ThreadLimit              64
        ThreadsPerChild          30
        MaxRequestWorkers        80
        MaxConnectionsPerChild   80
</ifmodule>
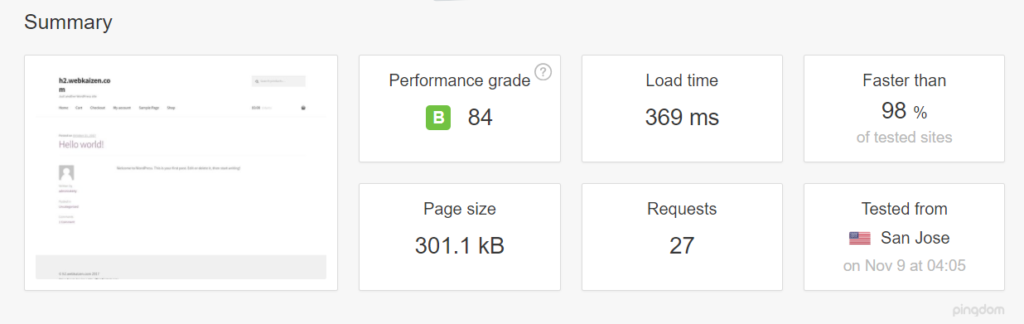
Then we restarted the server with sudo service apache2 restart (if we change some directives, like ThreadLimit, we will need to stop and start the service explicitly, with sudo service apache2 stop; sudo service apache2 start).
Our tests on Pingdom now showed page load time reduced by more than half:
Other tips for tuning Apache:
Disabling .htaccess: htaccess allows setting specific configuration for every single directory in our server root, without restarting. So, traversing all the directories, looking for the .htaccess files, on every request, incurs a performance penalty.
Quote from the Apache docs:
In general, you should only use
.htaccessfiles when you don’t have access to the main server configuration file.*
… in general, use of.htaccessfiles should be avoided when possible. Any configuration that you would consider putting in a.htaccessfile, can just as effectively be made in a<directory>section in your main server configuration file.*
The solution is to disable it in /etc/apache2/apache2.conf:
AllowOverride None
If we need it for the specific directories, we can then enable it within
AllowOverride All
Further tips include:
-
Control the browser cache with mod_expires — by setting the expires headers.
-
Keep HostNameLookups turned off —
HostNameLookups Offis the default since Apache 1.3, but make sure it stays off, because it can incur a performance penalty. -
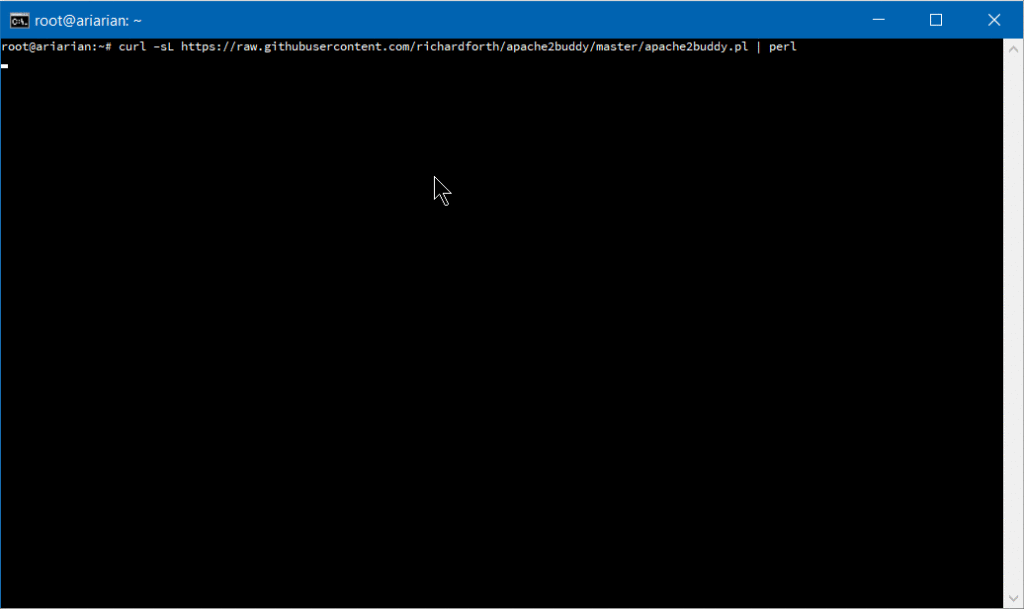
Apache2buddy is a simple script that we can run and get tips for tuning our system:
curl -sL https://raw.githubusercontent.com/richardforth/apache2buddy/master/apache2buddy.pl | perl
Nginx
Nginx is an event-driven and non-blocking web server. To quote one poster on Hacker News,
Forking processes is incredibly expensive compared to an event loop. Event-based HTTP servers inevitably won.
This statement sparked quite a debate on Hacker News, but from our experience, just switching from a mpm_prefork Apache to Nginx can often mean saving the website from crashing. Simple switching to Nginx is very often a cure in itself.
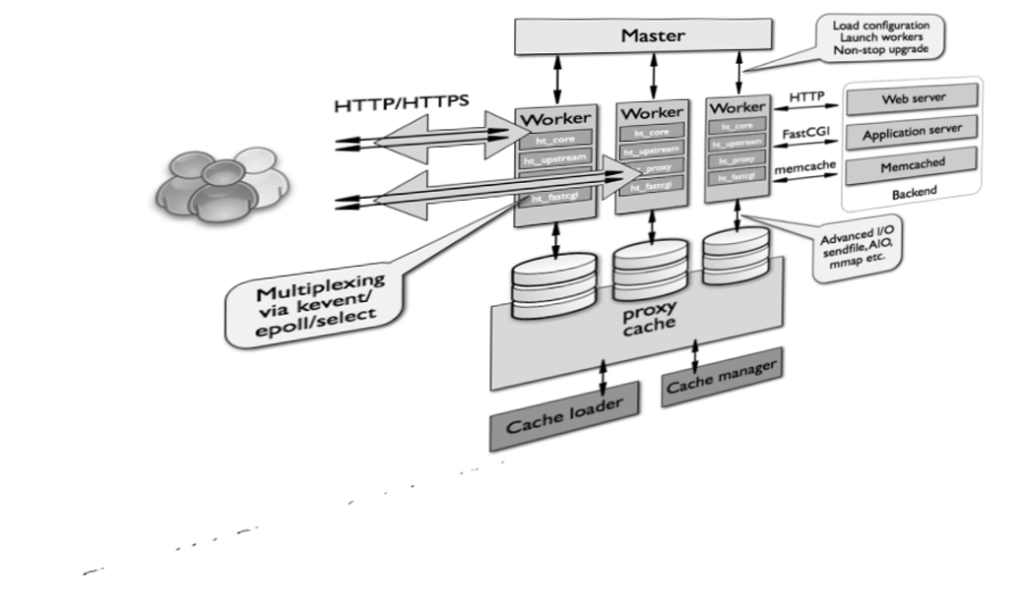
A more thorough visual explanation of Nginx architecture can be found here.
Nginx settings
Nginx recommends pinning the number of workers to number of PC cores (just like we did with Apache’s mpm_event configuration), by setting worker_processes to auto (default is 1) in /etc/nginx/nginx.conf.
worker_connections sets the number of connections every worker process can handle. The default is 512, but it can usually be increased.
Keepalive connections are a server aspect that impacts performance, which isn’t usually visible in benchmarks.
According to the Nginx website,
HTTP keepalive connections are a necessary performance feature that reduce latency and allow web pages to load faster.
Establishing new TCP connections can be costly — not to mention when there is HTTPS encryption involved. The HTTP/2 protocol mitigates this with its multiplexing features. Reusing an existing connection can reduce request times.
Apache’s mpm_prefork and mpm_worker suffer from concurrency limitations that contrast the keepalive event loop. This is somewhat fixed in Apache 2.4, in mpm_event module, and comes as the only, default mode of operation in Nginx. Nginx workers can handle thousands of incoming connections simultaneously, and if it’s used as a reverse proxy or a load balancer, Nginx then uses a local pool of keepalive connections, without TCP connection overhead.
keepalive_requests is a setting that regulates the number of requests a client can make over a single keepalive connection.
keepalive_timeout sets the time an idle keepalive connection stays open.
keepalive is a setting pertaining to an Nginx connection to an upstream server — when it acts as a proxy or load balancer. This means the number of idle keepalive upstream connections per worker process.
Enabling the upstream keepalive connections requires putting these directives into the Nginx main configuration:
proxy_http_version 1.1;
proxy_set_header Connection "";
Nginx upstream connections are managed by ngx_http_upstream_module.
If our front-end application keeps polling our back-end application for updates, increasing the keepalive_requests and keepalive_timeout will limit the number of connections that need to be established. The keepalive directive shouldn’t be too large, to allow for other connections to reach our upstream server.
The tuning of these settings is done on a per-case basis, and needs to be tested. That is maybe one reason why keepalive doesn’t have a default setting.
Using unix sockets
By default, Nginx uses a separate PHP process to which it forwards PHP file requests. In this, it acts as a proxy (just like Apache when we set it up with php7.0-fpm).
Often our virtual host setup with Nginx will look like this:
location ~ \.php$ {
    fastcgi_param REQUEST_METHOD $request_method;
    fastcgi_param SCRIPT_FILENAME $document_root$fastcgi_script_name;
    fastcgi_pass 127.0.0.1:9000;
}
Since FastCGI is a different protocol from HTTP, the first two lines are forwarding some arguments and headers to php-fpm, while the third line specifies the way to proxy our request — over a local network socket.
This is practical for multi-server setups, since we can also specify remote servers to proxy requests to.
But if we’re hosting our whole setup on a single system, we should use a Unix socket to connect to the listening php process:
fastcgi_pass unix:/var/run/php7.0-fpm.sock;
Unix sockets are considered to have better performance than TCP, and this setup is considered safer. You can find more details about this setup in this article by Rackspace.
This tip regarding Unix sockets is also applicable for Apache. More details here.
gzip_static: the accepted wisdom around web server performance is to compress our static assets. This often means we’ll try to compromise, and try to compress only files that are above some threshold, because compressing resources on the fly, with every request, can be expensive. Nginx has a gzip_static directive that allows us to serve gzipped versions of files — with extension .gz — instead of regular resources:
location /assets {
    gzip_static on;
}
This way, Nginx will try to serve style.css.gz instead of style.css (we need to take care of the gzipping ourselves, in this case).
This way, the CPU cycles won’t be wasted through on-the-fly compression for every request.
Caching with Nginx
The story about Nginx wouldn’t be complete without mentioning how to cache content. Nginx caching is so efficient that many sysadmins don’t think that separate layers for HTTP caching — like Varnish — make much sense. Perhaps it is less elaborate, but simplicity is a feature. Enabling caching with Nginx is rather simple.
proxy_cache_path /path/to/cache levels=1:2 keys_zone=my_cache:10m max_size=10g
  inactive=60m;
This is a directive we place in our virtual host file, outside of the server block. The proxy_cache_path argument can be any path we want to store our cache. levels designates how many levels of directories Nginx should store cached content in. For performance reasons, two levels are usually okay. Recursing through the directories can be costly. The keys_zone argument is a name for a shared memory zone used for storing the cache keys, and 10m is room for those keys in memory (10MB is usually enough; this isn’t the room for actual cached content). max_size is optional, and sets the upper limit for the cached content — here 10GB. If this isn’t specified, it will take up all the available space. inactive specifies how long the content can stay in the cache without being requested, before it gets deleted by Nginx.
Having set this up, we would add the following line, with the name of our memory zone to either server or location block:
proxy_cache my_cache;
An extra layer of fault-tolerance with Nginx can be achieved by telling it to serve the items from cache when it encounters a server error on the origin, or the upstream server, or when the server is down:
proxy_cache_use_stale error timeout http_500 http_502 http_503 http_504;
More details about the server or location block directives to further tune Nginx caching can be found here.
proxy_cache_* directives are for static assets, but we usually want to cache the dynamic output of our web apps — whether it’s a CMS or something else. In this case, we’ll use the fastcgi_cache_* directive instead of proxy_cache_*:
 fastcgi_cache_path /var/run/nginx-cache levels=1:2 keys_zone=my_cache:10m inactive=60m;
 fastcgi_cache_key "$scheme$request_method$host$request_uri";
 fastcgi_cache_use_stale error timeout invalid_header http_500;
 fastcgi_ignore_headers Cache-Control Expires Set-Cookie;
 add_header NGINX_FASTCGI_CACHE $upstream_cache_status;
The last line above will set response headers to inform us whether the content was delivered from the cache or not.
Then, in our server or location block, we can set some exceptions to caching — for example, when the query string is present in the request URL:
if ($query_string != "") {
    set $skip_cache 1;
}
Also, in our \.php block, inside server, in case of PHP, we would add something like:
location ~ \.php$ {
    try_files $uri =404;
    include fastcgi_params;

    fastcgi_read_timeout 360s;
    fastcgi_buffer_size 128k;
    fastcgi_buffers 4 256k;
    fastcgi_param SCRIPT_FILENAME $document_root$fastcgi_script_name;

    fastcgi_pass unix:/run/php/php7.0-fpm.sock;

      fastcgi_index index.php;
      fastcgi_cache_bypass $skip_cache;
      fastcgi_no_cache $skip_cache;
      fastcgi_cache my_cache;
      fastcgi_cache_valid  60m;
}
Above, the fastcgi_cache* lines, and fastcgi_no_cache, regulate caching and exclusions.
Detailed reference of all these directives can be found on the Nginx docs website.
To learn more, the people over at Nginx have provided a free webinar on this topic, and there’s a number of ebooks available.
Conclusion
We’ve tried to introduce some techniques that will help us improve our web server’s performance, and the theory behind those techniques. But this topic is in no way exhausted: we still haven’t covered reverse-proxy setups that consist of both Apache and Nginx, or multi-server setups. Achieving the top results with both these servers is a matter of testing and analyzing specific, real-life cases. It’s kind of a never-ending topic.
Frequently Asked Questions on Apache vs Nginx Performance Optimization Techniques
What are the key differences between Apache and Nginx in terms of performance and optimization?
Apache and Nginx are both powerful web servers, but they differ significantly in their performance and optimization capabilities. Apache, an older server, uses a process-driven model, creating a new thread for each request. This can lead to significant memory usage when handling multiple simultaneous connections. On the other hand, Nginx uses an event-driven architecture, which allows it to handle thousands of connections simultaneously with minimal memory usage. This makes Nginx more efficient and faster, especially for static content delivery and reverse proxy scenarios.
How can I optimize Nginx for better performance?
There are several ways to optimize Nginx for better performance. First, you can adjust worker processes and worker connections. The worker process should be set to the number of CPUs or cores, while the worker connections should be set to the maximum open file limit. Second, you can enable gzip compression to reduce the size of data that Nginx sends to clients. Third, you can use caching to store frequently accessed data in memory, reducing disk I/O operations. Lastly, you can use load balancing to distribute network traffic across multiple servers, improving response times and overall performance.
How can I optimize Apache for better performance?
Apache can be optimized in several ways. First, you can adjust the MaxClients directive to control the maximum number of simultaneous connections. Second, you can enable mod_deflate to compress data before sending it to clients, reducing bandwidth usage. Third, you can use caching with mod_cache to store frequently accessed data in memory, reducing disk I/O operations. Lastly, you can use load balancing with mod_proxy_balancer to distribute network traffic across multiple servers, improving response times and overall performance.
Can I use both Apache and Nginx together?
Yes, you can use both Apache and Nginx together in a reverse proxy setup. In this configuration, Nginx serves as the front-end server handling client requests, while Apache serves as the back-end server processing these requests. This setup combines the strengths of both servers, with Nginx efficiently handling static content and Apache providing dynamic content processing.
How does Nginx handle static and dynamic content differently?
Nginx excels at serving static content due to its event-driven architecture, which allows it to handle thousands of simultaneous connections with minimal memory usage. For dynamic content, Nginx can pass requests to application servers like PHP-FPM or proxy them to an Apache server. However, Nginx does not natively process dynamic content like Apache does with its mod_php module.
How does Apache handle static and dynamic content differently?
Apache can serve both static and dynamic content. For static content, Apache uses its core modules. For dynamic content, Apache uses additional modules like mod_php to process PHP scripts. However, Apache’s process-driven model can lead to significant memory usage when handling multiple simultaneous connections, making it less efficient than Nginx for static content delivery.
What is the impact of server optimization on website performance?
Server optimization can significantly improve website performance. It can reduce server response times, increase the number of simultaneous connections a server can handle, and reduce bandwidth usage. This can lead to faster page load times, a better user experience, and improved SEO rankings.
How can I choose between Apache and Nginx?
The choice between Apache and Nginx depends on your specific needs. If you need a server that can handle a large number of simultaneous connections efficiently, or if you primarily serve static content, Nginx may be the better choice. If you need a server with robust support for dynamic content processing, or if you rely on .htaccess files for configuration, Apache may be more suitable.
What are some common performance issues with Apache and Nginx?
Common performance issues with Apache include high memory usage and slow response times when handling multiple simultaneous connections. With Nginx, common issues include improper configuration of worker processes and connections, and lack of dynamic content processing capabilities.
How can I monitor the performance of Apache and Nginx?
You can monitor the performance of Apache and Nginx using various tools. For Apache, you can use the mod_status module to provide server status information. For Nginx, you can use the stub_status module. Additionally, you can use third-party monitoring tools like New Relic, Datadog, or Nagios for more detailed performance metrics and alerts.

