Selections in Photoshop, Part 3: Colour Selection Tools

In previous posts, we looked at the Geometric Tools and Freehand Tools for selecting in Photoshop. Today it’s the turn of the Colour-based selection tools.
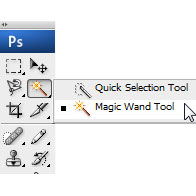
The Magic Wand (![]() ) selects parts of an image based on the similarity in colour of adjacent pixels. The Quick Selection (
) selects parts of an image based on the similarity in colour of adjacent pixels. The Quick Selection (![]() ) tool (which was first introduced in Photoshop CS3) “paints” a selection by automatically finding and following defined edges in the image. Let’s take a look at how they each work.
) tool (which was first introduced in Photoshop CS3) “paints” a selection by automatically finding and following defined edges in the image. Let’s take a look at how they each work.
The Magic Wand Tool
The Magic Wand tool is definitely one of the easiest ways to make a selection. It is most useful when you want to select and area consisting of similar colours, surrounded by a completely different colour.
1. Select the Magic Wand tool (![]() ) in the toolbar or hit W.
) in the toolbar or hit W.
2. On the tool options bar, type a number in the Tolerance text box to increase the number of similar tones that will be selected.
![]()
The Tolerance option sets the sensitivity of the Magic Wand tool. This limits or extends the range of pixel similarity, so 32—the default tolerance—selects the colour you click plus 32 lighter and 32 darker tones of that colour.
3. Using the Magic Wand, click the surface of the area you want to select. I’m using an image of some Christmas tree biscuits. When I click on one of the biscuits, most but not all of it will be selected.
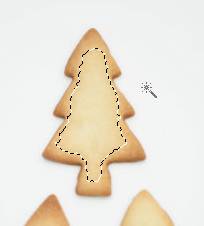
4. To select the remaining area and ADD to the selection hold down Shift so that a plus sign appears with the Magic Wand pointer. This indicates that whatever you click will be added to the current selection.
Just keep Shift + Clicking till you select the entire area.

If you accidentally select an area outside where you want to select, choose Edit > Undo (Ctrl + Z / Cmd + Z) , and try again. You can also change the Tolerance level in the options bar as you work.
Making a Quick Selection
The Quick Selection tool, like many of the Photoshop tools, is based on the idea of a brush. It lets you quickly “paint” a selection using a round brush tip of adjustable size. It works in a similar fashion to the Magic Wand but is a little more sophisticated.
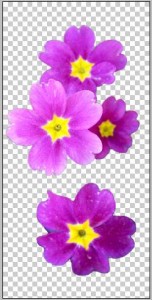
For this example, I want to select some coloured flowers and remove them from their background. The image I’m using by Jana Koll and is free to download from Stock Xchng.
1. Select the Quick Selection tool (![]() ) in the toolbox or hit Shift W to switch between the Magic Wand and the Quick Selection tools.
) in the toolbox or hit Shift W to switch between the Magic Wand and the Quick Selection tools.
2. In the tool options bar, click the Brushes tab to temporarily open the Brushes palette. Set the Brush Size diameter and the hardness of the brush. You may find there is a bit of trial and error involved while you find the correct sized brush.
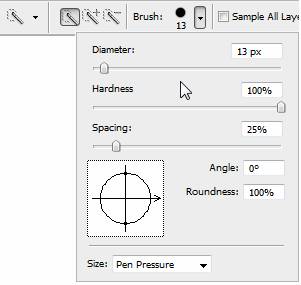
If you are using more than one layer you could choose the Sample All Layers option to sample from all visible layers, not just the selected one. In this example there is only one layer in the image so this is not an issue.
3. Click on part of the blurred green background, and gently drag the pointer. You’ll see the Quick selection tool very accurately selects a chunk of background.
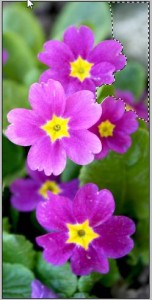
Continue to drag around the flowers. If you accidentally select a flower, hold down the Alt/Option key and paint to deselect. If it happens repeatedly, try reducing the size of your Quick Selection brush.
4. Continue to drag around the flowers until you complete the selection. You’ll find that this tool is quite intuitive and that you only need to paint small areas in order to select large chunks.

Ok that’s the selection made, but we’re not finished with this tool yet. Sometimes selections have very jaggy edges, but with the Quick Selection tool you can refine your selection.
5. In the tool options bar, click on the Refine button, which opens the following dialog box;
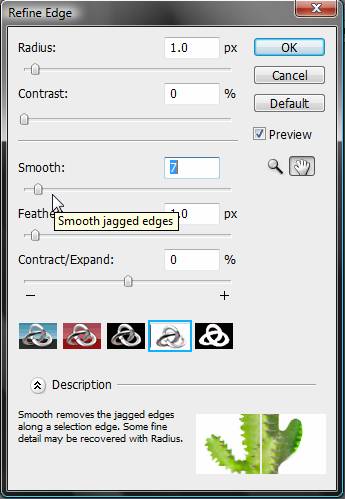
I won’t go through each of the options, suffice to say that there is plenty of sliders for you to play with and explore. For this example I increased the smoothness, which helps removes some of the jagged edges.
6. Finally I hit Delete to remove the background (remember we had actually selected the background and not the flowers). I can now easily add a different background.
I hope you’ve found this description of the Colour Selection tools useful — they’re two great tools for making selections based on colour.
Tomorrow we’ll wrap this series up with some additional tips and tricks for manipulating your selections. I hope you’ll join me!
Related Reading:
Frequently Asked Questions about Photoshop Selection Tools
How can I refine the edges of my selection in Photoshop?
Refining the edges of your selection in Photoshop can be done using the ‘Refine Edge’ tool. This tool allows you to adjust the edge of your selection to make it smoother, feathered, or to expand or contract it. To use this tool, first make a selection using any selection tool like the Magic Wand or Quick Selection tool. Then, go to the ‘Select’ menu and choose ‘Refine Edge’. A dialog box will appear with various sliders that you can adjust to refine your selection.
What is the difference between the Magic Wand tool and the Quick Selection tool?
The Magic Wand tool and the Quick Selection tool are both selection tools in Photoshop, but they work in slightly different ways. The Magic Wand tool selects pixels based on their color. You click on a pixel, and the tool selects all adjacent pixels that have a similar color. The Quick Selection tool, on the other hand, works more like a brush. You drag the tool over the area you want to select, and it automatically selects similar pixels.
How can I select a specific color range in Photoshop?
To select a specific color range in Photoshop, you can use the ‘Color Range’ command. Go to the ‘Select’ menu and choose ‘Color Range’. A dialog box will appear. Click on the color you want to select in the image. You can adjust the ‘Fuzziness’ slider to control the range of colors that are selected.
Can I use the Magic Wand tool to select non-contiguous areas?
Yes, you can use the Magic Wand tool to select non-contiguous areas. To do this, simply hold down the Shift key while clicking on the areas you want to select. Each click will add to the current selection.
How can I deselect a selection in Photoshop?
To deselect a selection in Photoshop, you can either go to the ‘Select’ menu and choose ‘Deselect’, or you can press Ctrl+D (Command+D on a Mac).
What is the Lasso tool and how is it different from the Magic Wand tool?
The Lasso tool is another selection tool in Photoshop. Unlike the Magic Wand tool, which selects pixels based on their color, the Lasso tool allows you to make freeform selections. You can draw around the area you want to select, and the tool will create a selection that follows your drawing.
How can I move a selection in Photoshop?
To move a selection in Photoshop, first make a selection using any selection tool. Then, switch to the Move tool by pressing V on your keyboard. Click inside the selection and drag it to the desired location.
Can I save a selection in Photoshop for later use?
Yes, you can save a selection in Photoshop for later use. To do this, go to the ‘Select’ menu and choose ‘Save Selection’. A dialog box will appear where you can name your selection and choose a destination.
How can I invert a selection in Photoshop?
To invert a selection in Photoshop, go to the ‘Select’ menu and choose ‘Inverse’. This will invert your selection, selecting everything that was not previously selected and deselecting everything that was.
Can I feather a selection in Photoshop?
Yes, you can feather a selection in Photoshop. Feathering softens the edges of a selection. To feather a selection, go to the ‘Select’ menu, choose ‘Modify’, and then choose ‘Feather’. A dialog box will appear where you can enter the feather radius.
Jennifer Farley is a designer, illustrator and design instructor based in Ireland. She writes about design and illustration on her blog at Laughing Lion Design.
