

Knowing how to make selections, and knowing which tools to use in Photoshop, are enormously important and fundamental skills. I emphasize to my students that before they can go and set the world on fire with their Photoshop compositions, they absolutely MUST be up to scratch with the selection tools.
Note: Some of the ground we’ll cover here is very basic. If you’re a Photoshop pro, chances are you’ll have seen it all before. That said, I am also going to be quite thorough in my coverage of these basics. You never know — you may learn something after all.
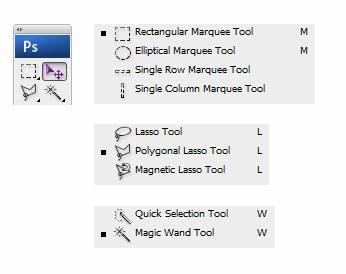
OK, let’s get selecting! First up, you should know that you can make selections in your images based on colour, shape and size. There are four sets of tools available to enable you to do this:
- Marquee tools
- Lasso tools
- Quick Select and Magic Wand
- Pen tools
In this series of articles, I’ll demonstrate how to use all of these tools — except the Pen tools, which are important enough to warrant a series of their own.
The Photoshop Selection Tools
The tools listed above are used to make three types of selections:
- Geometric Selections
- Freehand selections
- Colour-based selections
Today we’ll look at the Geometric selections.
“Geometric” might sound a bit scary or mathematical, but don’t worry, all we’re talking about here are shapes.
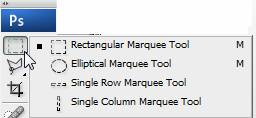
Using the Marquee Tools
You use the Rectangular Marquee tool to select a rectangular or square area in an image.
- Click on the Rectangular Marquee tool in the Photoshop toolbox or press M on the keyboard.
- On your image, click and drag the pointer down and to the right to draw a rectangle. Release the mouse button.
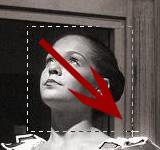
An animated dashed line (often referred to as marching ants) indicates that the area inside it is selected. When you select an area, it becomes the only editable area of the image. The area outside the selection is protected.
To move the selection:
- Move the pointer inside your rectangular selection so that the pointer appears as an arrow with a small rectangle (
 ).
). - Drag the selection to another part of your image. When you drag the selection, only the selection border moves, not the actual pixels in the image.
Deselecting a Selection
When you want to get rid of a selection you can do any one of the following:
- Make sure that the Rectangular Marquee tool is still selected and in the image window, click anywhere outside the selected area.
- Choose Select > Deselect.
- Use the keyboard shortcut Ctrl-D (Windows) or Command-D (Mac).
When you do any of those things, the marquee will disappear.
Using keyboard combinations with tools
Sometimes you may need to use a keyboard key in conjunction with a tool in order to make the tool act in a certain way.
- Make sure the Rectangle Marquee tool is selected. Position the pointer in the centre of the area you want to select.

- Press Alt-Shift (Windows) or Option-Shift (Mac) and click and drag outward. This time you’ll notice that marquee is a perfect square as long as you drag with the Shift key pressed.
- Holding down Alt forces the marquee to draw from the centre outwards.
- Holding down Shift constrains the rectangle to a square.
- First, release the mouse button, and then release the keyboard keys.
- Try using the Paint Brush tool to paint in the image window. Notice that the paint brush will only affect the selected area. The rest of the image is protected.
The Elliptical Marquee tool
The Elliptical Marquee tool lets you create oval or circular selection marquees.
- Select the Elliptical Marquee tool by pressing and holding the mouse button over the Rectangular Marquee tool to open the pop-up list of hidden tools, and select the Elliptical Marquee tool.
- With the Elliptical Marquee tool selected, drag out a circle or ellipse. As before, holding down Alt forces the marquee to draw from the centre outwards. Holding down Shift constrains the ellipse to be a perfect circle.

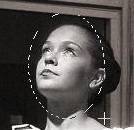
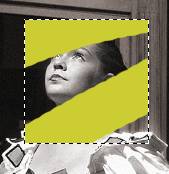
To inverse the selection, choose Select > Inverse or Ctrl + Shift + I (Windows) or Cmd + Shift + I (Mac).
Although the animated selection border looks the same, look carefully and you will see that a similar border now appears all around the edges of the image. You’ve got an inverse selection. This means the rest of the image is selected and can be edited, while the original area within the circle is not selected and is protected. To illustrate this point further, lets make the background dark.
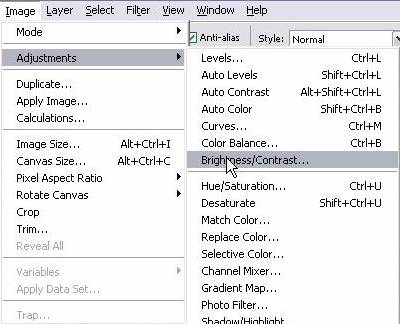
- Choose Image > Adjustments > Brightness/Contrast
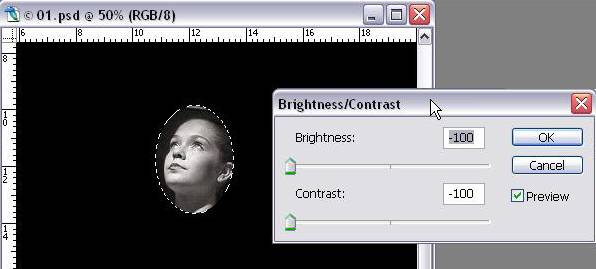
The Brightness/Contrast dialog box will open. Make sure the Preview check box is checked so that you can see how your changes will affect the image. - Drag both the Brightness and the Contrast sliders to -100. You’ll see that the selected area has turned black.
- Click OK to apply these changes to your image.
Single Pixel Selection Tools
The Single Row Marquee tool and Single Column Marquee tool are used to select either a 1-pixel-high row or a 1-pixel-wide column, respectively. The single pixel tools are very useful when creating a repeating background for a web site.
Select the tool in the toolbox, as before, then click near the area you want to select, and then drag the marquee to the exact location. Depending on the size of your image, it may look as if no marquee is visible, so just increase the magnification of your image view.
I hope that this introduction has been useful for anyone getting started with selections or maybe as a refresher for those that have gotten a bit rusty. In the next part of the series, I’ll discuss how to use Freehand tools, which will give you much more control over the shapes of your selections, along with some tips and tricks on how to switch from one freehand tool to another without losing your selections.
Frequently Asked Questions about Photoshop Selections and Geometric Tools
What are the different types of selection tools available in Photoshop?
Photoshop offers a variety of selection tools, each with its unique functionality. The primary ones include the Marquee tools (Rectangular and Elliptical), Lasso tools (Lasso, Polygonal Lasso, and Magnetic Lasso), and the Quick Selection tool. The Marquee tools are used for making rectangular or elliptical selections. The Lasso tools are used for freehand, polygonal (straight-edged), and magnetic (snap-to) selections. The Quick Selection tool lets you quickly “paint” a selection using an adjustable round brush tip.
How can I use the Marquee tools effectively?
The Marquee tools are perfect for making geometric selections. To use them, select the tool from the toolbar, click on your image, and drag to create a selection. Hold down the Shift key while dragging to constrain the selection to a perfect square or circle. If you want to select from the center, hold down the Alt (Option on Mac) key while dragging.
What is the best way to use the Lasso tools?
The Lasso tools are ideal for making freeform selections. The standard Lasso tool allows you to draw freehand selections, while the Polygonal Lasso tool is perfect for straight-edged selections. The Magnetic Lasso tool automatically clings to the edge of the contrasting object as you move your cursor around it.
How does the Quick Selection tool work?
The Quick Selection tool works like a brush, allowing you to “paint” your selection. It automatically detects the edges of the object as you paint, making it a great tool for quickly selecting objects with complex edges against high-contrast backgrounds.
How can I modify my selections?
Photoshop provides several options to modify your selections. You can add to a selection by holding down the Shift key and dragging, subtract from a selection by holding down the Alt (Option on Mac) key and dragging, or intersect a selection by holding down both Shift and Alt (Option on Mac) keys and dragging.
How can I move or copy my selections?
To move a selection, simply select the Move tool from the toolbar and drag the selection. To copy a selection, hold down the Alt (Option on Mac) key while dragging.
How can I save and load selections?
To save a selection, go to the Select menu, choose Save Selection, and give it a name. To load a saved selection, go to the Select menu, choose Load Selection, and select the desired one from the list.
How can I feather my selections?
Feathering softens the edges of your selections. To feather a selection, go to the Select menu, choose Modify, and then Feather. Enter a feather radius to determine the amount of softening.
How can I invert my selections?
To invert a selection, meaning to select everything but the current selection, go to the Select menu and choose Inverse.
How can I deselect my selections?
To deselect a selection, go to the Select menu and choose Deselect, or simply press Ctrl+D (Command+D on Mac).