
Key Takeaways
- The Web Notifications API is a standardized system developed by the W3C for delivering end-user notifications, which can alert users outside the context of a web page.
- The API allows developers to create a notification instance using the Notification property of the window object, which accepts a title and an optional object of settings. The settings can specify additional information like the purpose of the notification, language, text direction, an ID tag, and an icon URL.
- The Web Notifications API exposes two methods: requestPermission() for asking user permission to show notifications, and close() to programmatically close a notification. It also has four event handlers: onclick, onclose, onerror, and onshow.
- While the API is easy to use, browser support is not universal. Chrome, Firefox, and Safari have implemented it, covering a significant portion of users. However, developers should test their notifications across different browsers and devices.
The time of the 56kb connections has faded out of memory for a lot of people (mobile users not withstanding). It was a time when browsers that could open a single page where enough, and no one could even predict a future with multi-tabbed browsing. Today, we’re overwhelmed by social networks, posts, replies, comments, photos, videos, and much more. Several systems have been created to overcome the need to look at every single tab to check for new activities. One of these methods are notifications, which are very widespread on different websites.
Until not too long ago, every developer had to implement notifications on their own, resulting in a whole set of different solutions. The W3C has defined an API to solve this problem in a standard way called the Web Notifications API.
On mobile devices we’re very familiar with the concept of notifications. Try to be offline for a couple of hours and, as soon as you connect to the Internet, you’ll be overwhelmed by notifications from the different apps installed on your device. It’d be great to have the same mechanism for our web pages that work seamlessly on desktop and mobile devices. As stated in the introduction, such system has been developed and standardized, so today we have the Web Notifications API.
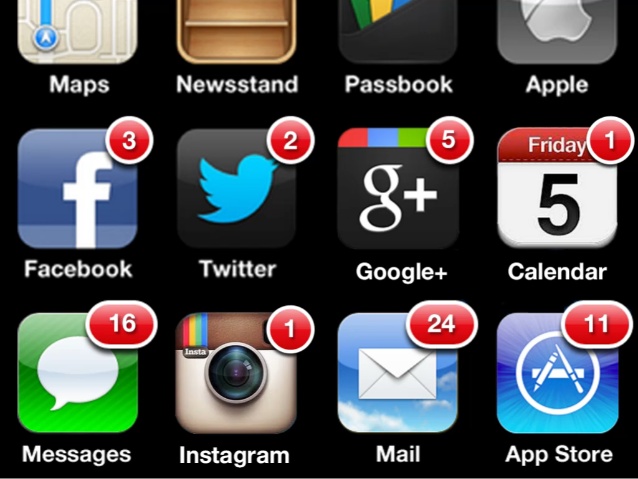
Image shamelessly stolen from the presentation of Brad Frost, Death to Bullshit
What is the Web Notifications API
The Web Notifications API is defined as an API for end-user notifications. A notification allows alerting the user outside the context of a web page of an occurrence, such as the delivery of email.
The specifications don’t describe how and where a UA should display these notifications. Therefore, we’ll see different styles on different browsers and, based on the device we’re using, we’ll see the notifications in different places (for example on mobile we may see them in the notifications bar). It’s worth noting that before you can show a notification, the browser shows an alert to the the user, who must explicitly give his/her consensus.
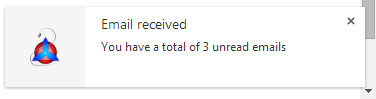
An example of a notification using the Web Notifications API on Firefox
This API has been around for a while, to the point that the specifications have changed several times. The specification has known two major versions. The first version was implemented in older versions of Chrome and Firefox. Now, the specification seem stable, although as of April, 19th 2014 it’s still a W3C Working Draft.
Thinking of some use cases for such an API isn’t very hard. For example, you may want to receive a notification as soon as you receive an email. You may also want to be notified if someone mentions you in a Tweet, or posts a photo of you on Facebook or Google+.
Now that we know what this API is, and what it’s good for, let’s delve into the description of its methods, properties, and events.
Methods, Properties, and Events
The Web Notifications API is exposed through the Notification property of the window object. This is a constructor that allows us to create a notification instance. It accepts two parameters – a string containing the title of the notification, and an optional object of settings. Before we see how we can create an instance, let’s look at the settings we can specify:
body: A string used to further specify the purpose of the notification.lang: Specifies the language of the notification. Its value must be compliant with the BCP 47 standard. Examples of valid strings areen-USandit-IT.dir: Defines the direction of the message’s text. Its value can beautomeaning that the direction is based on the browser’s settings,ltrto specify a left-to-right direction (for European languages), orrtlto specify a right-to-left direction (for some Asian languages).tag: A string that is used as an ID that can be employed to retrieve, replace, or remove the notification.icon: Specifies the URL of an image that will be used as the notification’s icon.
To create an instance of a Notification object, we should write a statement like the following:
var notification = new Notification('Email received', {

  body: 'You have a total of 3 unread emails'

});
Pretty easy, isn’t it?
It turns out that the settings we’ve just learned are also available as read-only properties of a notification instance. In addition, the Notification object exposes a property called permission. permission contains a string representing the current permission to display notifications. Its value can be one of the followings: denied, which means that the user has denied notifications, granted, which means the user has given permission, or default, which means the user choice is unknown.
This API exposes two methods: requestPermission() and close(). As the names suggest, the former is used to request the permission to show notifications to the user, while the latter programmatically closes a notification. requestPermission() is a method of the Notification object and accepts an optional callback that is executed when the user accepts or denies permission. The choice is passed to the callback as a parameter, and the value can be granted, denied, or default.
close() is an instance method and doesn’t accept any parameters.
Sometimes we may need to perform an action as soon as the status of the notification changes. For example, we may want to know if the user has clicked the notification, or when it is closed. To do that, we can attach a handler to one of the four events exposed:
onclick: Fired when the user clicks on the notification.onclose: Fired as soon as the user or the brower closes the notification.onerror: Fired if an error occurs with the notification.onshow: Fired when the notification is shown.
A basic example of using these events is shown below.
var notification = new Notification('Email received', {

  body: 'You have a total of 3 unread emails'

});
notification.onshow = function() {

  console.log('Notification shown');

};
Browser Compatibility
Support for the Web Notifications API isn’t very good on both desktop and mobile. On desktop, Chrome and Firefox implemented the first version of this API a while ago. However, considering only the new version of the API, implementation starts from Chrome 22 and Firefox 22 (both without a vendor prefix). Safari 6+ also supports the Web Notifications API. On the mobile side of things, only Firefox and Blackberry have full support. Testing if a browser supports this API is a matter of writing a check like the one shown below.
if ('Notification' in window) {

  // API supported

} else {

  // API not supported

}
Demo
In this section I’ll show you a simple demo that allows you to so see this API in action. The demo is made of two parts. In the first part, there is a form that lets you write some text which will be used in the displayed notification. In the second part, a button allows you to quickly see what this API does using predefined parameters that I’ve included in the demo. Both these requests will trigger the request for permission to the user. Once permission is given, the notification will appear on the screen in case of a desktop, and in the notification bar in the case of a mobile device.
In the scripting part of the demo, the first thing we do is test the browser to see if it supports the Web Notifications API. If the API isn’t supported, we display the message “API not supported”, and disable the two buttons that trigger the notifications. If the browser implements this API, we attach a listener to the click event of the buttons. As you can see from the code, the handler is the same and the different title and message shown is changed according to the element that has triggered the event:
if (event.target.id === 'button-wn-show-preset') {

  // Uses the preset parameters

} else {

  // Uses the custom parameters

}
In addition to displaying the notification, we attach a handler to each of the four events exposed by the notification instance. This handler will do nothing but log, in a specific textform element, the event fired and the button that fired it.
A live demo of the code below is available here.
<!DOCTYPE html>

<html>

  <head>

    <meta charset="UTF-8">

    <meta name="viewport" content="width=device-width, initial-scale=1.0"/>

    <title>Web Notifications API Demo</title>

    <style>

      *

      {

        -webkit-box-sizing: border-box;

        -moz-box-sizing: border-box;

        box-sizing: border-box;

      }
      body

      {

        max-width: 500px;

        margin: 2em auto;

        padding: 0 0.5em;

        font-size: 20px;

      }
      h1

      {

        text-align: center;

      }
      .hidden

      {

        display: none;

      }
      #custom-notification

      {

        margin-top: 1em;

      }
      label

      {

        display: block;

      }
      input[name="title"],

      textarea

      {

        width: 100%;

      }
      input[name="title"]

      {

        height: 2em;

      }
      textarea

      {

        height: 5em;

      }
      .buttons-wrapper

      {

        text-align: center;

      }
      .button-demo

      {

        padding: 0.5em;

        margin: 1em;

      }
      #log

      {

        height: 200px;

        width: 100%;

        overflow-y: scroll;

        border: 1px solid #333333;

        line-height: 1.3em;

      }
      .author

      {

        display: block;

        margin-top: 1em;

      }

    </style>

  </head>

  <body>

    <h1>Web Notifications API</h1>

    <span id="wn-unsupported" class="hidden">API not supported</span>
    <form id="custom-notification" action="">

      <label for="title">Title:</label>

      <input type="text" id="title" name="title" />
      <label for="body">Body:</label>

      <textarea id="body" name="body"></textarea>
      <div class="buttons-wrapper">

        <button id="button-wn-show-preset" class="button-demo">Show Preset Notification</button>

        <input type="submit" id="button-wn-show-custom" class="button-demo" value="Show Custom Notification" />

      </div>

    </form>
    <h3>Log</h3>

    <div id="log"></div>

    <button id="clear-log" class="button-demo">Clear log</button>
    <script>

      if (!('Notification' in window)) {

        document.getElementById('wn-unsupported').classList.remove('hidden');

        document.getElementById('button-wn-show-preset').setAttribute('disabled', 'disabled');

        document.getElementById('button-wn-show-custom').setAttribute('disabled', 'disabled');

      } else {

        var log = document.getElementById('log');

        var notificationEvents = ['onclick', 'onshow', 'onerror', 'onclose'];
        function notifyUser(event) {

          var title;

          var options;
          event.preventDefault();
          if (event.target.id === 'button-wn-show-preset') {

            title = 'Email received';

            options = {

              body: 'You have a total of 3 unread emails',

              tag: 'preset',

              icon: 'http://www.audero.it/favicon.ico'

            };

          } else {

            title = document.getElementById('title').value;

            options = {

              body: document.getElementById('body').value,

              tag: 'custom'

            };

          }
          Notification.requestPermission(function() {

            var notification = new Notification(title, options);
            notificationEvents.forEach(function(eventName) {

              notification[eventName] = function(event) {

                log.innerHTML = 'Event "' + event.type + '" triggered for notification "' + notification.tag + '"<br />' + log.innerHTML;

              };

            });

          });

        }
        document.getElementById('button-wn-show-preset').addEventListener('click', notifyUser);

        document.getElementById('button-wn-show-custom').addEventListener('click', notifyUser);

        document.getElementById('clear-log').addEventListener('click', function() {

          log.innerHTML = '';

        });

      }

    </script>

  </body>

</html>
Conclusion
In this article we’ve discussed the Web Notifications API and the use cases for it. We’ve also described the methods, properties, and the events exposed by the API. As we’ve seen, using this API is pretty easy, so it should not be hard for you to employ it in your next project.
Unfortunately, its support among browsers is not so good, but because Chrome, Firefox, and Safari implemented it, on average we should be able to cover a good portion of our users. To reinforce the concepts don’t forget to play with the provided demo and, possibly to try to change the code.
Frequently Asked Questions (FAQs) about Web Notifications API
What is the difference between the Web Notifications API and the Push API?
The Web Notifications API and the Push API are both used to deliver notifications to users, but they serve different purposes. The Web Notifications API is used to display notifications to the user, while the Push API is used to handle the delivery of data to a web application from a server, even when the web application is not in focus or the user’s device is asleep. The Push API is often used in conjunction with the Web Notifications API to display notifications resulting from a push message.
How can I request permission to display notifications?
Before you can display notifications to a user, you must first request their permission. This can be done using the Notification.requestPermission() method. This method will display a prompt to the user asking them to allow or block notifications from your website. The method returns a Promise that resolves to the permission state chosen by the user.
Can I include images in my web notifications?
Yes, you can include images in your web notifications. The Notification interface’s image property can be used to specify an image to be displayed in the notification. The image must be a string representing a URL to the image.
How can I handle click events on my notifications?
You can handle click events on your notifications by adding an event listener for the ‘click’ event to the Notification object. Inside the event listener, you can specify what should happen when the notification is clicked. For example, you might want to focus a window or open a specific URL.
Can I display notifications even when my web app is not in focus?
Yes, you can display notifications even when your web app is not in focus. This is one of the main advantages of using the Web Notifications API. However, to do this, you will need to use the Push API to handle the delivery of data from your server to your web app.
Are web notifications supported in all browsers?
Web notifications are widely supported in most modern browsers, including Chrome, Firefox, Safari, and Edge. However, support may vary between different versions of these browsers and there may be some differences in how notifications are displayed or behave.
Can I customize the sound of my web notifications?
The ability to customize the sound of web notifications depends on the browser. Some browsers allow you to specify a custom sound using the Notification interface’s sound property, while others do not. It’s important to check the specific browser’s documentation for details.
How can I close a notification?
You can close a notification programmatically using the Notification.close() method. This method will close the notification if it is currently displayed.
Can I use web notifications in a mobile web app?
Yes, you can use web notifications in a mobile web app. However, support for web notifications on mobile devices can vary between different browsers and operating systems. It’s important to test your notifications on a variety of devices to ensure they work as expected.
Are there any limitations or restrictions when using the Web Notifications API?
There are some limitations and restrictions when using the Web Notifications API. For example, you must obtain the user’s permission before you can display notifications. Additionally, some browsers limit the number of notifications that can be displayed at once, or the length of time a notification can be displayed. It’s important to check the specific browser’s documentation for details.