Localizing an iOS App

Key Takeaways
- Global Market Reach: Localizing your iOS app is essential for tapping into international markets, which can significantly expand your user base and business growth.
- Internationalization vs. Localization: Understand the difference; internationalization involves preparing your app to support localization by removing hard-coded, locale-specific elements, while localization involves adapting the app to meet the linguistic and cultural needs of specific locales.
- Utilize System APIs: For successful internationalization, use system-provided APIs like NSDateFormatter and NSNumberFormatter to handle locale-specific formats for dates, numbers, and currencies, ensuring your app adapts to different regions without extensive code modifications.
- Resource Localization: Localize resources including text, images, and audio files to ensure that all aspects of the app resonate with the target audience, enhancing user experience and engagement.
- Dynamic Layouts with Auto Layout: Implement Auto Layout to accommodate varying text lengths across different languages, ensuring a seamless and adaptable user interface across different devices and orientations.
The App Store is a global market. Taking international users into consideration and building an app that adapts to them can greatly increase your market reach and/or your business growth.
Instead of forcing users to make do with the default language, you could instead give them an app that presents information in their language. With the availability of so many apps that could be used instead of yours, adapting for international audiences could go a long way in retaining users.
This is achieved through internationalization and localization, two terms that are often used interchangeably and whose meanings are usually confused.
Internationalization is structuring an app to support localized content by not hardcoding any country or culture specific information, e.g. dates, currency, numbers.
This is done by utilizing the system provided APIs whenever this kind of information is outputted, thus making the application adaptable to different locales without any additional code changes.
Localization is the process of providing appropriate data and resources in your application based on the user’s Language settings.
It involves not only translating the app’s text into the different supported languages, but also providing different resources like audio files, images and nib files to the different supported languages and cultures.
The two activities complement each other. Internationalization provides the base infrastructure needed to support and facilitate localization. We are going to look at how to implement both of these in an iOS app.
Internationalization
The first step in internationalizing an app is to identify all the culture-specific information it displays. This consists of currency, dates, numbers etc.
Apple provides classes that should be used instead of harcoding, so that if you decide to distribute your apps to other markets, you will not need to change the base code.
It is usually advisable to internationalize your app from the very beginning even if you don’t plan to localize it. It doesn’t require that much extra effort to build an internationalized app, but the payoffs for internationalizing can be great.
Should your company grow and require a localized app that targets more markets, you will have a harder time localizing an app that wasn’t internationalized in the first place.
A lot of code changes and testing will be necessary to make sure no culture-specific information was left hardcoded. If the application had been internationalized, there will be less code rewrites and additional testing.
To internationalize your app, you should use the following classes and functions when outputting dates, numbers, strings and text.
NSDateFormatter
The NSDateFormatter is used whenever a date is to be displayed. It has a locale property which is set to the device’s current locale. When NSDateFormatter is used to create a date, it checks its locale property and displays the date in the appropriate format.
Below is a code snippet showing how the NSDateFormatter can be used. Here we set the locale, but for your app this won’t be necessary as it will use the device’s locale setting.
NSDateFormatter *dateFormatter = [[NSDateFormatter alloc] init];
dateFormatter.dateStyle = NSDateFormatterMediumStyle;
dateFormatter.timeStyle = NSDateFormatterNoStyle;

NSDate *date = [NSDate date];

[dateFormatter setLocale:[[NSLocale alloc] initWithLocaleIdentifier:@"en_US"]];
NSLog(@"Date for locale %@: %@", [[dateFormatter locale] localeIdentifier], [dateFormatter stringFromDate:date]);

[dateFormatter setLocale:[[NSLocale alloc] initWithLocaleIdentifier:@"fr_FR"]];
NSLog(@"Date for locale %@: %@", [[dateFormatter locale] localeIdentifier], [dateFormatter stringFromDate:date]);

[dateFormatter setLocale:[[NSLocale alloc] initWithLocaleIdentifier:@"en_UK"]];
NSLog(@"Date for locale %@: %@", [[dateFormatter locale] localeIdentifier], [dateFormatter stringFromDate:date]);

[dateFormatter setLocale:[[NSLocale alloc] initWithLocaleIdentifier:@"de_DE"]];
NSLog(@"Date for locale %@: %@", [[dateFormatter locale] localeIdentifier], [dateFormatter stringFromDate:date]);
Below is the output of the above code.
Date for locale en_US: May 15, 2014
Date for locale fr_FR: 15 mai 2014
Date for locale en_GB: 15 May 2014
Date for locale de_DE: 15.05.2014
In the example above, we manually set the locale that the NSDateFormatter uses. In a real application, you let the device’s setting determine this. In such cases, you can test the output by changing the Region Format in your phone’s settings. Go to Settings -> General -> International -> Region Format -> [Select Region]
NSNumberFormatter
NSNumberFormatter is used to internationalize currency values and number formats. Numbers and currencies are usually formatted differently in different countries. Instead of hardcoding the format of these figures, use NSNumberFormatter which will display the figures according to the device’s locale.
The example below uses NSNumberFormatter to output a value according to different locales.
NSNumberFormatter *numberFormatter = [[NSNumberFormatter alloc] init];
numberFormatter.numberStyle = NSNumberFormatterDecimalStyle;

[numberFormatter setLocale:[[NSLocale alloc] initWithLocaleIdentifier:@"en_US"]];
NSLog(@"Number format for locale %@: %@", [[numberFormatter locale] localeIdentifier], [numberFormatter stringFromNumber:@123456.789]);

[numberFormatter setLocale:[[NSLocale alloc] initWithLocaleIdentifier:@"fr_FR"]];
NSLog(@"Number format for locale %@: %@", [[numberFormatter locale] localeIdentifier], [numberFormatter stringFromNumber:@123456.789]);

[numberFormatter setLocale:[[NSLocale alloc] initWithLocaleIdentifier:@"en_UK"]];
NSLog(@"Number format for locale %@: %@", [[numberFormatter locale] localeIdentifier], [numberFormatter stringFromNumber:@123456.789]);

[numberFormatter setLocale:[[NSLocale alloc] initWithLocaleIdentifier:@"de_DE"]];
NSLog(@"Number format for locale %@: %@", [[numberFormatter locale] localeIdentifier], [numberFormatter stringFromNumber:@123456.789]);
The following is the output from the above code.
Number format for locale en_US: 123,456.789
Number format for locale fr_FR: 123 456,789
Number format for locale en_GB: 123,456.789
Number format for locale de_DE: 123.456,789
Apart from formatting numbers, NSNumberFormatter also formats currency values. If its numberStyle property is set to NSNumberFormatterCurrencyStyle it will output currencies with the appropriate decimal separator (a dot or comma), thousands separator (a comma or a dot) and currency symbols which will be properly placed (in some countries the symbol comes before the value while in others it comes after).
The following code snippet uses NSNumberFormatter to output currency values for different locales.
NSNumberFormatter *currencyFormatter = [[NSNumberFormatter alloc] init];
currencyFormatter.numberStyle = NSNumberFormatterCurrencyStyle;

[currencyFormatter setLocale:[[NSLocale alloc] initWithLocaleIdentifier:@"en_US"]];
NSLog(@"Currency format for locale %@: %@", [[currencyFormatter locale] localeIdentifier], [currencyFormatter stringFromNumber:@100000]);

[currencyFormatter setLocale:[[NSLocale alloc] initWithLocaleIdentifier:@"fr_FR"]];
NSLog(@"Currency format for locale %@: %@", [[currencyFormatter locale] localeIdentifier], [currencyFormatter stringFromNumber:@100000]);

[currencyFormatter setLocale:[[NSLocale alloc] initWithLocaleIdentifier:@"en_UK"]];
NSLog(@"Currency format for locale %@: %@", [[currencyFormatter locale] localeIdentifier], [currencyFormatter stringFromNumber:@100000]);

[currencyFormatter setLocale:[[NSLocale alloc] initWithLocaleIdentifier:@"de_DE"]];
NSLog(@"Currency format for locale %@: %@", [[currencyFormatter locale] localeIdentifier], [currencyFormatter stringFromNumber:@100000]);
The above will have the following output.
Currency format for locale en_US: $100,000.00
Currency format for locale fr_FR: 100 000,00 €
Currency format for locale en_GB: £100,000.00
Currency format for locale de_DE: 100.000,00 €
NSLocalizedString
Instead of hardcoding text in your application, you should put the text into a strings file (called a strings file because of its .strings extension) and update your code to load the data it needs from those files. If you decide later to localize the application, it would just be a matter of translating the strings without requiring a change in the interface (not always the case, as some languages are so different you would require to also localize your nib files).
To load the text from the strings file we use NSLocalizedString.
NSLocalizedString is a Foundation macro which is used to get the localized version of a string. It takes two arguments – key and comment. The key uniquely identifies the string to be localized and the comment indicates the context where the string is used. The comment can be set to nil but you might want to include a descriptive comment for your own reference and to aid a translator.
To internationalize strings in your code, replace literal strings with the NSLocalizedString function. For example instead of the following
NSString *string = @"Hello World";
you would instead use
NSString *string = NSLocalizedString(@"HELLO", nil);
Where you will have a strings file with the following
"HELLO" = "Hello World";
Localization
Once we have a properly internationalized application, it is easier to translate its resources and user interface into the different languages we want to target. This is what localization is. We provide appropriate resources (text, audio, images, nib files, e.t.c) for each language.
To see how his works, we will localize a simple application. Download the starter project which we’ll use in this tutorial.
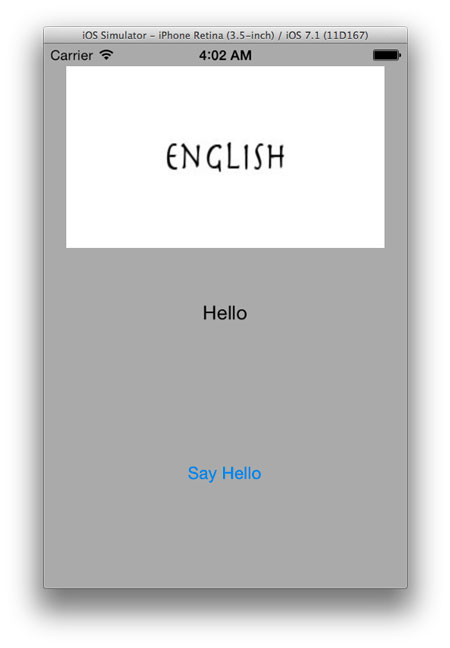
The project folder downloaded contains the main project labeled Hello World and an image named image.jpg that we will use later. The application has a single view as shown below with an image, label and a button.
Any resource in a project can be localized, whether it is an image, audio file, xib file or a storyboard. When a resource is localized, the localized copy is added to the application bundle. The resources are placed in language-specific directories, known as lproj directories. The directories are given the name of the localization suffixed with lproj. For example en.lproj for English and es.lproj for Spanish.
The localization codes are a combination of a language code and an optional region code. For language codes, you can use either the ISO 639-1 or ISO 639-2 conventions. ISO 639-1 is the preferred way to identify languages. However, if an ISO 639-1 code is not available for a particular language, the three-letter codes defined by the ISO 639-2 specification may be used instead.
For regional codes, you can use the ISO 3166-1 conventions. This specification uses a two-letter, capitalized code to identify a specific country. This is optional. Check here for a full list of language codes.
We are going to first localize our interface, the Main.storyboard file. Xcode has a feature called Base internationalization, which simplifies the process of localizing XIB and storyboard files. Instead of creating storyboard or XIB files for every language you want to support, Xcode creates a Base.lproj directory which contains the main storyboard or XIB files.
With this in place, localization can be undertaken by creating the Localizable.strings files. For languages whose views cannot be changed by localizing only the strings, you can create the full XIB or storyboard files.
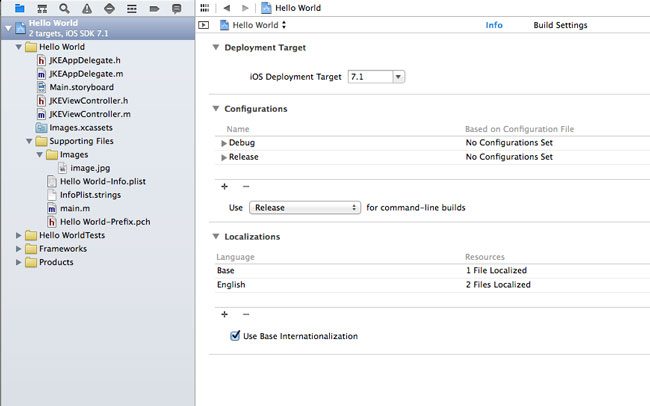
To begin, click on the Hello World project folder on the left panel, select the Hello World project on the next panel and click on the Info tab. Notice that Base international has been enabled by default.
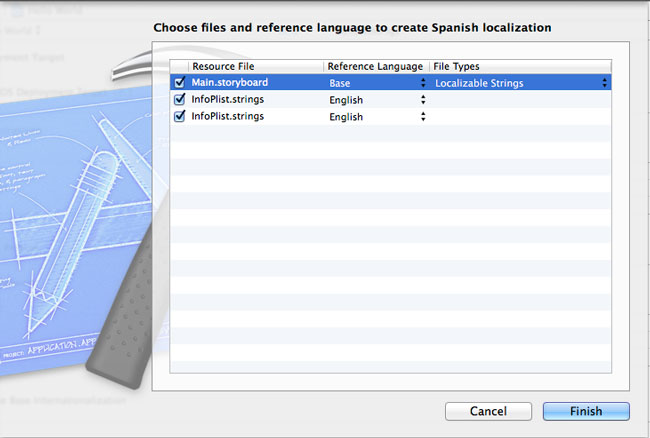
At the Localizations section, click the + and choose Spanish (es). Click the Finish button on the window that pops up with the selection shown below.
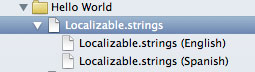
In the project navigator, you will notice that Main.storyboard and InfoPlist.strings can now be expanded. Expand the storyboard file and you’ll find both the base storyboard and a strings file for Spanish.
The Main.strings (Spanish) file contains a list of strings in key/value pairs. Xcode generates these strings from the textual elements on the interface. The keys relate to the object IDs of the UI items and the values are the strings that should be translated.
Our Main.strings (Spanish) file contains the following:
/* Class = "IBUILabel"; text = "Hello"; ObjectID = "Fg0-t0-XFF"; */
"Fg0-t0-XFF.text" = "Hello";

/* Class = "IBUIButton"; normalTitle = "Say Hello"; ObjectID = "pr4-OE-zWY"; */
"pr4-OE-zWY.normalTitle" = "Say Hello";
Edit the file as shown below
/* Class = "IBUILabel"; text = "Hello"; ObjectID = "Fg0-t0-XFF"; */
"Fg0-t0-XFF.text" = "Hola";

/* Class = "IBUIButton"; normalTitle = "Say Hello"; ObjectID = "pr4-OE-zWY"; */
"pr4-OE-zWY.normalTitle" = "Saludar";
That is it for localizing our view’s text. To localize the image, select the image file in the project navigator Supporting Files -> Images -> image.jpg. In the File Inspector on the right, click on the Localize button.
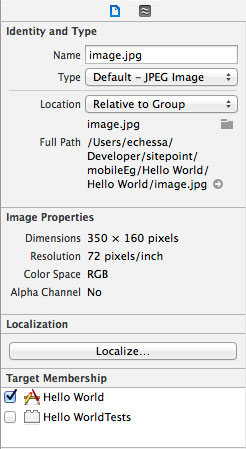
In the dialog box that appears, select English. Upon confirmation, the Localization section on the File Inspector will now show English as selected. Check the Spanish checkbox.
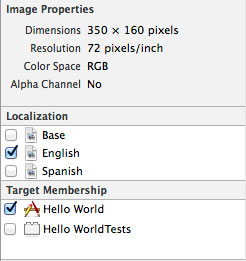
You should now see both the English and Spanish versions on the project navigator. At the moment, the Spanish image is the exact same copy of the English image.
To change this, in Finder, locate the image file named image.jpg that was in the starter project you downloaded for this tutorial. Copy it into your project’s Hello World/es.lproj directory, replacing the image that is there.
You should note that your resources for the different lproj directories should have the same name as their counterparts.
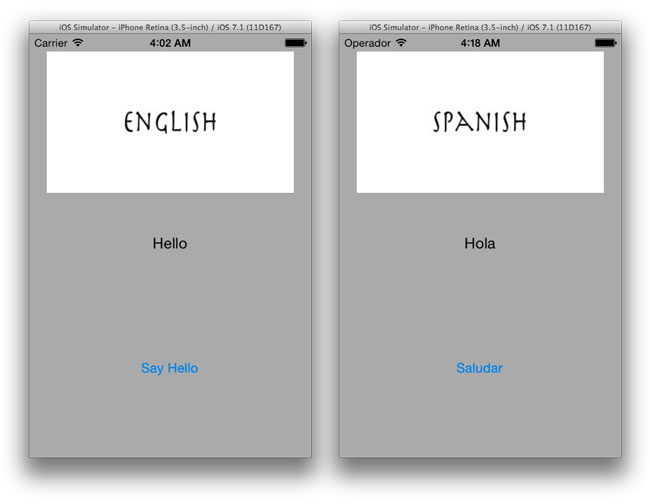
Run the application and on changing your devices language to Español you will see the views language translated and the image changed. Path to change language settings: General -> International -> Language -> Espanol.
To see the changes, you might need to reset the simulator and do a clean build. To reset the simulator, navigate to iOS Simulator -> Reset Content and Settings in the menu bar. To do a clean build, navigate to Product -> Clean in the Xcode menu bar.
We have localized the static resources in our application. We are now going to look at how to localize dynamic text. We will use the NSLocalizedString macro we looked at earlier to load text from a strings file.
Go to File -> New -> File. Choose Strings File under the Resource subsection.
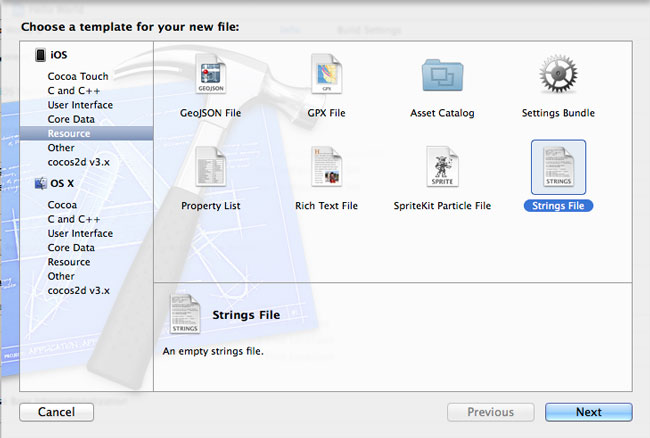
Click Next, name the file Localizable.strings and then save it.
By default, NSLocalizedString looks for a file named Localizable.strings. So it is important to stick to this naming convention, otherwise you will have to type the name of your .strings file every time you reference a localized string.
Localizing this file will be similar to how we localized the image file. Select Localizable.strings in the project navigator and on the File Inspector click the Localize button.
Select English in the dialog box that appears.
With the strings file still selected, check the Spanish check box in the Localization section of the File Inspector.
You should now have two versions of Localizable.strings file.
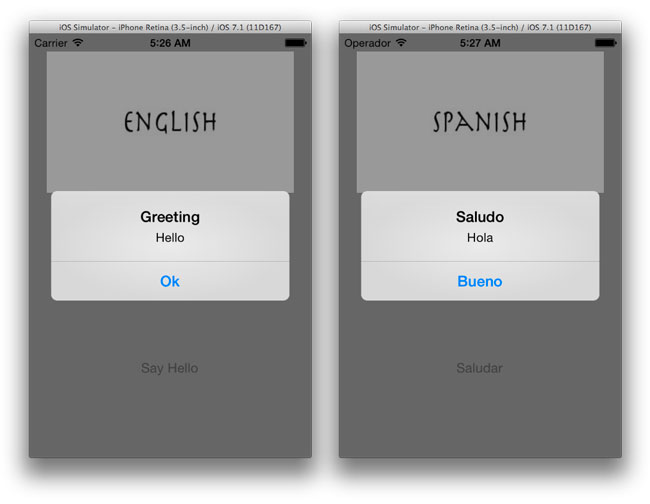
Place the following in the English strings file.
"TITLE" = "Greeting";
"GREETING" = "Hello";
"OK" = "Ok";
And in the Spanish strings file, place in the following.
"TITLE" = "Saludo";
"GREETING" = "Hola";
"OK" = "Bueno";
We want the above message to appear when the Say Hello button is pressed. Create an action named sayHello for the button. (I am assuming that the reader knows how to do this. If not look at this guide). Edit the JKEViewController.m file as shown below.
- (IBAction)sayHello:(UIButton *)sender {

    [[[UIAlertView alloc] initWithTitle:NSLocalizedString(@"TITLE", nil)
                                message:NSLocalizedString(@"GREETING", nil)
                               delegate:nil
                      cancelButtonTitle:NSLocalizedString(@"OK", nil)
                      otherButtonTitles:nil] show];
}
Run the application and test it. You should see results similar to the below image. (If you don’t see expected changes when you run the project, reset the simulator and do a clean build as previously described).
To localize the app name add the following string to the InfoPlist.string (Spanish) file:
"CFBundleDisplayName" = "Hola Mundo";
Auto Layout
Auto Layout was introduced in iOS 6 and is an important functionality to use when localizing your application. Before Auto Layout, developers used to set the app’s user interface using coordinates and bounds and the interface was static and unchangeable.
With Auto Layout, you set constraints on the UI views which describe the relationship that they have with each other. During runtime the Auto Layout system determines how to lay out each view using the set constraints. This creates flexible layouts which adapt to different screen sizes (e.g. 3.5′ or 4.0′ iPhone), orientations and text size (which is now changeable because of Dynamic Type).
This is important with internationalization because of the varying text lengths of different languages. If you lay out views that display text, they might expand greatly to accommodate text from other languages (or they might take up less space than they do with the base language). If Auto Layout is used, the other views will adapt to this change according to how you set the constraints.
We won’t go into much detail about Auto Layout here, but be sure to check the documentation.
Conclusion
We have looked at ways in which an app can be localized and thus make it usable and appealing to users in different locales. The app store provides developers access to a global market. Taking the international market into consideration when building your app can greatly increase your market reach. For more on localization, check the apple guides.
Frequently Asked Questions on Localizing iOS App
What is the importance of localizing an iOS app?
Localizing an iOS app is crucial for reaching a global audience. It involves translating the app’s user interface, content, and functionality to cater to different languages and cultures. This process not only enhances the user experience but also increases the app’s market reach, thereby boosting downloads and revenue. It’s a way of showing respect for different cultures and languages, which can significantly improve the app’s reputation and user satisfaction.
How can I start localizing my iOS app?
To start localizing your iOS app, you need to internationalize it first. Internationalization is the process of designing and building your app to be adaptable to different languages, regions, and cultures. This involves coding and structuring your app in a way that makes it easy to translate and adapt for different locales. Once your app is internationalized, you can then proceed to localize it for specific languages and regions.
What tools can I use for iOS app localization?
There are several tools available for iOS app localization. Xcode, Apple’s integrated development environment (IDE), provides built-in support for localization. It allows you to manage and organize your localization files, and it can automatically generate strings files for you. Other tools like Lokalise and Phrase also offer robust localization features, including translation management, collaboration tools, and automation features.
How can I localize the App Store information of my iOS app?
Localizing your App Store information is crucial for reaching a global audience. You can do this through App Store Connect, which allows you to provide localized app descriptions, keywords, screenshots, and more. This helps users in different regions understand what your app is about and how it can benefit them.
What are the common challenges in iOS app localization?
Some common challenges in iOS app localization include dealing with text expansion, managing cultural differences, handling right-to-left languages, and maintaining the quality of translations. It’s important to plan for these challenges ahead of time and use the right tools and strategies to overcome them.
How can I test my localized iOS app?
Testing your localized app is crucial to ensure its quality and usability. You can use Xcode’s testing framework to create unit tests and UI tests for your localized strings. You can also manually test your app by changing the device’s language and region settings.
How can I manage translations for my localized iOS app?
Managing translations for your localized app can be done using translation management systems like Lokalise or Phrase. These tools allow you to collaborate with translators, review and approve translations, and automate the translation process.
How can I handle right-to-left languages in my localized iOS app?
Handling right-to-left languages in your localized app involves flipping the layout of your user interface and ensuring that your text is properly aligned. Xcode provides support for right-to-left languages, and you can use the “semantic content attribute” to control the layout direction of your views.
How can I deal with text expansion in my localized iOS app?
Text expansion is a common issue in localization, as some languages may require more space than others. You can deal with this by designing your user interface to be flexible and adaptable to different text lengths. This involves using Auto Layout in Xcode to create dynamic layouts that can accommodate different text sizes.
How can I maintain the quality of translations in my localized iOS app?
Maintaining the quality of translations in your localized app involves using professional translators, reviewing and proofreading translations, and testing your localized app. You can also use translation management systems to manage and control the quality of your translations.
I am a web developer who dabbles in mobile development from time to time. You can find me on Twitter @joyceechessa to see what I’m up to.