

Key Takeaways
- Atomic is a new tool for interaction design that allows web designers to quickly prototype and share interaction ideas without the need for coding or direct developer involvement. It is particularly useful for remote work.
- The tool, which is similar in interface and shortcuts to Sketch App, allows designers to create different states for a web element and define how it reacts to user interaction. It also has a feature for creating interactive hotspots.
- Atomic also enables easy sharing of prototypes, allowing users to send a link to anyone for feedback. This cloud-based tool can be integrated with other design tools like Sketch and Photoshop, making it a versatile addition to a designer’s toolkit.
Interaction design is the art of creating logical responses to a user’s action on the web. Whether you’re an interaction specialist, a user experience consultant, or a broadly-skilled web designer, it’s your responsibility to decide how a web element reacts to interaction and communicate that to the development team, even if you don’t quite understand the technologies that they’ll use.
But what is the fastest way to do that, without walking over to your developers desk and gesturing insane hand movements?
Also, what if you work remotely?
Atomic finally released their beta last week and it’s the fastest way of sampling an interaction idea and sending it out.
![]()
Before Atomic
FramerJS, Origami and Pixate are some of the tools at our disposal already, but we don’t always want to code our interactions or test them on native devices, do we?
Atomic is blazingly fast, and if you’re coming from a Sketch App background, it’s even better. It mimics the same keyboard shortcuts, has the same intuitive snap-to features, and quite honestly it felt like I was using Sketch, only with the ability to prototype interactions.
Getting Started
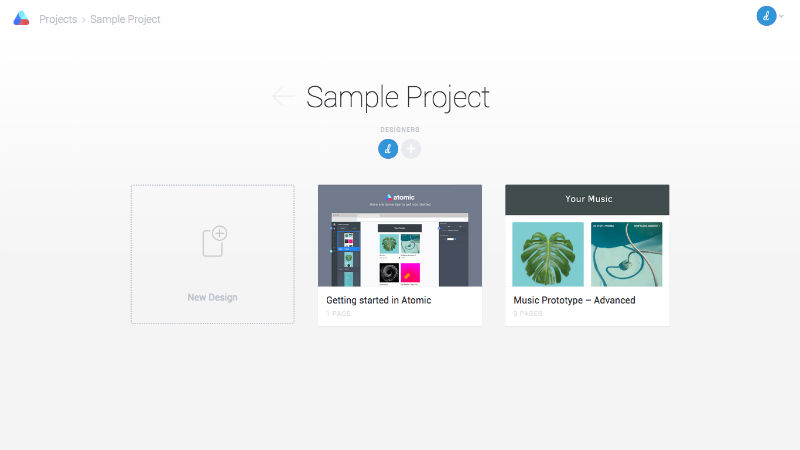
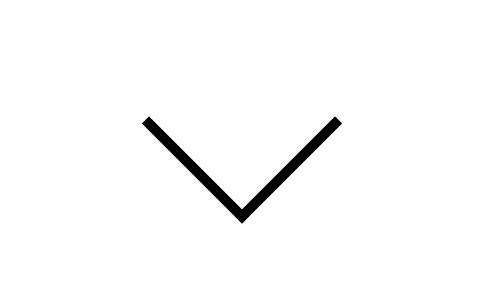
Ready to start? It’ll only take a few minutes of your time. Head over to the atomic website, sign up for the beta, and select “New Design” at the Projects screen. In this small tutorial we’ll be transitioning a dropdown arrow into a close icon upon a click interaction.
Creating The First State
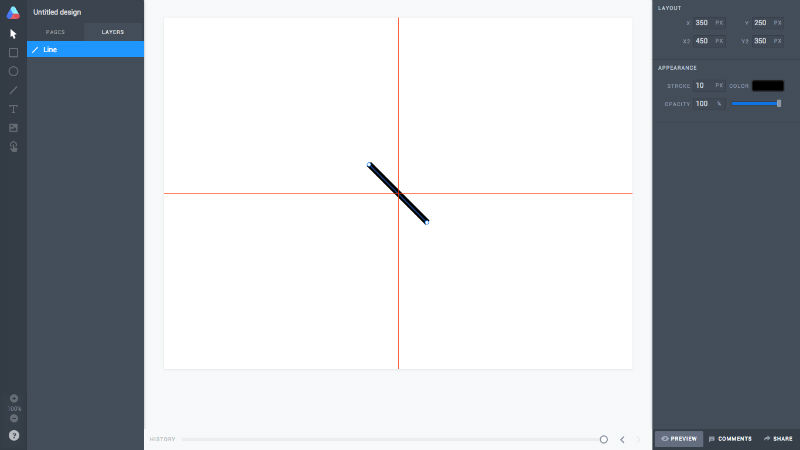
Press “L” to initiate a simple Line.
The other shortcuts are “S” for Select, “R” for Rectangle, “O” for Oval, “T” for Text, “I” for Image and “H” for Hotspot.
You can hold “Shift” while dragging to create a completely accurate 45 degree angle; to skip ahead a few steps, the X, Y, X2 and Y2 should be 350, 250, 450, 350 respectively, and also make sure the “Stroke” is 10px.
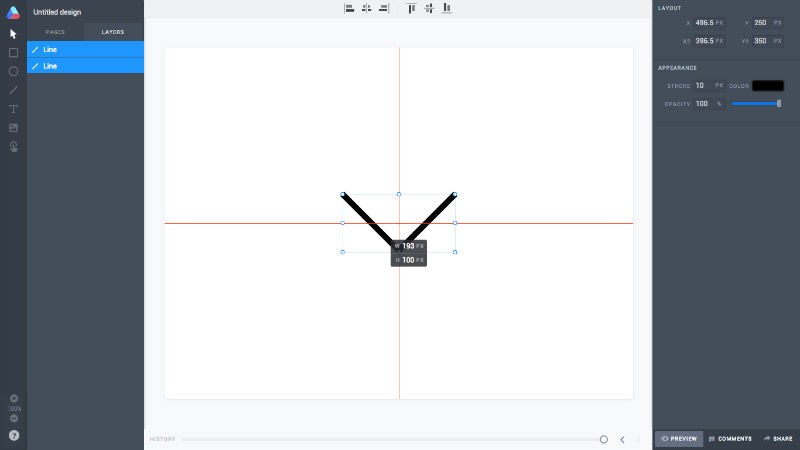
Press “D” for Duplicate and enter a new set of coordinates: 453, 250, 443 and 350. We now have our dropdown icon, but we need it center-aligned. See the layers on the left-hand side? Click both of them while holding Shift and drag both lines together into the center of the artboard. You’ll know you’ve hit the spot when the red auto-alignment lines appear.
We’ve created our first state.
Creating The Second State
Click “Pages” in the layers sidebar; click “Page 1” on the card and rename it to something more relevant, like State 1 (Dropdown). Click the hamburger menu icon, also on the card, and duplicate our first state – then rename the duplication to State 2 (Close).
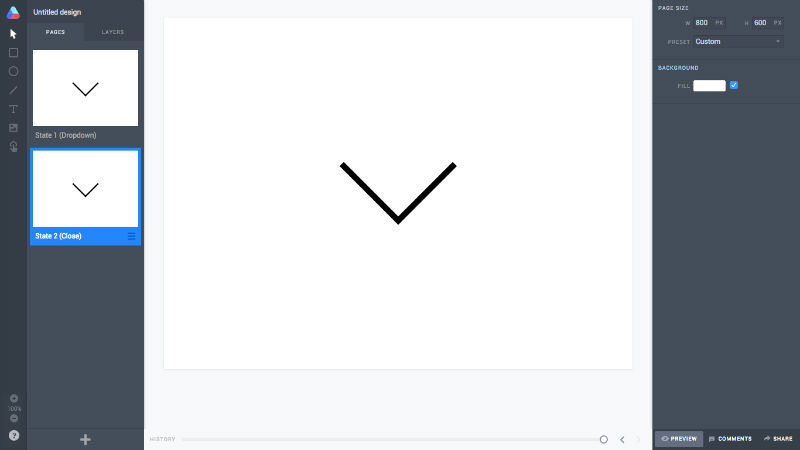
Switch back to “Layers” and select that right-most line; drag it to the left until the dropdown icon resembles a close icon. Repeat the multiple layer select step (by selecting both layers while holding Shift, in case you forgot) and drag into the center of the artboard again.
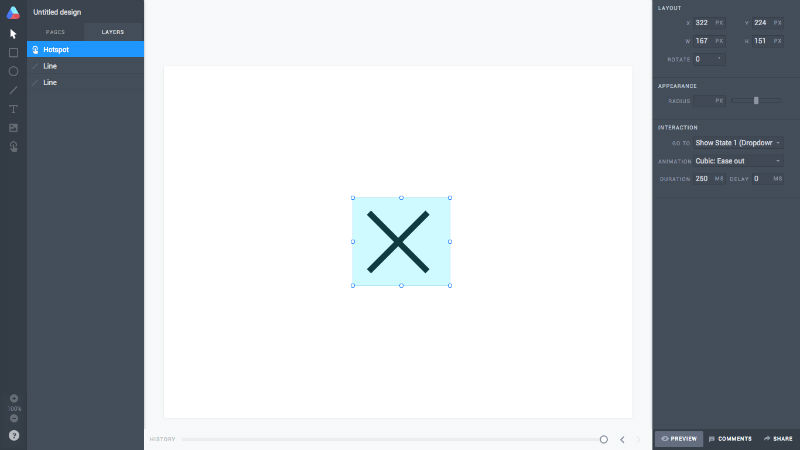
Creating Interactive Hotspots
Now this is where the magic happens. Press “H” to create a Hotspot. Since we’re only sampling a single interaction, the hotspot can be any size you wish, as long as it fully covers the dimensions of our icon.
After you’ve created the hotspot, a new set of options will appear. Under the “Interaction” heading, select the first state as the “Go To” option. Select “Cubic: Ease Out” as the animation type. Atomic is able to handle interactions of much higher complexity, but for the sake of this tutorial we’ll keep it simple and use the default values for the other options.
Previewing Interactions
Now switch back to the other state and repeat this step. When you’re ready, click the “Preview” button in the bottom-right corner of the window and click away. What you should be seeing is your dropdown icon animating into a close icon.
Sharing Your Interaction
If you didn’t actually follow this tutorial, that’s fine…I’ll send you a link! In the bottom-right corner, adjacent to the “Preview” button, click “Share”.
Copy the link and simply send it to anybody you like, however you like. Here’s the animation we made just now. After you’ve sent out the link to your interaction, users can comment on it and offer feedback.
It really is that simple!
Conclusion
Without downloading an app or writing a single line of code, I was able prototype how a dropdown icon would transform into a close icon. The use-case for this would be a dropdown menu that only appears when the icon is clicked, as opposed to accidentally triggering it upon a hover state.
But of course the dropdown needs a close icon, hence the use-case for my interaction idea. Did I mention you can copy my interaction and edit it? I challenge you to design the dropdown menu and demonstrate how exactly it would drop down.
Frequently Asked Questions about Atomic Design
What is Atomic Design and how does it work?
Atomic Design is a methodology developed by Brad Frost for creating design systems. It’s based on the idea that a design system is similar to chemical elements. The smallest parts, atoms, form larger, reusable components, known as molecules. These molecules combine to form even larger, reusable components called organisms. By combining organisms, we can create templates, and finally, pages. This approach allows designers to create most consistent, scalable, and robust design systems.
How does Atomic differ from other design tools?
Atomic is a powerful design tool that focuses on interaction design. It allows designers to create high-fidelity prototypes with a high level of detail. Unlike other tools, Atomic offers a timeline feature that lets designers control the duration and easing of their animations, providing a more realistic interaction experience.
Can I collaborate with my team using Atomic?
Yes, Atomic is built with collaboration in mind. It allows multiple users to work on the same project simultaneously. You can also share your prototypes with stakeholders and gather feedback directly within the tool.
Is Atomic suitable for beginners?
Atomic is user-friendly and suitable for both beginners and experienced designers. It offers a range of tutorials and resources to help users get started and make the most of its features.
How does Atomic help in creating beautiful interactions?
Atomic provides a range of features that help in creating beautiful interactions. It offers a timeline for animations, allowing designers to control the duration and easing of their animations. It also provides a range of pre-designed components that can be customized to fit your design.
Can I integrate Atomic with other tools?
Yes, Atomic can be integrated with other tools like Sketch and Photoshop. This allows you to import your designs directly into Atomic and start adding interactions.
Is Atomic a cloud-based tool?
Yes, Atomic is a cloud-based tool. This means you can access your projects from anywhere, at any time. It also makes collaboration easier as you can share your projects with your team and stakeholders directly.
What is the pricing for Atomic?
Atomic offers different pricing plans based on your needs. They offer a free plan with limited features, as well as paid plans that offer more features and capabilities.
Can I use Atomic for mobile app design?
Yes, Atomic is suitable for both web and mobile app design. It allows you to design responsive prototypes that can adapt to different screen sizes.
How can I learn to use Atomic?
Atomic offers a range of resources to help you learn how to use the tool. This includes tutorials, articles, and a community forum where you can ask questions and share your experiences with other users.

