How to Build Your Own AI Assistant Using Api.ai


If you’re keen to learn more on AI, check out our screencast Microsoft Cognitive Services and the Text Analytics API, for AI sentiment in your bot.

The world of artificially intelligent assistants is growing — Siri, Cortana, Alexa, Ok Google, Facebook M, Bixby — all the big players in technology have their own. However, many developers don’t realize that it’s quite easy to build your own AI assistant too! You can customise it to your own needs, your own IoT connected devices, your own custom APIs. The sky’s the limit.
Note: this article was updated in 2017 to reflect recent changes to Api.ai.
Earlier, I put together a guide on five simple ways to build artificial intelligence in 2016, where I covered a few of the simple options out there for building an AI assistant. In this article, I’d like to look at one particular service that makes it incredibly simple to get quite a fully-featured AI assistant with very little initial set up — Api.ai.
Key Takeaways
- Api.ai, now part of Google Cloud, enables developers to build AI assistants with natural language processing and speech-to-text capabilities.
- Getting started with Api.ai is straightforward—simply sign up using a Google account, agree to the terms, and create your first agent.
- Customize your AI assistant by enabling the “Small Talk” feature in Api.ai to make your bot sound more human-like and engaging.
- Use JavaScript and HTML5 to connect your web interface to Api.ai, enabling both text input and voice commands.
- Api.ai offers detailed JSON responses and debugging tools to help refine and troubleshoot your AI assistant’s responses.
- For hosting, consider using services like Glitch.com for free HTTPS-enabled web hosting, ensuring secure communication with Api.ai.
Building an AI Assistant with Api.ai
This post is one of a series of articles aimed to help you get a simple personal assistant running with Api.ai:
- How to Build Your Own AI Assistant Using Api.ai (this one!)
- Customizing Your Api.ai Assistant with Intent and Context
- Empowering Your Api.ai Assistant with Entities
- How to Connect Your Api.ai Assistant to the IoT
What is Api.ai?
Api.ai is a service that allows developers to build speech-to-text, natural language processing, artificially intelligent systems that you can train up with your own custom functionality. They have a range of existing knowledge bases that systems built with Api.ai can automatically understand called “Domains” — which is what we’ll be focusing on in this article. Domains provide a whole knowledge base of encyclopedic knowledge, language translation, weather and more. In future articles, I’ll cover some of the more advanced aspects of Api.ai that allow you to personalize your assistant further.
Getting Started With Api.ai
To get started, we’ll head to the Api.ai website and click either the “Get Started for Free” button or the “Sign Up Free” button in the top right hand corner.
We’re then taken to a registration form which is pretty straightforward: enter your name, email and password and click “Sign up”. For those avoiding yet another set of login credentials, you can also sign up using your GitHub or Google account using the buttons to the right.
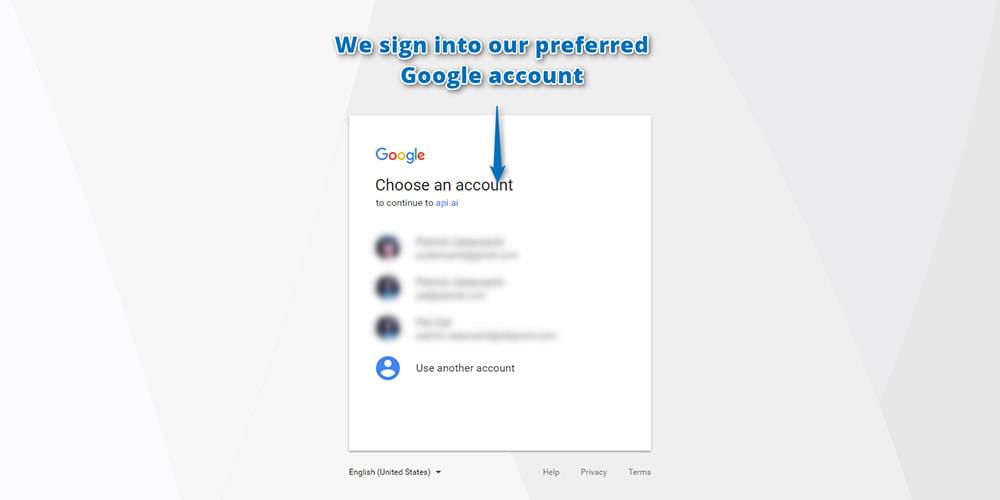
As Api.ai was bought by Google, it’s migrated towards solely using Google accounts to log in. So if you’re new to Api.ai, you’ll need to sign in with your Google account:
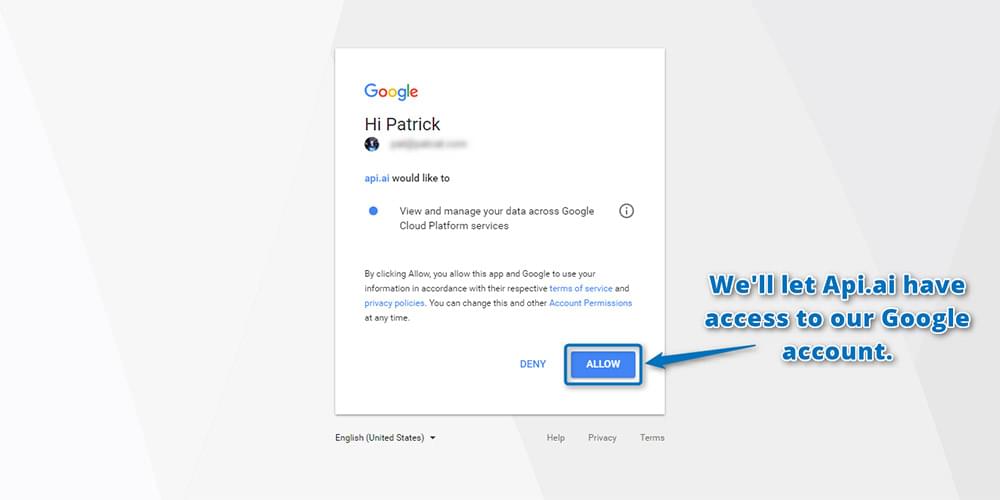
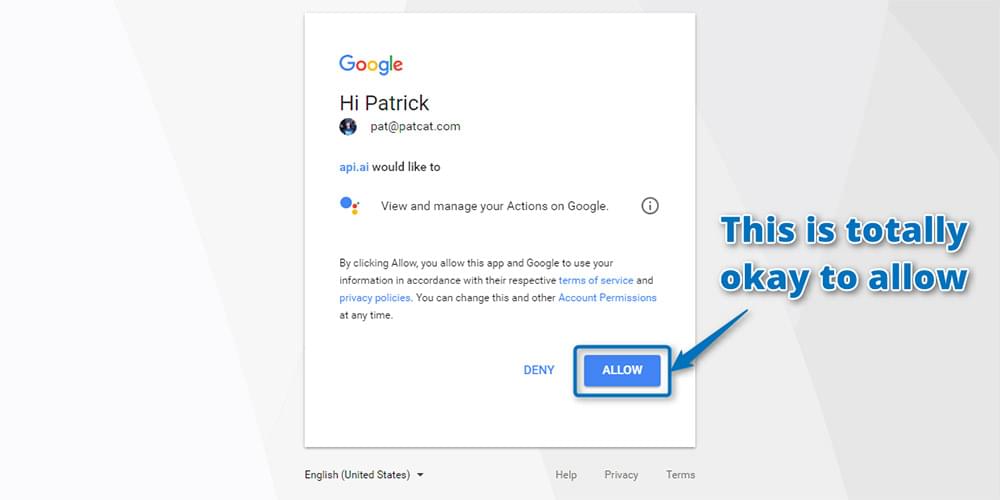
Click Allow to grant Api.ai access to your Google account in the screen that follows:
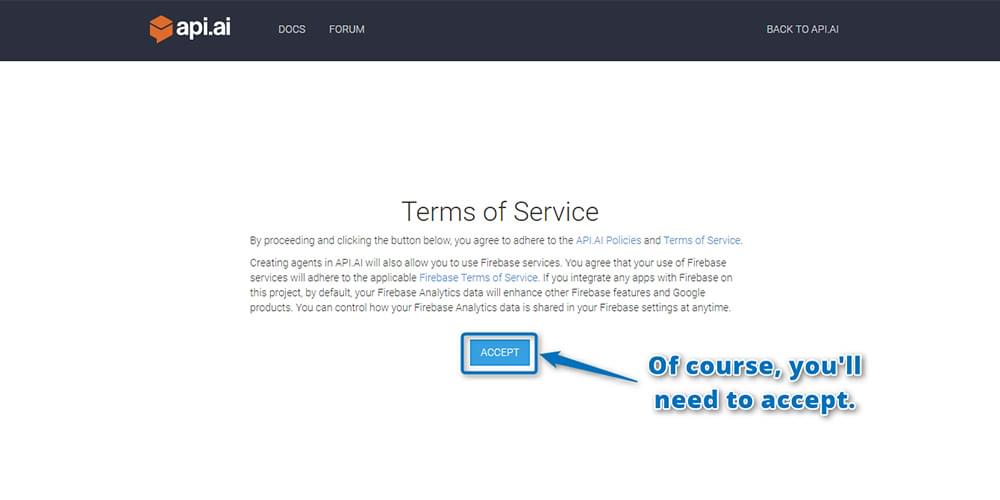
You’ll also need to read through and agree to their terms of service:
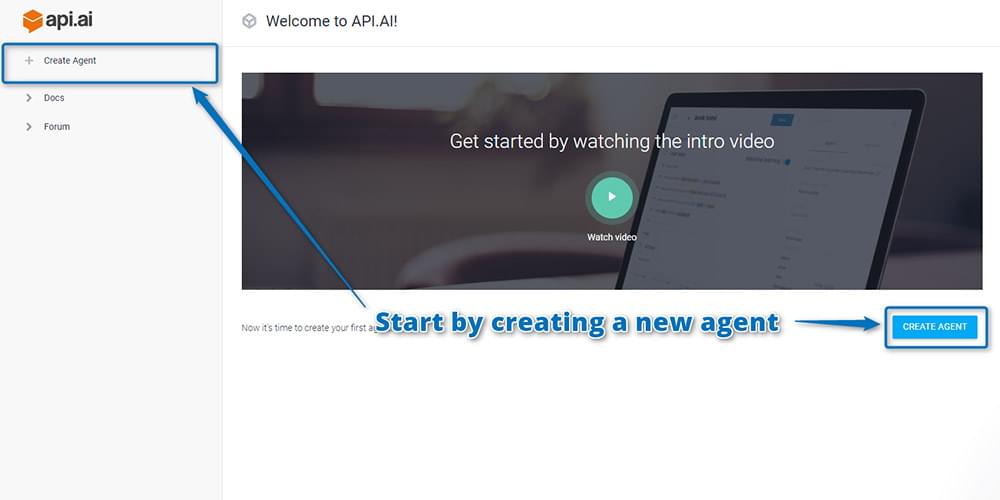
Once you’ve signed up, you’ll be taken straight to the Api.ai interface where you can create your virtual AI assistant. Each assistant you create and teach specific skills to is called an “agent” in Api.ai. So, to begin, you create your first agent by clicking the “Create Agent” button on the top left hand side:
You may need to authorize Api.ai again to have additional permissions for your Google account. This is normal and a-okay! Click “Authorize” to continue:
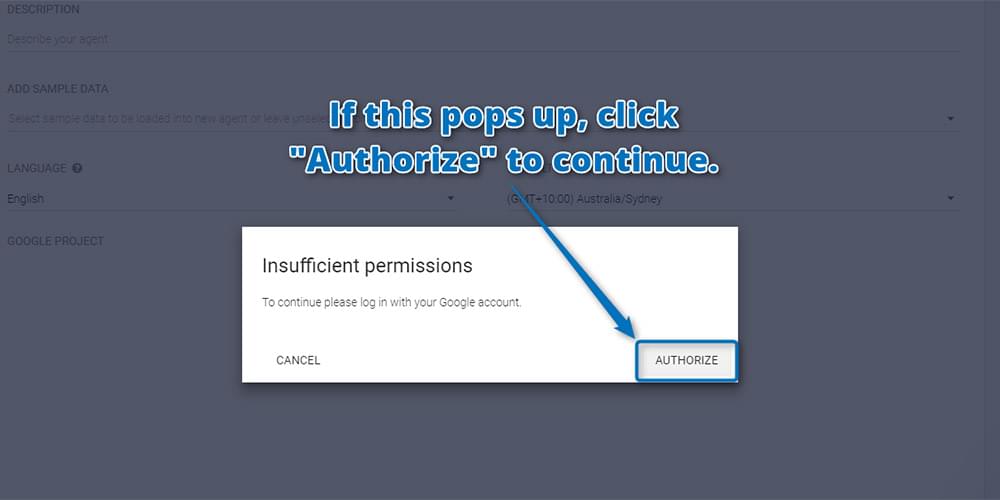
And allow:
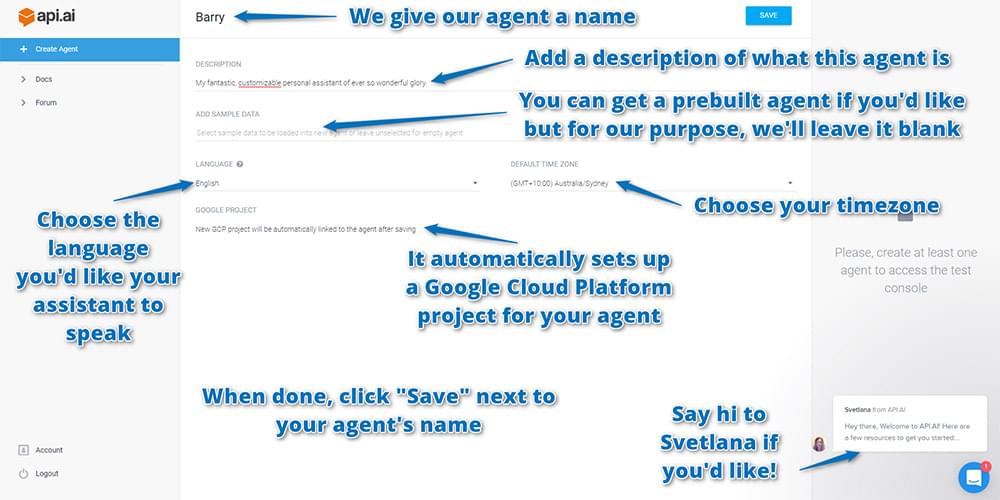
On the next screen, enter in your agent’s details, including:
- Name: This is just for your own reference to differentiate agents in the api.ai interface. You could call the agent anything you like — either a person’s name (I chose Barry) or a name that represents the tasks they’re helping out with (e.g. light-controller).
- Description: A human readable description so you can remember what the agent’s responsible for. This is optional and might not be needed if your agent’s name is self-explanatory.
- Language: The language which the agent works in. This cannot be changed once you’ve chosen it — so choose wisely! For this tutorial, choose English, as English has access to the most Api.ai domains. You can see which domains are available for each language in the Languages table in the Api.ai docs.
- Timezone: As you’d expect, it’s the timezone for your agent. Chances are it’ll already have detected your current timezone.
It will also automatically set up a Google Cloud Platform project for your agent, so you don’t need to do anything in this regard; it’s all automated! It’s good to know this is happening, though, so if you go through a lot of testing and creating many agents, just know there are a lot of Google Cloud Platform projects being created which you might want to clean up some day.
When you have input your agent’s settings, choose “Save” next to the agent’s name to save everything:
The Test Console
Once your agent has been created, you can test it out with the test console on the right. You can enter in queries at the top and it will send these to your agent, showing you what would be returned after it hears those statements. Enter in a question such as “How are you?” and see what it returns. Your results should appear below it:
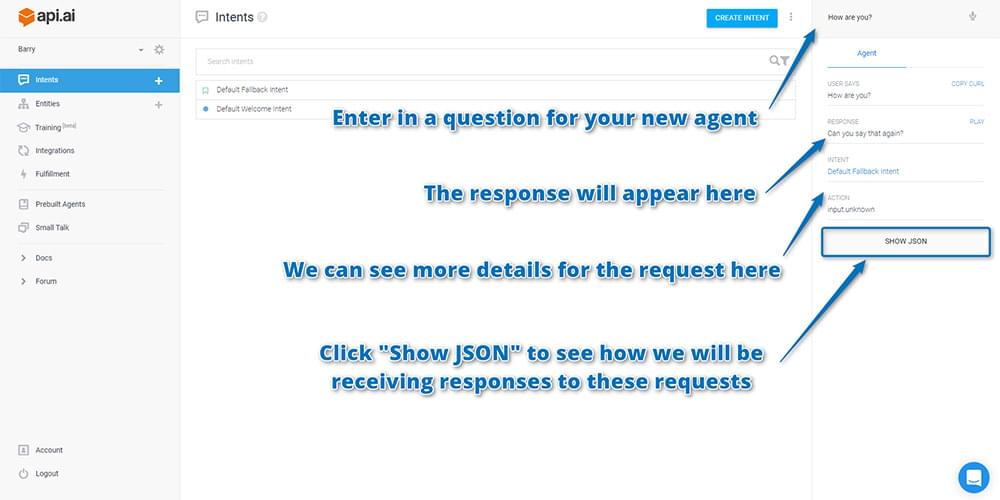
If you scroll down on the right hand side of results, you’ll see more details for how Api.ai interpreted your request (as seen in the screenshot above). Below that, there’s a button called “Show JSON”. Click that to see how the API will return this sort of response to you in your app.
Api.ai will open up the JSON viewer and show you a JSON response that looks similar to this one:
{
  "id": "21345678",
  "timestamp": "2017-05-12T08:04:49.031Z",
  "lang": "en",
  "result": {
    "source": "agent",
    "resolvedQuery": "How are you?",
    "action": "input.unknown",
    "actionIncomplete": false,
    "parameters": {},
    "contexts": [],
    "metadata": {
      "intentId": "6320071",
      "webhookUsed": "false",
      "webhookForSlotFillingUsed": "false",
      "intentName": "Default Fallback Intent"
    },
    "fulfillment": {
      "speech": "Sorry, can you say that again?",
      "messages": [
        {
          "type": 0,
          "speech": "Sorry, could you say that again?"
        }
      ]
    },
    "score": 1
  },
  "status": {
    "code": 200,
    "errorType": "success"
  },
  "sessionId": "243c"
}
As you’ll see … your agent doesn’t know how to respond! Right now, it’s not exactly “intelligent” artificial intelligence: it still needs the intelligence bit to be added in. The input.unknown value in the action field tells you that it’s not sure how to proceed. Above, it’s returning a message of “Sorry, can you say that again?”, which is one of its default fallbacks. Rather than telling the human that it doesn’t understand, it just asks them to say it again … over and over. This isn’t ideal, and I’d prefer to change it to something that makes it clear when the bot doesn’t understand. If you’re picky about this sort of thing too and want to change what it says here, you can find that on the “Intents” page by clicking the “Default Fallback Intent” item there.
A note for those who’ve used Api.ai a little while ago (or had seen it in action): you may have actually been expecting it to have a bit more available out of the box. Previously, it was able to answer queries like “Who is Steve Jobs?” by default. This is no longer the case! You’ve got to add your own integrations with third party APIs to take action and source information. Api.ai provides the sentence parsing and interpreting side of things.
Adding Small Talk
There’s one bit of default functionality you can add which gives your bot a little hint of intelligence — the “Small Talk” feature. This provides a range of answers to commonly asked questions … including “How are you?” from above. This isn’t on by default though. To turn it on, go to the “Small Talk” menu item on the left and click “Enable”:

After enabling, if you scroll down you can see a range of categories of common small talk phrases. Find the “Hello/Goodbye” section and click on it to expand it out. Add some different responses to the Question “How are you?” and then click “Save” at the top right. Upon adding phrases, you’ll see the percentage figure next to the “Hello/Goodbye” section increase to show you how much you’ve customized your chatbot.
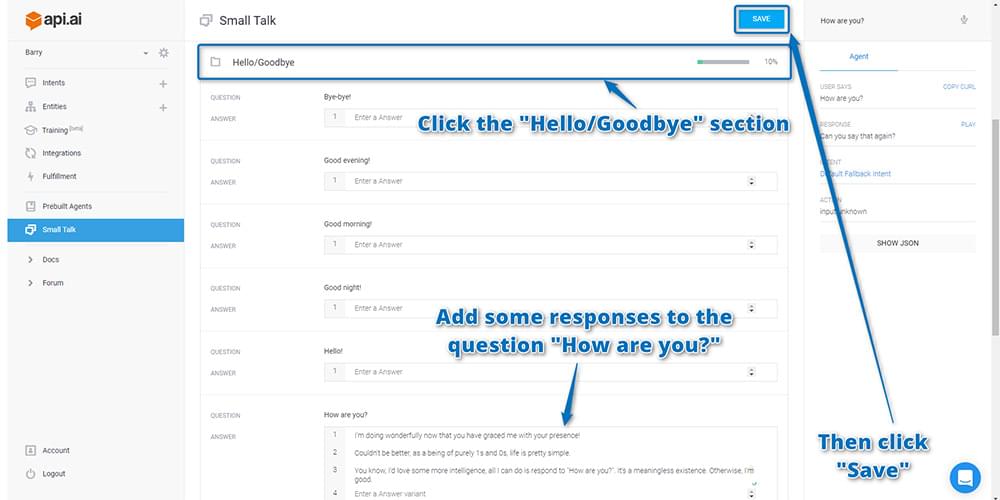
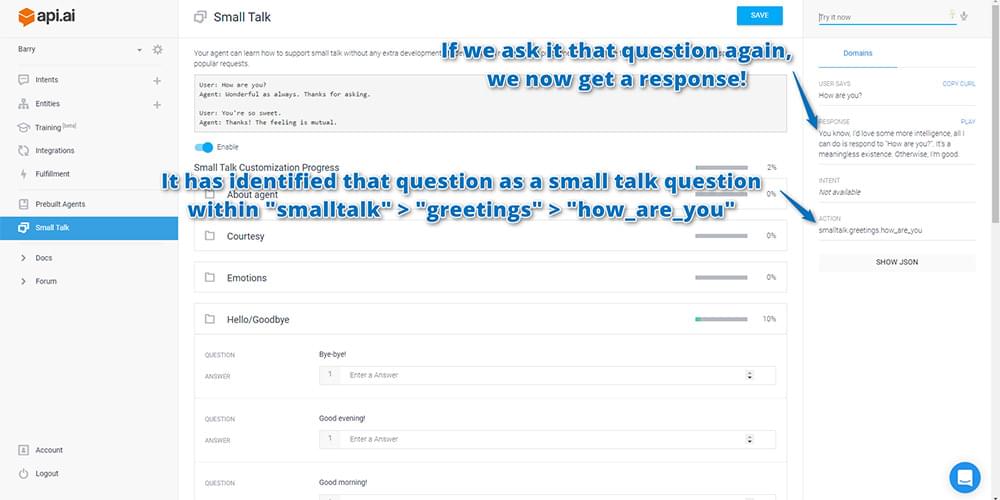
If you then go to the test console and ask it “How are you?” again, it should now answer with one of the responses that you entered in!
If it doesn’t respond correctly, check that you did actually click “Save” before giving that a go! It doesn’t save automatically.
Ideally, you’ll want to customize as much of your small talk responses as you can: this is what will give your Api.ai bot a more unique personality. You can choose the tone and structure of its responses. Is it a grumpy chatbot that hates humans talking to it? Is it a chatbot obsessed with cats? Or maybe a chatbot that responds in pre-teen internet/text talk? You get to decide!
Now that you at least have some small talk elements going on, your agent is now ready for you to integrate them into your own web app interface. To do so, you’ll need to get your API keys to give you remote access to your agent.
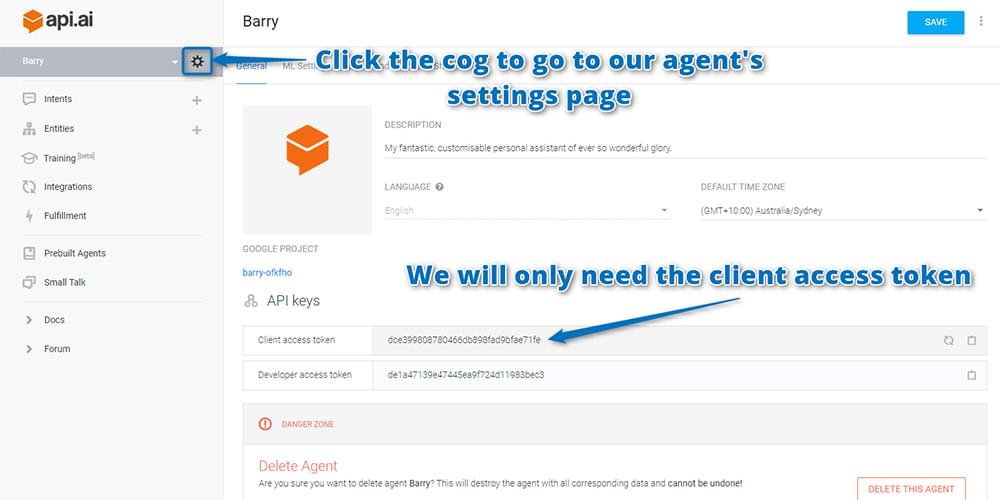
Finding your Api.ai API keys
The API keys you’ll need are on the agent’s settings page. To find that, click on the cog icon next to your agent’s name. On the page that appears, copy and paste the “Client access token” somewhere safe. That’s what we’ll need to make queries to Api.ai’s service:
The Code
If you’d like to take a look at the working code and play around with it, it’s available on GitHub. Feel free to use it and expand on the idea for your own AI personal assistant.
If you’d like to try it out, I have Barry running right here. Enjoy!
Connecting to Api.ai Using JavaScript
You currently have a working personal assistant that’s running in Api.ai’s cloud somewhere. You now need a way to speak to your personal assistant from your own interface. Api.ai has a range of platform SDKs that work with Android, iOS, web apps, Unity, Cordova, C++ and more. You can even integrate it into a Slack bot or Facebook Messenger bot! For this example, you’ll be using HTML and JavaScript to make a simple personal assistant web app. My demo builds off the concepts shown in Api.ai’s HTML + JS gist.
Your app will do the following:
- Accept a written command in an input field, submitting that command when you hit the Enter key.
- OR, using the HTML5 Speech Recognition API (this only works on Google Chrome 25 and above), if the user clicks “Speak”, they can speak their commands and have them written into the input field automatically.
- Once the command has been received, you can use jQuery to submit an AJAX POST request to Api.ai. Api.ai will return its knowledge as a JSON object, as you saw above in the test console.
- You’ll read in that JSON file using JavaScript and display the results on your web app.
- If available, your web app will also use the Web Speech API (available in Google Chrome 33 and above) to respond back to you verbally.
The whole web app is available on GitHub at the link above. Feel free to refer to that to see how I’ve styled things and structured the HTML. I won’t be explaining every piece of how it’s put together in this article, focusing mainly on the Api.ai SDK side of things. I’ll also point out and explain briefly which bits are using the HTML5 Speech Recognition API and Web Speech API.
Your JavaScript contains the following variables:
var accessToken = "YOURACCESSTOKEN",
    baseUrl = "https://api.api.ai/v1/",
    $speechInput,
    $recBtn,
    recognition,
    messageRecording = "Recording...",
    messageCouldntHear = "I couldn't hear you, could you say that again?",
    messageInternalError = "Oh no, there has been an internal server error",
    messageSorry = "I'm sorry, I don't have the answer to that yet.";
Here’s what each of these is for:
accessToken. This is the API key that you copied over from the Api.ai interface. These give you permission to access the SDK and also say which agent it is you’re accessing. I want to access Barry, my personal agent.baseUrl. This is the base URL for all calls to the Api.ai SDK. If a new version of the SDK comes out, you can update it here.$speechInput. This stores your<input>element so you can access it in your JavaScript.$recBtn. This stores your<button>element that you’ll be using when the user wants to click and speak to the web app instead.recognition. You store yourwebkitSpeechRecognition()functionality in this variable. This is for the HTML5 Speech Recognition API.messageRecording,messageCouldntHear,messageInternalErrorandmessageSorry. These are messages to show when the app is recording the user’s voice, can’t hear their voice, when you have an internal error, and if your agent doesn’t understand. You store these as variables so that you can change them easily at the top of your script, and also so that you can specify which ones you don’t want the app to speak out loud later on.
In these lines of code, look for when the user presses the Enter key in the input field. When that happens, run the send() function to send off the data to Api.ai:
$speechInput.keypress(function(event) {
  if (event.which == 13) {
    event.preventDefault();
    send();
  }
});
Next, watch for if the user clicks the recording button to ask the app to listen to them (or if it is listening, to pause listening). If they click it, run the switchRecognition() function to switch from recording to not recording and vice versa:
$recBtn.on("click", function(event) {
  switchRecognition();
});
Finally, for your initial jQuery setup, you set up a button which will be on the bottom right of your screen to show and hide the JSON response. This is just to keep things clean: most of the time you won’t want to see the JSON data that comes through, but every now and then if something unexpected happens, you can click this button to toggle whether the JSON is viewable or not:
$(".debug__btn").on("click", function() {
  $(this).next().toggleClass("is-active");
  return false;
});
Using the HTML5 Speech Recognition API
As mentioned above, you’ll be using the HTML5 Speech Recognition API to listen to the user and transcribe what they say. This only works in Google Chrome at the moment.
Our startRecognition() function looks like so:
function startRecognition() {
  recognition = new webkitSpeechRecognition();

  recognition.onstart = function(event) {
    respond(messageRecording);
    updateRec();
  };
  recognition.onresult = function(event) {
    recognition.onend = null;

    var text = "";
    for (var i = event.resultIndex; i < event.results.length; ++i) {
      text += event.results[i][0].transcript;
    }
    setInput(text);
    stopRecognition();
  };
  recognition.onend = function() {
    respond(messageCouldntHear);
    stopRecognition();
  };
  recognition.lang = "en-US";
  recognition.start();
}
This is what runs the HTML5 Speech Recognition API. It all uses functions within webkitSpeechRecognition(). Here are a few pointers for what’s going on:
recognition.onstart. Runs when recording from the user’s microphone begins. You use a function calledrespond()to display your message telling the user you’re listening to them. I’ll cover therespond()function in more detail soon.updateRec()switches the text for your recording button from “Stop” to “Speak”.recognition.onresult. Runs when you have a result from the voice recognition. You parse the result and set your text field to use that result viasetInput()(this function just adds the text to the input field and then runs yoursend()function).recognition.onend. Runs when the voice recognition ends. You set this tonullinrecognition.onresultto prevent it running if you have a successful result. This way, ifrecognition.onendruns, you know the voice recognition API hasn’t understood the user. If the function does run, you respond to the user to tell them you didn’t hear them correctly.recognition.lang. Sets the language you’re looking for. In the demo’s case, it’s looking for US English.recognition.start(). Starts that whole process!
Your stopRecognition() function is much simpler. It stops your recognition and sets it to null. Then, it updates the button to show that you’re not recording anymore:
function stopRecognition() {
  if (recognition) {
    recognition.stop();
    recognition = null;
  }
  updateRec();
}
switchRecognition() toggles whether you’re starting or stopping recognition by checking the recognition variable. This lets your button toggle the recognition on and off:
function switchRecognition() {
  if (recognition) {
    stopRecognition();
  } else {
    startRecognition();
  }
}
Communicating With Api.ai
To send off your query to Api.ai, you use the send() function which looks like so:
function send() {
  var text = $speechInput.val();
  $.ajax({
    type: "POST",
    url: baseUrl + "query",
    contentType: "application/json; charset=utf-8",
    dataType: "json",
    headers: {
      "Authorization": "Bearer " + accessToken
    },
    data: JSON.stringify({query: text, lang: "en", sessionId: "runbarry"}),
    success: function(data) {
      prepareResponse(data);
    },
    error: function() {
      respond(messageInternalError);
    }
  });
}
This is a typical AJAX POST request using jQuery to https://api.api.ai/v1/query. You make sure you’re sending JSON data to it and are expecting JSON data from it. You also need to set two headers — Authorization and ocp-apim-subscription-key — to be your API keys for Api.ai. You send your data in the format {q: text, lang: "en"} to Api.ai and wait for a response.
When you receive a response, you run prepareResponse(). In this function, you format the JSON string you’ll put into your debug section of the web app and you take out the result.speech part of Api.ai’s response which provides you with your assistant’s text response. You display each message via respond() and debugRespond():
function prepareResponse(val) {
  var debugJSON = JSON.stringify(val, undefined, 2),
      spokenResponse = val.result.speech;
  respond(spokenResponse);
  debugRespond(debugJSON);
}
Your debugRespond() function puts text into your field for a JSON response:
function debugRespond(val) {
  $("#response").text(val);
}
Your respond() function has a few more steps to it:
function respond(val) {
  if (val == "") {
    val = messageSorry;
  }
  if (val !== messageRecording) {
    var msg = new SpeechSynthesisUtterance();
    var voices = window.speechSynthesis.getVoices();
    msg.voiceURI = "native";
    msg.text = val;
    msg.lang = "en-US";
      window.speechSynthesis.speak(msg);
  }
  $("#spokenResponse").addClass("is-active").find(".spoken-response__text").html(val);
}
At the beginning, you check to see if the response value is empty. If so, you set it to say that it isn’t sure of the answer to that question, as Api.ai hasn’t returned a valid response to you:
if (val == "") {
  val = messageSorry;
}
If you do have a message to output and it isn’t the one saying that you’re recording, then you use the Web Speech API to say the message out loud using the SpeechSynthesisUtterance object. I found that without setting voiceURI and lang, my browser’s default voice was German! This made its speech rather tough to understand until I changed it. To actually speak the message, you use the window.speechSynthesis.speak(msg) function:
if (val !== messageRecording) {
  var msg = new SpeechSynthesisUtterance();
  msg.voiceURI = "native";
  msg.text = val;
  msg.lang = "en-US";
  window.speechSynthesis.speak(msg);
}
Note: it’s important not to have it speak the “Recording…” bit of text: if you do, the microphone will pick up that speech and add it into the recorded query.
Finally, display your response box and add that text to it so that the user can read it too:
$("#spokenResponse").addClass("is-active").find(".spoken-response__text").html(val);Hosting Your Web Interface
For the best results, you may need to host it on a web server with HTTPS enabled. Your requests to Api.ai are over HTTPS, so it’s much better to also host your web interface on HTTPS. If you’re looking to just use this as a prototype and don’t have an HTTPS secured web server readily available, try Glitch.com! It’s a new service that can host code snippets that contain both front-end and back-end (Node.js) code.
As an example, I’ve got Barry also hosted at https://barry.glitch.me. Glitch hosting at the moment is totally free! It’s a great service and I highly recommend giving it a go.
If you’re looking to make this a bigger project, consider either Let’s Encrypt for a free SSL/TLS certificate, or look into purchasing one from your web host.
In Action
If you run the web app using my styles within the GitHub repo, it looks something like this:

If you ask it a question by clicking “Speak” and saying “How are you?”, it initially shows that you’re recording:
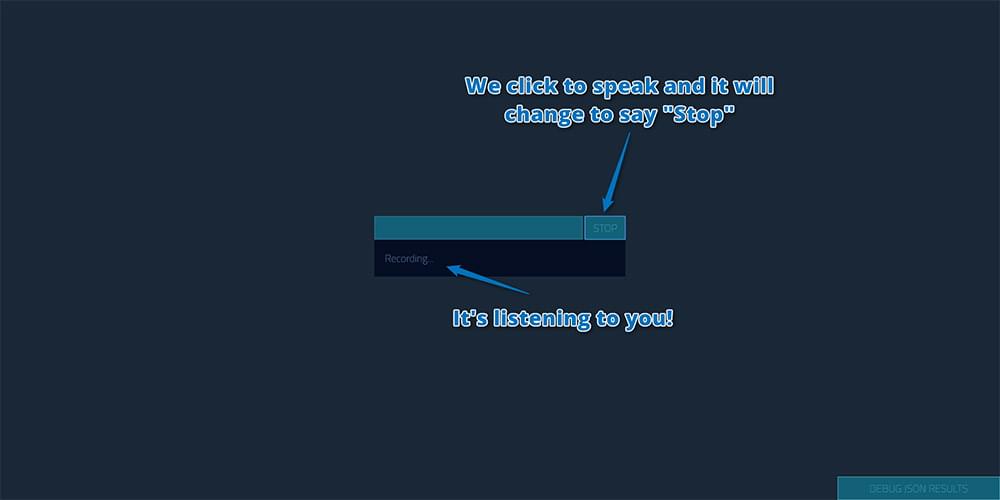
(You may need to give Chrome permission to access your microphone when you click that button. Apparently this will happen every time unless you serve the page as HTTPS.)
It then responds visually (and speaks it too, which is difficult to show in a screenshot) like so:

You can also click the button in the bottom right to see the JSON response Api.ai gave you, just in case you’d like to debug the result:

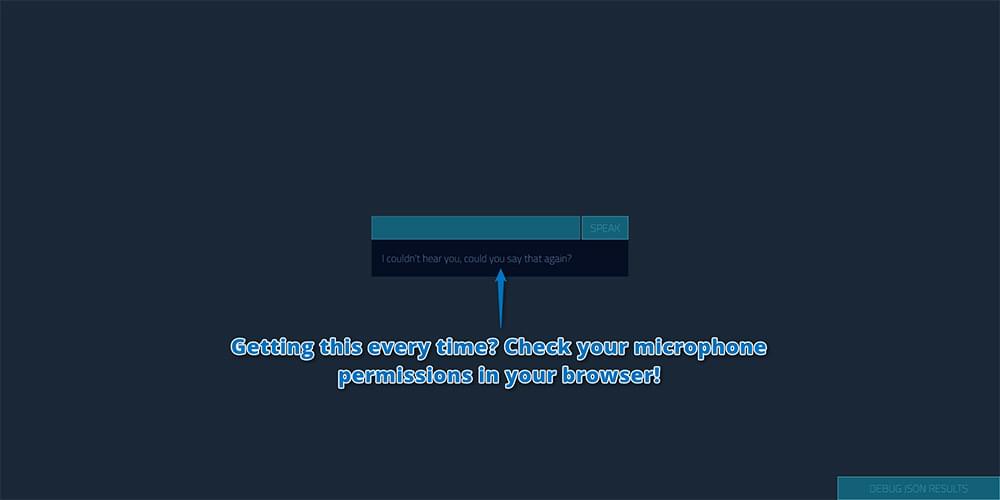
If you seem to mainly be getting the “I couldn’t hear you, could you say that again?” message, check your microphone permissions in your browser. If you’re loading the page locally (e.g. if your address bar starts with file:///), Chrome doesn’t seem to give any access to the microphone at all, and thus you’ll end up with this error no matter what! You’ll need to host it somewhere. (Try Glitch.com as mentioned above.)
Personally, I’m not a fan of some of the default phrases in small talk, like this one:

I’ve customized a bunch of them in those settings we looked at earlier. For example, I found this small talk statement in the list quite odd and decided to customize it like so:

So get out there and customize your own chatbot! Make it unique and have fun!
Having Issues?
I found that occasionally, if the Web Speech API tried to say something too long, Chrome’s speech stops working. If this is the case for you, close the tab and open a new one to try again.
Conclusion
As I’m sure you can see, Api.ai is a really simple way to get a chatbot-style AI personal assistant up and running.
Want to keep developing your Api.ai bot? There’s more that can be done: here’s the whole series I’ve written here at SitePoint!
If you build your own personal assistant using Api.ai, I’d love to hear about it! Did you name yours Barry too? What questions have you set up for it? Let me know in the comments below, or get in touch with me on Twitter at @thatpatrickguy.
Give your AI the human touch with a sentiment tool. Check out our screencasts on the Microsoft Cognitive Services and the Text Analytics API.
Frequently Asked Questions (FAQs) about Building Your Own AI Assistant Using API.AI
What are the prerequisites for building an AI assistant using API.AI?
To build an AI assistant using API.AI, you need to have a basic understanding of programming concepts and languages, particularly JavaScript. You also need to be familiar with Google Cloud services as API.AI is a part of Google Cloud. It’s also beneficial to have a basic understanding of AI and machine learning concepts. However, API.AI is designed to be user-friendly and doesn’t require deep AI knowledge.
How can I integrate my AI assistant with other platforms?
API.AI provides integration support for many popular platforms like Slack, Facebook Messenger, and Skype. You can use the API.AI SDKs and APIs to integrate your AI assistant with these platforms. The process involves setting up a webhook and configuring the platform settings in the API.AI console.
Can I customize the behavior of my AI assistant?
Yes, API.AI allows you to customize the behavior of your AI assistant. You can define custom intents and entities, which determine how your AI assistant responds to user inputs. You can also use the fulfillment feature to write custom code that gets executed when a particular intent is triggered.
How can I improve the accuracy of my AI assistant?
The accuracy of your AI assistant depends on the quality of your training data. You can improve accuracy by providing a diverse set of example phrases for each intent. API.AI also provides a feature called “machine learning mode”, which automatically improves the model over time based on user interactions.
Is it possible to build a multilingual AI assistant using API.AI?
Yes, API.AI supports multiple languages. You can build a multilingual AI assistant by defining intents and entities in different languages. The language of the user input is automatically detected by API.AI.
How can I test my AI assistant during development?
API.AI provides a built-in testing console where you can interact with your AI assistant. You can enter user phrases and see how your AI assistant responds. This allows you to test and refine your AI assistant during development.
What are the costs associated with using API.AI?
API.AI is a part of Google Cloud, and its pricing is based on usage. There is a free tier that includes a certain number of requests per minute and per month. Beyond the free tier, you are charged based on the number of requests.
Can I use API.AI to build an AI assistant for my mobile app?
Yes, API.AI provides SDKs for both Android and iOS. You can use these SDKs to integrate your AI assistant with your mobile app.
How can I handle complex conversations with API.AI?
API.AI provides a feature called “contexts” that allows you to handle complex conversations. Contexts let you control the flow of the conversation and manage dependencies between intents.
Can I use API.AI to analyze user interactions with my AI assistant?
Yes, API.AI provides analytics features that allow you to analyze user interactions. You can see the usage statistics, the performance of your intents, and the user satisfaction score. This information can help you improve your AI assistant over time.
PatCat is the founder of Dev Diner, a site that explores developing for emerging tech such as virtual and augmented reality, the Internet of Things, artificial intelligence and wearables. He is a SitePoint contributing editor for emerging tech, an instructor at SitePoint Premium and O'Reilly, a Meta Pioneer and freelance developer who loves every opportunity to tinker with something new in a tech demo.