


Many designers are just that: Designers.
They don’t want to be programmers and therefore have learned to leverage existing content management systems to provide the functionality that their clients require.
And there’s absolutely nothing wrong with that.
But the issue many of us encounter is that the applications we’ve been leveraging: Joomla, WordPress, and Drupal, and so on have grown up along with us.
Unfortunately they are no longer the lightweight, simple CMS and/or blog engines they once were.
That causes overhead. Overhead for us when trying to skin them to look like the design our client signed off on.
Overhead for the server, since they’re simply bigger, more demanding creatures.
And overhead for our poor clients, in the form of information overload, when they try to log in and actually do something.

Have you taken a step back and looked at the WordPress administration panel lately?
Dropping a client into that admin panel is like dropping them into NASA Mission Control. It can often mean headaches for them AND you.
There’s a need for an elegant, fast, and flexible CMS.
Boo! Introducing Ghost

This is where Ghost comes in! Ghost is a Blog engine and NOTHING else. The developers over at Ghost.org aim to keep it that way.
This is really good news for a number of reasons: There’s a lack of scope creep in the application. Things stay simple when you’re only trying to do one thing and do it well.
The administration panel for Ghost isn’t just simple, it’s beautiful, and it’s drag and drop adjustable.
Because it’s such a nicely designed administration interface, you’ll have way less client resistance than you may be used to. Ghost is clean, simple, easy, and has no higher aspirations than becoming better at what it’s intended to do.
Besides the philosophical simplicity, presentational beauty, and ease of client use, there’s something else.
Ghost’s underlying programming language is based on node.js. Essentially that’s JavaScript running server-side, so you won’t have to learn PHP, Ruby or any other server side programming language. It’s the same kind of JavaScript syntax that you’re probably, at least, somewhat familiar with.
So, whether you’re a new designer looking for something to add to your service offering, or a long-time designer looking for some fresh air for your service offerings, read on.
Summoning the Ghost
Today, I just want to get you set up with a working Ghost install for you to tinker with. Like any new technology, you’re going to want to play with it to truly understand it’s power.
In our next article, we’ll look at how you can take control of Ghost’s powerful theming system.
There are now lots of hosting companies that cater for Ghost sites, including some of the big boys like Amazon and DigitalOcean. Many are cheap — some are even free.
Because node.js has some server-side requirements that aren’t compatible with all shared hosting, I’m going to use Microsoft Azure in this example. If you don’t currently have an Azure account, fear not. You can still follow along with the free demo offering on the Azure home page.
Deploying Ghost on Microsoft Azure.
1). Visit http://azure.microsoft.com/ with your favorite browser. Log in and go to the Management Portal (https://manage.windowsazure.com/).
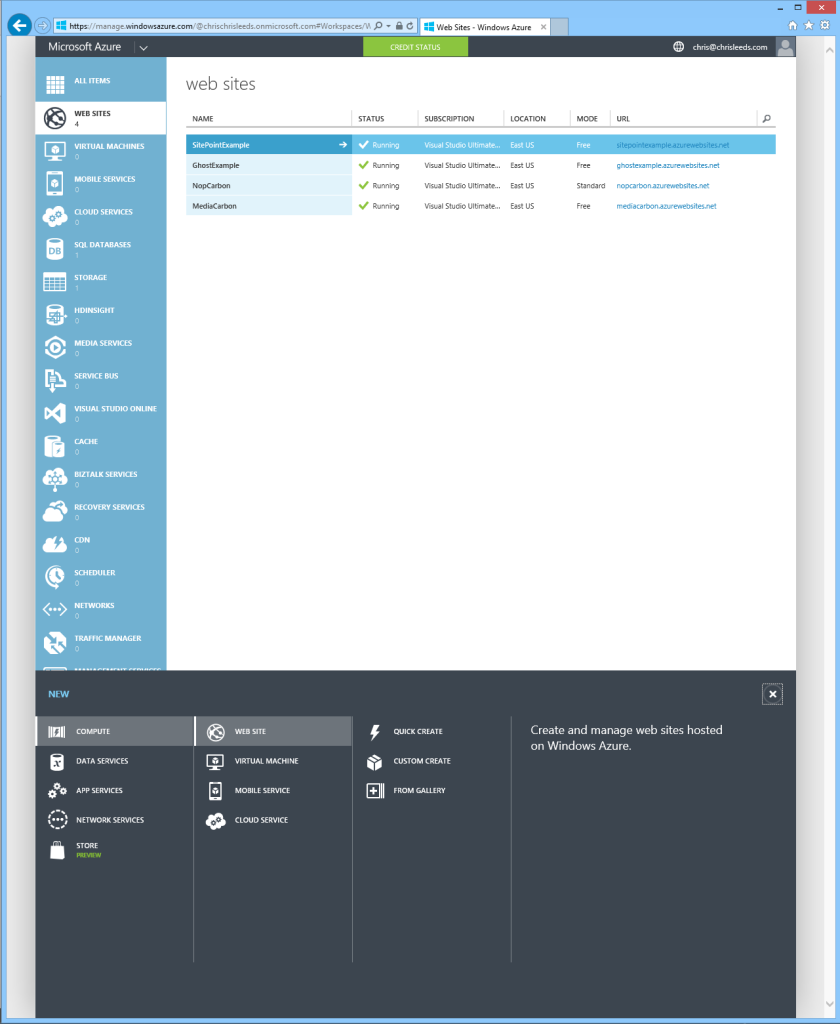
From the Azure Management page, click the Web Sites tab on the left of your screen, and then click the +New button on the bottom left of the screen to open the Menu Tab.
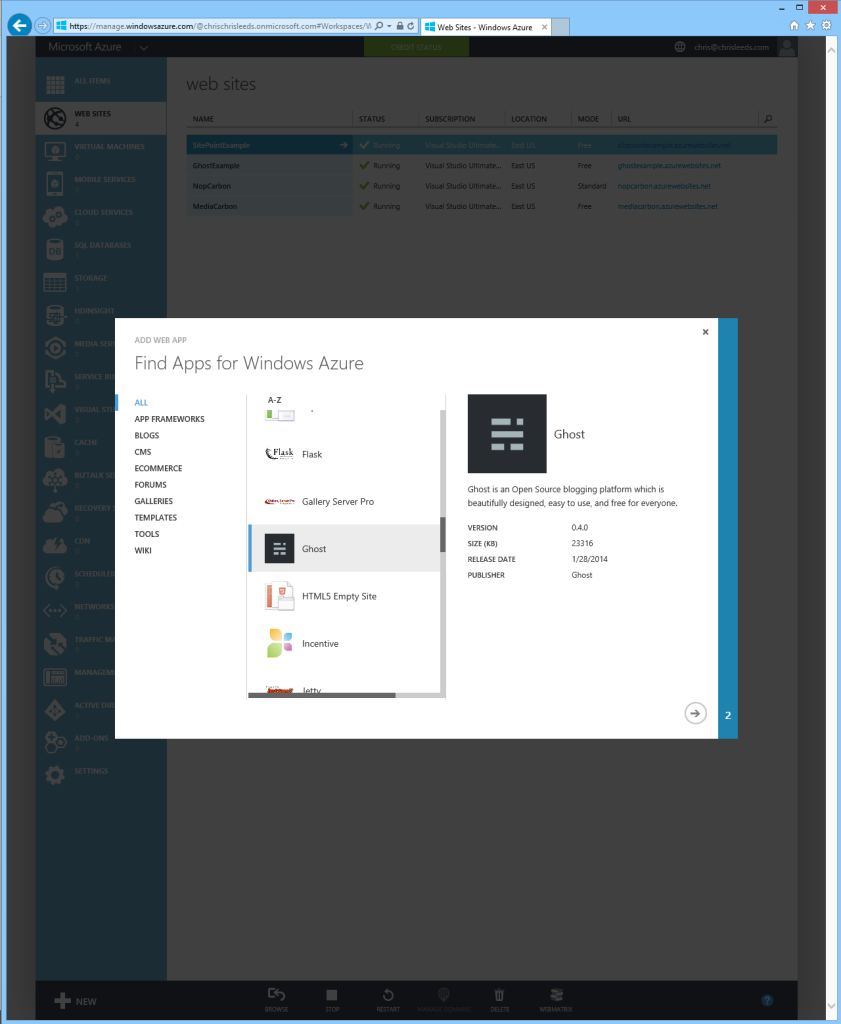
2). In the +New menu, from left to right choose Compute, Web Site, and then click From Gallery to open the Add Web App dialog. Scroll through the list of applications and click the entry for Ghost.
On the lower right of the Add Web App dialog, click the “Next” arrow to open the Configuration page of the Add Web App dialog. You have several choices to make here:
-
URL
This is the URL that your Ghost deployment will be publicly visible. Initially you will use a sub domain such as in my example: GhostExample.azurewebsites.net. After deployment you can apply a domain name to the deployment.
-
Region
This is the geographical location of the datacenter hosting your deployment. In my case I chose East US. Chose the appropriate location for your needs.
-
Email Service Name
This entry is here to establish the deployment’s email capability for sending automatic emails, password recovery, and so on. This can be changed after deployment as well.
In this example, I chose my Gmail account for simplicity. If you use Gmail, make sure to check your spam-trap because it’s fairly common for Gmail to consider Ghost’s log-in attempt to be an unauthorized attempt, in which case Gmail will send you a message regarding the situation and remedies.
-
Email Service Username
This entry is almost always the actual email address associated with the Email Service Name.
-
Email Service Password
This is the actual password for the email account name that you entered in the Username field.
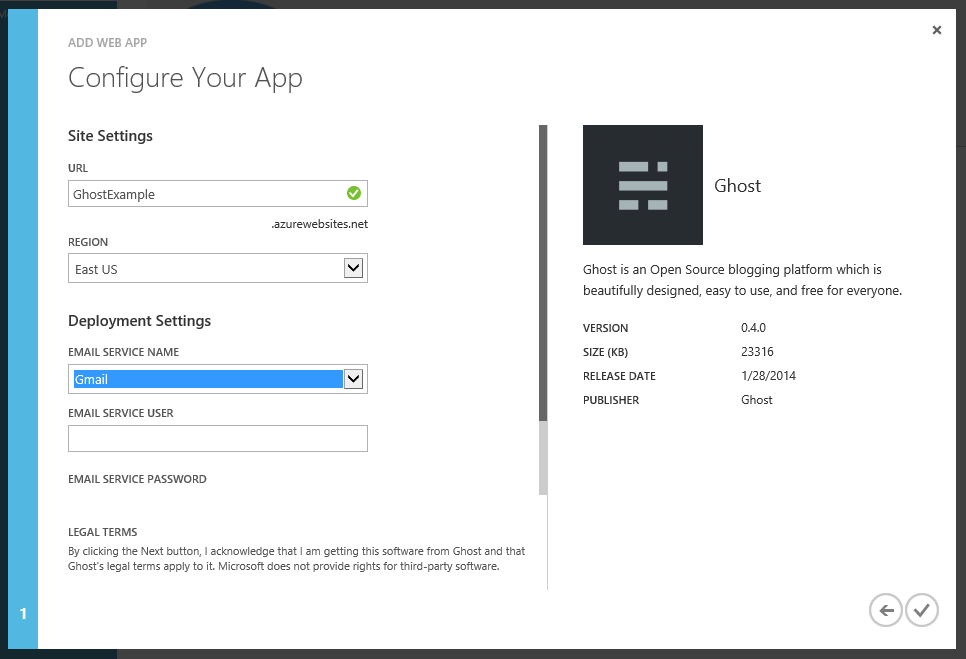
Configure these form fields as you wish and then click the Checkmark icon on the lower right of the dialog.
Azure begins the provisioning process. You’ll see a status message at the bottom of your page and the status indicator will be “Creating”.
This can sometimes take a few minutes, so don’t worry that it’s failing, just be patient.
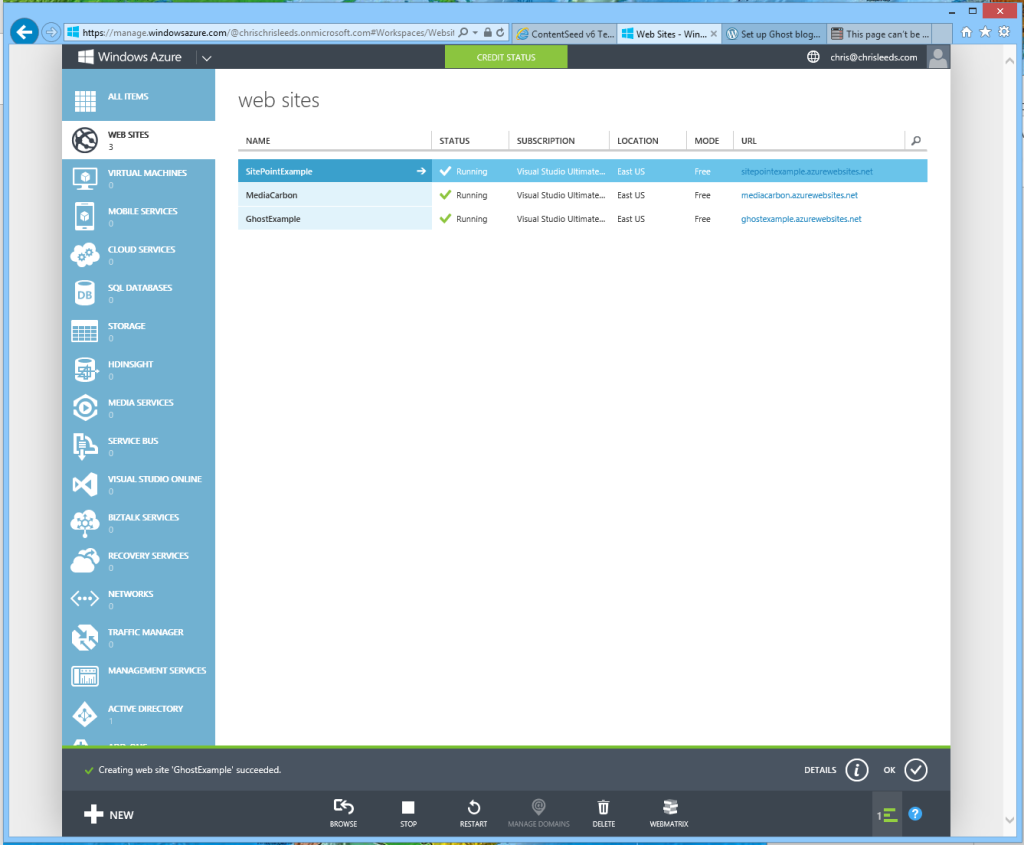
When provisioning is complete you will see a confirmation message at the bottom of the page and the status for your new site will change to “Running”.
4). In the URL column, click the link for your new Ghost deployment to open it in your browser.
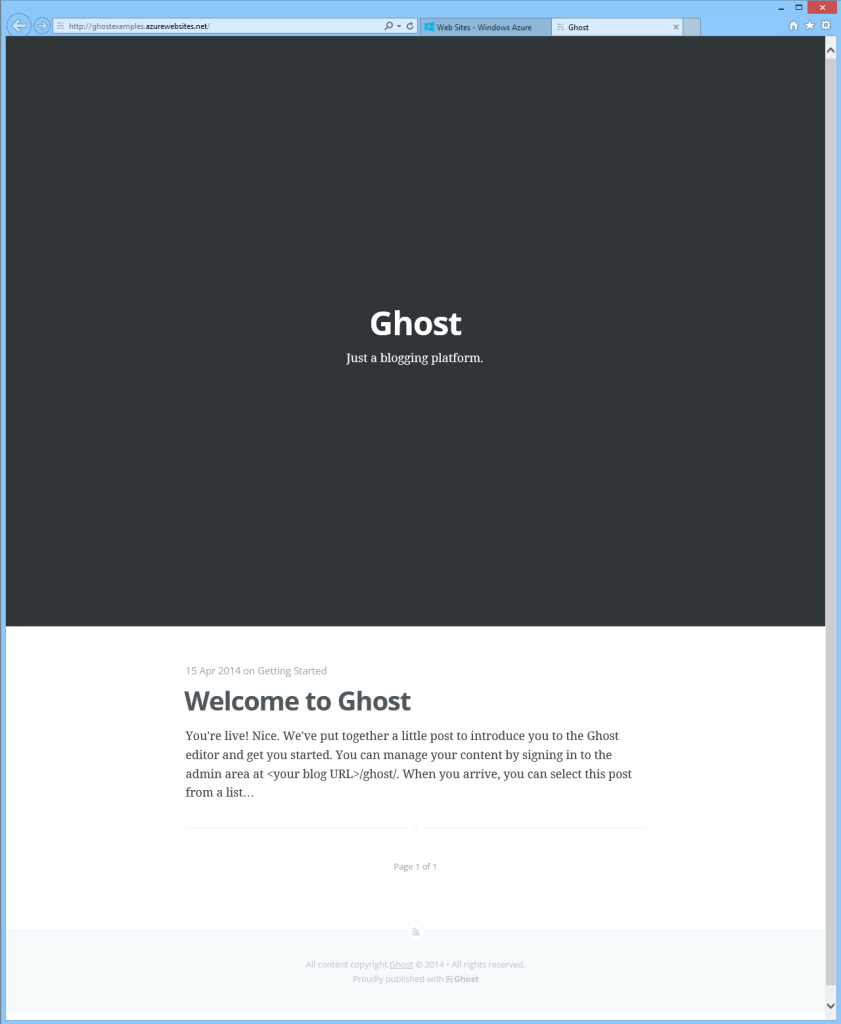
Assuming a successful deployment, you will be presented with a page similar to this.
5). As the welcome message instructs, add “/ghost/” to the URL in your browser’s address bar.
In my example it would be http://GhostExample.AzureWebSites.net/ghost/. This URL is also where you will return to administer the deployment.

On the first visit Ghost requires you to create an account for yourself. These values are for your internal account on the new deployment.
6). Enter your Name, Email, and add a Password, and then click the Sign Up button.
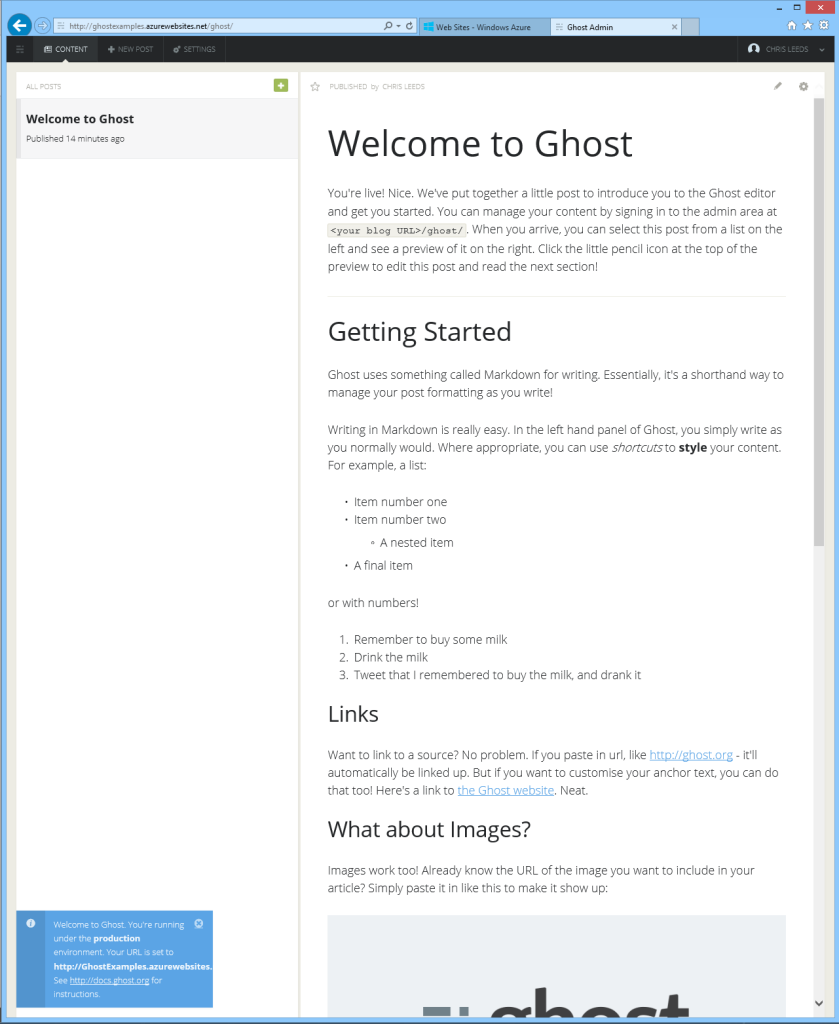
After creating your initial account, Ghost will redirect to the admin interface.
Take some time to explore the interface, become familiar with what’s there, try posting a new article, and so on.
Consider what you’ve accomplished in under five minutes: you’ve deployed a state of the art blog platform on a state of the art server. That’s something that just wasn’t an option as little as five years ago. While the result is a nice accomplishment, with very little effort, it’s only the beginning. There remain such tasks as modifying the visual appearance of the deployment, modifying the settings, creating content, and so on.
In the next installment in this series you will learn how to download the site files to your local computer and modify the theme, giving your deployment its own unique appearance.
See you for Part 2!
Frequently Asked Questions about Getting Started with Ghost
What is Ghost and why should I use it?
Ghost is a powerful open-source publishing platform that allows you to create your own personal blog or website. It’s designed to be easy to use, yet powerful enough for advanced users. Ghost is built on modern technology stack using Node.js, making it fast and responsive. It’s also SEO-friendly, which means your content is optimized for search engines right out of the box. Ghost’s simplicity, speed, and SEO capabilities make it an excellent choice for bloggers and web developers.
How do I install Ghost on my local machine?
Installing Ghost on your local machine is a straightforward process. You’ll need to have Node.js and npm installed on your computer. Once you have these prerequisites, you can install Ghost CLI, a command-line tool that helps manage your Ghost instances. With Ghost CLI installed, you can then install Ghost in your directory of choice. Remember to start your Ghost instance after installation.
How do I create a new post in Ghost?
Creating a new post in Ghost is simple. From your Ghost admin dashboard, click on the “New Post” button. This will open up the Ghost editor where you can write your post, add images, and format your text. Ghost uses Markdown for formatting, but you can also use the rich text editor if you prefer. Once you’re done, you can preview your post before publishing it.
How do I customize my Ghost theme?
Ghost uses Handlebars.js for its themes, which allows for a great deal of customization. You can modify your theme’s HTML, CSS, and JavaScript files to suit your needs. Ghost also has a marketplace where you can find a wide variety of pre-made themes that you can use as a starting point for your own customization.
How do I manage users in Ghost?
Ghost allows you to invite new users to your site and assign them roles. From your Ghost admin dashboard, you can invite new users via their email addresses. Once they accept the invitation, they can create their own account. You can assign them roles such as Administrator, Editor, Author, or Contributor, each with their own set of permissions.
How do I optimize my Ghost site for SEO?
Ghost has built-in SEO features such as meta tags and sitemaps. You can also customize your post URLs for better SEO. Additionally, Ghost supports AMP (Accelerated Mobile Pages) out of the box, which can help improve your site’s performance on mobile devices and potentially boost your search engine rankings.
How do I backup my Ghost site?
It’s important to regularly backup your Ghost site to prevent data loss. You can backup your Ghost site by exporting your content via the Ghost admin dashboard. This will create a JSON file that contains all your posts, pages, and settings. You should also backup your theme files and any custom integrations or modifications you’ve made.
How do I migrate my blog from WordPress to Ghost?
Ghost provides a WordPress plugin that allows you to export your WordPress content in a format that can be imported into Ghost. Once you’ve exported your WordPress content, you can import it into Ghost via the Ghost admin dashboard.
How do I update my Ghost installation?
Updating Ghost is easy with the Ghost CLI. You can update your Ghost installation by running a simple command in your terminal. It’s recommended to backup your Ghost site before updating to prevent any potential data loss.
How do I troubleshoot common issues in Ghost?
Ghost provides detailed documentation that can help you troubleshoot common issues. You can also reach out to the Ghost community for help. If you’re experiencing issues with your Ghost installation, it’s recommended to check the error logs for any clues as to what might be causing the problem.

