
There are many ways to add a Google Map to a web page. Google offers a variety of map types whose use depends essentially on your needs.
Without taking into account some specific uses (APIs for Places or Earth for example) the types of maps most commonly used are:
- Static Maps and Street View Images
- Embedded Maps
- JavaScript Maps
There are also many web services to improve your map as as well as specific APIs for mobile devices. In this article, we’ll cover only basic APIs for web pages. If you are interested in going deeper with Google Maps, take a look at the Google Maps API main page.
Key Takeaways
- Google Maps provides a variety of map types to cater to different needs, including Static Maps, Street View Images, Embedded Maps, and JavaScript Maps. Each type has its specific uses and can be customized based on user requirements.
- To use Google Maps in a web page, an API key is required. This key can be obtained for free but has a limit for daily map loads. If more traffic is needed, an additional quota can be purchased. It’s recommended to use different API keys for different websites.
- The JavaScript Maps API offers the most potential for customization and interactivity. This includes displaying a place, adding a marker, and adding an info window. Other features and possibilities are vast, such as geolocalization, heatmaps, and geometry features.
Getting an API key
As explained on the Google Maps Developer site:
All Maps API applications should load the Maps API using an API key. Using an API key enables you to monitor your application’s Maps API usage, and ensures that Google can contact you about your application if necessary. If your application’s Maps API usage exceeds the Usage Limits, you must load the Maps API using an API key in order to purchase additional quota”.
You have to request a free API Key (see Google Maps Tutorial: Obtaining an API Key). It allows you to load the map for a defined number of times per day (every API has its specific limit). If you need more traffic, you have to purchase an additional quota (see Google Maps Usage limits).
The API key need for maps is a bit of a confusing question. When Google published v3 APIs, a key wasn’t needed. Now, Google has changed its policy, but for backwards compatibility you can load APIs (not all anyway) without a key (see Google Maps API Faq).
To request an API key, first go to the Google Developer Console page (you must own a Google account), create a new project and activate the APIs you need (you’ll find that some APIs are already active):
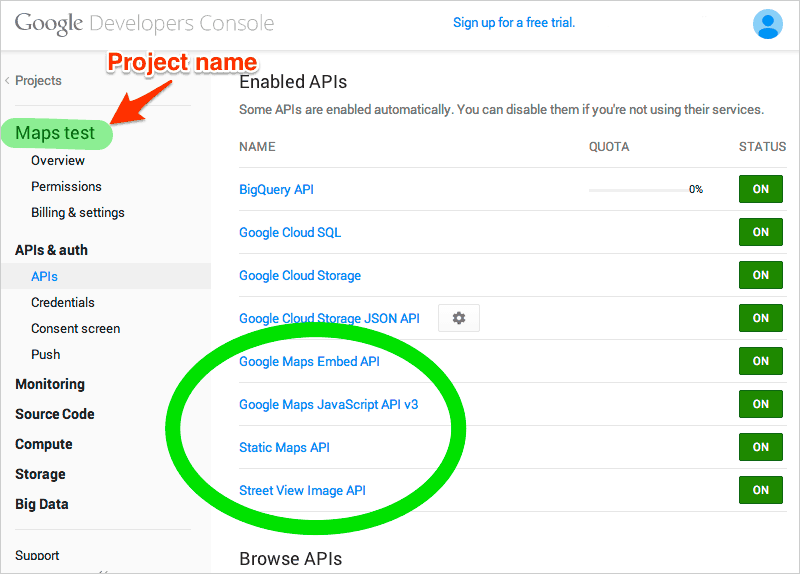
Note that sometimes Google Maps documentation redirects you to the previous developer console: despite of the old Google interface. It is the same as the new one.
The recipes illustrated in this article will need the Maps Embed, Maps JavaScript, Static Maps, and Street View Image APIs.
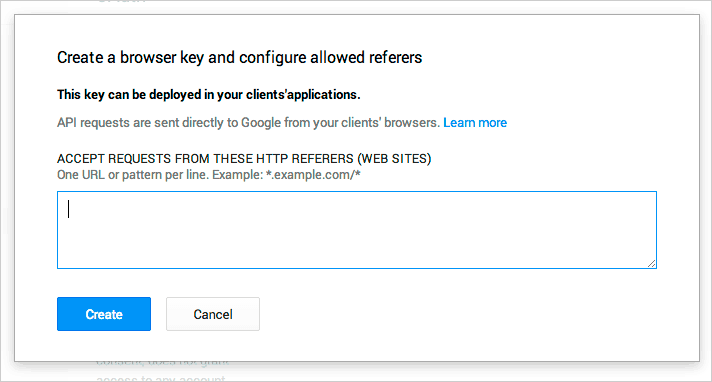
We have now to generate a new public key and, if needed, constrain it to specific domains.
Click on Credential in the left menu, then choose Create new Key in the Public API access section. A dialog will appear where you can choose the Browser key option.

Now you can set one or more http referrers to enable the new key only for them, or (as in this case), simply click the Create button.
Your new API key will now be displayed in your console. At any time you can delete or regenerate it as well as edit the allowed referrers list.
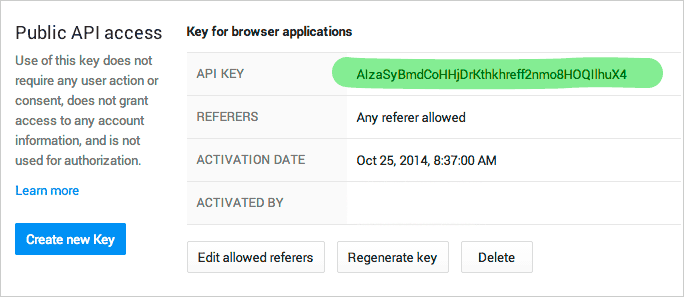
Note that this key will only allow the use of the APIs you have enabled in your project. If you need more APIs, you have to edit your project or create a new one.
Avoid using the same key for all your websites. Create a new API project with specific keys for each of them.
Static maps
Static Maps are the simplest way to add a map to a web page. They don’t require JavaScript or dynamic loading. Maps are created from a URL request that returns a map image you can display on your web page with an img tag.
Although there are many options you can set to customize your map, there are essentially three parameters to display it:
- Your API key
- The map center
- The image size
This a very basic example of a roadmap view centered at Piazza Mattei in Rome, Italy:
<img src="https://maps.googleapis.com/maps/api/staticmap?center=Piazza Mattei,+Rome+Italy&size=600x300&key=__YOUR_API_KEY__"

     alt="Rome, Piazza Mattei">
See the Pen Google Maps: Static example by SitePoint (@SitePoint) on CodePen.
In most cases, you would add options like a zoom value, a marker, or some other parameter. The same map could appear very differently:
See the Pen Google Maps: Static Map example #2 by SitePoint (@SitePoint) on CodePen.
Main parameters are:
- center (required if markers are not present): Defines the center of the map. It can be a URL-escaped string address (like in our example) or a comma-separated latitude,longitude pair;
- zoom: The zoom level of the map;
- size: The rectangular dimensions of the map as
widthxheightformat. The image can be a maximum of 640x640px for free accounts and 2048×2048 for paid ones. - scale: Affects the number of pixels returned for an image, and it is to be used for better rendering in high-density devices (a
size=200x200&scale=2value returns a 400×400 image). Available values for free account are1(the default) or2(in this case the maximum pixel size becomes 1280x1280px); paid accounts can use thescale=4value too; - maptype: defines the type of the map such as
roadmap(the default),satellite,hybrid, andterrain.
There are many other parameters. For a complete list, see the official documentation page.
Street View Images
As static maps, even Street View Images can be used to display static images, but in this case you will obtain, obviously, a street image. In this example you can see the Turtle Fountain in Piazza Mattei, Rome:
See the Pen Google Maps: Streetview example by SitePoint (@SitePoint) on CodePen.
You can play with the compass heading of the camera to change the angle view, the fov parameters (the horizontal field of view) that acts as a zoom value, and the pitch, that specifies the up or down angle of the camera.
See the streetview section in the official docs.
Embedded maps
With embedded maps, we can add interactivity to a map. Also this method is very simple, it consists of an iframe that shows your map just like as in the Google Maps page.
You can set almost the same parameters you can add to static maps in four different modes:
- Place mode displays a map with a marker positioned in a particular place (it can be an address as well as a business or geographic place);
- Directions mode displays the path between two or more points;
- Search mode displays results for a search (for example “Coffee shop in Rome”)
- View mode returns a map without any markers or directions.
Here is an example of a direction map showing a walking route from Piazza Mattei to Piazza Navona in Rome:
See the Pen Google Maps: Embedded directions map by SitePoint (@SitePoint) on CodePen.
For a complete listing of all parameters see the embed section of the documentation page.
You can also easily build your embedded map using the provided map builder tool.
JavaScript maps
JavaScript maps offer the greatest potential for customization and interactivity.
Listing all the possibilities of the JavaScript Maps API and outlining all their features in this article is near impossible. I will therefore only address a recipe of more frequent use: Displaying a place, adding a marker and an info window.
First you have to link to the JavaScript API by adding a script tag in your document:
<script src="https://maps.googleapis.com/maps/api/js?key=__YOUR_API_KEY__">

</script>
Then you need to add a div (or another block element) container to your map and style it as you like. In my example, I’ve simply added width, height, and border styles with CSS.
Now you can initialize the map using the Map method and adding a map center. There are many ways to indicate a map center. The simplest way is to provide a latitude,longitude pair using the LatLng method (there are many ways to retrieve the coordinates of a point, for example using this page at itouchmap.com).
You can also do this directly in your map. This operation is called geocoding, but we won’t cover it in this article. You can find a simple example in this CodePen example.
Building the map requires a few lines of JavaScript:
function initialize() {

  var map = new google.maps.Map(

    document.getElementById('map'),

    {

      zoom: 18,

      center: new google.maps.LatLng(41.893888,12.477525)

    }

  );

}
window.onload = initialize;
The initialize function instantiates a new Map object, binding it to the #map element. Then the LatLng method is called to provide the coordinates of the place to be represented.
This is the result:
See the Pen Google Maps: JS API example #1 by SitePoint (@SitePoint) on CodePen.
We’d now like to add a marker and an information window to be displayed on our map when the marker is clicked. We’ll use the Marker method to add a default marker and bind it to our map using the map option. The position option allows us to put it at the center of our map:
var marker = new google.maps.Marker({

    position: map.getCenter(),

    map: map,

    title: 'Roma, Piazza Mattei'

});
Then we have to create an InfoWindow object and add a listener to the marker for click events:
var infowindow = new google.maps.InfoWindow({

    content: '<div style="white-space: nowrap"><strong>The Turtle Fountain</strong><br>More info at <a href="http://en.wikipedia.org/wiki/Fontana_delle_Tartarughe">wikipedia.org</a></div>'

});
google.maps.event.addListener(marker, 'click', function() {

    infowindow.open(map, marker);

});
This is the result:
See the Pen Google Maps: JS API example #2 by SitePoint (@SitePoint) on CodePen.
For a complete overview of all JavaScript API features, have a look at the tutorial and reference in the official docs.
Conclusion
The methods illustrated in this article represent a very small sampling of what’s possible with Google Maps. You can also try out the geometry features, geolocalization, heatmaps, and more – the possibilities are endless.
If there’s a particular feature of Google maps that you’ve used, let us know in the comments.
Frequently Asked Questions about Getting Started with Google Maps Recipes
How can I get started with Google Maps API?
To get started with Google Maps API, you first need to have a Google account. Once you have an account, go to the Google Cloud Platform Console and create a new project. After creating the project, enable the Maps JavaScript API on the project. You will then be provided with an API key which you can use in your application to access Google Maps services.
What are the different types of Google Maps APIs available?
Google provides several APIs for different types of maps. These include the Maps JavaScript API for interactive maps, the Static Maps API for simple, embeddable map images, the Street View API for panoramic views, and the Geocoding API for converting addresses into geographic coordinates, among others.
How can I embed a Google Map on my website?
To embed a Google Map on your website, you can use the Maps Embed API. This API allows you to generate a URL that you can use in an iframe to display a map. You can customize the map by specifying parameters in the URL, such as the location, zoom level, and map type.
How can I customize the appearance of a Google Map?
Google Maps provides a feature called Styled Maps that allows you to customize the appearance of the map. You can change the colors of the map features, hide or show certain features, and even create a completely custom map style. You can use the Styled Map Wizard to generate the necessary code for your custom map.
How can I add markers to a Google Map?
To add markers to a Google Map, you can use the Marker class in the Maps JavaScript API. You can specify the location of the marker by providing the latitude and longitude coordinates. You can also customize the appearance of the marker by providing an icon image.
How can I handle user interactions with a Google Map?
The Maps JavaScript API provides several event handlers that you can use to handle user interactions with the map. These include click events, drag events, and zoom events. You can use these events to perform actions such as displaying information when a marker is clicked, updating the map when it is dragged, or changing the zoom level when the map is zoomed.
How can I use Google Maps in a mobile application?
Google provides the Maps SDK for Android and the Maps SDK for iOS for integrating Google Maps into mobile applications. These SDKs provide similar functionality to the Maps JavaScript API, but are designed specifically for use in native Android and iOS applications.
How can I calculate directions between two locations on a Google Map?
To calculate directions between two locations, you can use the Directions API. This API provides a route between two locations, along with step-by-step directions. You can specify the mode of transportation, such as driving, walking, or transit.
How can I display real-time traffic information on a Google Map?
Google Maps provides a Traffic Layer that you can add to your map to display real-time traffic information. The traffic information is color-coded to indicate the level of congestion.
How can I use Google Maps for geospatial analysis?
Google provides the Maps Data API for geospatial analysis. This API allows you to create, read, update, and delete geospatial data. You can use this data to perform analysis such as finding the nearest point, calculating the distance between points, and determining the area of a polygon.