

Installing a Linux distribution can be both exhilarating and frustrating. My first two attempts at Linux installs – the first in 1996, the second in 1997 – were unsuccessful.
Installation routines and hardware support in Linux at the time were much less advanced than they are today; Red Hat was still at a relatively early stage in its evolution, Mandriva had yet to be created, and SuSE was just coming out from under the shadow of Slackware. After two failures, I simply decided that I wasn’t going to be beaten by a Linux distribution. I set my machine up in a dual-boot configuration (including both Linux and Windows partitions) with the commitment to use Windows as little as possible. Within a year, the only reason Windows remained on the machine was my wife’s lack of familiarity with Linux. Given that her computing needs were to surf the Web and read email, she, too, eventually made a smooth transition to Linux as the full-time computing platform.
We’ll talk about the dual-boot option at length in this chapter. But first, it’s important to undertake some preliminary research that will help you solve the issues you might experience during installation, whether you’re using a pure Linux system, or a dual-boot configuration.
This article has been reproduced from SitePoint’s new release, “Run Your Own Web Server Using Linux & Apache“, by Stuart Langridge and Tony Steidler-Dennison. The book is designed to show you how to set up, optimize and secure your own Web server. This excerpt of four chapters covers:
- Building the Linux Environment, including research and installation procedures.
- Day-to-day Usage, including a tour of the GNOME Desktop, the Linux Filesystem, and startup and shutdown procedures.
- The Command Line, which introduces the command line, and explains, with numerous practical examples and advice, how to perform essential tasks using this invaluable tool. Includes exploration of the shell and the PATH environment variable.
- Systems Administration, including the procedures for creating new users and groups, sending email, and automating routine tasks, and discusses mounting and filesystems as well as a wide range of services.
If you’d like to read this information offline, you can download the PDF version of this article.
For more information on this title, see the book’s dedicated page.
But now, let’s start building the Linux environment.
Chapter 1. Building The Linux Environment
The Necessary Research
Few things are more frustrating than a lack of hardware support, especially when you’ve become used to the quick driver installs offered by Windows. In fact, Windows comes complete with a basic set of drivers that are intended to anticipate the hardware attached to your machine. Hardware manufacturers also release driver discs for devices such as video cards, network cards and scanners for Windows machines. Developing these drivers costs the hardware manufacturers a great deal of money, so for a long time it didn’t make economic sense for hardware developers to supply drivers for Linux.
As Linux has gained market share within the server market, Linux driver development has improved markedly. Storage devices, RAID arrays, Ethernet cards – all have enjoyed increasing Linux driver development in the past few years.
In order to avoid the headache of missing drivers, it’s important to do a little research before installing your Linux distribution. While it’s unlikely that you’ll have a problem with modern distributions, you’ll still want to do the research just to avoid any hardware issues.
Most of the major distributions release hardware compatibility lists. These lists itemize the hardware that’s known to work with the drivers included in the distributions. Red Hat/Fedora, Mandriva, and SuSE also provide hardware mailing lists for distributions from their Websites. These lists, though, tend to rely on users to help solve hardware compatibility issues after the fact, rather than providing information for users before an installation.
Additionally, there’s an excellent compatibility list for Linux in general. It doesn’t provide quite the degree of granularity you’ll find in the manufacturer-specific lists, so it should be used as a fallback, rather than your primary source of information.
Hardware Compatibility Lists
Red Hat/Fedora
Red Hat’s major product line is Red Hat Enterprise Linux (RHEL), which is mostly based on Red Hat’s free software distribution, Fedora. Fedora is not actually maintained by Red Hat; it’s maintained by the community of Fedora developers. However, Red Hat does a lot of work on Fedora, because that work flows into RHEL.
Red Hat’s Hardware Catalog doesn’t extend beyond RHEL to the Fedora releases, which is something that you’ll need to remember when looking to the Red Hat site for Fedora support. The list provides information on CPUs, video cards, SCSI controllers, IDE controllers, network cards, modems, and sound cards.
SuSE
SuSE offers two lists: the Express Search and Extended Search. The difference between the two is that the Extended Search offers fields beyond Vendor, Device, and Category. In practice, you’re likely only to need the Express Search.
Mandriva Linux
The Mandriva Linux Hardware Compatibility Database is a very comprehensive list of hardware that has been tested by the Mandriva Linux community.
General Linux
The Linux Hardware Compatibility HOWTO is perhaps the most comprehensive of the high-level Linux links. It was begun in 1997 and is updated as often as twice annually. It provides information on all device types and all major manufacturers.
Aside from providing interesting and useful user forums, LinuxQuestions.org also provides an outstanding list of Linux-compatible hardware. This is the most up-to-date of the high-level Linux lists, with updates appearing daily where applicable. While it’s not as comprehensive as the HOWTO, the LinuxQuestions list is easily as important because of this timeliness.
Linux Compatible provides both updated lists, and forums in which users can help other users resolve existing hardware issues.
Installing the Distribution
Once you have completed your preliminary hardware research, it’s time to walk through the installation process. We’ll take a look at both the graphical and text-based installers, the second of which can be useful when you’re installing Linux on a machine with limited resources. Don’t forget that, if your situation demands it, you can install Fedora Core on your server without a desktop. In any event, it’s a good idea to read through the following sections before putting the installation CD into your computer.
The Dual-Boot Option
We’ve already mentioned the dual-boot option for your server: running both Windows and Linux on the system. As I’ve mentioned, this provides a great set of “technical training wheels” as you adjust to the new capabilities and options in your Linux server. The following installation instructions will work equally well with a dual-boot configuration. However, there are a few important points to keep in mind when choosing this option.
- If you’re building your dual-boot server on a fresh box, be sure to install and configure Windows first. By default, Windows doesn’t recognize any of the native Linux filesystems. (NB. There are third-party utilities that allow Windows to read the drives of a Linux installation on the same machine, though; see pro.mount-everything.com for one commercial example.) If Linux is installed first, the Windows boot loader will take over and load Windows; Linux will be there, but you won’t be able to boot into it. A Linux installation will cooperate with Windows and allow you to boot into both.
- Linux provides a means to read the FAT32 (typically used by Windows 98 and ME) or NTFS (usually used by Windows NT, 2000, and XP) filesystems. In the case of FAT32, you’ll also be able to write to the Windows partitions. If you’re using an NTFS-based Windows installation, the files on the Windows partition will be read-only.
- If you’re installing Linux on a system that already contains a Windows operating system, it may be useful to purchase a nondestructive partition management tool, such as Partition Magic. This will allow you to move the partitions on your Windows system, creating room on the drive for the Linux installation, and preserving the data that already exists on the drive.
With the exception of these important points, the process of installing a dual-boot system is the same as a single OS installation.
Graphical Installation
Some would argue that the real rise of Linux began with the advent of graphical installers. Prior to that time, installation was a “mouseless” affair, using the keyboard arrow keys and space bar. Red Hat – the distribution upon which Fedora is based – was a pioneer in graphical Linux installation routines. Since that time, the creators have continued to refine and improve upon the process, the result being a very clean and easy-to-follow installation procedure. As you’ll see in the screen shots I’ll present throughout the rest of this chapter, installing Fedora on your new server is nearly painless!
I’ve provided screen shots for nearly every step of the process. While the procedure is easy, there are a few steps that are particularly important to a successful installation. Hopefully, the abundance of screen shots in the following discussion will help you to more easily understand the installation process.
Obtaining Installation CDs
There are two main ways to obtain Fedora Core installation CDs: you can download the CDs from http://fedora.redhat.com/download/ and burn them yourself, or you can buy them.
The installation CDs are downloaded as a series of ISO images, named something like FC4-i386-disc1.iso (FC4 means Fedora Core 4, i386 means it’s for Intel x86 processors, and disc1 means that it’s the first CD). ISO images are direct copies of an entire CD, stored in a single file. Once you’ve downloaded the images, you’ll need to burn each of them to a CD. Alternatively, if you have a DVD burner, and the machine onto which you plan to install Fedora has a DVD drive, you can download the DVD image (instead of the CD images) and burn it to one DVD in the same way you’d burn a CD. Most CD burning programs offer a menu option to burn an ISO image; a list of instructions for the use of various popular Windows CD burning tools is also available online. If in doubt, the help files, or Websites, associated with your CD burning tool are likely to explain how to burn an ISO image onto a CD. (NB. If your CD burning program cannot burn ISO images, CDBurnerXP Pro is simple to use, and runs on all versions of Windows.)
Buying Fedora on CD will cost you a little, but it’s quicker and easier than downloading the images if you don’t have a fast broadband connection (the four CD images total almost 2.5GB). You can buy Fedora Installation CDs from any number of vendors, most of whom will charge you little more than the cost of the blank CDs, plus postage and packing; the easiest way to find these vendors is to search the Web for “cheap Linux CDs” in your country, or ask a local Linux User Group. This may well be the best way to get hold of the CDs if this is your first time running Linux.
The Installation
To begin the installation, put the first installation CD in the CD-ROM drive and reboot the machine. If your machine is configured to boot from the CD-ROM, you’ll see the screen shown in Figure 1.1, when the machine starts.
Figure 1.1. The initial Fedora installation screen.
The initial installation offers several options. You can choose to install in graphical mode by hitting Enter, or in text mode by typing linux text at the boot: prompt. Either way, the first thing the installer will do is offer to check the installation media for you. This is a good way to determine if your installation CDs have been tampered with, or have become corrupted. The process will take a little while, but I’d recommend that you do run this test.
Like any operating system, Linux requires a minimal set of hardware drivers during the installation. After testing the installation media, you’ll see lots of text scrolling down the screen – this is the initial hardware probing process in action. Red Hat helped pioneer the development of graphical Linux installers with Anaconda, Red Hat’s installation program. It includes a highly accurate probing and testing mechanism that makes the rest of the installation routine quite painless.
Once all this media testing and hardware probing is done, you’ll finally see the Welcome to Fedora Core screen. Click the Next button to get started.
Selecting your Language
Figure 1.2. Choosing an installation language.
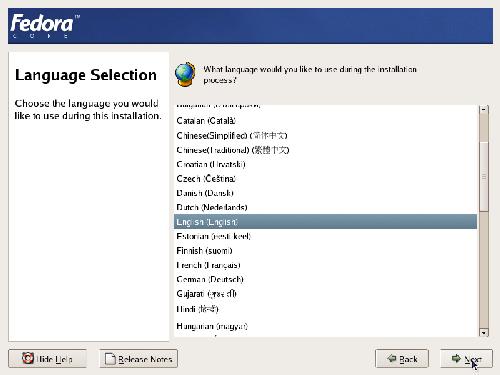
Fedora is truly an international operating system: the installation screens are available in more than 30 languages. Select your native tongue from the Language Selection screen shown in Figure 1.2, and click Next.
Figure 1.3. Choosing a keyboard layout.
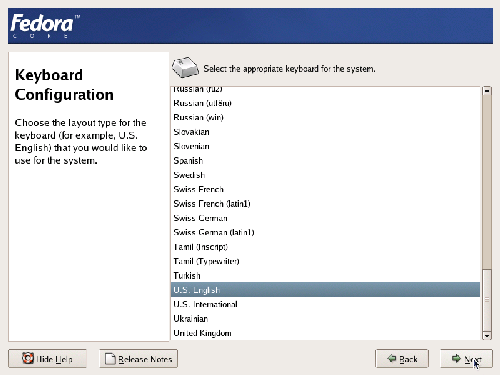
The number of keyboard languages available to Fedora is similar to the number of languages available through the installation screens. Select the language of your keyboard from the screen shown in Figure 1.3.
Installation Types
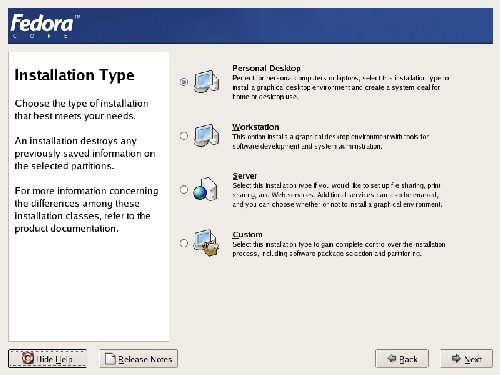
The Fedora installer offers three specialized installation types: Personal Desktop for home or office use, Workstation for development or system administration work, and Server for file, print and Web server use. There’s also a Custom option if you’d like to take complete control over the way your system is configured. As we’re setting up a Web server, select the Server option from the Installation Type screen shown in Figure 1.4, before clicking Next.
Figure 1.4. Choosing an installation type.
Disk Partitioning
The Fedora installer offers two partitioning methods – automatic and manual – as shown in Figure 1.5.
Figure 1.5. Selecting a partitioning method.
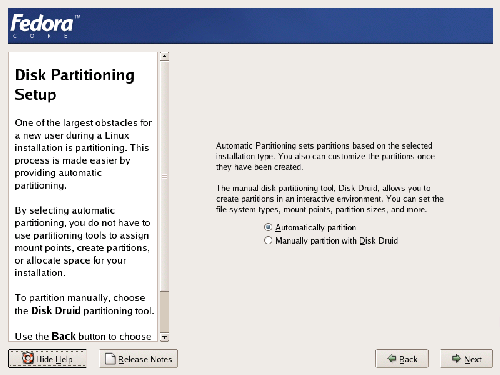
Automatic partitioning creates three partitions:
- The
/bootpartition is the home of the kernel: the program at the very heart of Linux. Fedora recommends a /boot partition of no less than 100MB, though you’ll seldom need this much. - The
swappartition is used as a fallback for memory when all of the system memory is in use. - The
/partition contains everything that isn’t on its own partition.
What, no Drive Letters?
Partitions in Linux appear differently than those in Windows. Linux partitions don’t use the drive letter designations, such as C:, which you may already be used to. The primary partition on Linux is labeled / (you’ll see how this fits into the overall partitioning layout later). Other common partitions on a system include /boot (contains the kernel and boot loader), /home (contains user-specific files), and /var (contains program configuration and variable data). These labels are called mount points, and we’ll discuss them further in Chapter 4, System Administration.
It’s possible to organize your system so that it’s spread over multiple partitions; for example, it’s quite common to put /var (where data, including such things as MySQL databases and Websites, live) on a separate partition. However, automatic partitioning makes things simpler, and spreading your data across different partitions doesn’t achieve very much. Some administrators strongly recommend it, but the Fedora rescue CD (also downloadable as an ISO image from the Fedora Website) will help you avoid most problems that might have been aided by splitting the data across different partitions in the past. Therefore, the default partitioning setup is usually sufficient.
Using Disk Druid
Fedora also offers Disk Druid, a graphical partitioning tool. If you’d prefer a scheme other than the default, you’ll need to use Disk Druid during the installation process. Disk Druid presents both graphical and textual representations of the partition table on your machine. To select a partition, click on the graphical drive representation (shown in Figure 1.6), or on the textual representation. In either case, you can add, edit, or delete partitions by clicking on the appropriate tool bar buttons.
Figure 1.6. The Disk Druid partitioning tool.
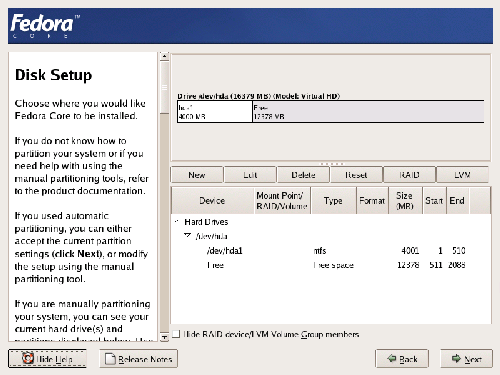
If the system onto which you’re installing Linux has a previous installation of Windows (or some other operating system), you might want to manually delete the partition that contained Windows. Also, if you don’t see any space marked as “Free” in the diagram at the top of the screen, you’ll need to delete something to make room for Fedora. To do this, select the partition to delete, and click the Delete button.
Deleting Partitions
Once you delete a partition, there’s no way to get back the data that was on it. (Well, there’s no easy way. Advanced recovery tools do exist.) Delete with care!
Correcting an Accidental Deletion
If you accidentally mark a partition for deletion, or make some other mistake, you can set everything back to its original state by clicking the Reset button. The changes you make to the partitions won’t actually take effect until later in the installation procedure.
Click the New button to open the Add Partition dialog shown in Figure 1.7.
Figure 1.7. Adding a partition.
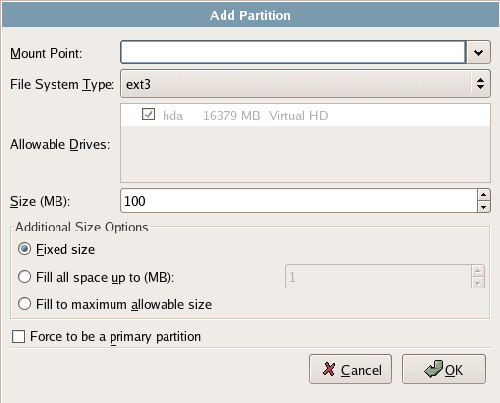
From here, you can designate the mount point, the filesystem type, and the partition’s size in megabytes. The window also offers further size options, including the ability to create a partition with all remaining space on the drive.
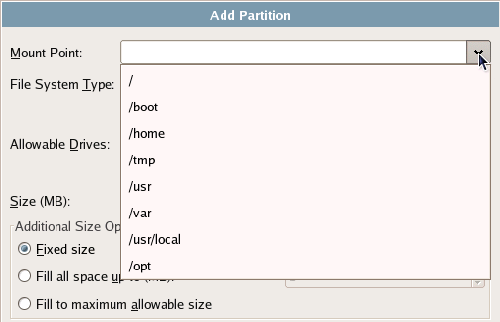
Selecting the Mount Point drop-down will display all common partition labels (mount points) available for your server, as shown in Figure 1.8, “Selecting a mount point.”; alternatively, you can enter the mount point label manually. Bear in mind that these are the most common mount points, and are familiar to all Linux system administrators. Creating a custom mount point might confuse other administrators of your server.
Figure 1.8. Selecting a mount point.
Once you’ve created a partition, you can edit it by selecting the partition, then clicking the Edit button, which will give you almost the same options as the Add Partition dialog.
If you try to proceed past the Disk Setup screen without creating a swap partition, you’ll receive the warning shown in Figure 1.9. A swap partition in Linux serves much the same purpose as virtual memory in Windows: when the system’s memory becomes full, part of the data in memory is written to the swap partition, freeing up that memory space. When the data that was written to the swap partition is needed again, it is read back into memory. To create a swap partition, click the Add button and select swap as the File System Type.
Figure 1.9. The swap warning.
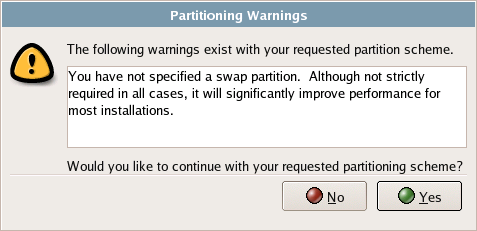
Swap Space
A good rule of thumb to use when creating swap space on your Linux machine is to create one and a half times the size of the machine’s physical memory. For example, if you have 1GB of physical memory, create a 1.5GB swap partition.
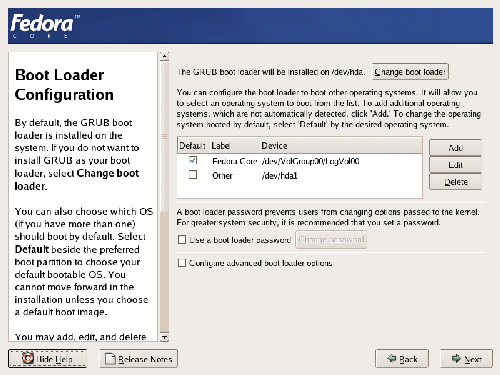
The GRUB Boot Loader
If you have decided to go with a dual-boot install, you’ll need to set up the GRUB boot loader. GRUB is a program that will let you select from a list of installed operating systems, then makes the computer start up the selected OS. As Figure 1.10 shows, it’s pretty easy to set up. Note that you should set a boot loader password to prevent unauthorized users from gaining access to the kernel’s startup parameters.
Figure 1.10. Configuring GRUB.
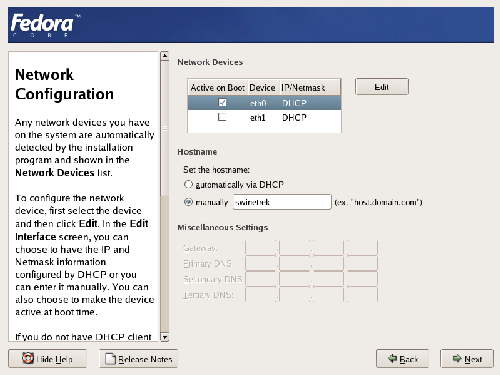
Networking
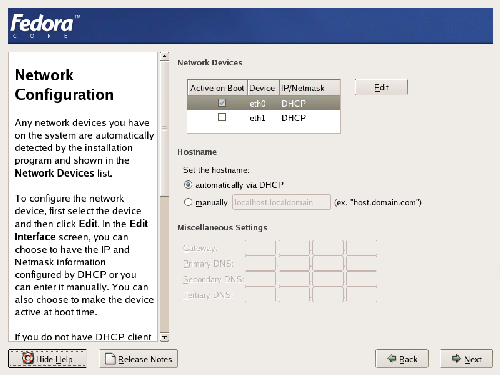
After you’ve set up all of your partitions, you’ll be offered the networking options shown in Figure 1.11, “Configuring Fedora’s networking options.”. Existing Ethernet cards within the machine will be denoted as ethn; if the machine has only one network card, it will be called eth0. The default configuration will be something like that displayed in Figure 1.11. The first network connection (usually eth0) will be made active, and will be automatically configured via DHCP. (NB. Dynamic Host Configuration Protocol (DHCP) will be used to auto-detect your network settings to enable you to connect to the Internet, or to a private network.) If the machine is on an internal network, you’ll probably be able to just leave this as the default. For a Web server that’s connected directly to the Internet, you’ll need to manually configure your static IP address and manually-configured gateway, DNS, and hostname. In this case, your ISP will be able to provide you with the IP address, gateway, and other details to use.
Figure 1.11. Configuring Fedora’s networking options.
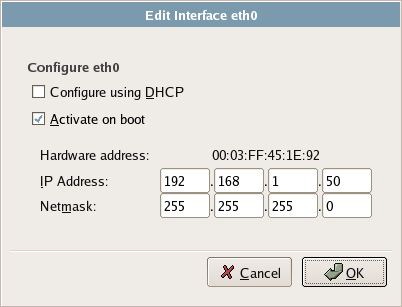
Clicking the Edit button in the Network Configuration screen will display the Edit Interface window shown in Figure 1.12. Here, you can make custom configuration adjustments such as giving the server a static IP address.
Figure 1.12. Manually configuring the Ethernet interface.
When the network device settings have been configured from the previous screen, you’re free to configure the hostname, gateway and DNS settings. Figure 1.13 shows a network device configured primarily for internal use.
Figure 1.13. A manually configured network interface.
Network Security
The Fedora Core distribution – and many of the other major distributions of Linux – strive to make configuring your network security as easy as possible. By default, Fedora turns on a firewall that blocks all traffic coming in from the network. To customize the firewall, simply select the services you want to run on this machine; alternatively, you can simply disable the firewall, which will leave the machine open and vulnerable to hacker attacks. You can also choose to enable Security Enhanced Linux (SELinux), which can help to minimize any damage caused if hackers gain control of parts of the system. Note that SELinux should not be considered an alternative to a firewall – neither the firewall, nor SELinux, makes your system completely secure, so it’s best to enable them both. For our purposes, you should only allow Remote Login and Web Server traffic through the firewall, and set Enable SELinux? to Active, as illustrated in Figure 1.14. Chapter 9, Server Security covers security in more detail.
Figure 1.14. Setting server security options.
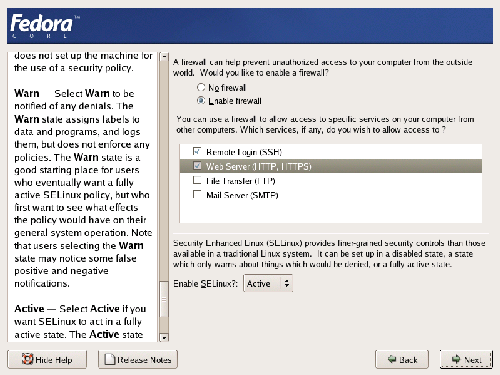
Telnet and FTP Security
Though they’re shown as options in the Fedora security configuration screens, both telnet and FTP are widely recognized as insecure protocols. SSH is a much more secure option than telnet for accessing remote machines, as SFTP is a more secure option than FTP for transferring files. If an FTP capability is required, it’s recommended that it be set up on a different server that’s isolated as much as possible from the rest of the network.
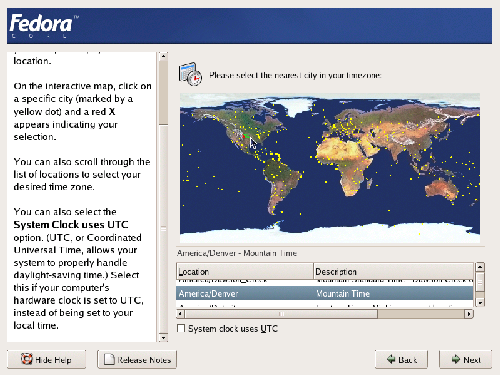
Setting the Time Zone
Fedora offers two options for setting the time zone for your server. You can roll the mouse over the metropolitan area that’s closest to you, or you can select from an exhaustive list of cities. In either case, the chosen city will be highlighted on the map, as shown in Figure 1.15.
Figure 1.15. Setting the time zone.
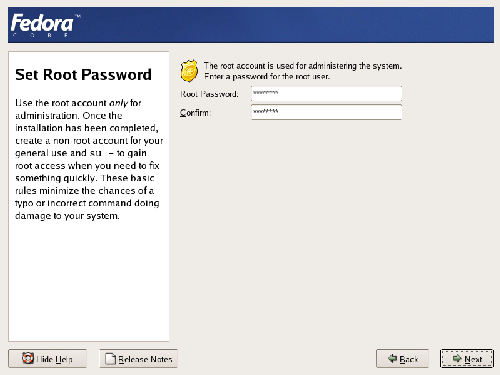
Setting up the Root User
All Linux systems have an administrative account, root. This account has access to everything on the computer; it’s similar to the Administrator account in Windows systems. As the power of root in Linux is so broad, it’s critical that you make accessing the root account as difficult as possible. Choose a secure password for the root account — one that consists of both upper- and lowercase letters, as well as numbers and special characters — and enter it into the fields as shown in Figure 1.16. I would recommend that you record your root password somewhere and keep it safe: if you forget the password, it becomes very difficult to gain access to your machine should things go wrong.
Figure 1.16. Setting the root password.
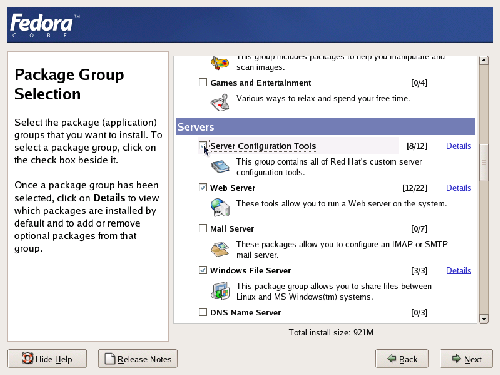
Installing Software Packages
Previously, when you were asked to select an installation type (you selected from personal desktop, workstation, server, or custom), your selection determined which software package groups would be made available for selection in this screen. For your server installation, you’ll see the full range of server software offered as part of the Fedora distribution, with a few nice extras thrown in. Select each of the package groups you want to install by clicking the appropriate check boxes, as shown in Figure 1.17.
Figure 1.17. Selecting package groups.
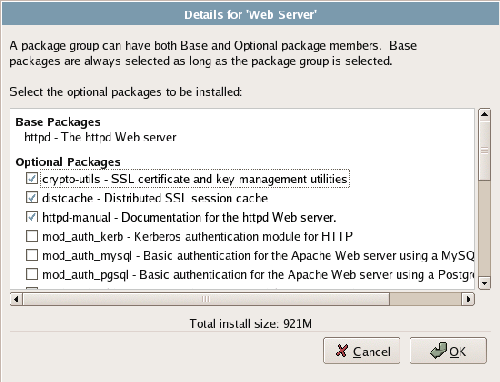
Each package group contains a number of packages; you can see a list of these (similar to the one shown in Figure 1.18) by clicking the Details link that appears when the package group is checked. This list is made up of base packages – packages that are required for this package group – and optional packages, which you can choose to install as your needs dictate.
Figure 1.18. Refining the package selection.
Through a long process of refinement, the Red Hat distributions have come to provide a full range of packages that meet nearly any common computing need. While it’s a good goal to keep a server installation to a minimum, you may find that there are some packages you just can’t do without. If you’re using Linux for the first time, it’s perfectly okay to accept the defaults; it’s easy to add packages later if you realize that something else is required, and the defaults are carefully chosen by the Fedora team to cover the needs of most people.
Of particular importance to your install are the GNOME Desktop Environment and the Server Configuration Tools, which provide a rich set of graphical tools for server configuration. The Server Configuration Tools provide the ability to configure Apache, mail servers, the boot loader, and other software critical to the configuration and operation of your server. Command line tools for accomplishing these tasks are, for the most part, provided in the core installation, but these can be complex and difficult to use. If you intend to administer your server using graphical tools, you’ll need to pick and choose carefully from this section. Since you’re setting up a LAMP (Linux, Apache, MySQL, and PHP) server, you should install the (Apache) Web Server, MySQL, and PHP at this point.
Aside from the Server Configuration Tools, Fedora provides a full range of server software, including the Apache Web server, IMAP and Postfix mail servers, Samba for sharing files with Windows machines, a DNS server, an FTP server, and others. Beware of the temptation to install too many things at this stage, though; it’s easy to install additional packages later, as required, and the more services that are installed now, the more security work you’ll need to do later on. It’s better to install only the things that you know you need now, and to add new services later, as you discover a requirement for them.
Of particular interest to your installation will be the optional Web Server packages provided in the Fedora Core distribution. These include the PHP scripting language, tools for connecting to MySQL and PostgreSQL database servers from PHP, and a full range of other software for communicating with the Apache server. If you’re building a server for a dynamic, database-driven Website, you’ll choose the pieces you need to make that possible from this section. You’re also going to require a database; if you don’t have a dedicated database server, Fedora Core 4 ships with two database packages: MySQL and PostgreSQL. MySQL is the simpler and most widely used of the two, so we’ll be focusing on it in this book.
PHP and MySQL: Further Reading
We’ll cover the high-level details of installing PHP and MySQL in a later chapter. However, the fine details of utilizing those packages lie outside the scope of this book. If you’re looking for a detailed reference for building a dynamic server with PHP and MySQL, check out Kevin Yank’s Build Your Own Database Driven Website Using PHP & MySQL (SitePoint, ISBN 0–9579218–1–0).
Other package groups in which you may be interested include the following:
- The Network Servers package group contains software for various network utility functions, such as DHCP and Kerberos.
- The Development Tools package group provides the tools necessary to build packages from source code. It’s a good idea to have these tools installed, though you may not immediately see how they’ll be used.
- The Administration Tools package group provides a full set of tools developed by Red Hat for server administration and configuration. You should install all of these, as they’ll help you configure your system in the way you choose. There are alternative, command line-based tools intended for experienced administrators, but the graphical tools are easier for those who aren’t experienced in Linux system administration to use.
- The System Tools package group contains a variety of useful tools that allow you to monitor the traffic to your server, connect to VNC and Windows Terminal servers and much more.
As you can see, a huge number of packages are available as part of Fedora Core. The installation provides a full range of software tools for building, configuring, and administering your Web server. It’s not uncommon for budget restraints to dictate that your Web server serve more than a single purpose; if you’re under such restrictions, you’ll find the Fedora tools even more useful.
More Information, Please
As you may have noticed throughout the above series of screens, Fedora provides further information on each of the sections via the Release Notes button beneath the left window pane. This pane further serves as a help screen, providing specific details for each selected install package. Much like the brief package descriptions in the package Details screen, this pane provides a great resource for learning about your Linux system as you’re installing it. The help screens provide much more detail than the brief summaries.
“Installing, Please Wait…”
With the package selection completed, you’ve finished the heavy lifting in the installation of Fedora Linux. The remainder is to be completed by the installer itself: formatting the hard disk with the partitions you created, installing each of the packages you selected, and performing dependency checking for each of the packages.
The process of installing your server will expose you to the power of the RPM Package Manager (RPM) system. (RPM was originally an acronym for Red Hat Package Manager, but was officially changed to a recursive acronym when it came into wide use outside of Red Hat. Other examples of recursive acronyms are PHP (PHP Hypertext Preprocessor) and GNU (GNU’s Not Unix).) RPM is a format that’s used to distribute software for inclusion in Fedora Core, as well as other Linux distributions such as SuSE and Mandriva Linux. The installation of your server will occur as a series of RPM transactions, which check for dependencies and install each chosen or required piece of software.
Dependencies Demystified
Nearly all computer software is dependent upon other pieces of software. A simple and obvious example of this is that any software running on your new server is going to depend on Linux. This relationship is called a dependency. Dependencies are engendered by the philosophy of modular software design, or building big programs from other, smaller programs. RPM investigates and handles these dependencies, checking for the existence of dependent code and noting those pieces that might be missing.
Now it’s time to make yourself a nice cup of coffee: the installation of your Fedora Linux system may take as long as 45 minutes, depending on the speed of your machine. You’ll be asked a few times during the installation to insert additional CD-ROMs and, when the installation is complete, you’ll be prompted to reboot the machine. Your new server will start by presenting a screen that displays information about the Linux distribution and kernel version.
Note that if you’ve set up a dual-boot system, a countdown will occur before the boot loader automatically starts the default operating system. The countdown time can be adjusted through the boot loader configuration. This could be important for a production Web server: should the system go down, you’ll probably want the machine to return to the network as quickly as possible.
Last Steps
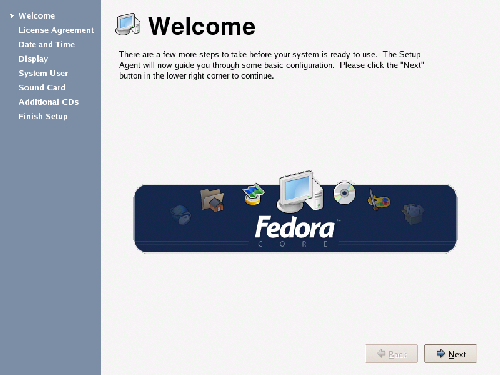
With the main installation completed, a few housekeeping items are all that remain to be done. Your Fedora server will walk through the process of loading drivers, then present you with the Setup Agent: a set of tools for configuring your system once it has been installed. The use of such tools has become a common approach among Linux distributions, with SuSE providing the YaST2 tool, and Mandriva utilizing SystemDrak. You’ll be presented with the Setup Agent’s welcome screen, shown in Figure 1.19, followed by the licence agreement. Once you’ve indicated that you agree to the license, you’ll enter the configuration screens.
Figure 1.19. The Setup Agent’s Welcome screen.
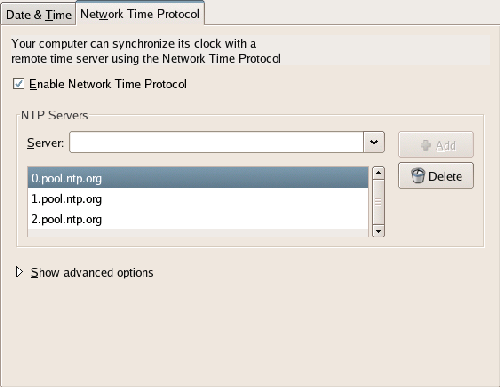
The Date and Time configuration screen provides two tabs: Date & Time and Network Time Protocol. The first tab allows you to confirm that the system clock is accurate. The second tab provides the ability to configure the Network Time Protocol (NTP) software, which can be used to synchronize your system’s clock with an authoritative source. Selecting Enable Network Time Protocol in this screen, as illustrated in Figure 1.20, will enable the NTP daemon – a program that runs in the background, periodically checking your system time against the time returned by an NTP server. Several of these servers are listed in the Server drop-down (a good NTP server is pool.ntp.org. This is actually a name shared by many servers, ensuring that it’s always available). If NTP is enabled and a server selected, the daemon will start, checking the selected server before moving on to the next Setup Agent screen.
Figure 1.20. The Network Time Protocol tab.
On the Display screen, you can select the type of monitor you’re using, the resolution at which you’d like to work, and the color depth. If you can’t find your monitor in the list, you can choose Generic CRT Display or Generic LCD Display.
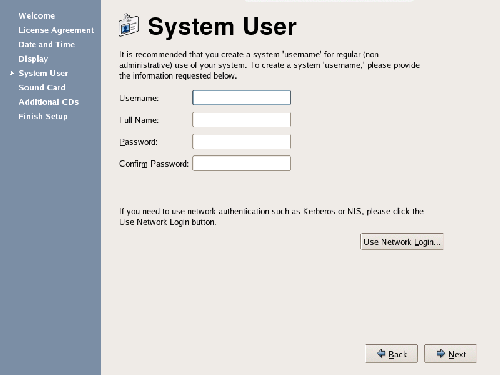
The Setup Agent also provides a screen that allows us to configure an additional user. The user details include a Username, Full Name, and Password, as shown in Figure 1.21. If you decide to allow network logins, you can also select that option from this screen.
Figure 1.21. Setting up a system user.
Create User Accounts
As with Windows, it’s highly recommended that you create user accounts in addition to the main administration or root account. The root account is omnipotent; it has permissions to create, modify, and destroy any file on the system. Performing an action as root without careful forethought can have catastrophic consequences for your system. Nearly every Linux user can recount in detail the first (and likely only) time they rendered their system inoperable from the root account.
If the Fedora installer found a sound card on your system, you’ll be asked to confirm its details. You’ll also see a button with which to test it out, though, on a production Web server, this may not be necessary. There’s also an Additional Software screen, which you can use to install any extra software you might need. You can just skip this screen for now.
Congratulations, you’ve now set up a Linux Web server! The graphical installation provides new Linux users with a manageable set of tools to get the system up and running. However, there are cases in which the text mode installation is a quicker and more efficient means to the same end. Let’s take a look at the text mode installer now.
Summary
The installation of a Linux system requires a little more up-front research than does a Windows installation. As many Linux device drivers are created through community-based reverse-engineering, rather than by those devices’ manufacturers, it’s important to check a number of hardware compatibility lists prior to commencing the installation. This will help you ensure that drivers exist for the devices on your server.
Linux support can take many forms, the most popular being Web-based lists and forums. This approach truly represents the spirit of community in the open source world, where user experience is relied upon to provide solutions to Linux issues. All commercial Linux distributors provide some level of paid support, though the support period may vary widely from one distributor to another.
Linux systems can be installed with a full complement of graphical tools, or as a minimal text-based system. The installers follow suit, providing options to complete an installation from a graphical environment, or from a purely text-based environment.
Unlike Windows systems, the desktop environment is not inextricably bound to the operating system kernel code. Instead, the X Windows and desktop management systems are distinct systems that run in their own space. This feature of Linux allows for the creation of a fully operational, text-based system, which boasts a very small installation code base. However, most users will opt for a graphical system based on X Windows and any of a number of desktop managers.
Chapter 2. Day-to-day Usage
Unlike Windows, Linux doesn’t offer a standard user interface, but provides a number of desktop environments that can be installed on top of the Linux kernel. Fedora Core comes with the KDE and GNOME desktop environments; in this book, we’ll be looking primarily at GNOME.
The GNOME Desktop
Most graphical user interfaces are fairly similar; Microsoft Windows, Mac OS, and the GNOME desktop have a lot in common. You likely won’t have much trouble finding your way around, but GNOME does do a few things differently. Here’s a brief run-down of the GNOME basics to get you up and running.
A Tour of the Desktop
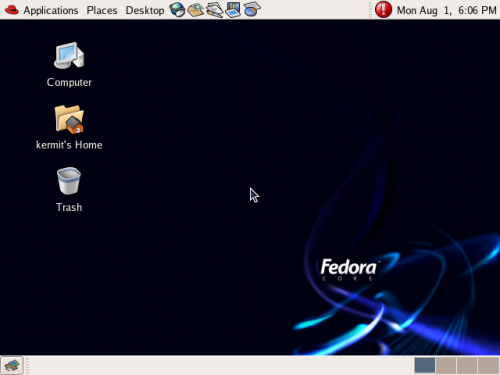
The GNOME desktop, shown in Figure 2.1, displays a bar at the top and a bar at the bottom; in GNOME, these bars are called panels.
Figure 2.1. The GNOME desktop.
The Bottom Panel
The bottom panel offers a clickable button for each window that’s open, similar to the Windows Taskbar, as shown in Figure 2.2.
Figure 2.2. The bottom panel of the GNOME desktop.
![]()
On the right-hand side of the bottom panel is the workspace switcher, illustrated in Figure 2.3. A workspace (also known as a virtual desktop) is a way to organize your open windows.
Figure 2.3. The workspace switcher displaying in the bottom panel.
![]()
As you open windows and move them around, you’ll see a little illustration of the window layout appears in the first square. If you then click on the second square, all of the windows will disappear from the screen – the windows are still open, but you can’t see them because you’ve switched to a different workspace. Click on the first square in the workspace switcher, and you’ll see that your original windows return.
You can move windows between workspaces by right-clicking on a window’s title bar and selecting a workspace from the Move to Another Workspace menu.
By default, you have four workspaces, but you can change this default in the Workspace Switcher Preferences window (right-click on the workspace switcher and select Preferences… to access this).
The Top Panel
The top panel is divided into three sections: the menus and “shortcut” icons are shown on the left, while the notification area appears on the right, as depicted in Figure 2.4.
Figure 2.4. The top panel of the GNOME desktop.
![]()
Top Panel Menus
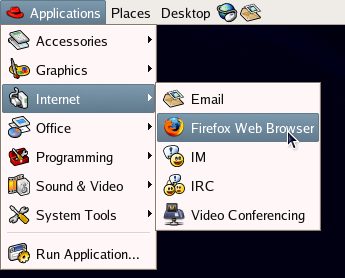
The top panel menus give us access to everything on the computer. The Applications menu shown in Figure 2.5 categorizes all installed applications as Games, Graphics, Internet, Office, and so on. If you installed Firefox, for example, you could find it in the Internet menu
Figure 2.5. Locating Firefox through the Applications menu.
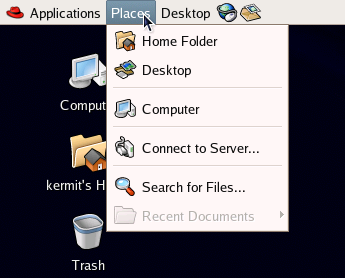
The Places menu depicted in Figure 2.6 lists file locations that may be useful: your home folder, your desktop, drives on the computer, and network locations.
Figure 2.6. The Places menu.
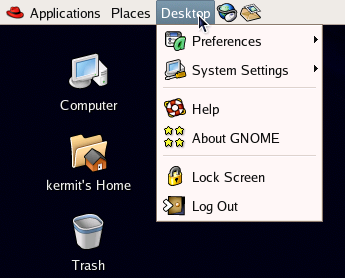
The Desktop menu provides access to configuration – user preferences and system settings – as well as online help, screen locking, log out, and shut down options. These are shown in Figure 2.7.
Figure 2.7. The Desktop menu.
Top Panel Shortcut Icons
The shortcut icons, located in the Launcher Panel next to the menus, provide quick access to common applications.
Figure 2.8. Displaying shortcut icons in the Launcher Panel.
![]()
By default, the icons provide shortcuts to the Web browser (Firefox) and the email client (Evolution), as well as the three main OpenOffice.org applications (word processing, spreadsheet, and presentation tool packages) if you have these installed.
Using Windows
The display of windows that comprise the GNOME GUI is similar to the user interface on the Windows platform. Figure 2.9 shows the display of a GNOME window.
Figure 2.9. A GNOME window.
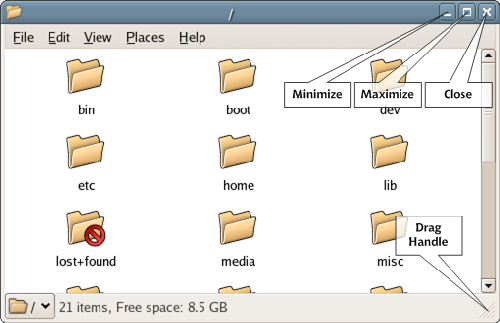
If you’ve used other operating systems, you’re not going to have any trouble with GNOME’s windows.
Starting Up and Shutting Down
Because Linux is a true multi-user system, you’ll need to log into your system account before you use the system. In GNOME, the default application for handling this task is the GNOME Display Manager (GDM). The GDM login screen will open after all your system’s devices and drives have been properly mounted. You’ll log in to the system using the account name and password you created after installation.
Keep Out Of root!
It’s never advisable to log in to your system as root. Remember that root is the omnipotent account in Linux, and is capable of performing any action on the system. Those actions include deleting system-critical files, which completely disables the system, making it very difficult to recover. root access should always be used sparingly. When logging in to your system, first log in to the user account; then, if necessary, you can perform administrative tasks by switching over to root temporarily.
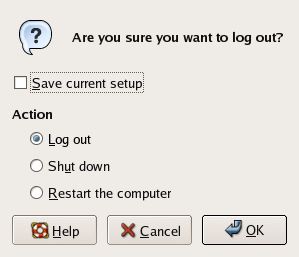
Remember that it’s important to shut down your Linux box gracefully, just as you would a Windows machine. This allows any buffered data to be written to the disk before the system shuts down. You can shut down either by selecting Desktop > Log Out, or through the command line. Let’s look first at the graphical tool for shutting down your machine.
Selecting Log Out from the Desktop menu, as shown in Figure 2.10, will give you the options to log out of your system account (returning you to the login screen), to reboot the machine, or to shut down the machine completely.
Figure 2.10. Linux’s logout options.
The Linux Filesystem
Drives and Partitions
If you’re used to the drive-oriented layout of Windows, the Linux filesystem structure might be a bit confusing. There is no C: drive; in fact, there are no drives as such, only partitions. To muddy the waters a little more, the partitions’ actual locations on the hard drive aren’t identified clearly. The Linux filesystem is much more abstract than that.
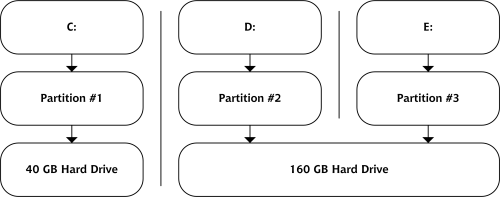
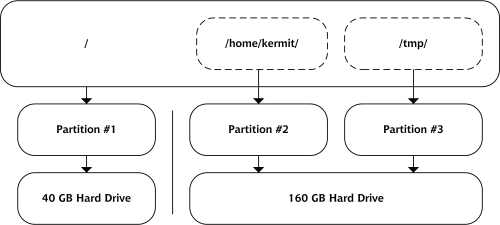
Let me give you an example. My workhorse machine at home, cortex, contains two physical hard drives. One is an old 40GB drive that contains the operating system and all the programs I use. The other is a new, 160GB behemoth I added later, which is partitioned into two sections. The first section contains my personal files: the photos I’ve taken with my digital camera, my MP3 collection, and few odds and ends. I leave the second section free for temporary files created by my programs.
On a Windows system, these drives would most likely be seen by both the system and the user as C:, D: and E:. Windows would be installed at C:WINDOWS, Firefox would live in C:Program FilesMozilla Firefox, my digital photos would reside in a directory called D:Photos, and so on. With Windows, the directory name is directly related to the partition, and therefore the hard disk, on which it’s stored. This concept is illustrated in Figure 2.11.
Figure 2.11. How C:, D: and E: relate to my physical hard disks.
The Linux filesystem hides this unnecessary detail from you (until, of course, you want to see it). The operating system kernel is stored in a directory called /boot/, Firefox is in /usr/lib/firefox-1.0.4/, my photos and MP3s go into directories called /home/username/photos/ and /home/username/music/, and temporary files go into a directory called /tmp/. There are no obvious signs that these directories reside in different partitions or on different hard disks.
The Linux filesystem assigns each partition a different mount point: a directory through which we access the partition. In our example, the D: in Windows is analogous to /home/tony/ on our Linux system, E: is similar to /tmp/, and C: would be /, the top of the filesystem hierarchy. This structure is depicted in Figure 2.12.
Figure 2.12. The same partitions viewed in Linux.
There’s no doubt that it’s confusing when you first make the transition from the physical disk-oriented view of Windows to the hierarchical filesystem of Linux. In time, however, you get over the shock and start to see the sense in viewing the system holistically, rather than as separate compartments.
The ext3 Filesystem
Linux is deservedly renowned for its ability to work with many different filesystems. A modern Linux distribution will read, write, and keep track of files in nearly all the Microsoft filesystems – from the original FAT through to NTFS – as well as filesystems used by Mac OS X, OS/2, and all sorts of esoteric operating systems. For Linux, it’s a simple matter of loading the appropriate kernel module and mounting a partition. This makes it easy to handle files written on other systems on your Linux machine. In this section, we’ll look at the filesystem that’s native to your Fedora Core server: ext3.
The ext3 filesystem is an extension of the native Linux filesystem, ext2, and is now the default filesystem for Fedora Core. ext3 extends ext2 with a journaling layer that facilitates quick system recovery, and ensures a high level of data integrity. The journal is constantly updated with notes of file actions that are pending, and those that have been completed.
Journaling protects against data corruption with speed and ease. All pending and completed operations are logged to the journal. The system checks the journal when rebooting, and completes those operations that were pending at the time of a system failure or “dirty shutdown.” This protects the consistency of the data that was buffered at the time the system went down.
Recovery time is also decreased by the use of a journaling layer. Rather than checking each file, bit by bit, for consistency, the system merely completes any pending writes noted in the journal. This reduces what was once a 20- to 30-minute reboot operation to mere seconds – an improvement that’s especially critical in an enterprise environment.
Filesystems Galore
Other Linux distributions utilize different filesystems. SuSE Linux, for example, uses the ReiserFS filesystem by default. Extensive benchmarking has shown that ReiserFS can more efficiently handle large numbers of small files than can ext3. However, we won’t have time to look at these other filesystems. If you’d like more information on the other filesystem options available for your Linux system, you can find a detailed list, descriptions and installation instructions online at Linux Gazette.
A Quick Tour of the Filesystem
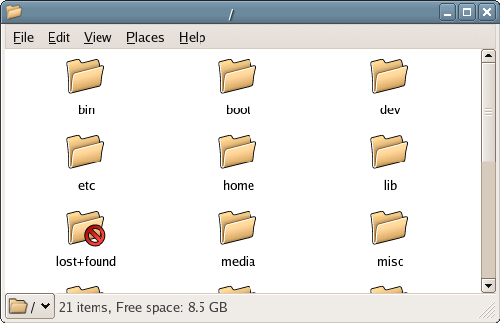
The Linux filesystem depicted in Figure 2.13 has a different structure than you’re probably used to. Let’s look at an outline of the filesystem structure, and explore its various functions and elements.
/(The Root Directory)
This is the top level of any Linux system, known as the root directory. Unfortunately, there’s also a directory named root. Don’t worry: we’ll explain the difference between these directories – and how to avoid confusion – in a minute./boot
This directory contains all the files necessary to boot the operating system, including the Linux kernel./binand/sbin
These folders are similar in their contents – they both contain executable binary files – but differ in purpose./bincontains executables that you’re likely to use from the command line: commands such asls,mv, andcp, which we’ll be looking at in Chapter 3, The Command Line, live in this folder./sbincontains commands and processes that are used by the operating system itself, so it might be best to stay away from this folder if you’re just starting out./dev
These are the device files – abstractions of all the devices that are actually in the system, as well as all devices that could be added to the system. These files provide the operating system with a description of, and instructions for handling, each device./etc
This directory contains system-specific configuration files. As an administrator, you’re likely to spend quite a bit of time in the/etcdirectory, because it contains configuration instructions for most of the applications on the system. For example, the configuration file for Apache is located at/etc/httpd/conf/httpd.conf./home
This directory contains the home directories for each user of the system. For instance, our example user has the home directory/home/kermit, and other users on the same system have home directories/home/gonzoand/home/fozzie. By default, Gonzo or Fozzie can’t read from or write to Kermit’s files, and Kermit can’t read from or write to theirs (only the root user has this ability)./root(TherootDirectory)
This is the home directory of the root user, and is not to be confused with the other “root directory”,/./lib
The/libdirectory contains all the shared libraries that will be accessed by various applications in the system. It also contains libraries that will be used by the kernel in various system operations./media,/mnt
These directories serve as mount points for temporarily mounted filesystems. For example, the CD-ROM drive will be accessible from/media/cdrom./opt
This directory offers storage for packages that have been added to the system./tmp
This directory provides system-wide storage for temporary files./usr
Contains user commands and binaries, graphical interface files, include files for use in system applications, and optional source code files./var
The/vardirectory contains variable data files: files that may change during the operation of an application with which they’re associated, including log files and mailbox files.
Mount Points
The concept of mount points may be a bit confusing, despite their existence in every operating system, including Windows. To avoid confusion, think of mount points as containers into which the contents of a device or filesystem will be emptied. For example, /media/cdrom is a mount point for the contents of the CD-ROM device. Emptying the contents of the device into the mount point makes the files accessible to the system and its users. In general, devices and filesystems must be mounted – attached to a mount point – before they can be used. In a later chapter, we’ll discuss a way by which we can mount these devices and filesystems automatically in Linux.
Figure 2.13. The Linux filesystem displaying in the File Browser application.
Navigating the Filesystem
Navigating the filesystem begins on the desktop with Nautilus, GNOME’s graphical representation of the filesystem. There are two icons sitting on the desktop that act as starting points to Nautilus: Computer and username’s Home, as shown in Figure 2.14.
Figure 2.14. The desktop filesystem icons.

The Computer icon begins at the top level of the system, similar to My Computer in Windows; while the username’s Home icon begins within the current user’s home directory.
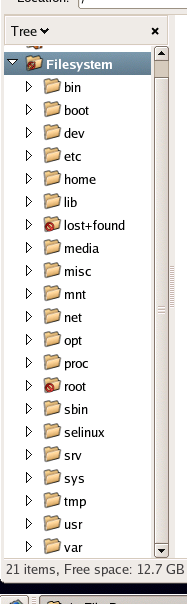
Double-clicking the Computer icon presents us with a view similar to that shown in Figure 2.15. We see the removable media attached to the computer, as well as icons representing the root of the local filesystem and any other filesystems to which we have access over the network.
Figure 2.15. The Computer icon’s top-level view.
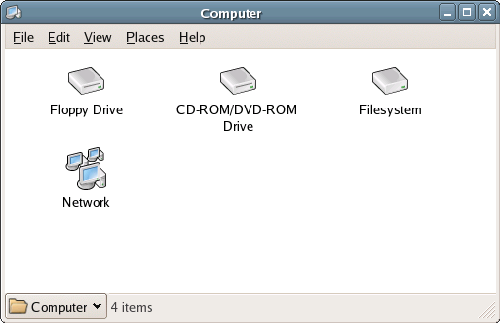
Double-clicking on the Filesystem icon opens a new window displaying the root directory of the filesystem, as shown in Figure 2.16. Double-clicking any of these icons will open another window, providing a view of the contents of the chosen directory, just like Windows Explorer or Finder on a Mac.
Figure 2.16. Viewing the Computer icon filesystem.
Double-clicking on the username’s Home icon on the desktop will jump straight to the current user’s home directory. To start with, the home directory will only contain one visible folder icon, Desktop, as depicted in Figure 2.17.
Figure 2.17. The Home icon view.

Handling Linux Files
Literally everything in a Linux system is a file, including directories, links, and so on. Even the commands are files, ranging from the simple to the extremely complex. Because of the nature of the Linux system and its files, it’s important to understand the processes of file handling and editing on your new system.
In this section, we’ll take a quick spin through the file permissions structure, get a grip on the system’s ability to link from one file to another, and explore some of the more common text editing applications for Linux. Because everything in Linux is a file, it’s very important that you understand how files are accessed and edited. These are skills you’ll find yourself using nearly every day.
File Permissions
Linux utilizes one of the most granular file permissions systems of any computer operating system. As we’ve already seen, that granularity is due, in part, to the fact that everything in Linux is a file. Commands, configurations, device files: all are editable, depending upon who the editing user is, and how the permissions on the file have been set. Accordingly, it’s important to understand the permissions structure and how it will affect both your and your users’ interaction with system files.
At their most basic, Linux permissions are broken into three sets of permissiovns. These are:
- Owner (or user) – The permissions granted to the user who owns the file (usually the user who created the file).
- Group – The permissions granted to a specified group of users. Users can be added to any number of available groups, each of which can have permissions on files.
- Other – The permissions granted to anyone who isn’t the owner, or a member of a group that has permissions to access the file.
Each of these sets can grant any combination of the following, self-explanatory permissions:
- read
- write
- execute
What’s especially interesting in the Linux permissions structure is how these three sets of three permissions interact. A particular user may belong to a group that can only read a particular file, but if that user also happens to be the file’s owner, the owner permissions of the file might also grant the user access to write to the file’s contents.
As an example, let’s look at the default permissions structure of a simple text file. Open the gedit application by choosing Applications > Accessories > Text Editor from the menu. Enter some text into gedit, then save the file in your home directory. Locate the file in Nautilus, right-click on the file, and select Properties. Click the Permissions tab to see the permissions that have been given to the file as shown in Figure 2.18.
Figure 2.18. Default permissions for a text file.
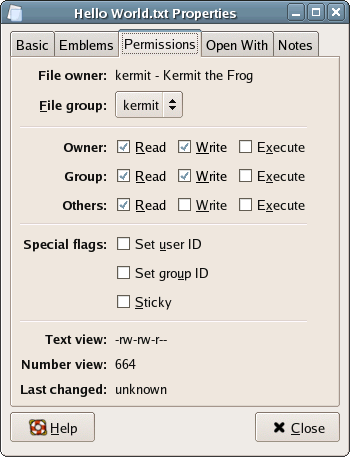
Let’s take an in-depth look at this dialog.
File owner
This identifies the user who owns the file. By default, the owner is the user who created the file; however, a user that has sufficient privileges – root, for example – can change the file ownership details.
File group
The group of users that has access to this file: in this case, a group named kermit. When you create a user, Linux will automatically create a group with the same name as that user. This allows us to give a user access to another user’s files. For example, if we added the user gonzo to the group kermit, Gonzo would have access to Kermit’s files.
Owner, Group and Others
These checkboxes allow the actual setting of permissions. You can grant the owner, the group you’ve selected, or everyone else any combination of read, write, and/or execute permissions. That combination of three sections of three permission types results in 512 possible combinations for the permissions on this file. That’s a pretty flexible structure! We’ll look more closely at file permissions in a moment.
Special flags
Special extensions to the permissions system allow us to flag a file for special treatment by the filesystem. We won’t need to use these flags within this book.
Text view and Number view
These alternative ways of viewing file permissions will be familiar to anyone who’s dealt with file permissions via the command line.
The text view is made up of ten characters. The first indicates the file type: if the file is a directory, this character will be d; if the file is a regular file, it’ll be -. The remaining nine characters indicate the read, write, and execute permissions for the owner, the group, and everyone else. For example, -rw-rw-r-- represents a regular file with read and write permissions for the owner, read and write permissions for the group, and read-only permission for everyone else. You can see this view change as you change the checkboxes above.
The number view is a more compact view of the text view. The numbers represent, from left to right, the permissions given to the owner, the group, and to everyone else. This view, too, changes as you change your selections in the checkboxes.
Last changed
This field identifies the date and time at which the file was last changed. As this file hasn’t been reopened and modified, Linux doesn’t consider it to be changed yet. Open the file and modify it to see this date change.
Symlinks, or Linking Files: More Abstraction
Most people who have ever worked with Windows understand the concept of shortcuts. A shortcut is really a pointer from one location to a file in another area of the system. In fact, some users understand and become so obsessed with shortcuts in Windows that their desktops are eventually covered with them! The ability to launch a file from somewhere other than its real location clearly has value for computer users. And Linux offers such capabilities, too. As an administrator, you’ll find Linux’s shortcuts nearly as exciting as those in Windows.
A shortcut in Windows and a symbolic link in Linux really amount to the same thing: they’re abstractions – mere representations – of the original file. Creating a shortcut in Windows doesn’t actually move the executable file to the desktop. Similarly, in Linux, we can write for a file an abstraction that appears to be the file itself. The file doesn’t really exist in the new location, it just operates as if it does.
One important difference between the way Windows and Linux create shortcuts is that a Linux symbolic link (normally called a symlink) can be treated exactly as if it were the file for most purposes. For example, if you open a symlink in your editor, and make changes to the file, the editor will edit the actual file to which the symlink points. If you try that under Windows, you’re likely to get a surprise when the editor opens up the shortcut file for editing, rather than the file that to which the shortcut links! Symlinks are used frequently under Linux because they’re a powerful abstraction that can make it seem as if a file is in multiple places at once.
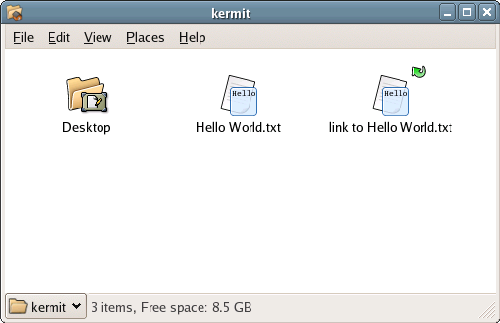
You can create a symbolic link in Nautilus by right-clicking on a file or folder, and selecting Make Link, as shown in Figure 2.19. This will create a symlink with “link to” at the start of the filename, as depicted in Figure 2.20. You can drag and drop this file anywhere, and rename it as you choose.
Figure 2.19. Creating a symlink in Nautilus.
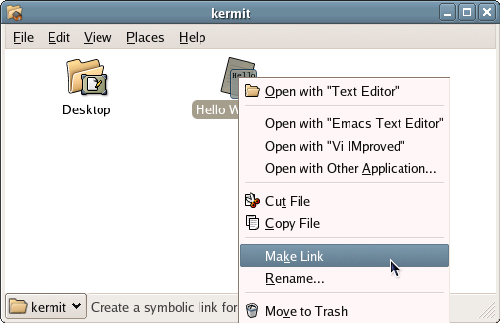
Figure 2.20. A newly created symlink.
Editing Text Files
A reasonable command of a Linux-compatible text editor will be crucial to the success of your day-to-day administration. As most of the configuration in a Linux system is done via text files, you’d be wise to find one that works for you. In fact, Linux is replete with text editors: editors without a GUI, editors with a GUI, editors intended primarily for programmers, editors targeted at HTML developers – there’s no shortage of tools to make your administrative tasks easier. In this section, we’ll take a look at some of the GUI-based text editors that are available to you. We’ll look at some of the command line-based editors a little later.
Fedora Core provides two robust GUI text editors in the default installation: gedit and Kate. gedit is the default text editor for the GNOME desktop environment, and Kate is the default for KDE, but both will work in either desktop environment.
If you were a longtime Notepad or Wordpad user in Windows, you’ll find that many of the same features are available in Linux’s GUI text editors, plus much, much more.
gedit
gedit is GNOME’s default text editor. Pictured in Figure 2.21, it offers a full range of features, including:
- Full support for internationalized text, including UTF-8
- Tabbed multi-document interface
- Syntax highlighting
- Plugins and a plugin manager
- A complete preferences interface
In addition to these standard features, the following plugins can be added to extend the gedit application:
- Spell checker
- Insert date and time
- Word count
- Change case of selected text
- Indent or unindent blocks of text
- Ascertain the differences between two documents or files
- Insert output from the command line
- Markup language tag lists for common markup languages such as HTML, LaTeX, etc.
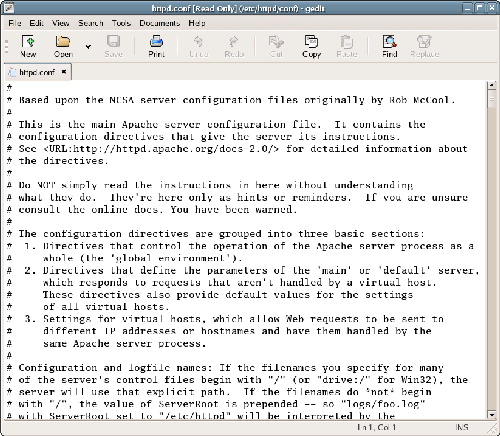
Figure 2.21. The main gedit screen, ready to edit the Apache configuration file.
Mind your Gs and Ks
You’ll quickly realize that most GUI applications for Linux are written specifically for one desktop environment or another. The naming conventions for these applications remain fairly consistent, and reasonably obvious. Most applications written for the GNOME desktop environment will begin with the letter “G,” while applications written specifically for the KDE desktop environment will begin with the letter “K.”
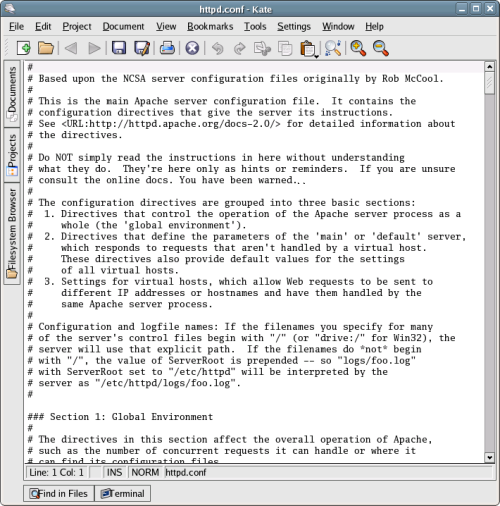
Kate
The KDE counterpart to gedit is Kate, the “KDE Advanced Text Editor,” pictured in Figure 2.22, “The main Kate screen, in which the Apache configuration file is being edited.”. If it’s not available in the Applications menu, you can start it by selecting Applications > Run Application… and entering kate.
Figure 2.22. The main Kate screen, in which the Apache configuration file is being edited.
Can’t Start Kate?
The Kate text editor, originally a standalone application, is now included in the kdebase package. It’s not available as a separate download. In order to use Kate, you’ll need to have all the KDE libraries and base applications installed. To install additional applications, select Desktop > System Settings > Add/Remove Applications.
Like gedit, Kate is a multi-view editor: it will allow you to open and edit multiple documents in the same window. As well as that single, very useful feature, Kate offers a full range of other capabilities that make it a very powerful text editor. Its features include:
- Kate allows you to edit all kinds of text files, even if they’re big. Kate can open a 50MB file in a few seconds.
- Kate’s powerful syntax highlighting engine is extensible via XML files.
- The editor offers code folding capabilities for many programming languages, including: C++, C, PHP, etc.
- Kate offers split window views, allowing you to view different parts of the document simultaneously.
- Kate allows users to choose the encoding we want to use for each file via the save/open dialog.
- Kate boasts built-in terminal emulation.
- Kate’s sidebar displays a list of open documents, a filesystem browser, and more.
- Kate provides a handy plugin interface that allows third party plugins.
- The editor provides project handling capabilities (which can be overridden by project handling plugins).
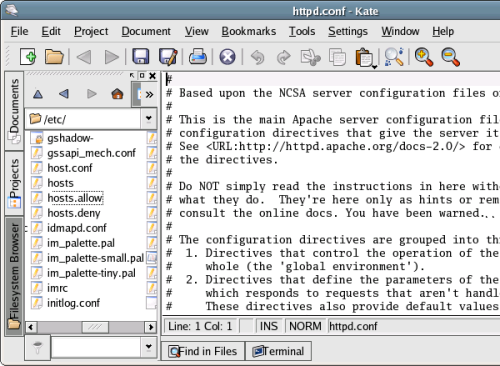
Ultimately, Kate is a bit more friendly, and offers greater flexibility for editing configuration files and writing shell scripts, than do some other editors. The syntax highlighting capabilities are unsurpassed, as Kate makes available a full range of programming languages and styles. Additionally, Kate provides such features as an open document listing (shown in Figure 2.23) and an integrated filesystem browser (Figure 2.24).
Figure 2.23. Kate’s Documents tab.
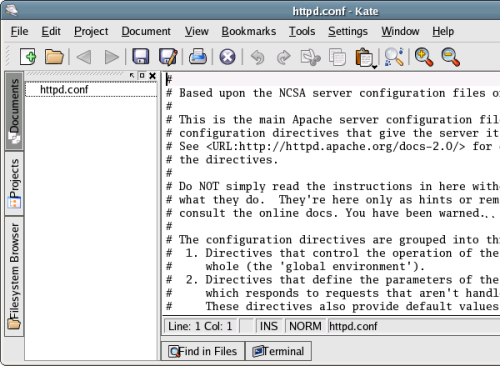
Figure 2.24. Kate’s Filesystem Browser tab.
While Linux does provide other GUI text editing options, gedit and Kate are two of the most powerful and user-friendly on offer. Either will suit your Linux text-editing purposes well.
Summary
It takes time to understand Linux, and the first stage in the process is to find your way around what may, at first, be a slightly unfamiliar desktop. In this chapter, we’ve discussed some of the basics of Linux, Fedora, and the GNOME desktop from a user’s point of view. Next it’s time to look at what you need to know in your role as the administrator of a Linux server.
Chapter 3. The Command Line
So far, our interactions with Linux have been through a pretty desktop environment, and it’s been reasonably easy for experienced Windows users to get their heads around the system. Things haven’t always been this way, though: the roots of the Linux user interface are firmly stuck in its command line.
What is the Command Line?
Unlike Windows, the GUI is completely optional in Linux. If you’re feeling particularly competent, or you have certain requirements (or very old hardware), you can run your Linux machine with no graphics at all. As Linux has evolved, a variety of GUIs have been built on top of it, but the command line remains the administrator’s best friend: a quick, easy, powerful way to perform actions that aren’t always easily available from the desktop.
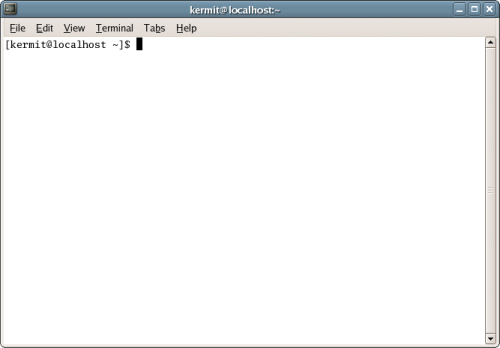
Figure 3.1. Accessing the GNOME Terminal.
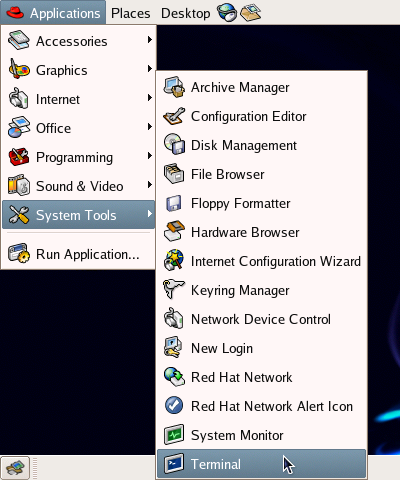
Throughout this book, we’ll use the GNOME Terminal application to gain access to the command line. You can access this application from Applications > System Tools > Terminal, as shown in Figure 3.1. The terminal itself is depicted in Figure 3.2.
Tweaking the Terminal
The GNOME desktop environment is fully customizable – and that includes the appearance of the terminal. You can determine the font that’s used, change the foreground and background colors of the window – you can even set the level of transparency of the window itself, so that it’s possible to see the desktop image behind the window! Within the terminal, you can find these settings in Edit > Current Profile…
Figure 3.2. The GNOME Terminal application.
Let’s look at a real-life example that uses the command line to meet a specific need. Once you understand the components of the command (and the complexity of the graphical alternative), you’ll begin to understand the practical utility of the terminal and the command line.
[kermit@swinetrek ~]$ find /var/backups/* -ctime +5 -exec rm {} ;I use this command regularly to remove from my system backups that are more than five days old. The command uses the find tool to search for files in the /var/backups directory that are more than five days old. For each file that the find tool locates, it runs the rm command: rm is the standard “remove file” command. Running this command regularly helps to save system storage space by deleting backups that, after five days, have become unnecessary. Of course, this command should be run in conjunction with an automated process that creates these backups every day or so.
Let’s compare the use of this command to the process of utilizing a graphical tool to accomplish the same task.
- Reach from the keyboard for the mouse.
- Double-click on the Computer icon on the desktop.
- Double-click on Filesystem to get to the root directory.
- Double-click the var folder to open it.
- Double-click the backups folder.
- Ensure that the resulting window displays the creation time of the files by selecting View > View as List.
- Holding down Ctrl, select the files with a creation date older than five days.
- Right-click and select Move to Trash from the context menu.
- To really delete the file, return to the desktop and empty the trash by right-clicking on the Trash icon and selecting Empty Trash.
You don’t need to understand the intricacies of the Linux filesystem to see the advantage of the command line. The graphical approach involves at least nine – likely many more – mouse clicks. Rather than viewing the process of finding and deleting these files as single operation, you’re forced to break the process down into its individual components. Add to that the inefficiency of using the mouse to locate, point at, and click targets on the screen, as compared to the swift simplicity of entering commands via the keyboard, and you start to understand how the command line can be a valuable and efficient tool for system administration.
This, however, doesn’t even address the real beauty and power of the command line. You don’t believe that I actually run the rm command three times a week, do you? That would also be terribly inefficient: I’d be relying on my own porous memory to make sure that the backups were removed! In fact, most of the commands you’ll use in Linux are fully scriptable, with minimal modification. In reality, I’ve asked my system, via the cron utility (which we’ll cover in depth in Chapter 4, System Administration) to execute the command three times each week. This is much like the Scheduled Tasks feature in Windows, but it’s more powerful: it can do just about anything. As you can see, an understanding of Linux commands and command line concepts is essential, even if you only open a terminal window occasionally.
Using the Command Line
When you use the Linux command line, you’re opening what can be thought of as an alternative window to the operating system – an alternative window through which you have access to much more powerful, lower level operating system functions. Graphical tools don’t provide that power. A graphical environment is merely a high-level abstraction of an operating system environment, and the icons and menus to which we’re all so accustomed provide only limited access into that environment. Those icons and menus represent operating system functions, but they’re not the actual functions. In other words, graphical interfaces provide a limited, additional layer between operator and operating system, in which a restricted range of functions are represented by pretty pictures. To administer your Web server with maximum efficiency, it’s useful to be able to work at the same level as your system.
High and Mighty, or Down and Dirty
When we talk about “high level” and “low level” functions, we imply a hierarchy of functionality. Functions of the lowest level communicate with the kernel directly, and therefore have great power and flexibility; higher level tools do more work themselves, offering more functionality and increased safety. Compare, for example, the low level rm command with the higher level Trash functionality in Nautilus. rm simply deletes a file: it’s quick and easy, but there’s no easy or guaranteed way to recover that file. Nautilus doesn’t provide you with such functionality. It insists that you move files to the Trash, effectively marking the file for potential deletion. The deletion itself doesn’t occur until you go to the desktop and empty the trash.
Logging in as root
We’ve already talked about logging into Linux as root. To do so from the GNOME terminal, you’ll enter the su (switch user) command.
[kermit@swinetrek ~]$ su

Password:
You’ll be prompted for the root password. Once you’ve entered it, you’ll gain full access to the system: computing omnipotence! Use it wisely. Although there are certain things that can only be done as root, including many of your system administration tasks, it’s important to observe good Linux hygiene: don’t remain logged in as root any longer than you need to. Every Linux administrator has a horror story of a time when, logged in as root, he or she mistyped a command and deleted everything on the machine (or some similar calamity). You want to avoid such disasters. Be careful, and don’t stay logged in as root if you don’t need to be. To switch back to your standard user account, use the exit command.
Some Practical Examples
Let’s look at a few examples of the command line in action.
Orienting yourself with the pwd Command
In Nautilus, we can have multiple folder windows open at once. However, when using the command line, we can only work within one directory at a time. That active directory is called the working directory. To find out which directory you’re currently in, use the pwd (print working directory) command.
[kermit@swinetrek ~]$ pwd

/home/kermit
Home, Sweet Home
Your home directory, /home/username, is often referred to as ~. Did you notice the ~ in the command prompt? It indicates that you’re currently in your home directory. As we begin to navigate the filesystem, we’ll see this command prompt change to reflect the name of the directory in which we’re working. Thus, we won’t have to constantly enter pwd to find out where we are.
Listing Files with the ls Command
The ls (which stands for list) command, used by itself, lists the contents of the working directory.
[kermit@swinetrek ~]$ ls

Desktop  Hello World.txt
You can retrieve a list of the files in another directory by adding the directory name to the command line. For example, ls / will return a listing of everything in the root directory.
[kermit@swinetrek ~]$ ls /

bin   dev  home  lost+found misc  net  proc  sbin    srv  tmp  var

boot  etc  lib   media      mnt   opt  root  selinux sys  usr
Using ls by itself will show you the names of the files contained in a folder, but little more. To view all of the files’ details, we can add the -l option to the command, which returns a longer listing.
[kermit@swinetrek ~]$ ls -l

total 16

drwxr-xr-x  2 kermit kermit 4096 Sep  5 14:21 Desktop

-rw-rw-r--  1 kermit kermit   13 Sep  8 07:30 Hello World.txt
There’s plenty of information here.
- The first column presents the permissions for each file in the format we discussed in Chapter 2, Day-to-day Usage. In summary, the first character tells us whether the file is a directory; the next nine characters show whether or not read, write, and execute permissions have been granted to the owner, group, and others.
- The next column is really only useful for directories; it reflects the number of files inside a directory. For files, this number will be 1.
- The next two columns identify the owner and the group assigned to the file. In this case, they’re both kermit.
- The size of the file in bytes is displayed next. Here, we see that the file
Hello World.txtis 13 bytes. - Next, we see the date and time at which the file was last modified. In the example above, the Desktop directory was last modified on the September 5 at 2:21 p.m.
- Finally, we’re given the name of the file.
ls -lis so useful that Fedora Core includes a built-in shortcut to it:ll.
Your home directory will contain a number of hidden files. In Linux, we can hide a file by starting its filename with a period: if we changed the name of Hello World.txt to .Hello World.txt, it would become hidden. It’s in these hidden files that programs store user-specific configuration information. To see hidden files, use the all option (-a), which can be use in conjunction with the -l option, or as an option to ll.
[kermit@swinetrek ~]$ ll -a

total 212

drwx------  13 kermit kermit 4096 Sep  8 09:16 .

drwxr-xr-x   5 root   root   4096 Sep  6 13:48 ..

-rw-------   1 kermit kermit    5 Sep  8 06:21 .bash_history

-rw-r--r--   1 kermit kermit   24 May 10 10:15 .bash_logout

-rw-r--r--   1 kermit kermit  191 May 10 10:15 .bash_profile

-rw-r--r--   1 kermit kermit  124 May 10 10:15 .bashrc

drwxr-xr-x   2 kermit kermit 4096 Sep  5 14:21 Desktop

-rw-------   1 kermit kermit   26 Sep  6 14:20 .dmrc

drwxr-x---   2 kermit kermit 4096 Sep  6 14:21 .eggcups

-rw-r--r--   1 kermit kermit  438 May 18 01:23 .emacs

-rw-------   1 kermit kermit   16 Sep  6 14:28 .esd_auth

drwx------   4 kermit kermit 4096 Sep  6 14:31 .gconf

drwx------   2 kermit kermit 4096 Sep  6 14:31 .gconfd

drwxrwxr-x   3 kermit kermit 4096 Sep  6 14:21 .gnome

drwx------   7 kermit kermit 4096 Sep  6 14:31 .gnome2

drwx------   2 kermit kermit 4096 Sep  6 14:20 .gnome2_private

drwxr-xr-x   2 kermit kermit 4096 Sep  6 14:21 .gstreamer-0.8

-rw-r--r--   1 kermit kermit  120 May 22 15:18 .gtkrc

-rw-rw-r--   1 kermit kermit  134 Sep  6 14:20 .gtkrc-1.2-gnome2

-rw-rw-r--   1 kermit kermit   13 Sep  8 07:30 Hello World.txt

-rw-------   1 kermit kermit    0 Sep  6 14:31 .ICEauthority

drwx------   3 kermit kermit 4096 Sep  6 14:21 .metacity

drwx------   2 kermit kermit 4096 Sep  6 14:22 .mozilla

drwxr-xr-x   3 kermit kermit 4096 Sep  6 14:21 .nautilus

-rw-------   1 kermit kermit   50 Sep  6 14:26 .recently-used

-rw-------   1 kermit kermit  497 Sep  6 14:21 .rhn-applet.conf

-rw-------   1 kermit kermit   66 Sep  8 09:16 .xauth3R8EvP

-rw-r--r--   1 kermit kermit  658 Jan 16  2005 .zshrc
At the top of this file listing appear two directories, named . and ... These are shortcuts to the current directory and the parent directory, respectively. We’ll look at these in the next section.
Moving around the Filesystem with the cd Command
The cd command stands for change directory. It changes the current working directory to the one specified immediately after the command.
[kermit@swinetrek ~]$ cd /etc/httpd/

[kermit@swinetrek httpd]$
Used by itself, the cd command returns you to your home directory.
[kermit@swinetrek httpd]$ cd

[kermit@swinetrek ~]$
The commands cd /home/kermit and cd ~ do the same thing. You can move to the working directory’s parent directory using the cd .. command.
[kermit@swinetrek ~]$ cd ..

[kermit@swinetrek home]$
Printing with the echo and cat Commands
The echo command simply sends output to the screen.
[kermit@swinetrek ~]$ echo "Hello, World!"

Hello, World!
Escaping Special Characters
Certain characters are reserved for special use on the command line, such as !. However, you’ll often want to use these characters in command options or in filenames. To use these characters, you must escape them, that is, prefix them with a backslash () character. If you use spaces in filenames, you’ll need to escape the spaces when dealing with those filenames on the command line: our file Hello World.txt needs to be accessed as Hello World.txt.
The cat command opens a file and writes its contents to the screen.
[kermit@swinetrek ~]$ cat Hello World.txt

Hello, World!
Copying and Moving Files with the cp and mv Commands
The copy command – cp – creates a copy of a file.
[kermit@swinetrek ~]$ cp Hello World.txt Copy.txt

[kermit@swinetrek ~]$ ls

Desktop  Hello World.txt  Copy.txt
Here, we’ve created an exact copy of Hello World.txt called Copy.txt. We can create a copy of a file in a different directory like so:
[kermit@swinetrek ~]$ cp Hello World.txt

> /var/backup/Hello World.txt

[kermit@swinetrek ~]$
Splitting Long Commands
Because some commands are too long for the page width of this book, I have split them into multiple lines. If you ever want to do this on the command line, you need to end each line with a space followed by a backslash (). When you press Enter when a line that ends this way, you’ll get a > prompt to enter the rest of the command. Since you’re not writing a book, you can just type these long commands as one long line (the terminal will wrap the command to the next line automatically as you type it).
You can use cp to copy an entire directory hierarchy. The following command will create a /var/backup/kermit directory, which will contain a copy of all of kermit’s files.
[kermit@swinetrek ~]$ cp -r /home/kermit/ /var/backup/

[kermit@swinetrek ~]$
mv (which stands for move) moves a file from one location in the filesystem to another.[kermit@swinetrek ~]$ mv Hello World.txt Moved.txt
[kermit@swinetrek ~]$In the above example, the file Hello World.txt is being moved to a new file named Moved.txt in the same directory; effectively, we’re just renaming the file. Unlike the cp command, when the mv command is used, the original file is not retained in its original location. To move the file to another directory, the command could be executed like so:
[kermit@swinetrek ~]$ mv Hello World.txt /var/backup/

[kermit@swinetrek ~]$
Switching Users with the su and exit Commands
We’ve already seen that su, used by itself, logs into the root account, and prompts you for the root user password:
[kermit@swinetrek ~]$ su

Password:

[root@swinetrek kermit]#
What the $#?
Note the changes to the prompt when you switch over to root: the character at the end of the prompt changes from a $ to a # to indicate that you’re logged in as root. If you were in your home directory, the current directory in the prompt would change from ~ to your old username. This indicates that you’re no longer your normal user in your home directory: you’re root in another user’s home directory. root’s home directory is /root.
To switch back to your original user, use the exit command:
[root@swinetrek kermit]# exit

exit

[kermit@swinetrek ~]$
You can use su to switch to any other user, as long as you know that user’s password.
[kermit@swinetrek ~]$ su gonzo

Password:

[gonzo@swinetrek kermit]$
Changing File Permissions with the chmod Command
We looked at permissions, and saw how to change them through the GUI, in Chapter 2, Day-to-day Usage. You can also change these permissions from the command line using the chmod (change mode) tool.
[kermit@swinetrek ~]$ chmod o+w Hello World.txt

[kermit@swinetrek ~]$ ll

total 16

drwxr-xr-x  2 kermit kermit 4096 Sep  5 14:21 Desktop

-rw-rw-rw-  1 kermit kermit   13 Sep  8 07:30 Hello World.txt
Here, we’ve granted all other users write access to Hello World.txt. We told chmod to do this by passing o+w to it. Let’s take a look at what that means:
- The
ocharacter tells chmod to deal with the set of permissions for other users. This could be replaced withufor the user set,gfor the group set, orafor all three sets. - The
+character tells chmod to grant permission. It can be changed to-, which will tellchmodto revoke permission. - The
wcharacter tells chmod to deal with write permission. This can be changed torfor read permission, orxfor execute permissions.
You can also combine these letters. For example, you can use ug-w to revoke write permissions for the user and group.
[kermit@swinetrek ~]$ chmod ug-w Hello World.txt

[kermit@swinetrek ~]$
Deleting Files with the rm Command
As we’ve already seen, the rm command removes a file. In the example below, rm would remove the file MyCopy.txt.
[kermit@swinetrek ~]$ rm MyCopy.txt

[kermit@swinetrek ~]$
In order to remove a directory and everything inside it, we must add the “recursive” (-r) option to the command, like so:
[kermit@swinetrek ~]$ rm -r untitled folder

[kermit@swinetrek ~]$
Ordinarily, you must have write permissions to a file in order to delete it; however, if you have write permissions on the directory containing the file, you can delete files if you confirm the action. If you attempt to delete a file to which you only have read permissions, you’ll be asked if you really want to delete that file:
[kermit@swinetrek ~]$ rm Read Only.txt

rm: Remove write-protected regular file 'Read Only.txt'? y

[kermit@swinetrek ~]$
To force a deletion without further confirmation, add the -f option to the command. This can be combined with the -r option to delete a write-protected directory, too.
[kermit@swinetrek ~]$ rm -rf Read Only Folder

[kermit@swinetrek ~]$
Don’t Force It!
Use the -f option with the rm command very carefully. When logged in as root, deleting directories or files without confirmation can result in serious damage to your installation. Confirming the deletion provides a safeguard against these accidental deletions.
Getting Help
Possibly the most useful of all command line tools is man, the online manual. If you ever need to find out what a command does or what options are available, just enter man commandname at the command prompt.
When reading the manual, the up and down arrow keys scroll through the text, the space bar scrolls through a page at a time, and Q quits the manual and returns you to the command prompt.
Introducing the Shell
In the same way that we can interact with Linux graphically through a desktop environment such as GNOME or KDE, we interact with the Linux command line through a shell. We’ve been using the shell throughout this chapter; let’s now take a look at some of its more advanced features.
The default shell in Fedora Core (and, in fact, in most modern Linux systems) is bash, or the Bourne Again Shell. bash is a modern rewrite of the original Bourne shell, sh, which was written in 1977. While other shell environments exist, such as tcsh, csh and ksh, bash has become increasingly popular due to its useful featureset. We’ll look in detail at some of those features here.
Tab Completion
One of the most useful features of many modern shells is tab completion. When a partial command or filename is entered on the command line, and the user presses the Tab key, the command or filename will be completed for you. For example, typing cat Hello, followed by Tab, will result in cat Hello World.txt being completed at the command line for you.
However, typing cd /etc/ht, followed by Tab, doesn’t immediately return anything. That’s because two directories begin with /etc/ht: /etc/httpd
and /etc/htdig. Pressing the Tab key a second time will list the possible options:
[kermit@swinetrek ~]$ cd /etc/ht

httpd/  htdig/

[kermit@swinetrek ~]$ cd /etc/ht
We can use this list to continue typing until we’ve typed enough characters to identify a single directory; we can then press Tab again to have the filename completed.
Command History
The bash shell records a limited history of recently issued commands – up to 1000 by default. You can use the up arrow key to scroll back through the command history, and the down arrow key to scroll forward. When the desired command is found, you can execute it by pressing Enter.
To see the full history, simply enter the history command. All your recent commands will be displayed in chronological order, with the oldest at the top.
[kermit@swinetrek ~]$ history

    1  pwd

    2  ls

    3  ls /

    4  ls -l

    5  ll -a

    6  cd /etc/httpd/

    7  cd

    8  cd ..

    9  echo "Hello, World!"

   10  cat Hello World.txt

   11  cp Hello World.txt Copy.txt

   12  cp Hello World.txt /var/backup/Hello World.txt

   13  cp -r /home/kermit/ /var/backup/

   14  mv Hello World.txt Moved.txt

   15  mv Moved.txt /var/backup/

   16  su

   17  su gonzo

   18  chmod o+w Hello World.txt

   19  ll

   20  chmod ug-w Hello World.txt

   21  rm Copy.txt

   22  rm -r untitled folder

   23  rm Read Only.txt

   24  rm -rf Read Only Folder
This history is also searchable. Hitting Ctrl-R will change the prompt to (reverse-i-search)`':; now, try typing part of one of the commands in your history. The shell will find within the history the most recent command that contains the entered string, and display it. Just hit Enter to execute it, or Esc to return to the normal prompt. In the example below, I’ve entered Hello and found the last command that involved the file Hello World.txt.
(reverse-i-search)`Hello': chmod ug-w Hello World.txtSome built-in history shortcuts can further maximize the efficiency with which you utilize the shell history. The !! command will execute the last command in the history file. For example, if the last command entered was ll, !! would re-run that command.
[kermit@swinetrek ~]$ !!

ll

total 16

drwxr-xr-x  2 kermit kermit 4096 Sep  5 14:21 Desktop

-rw-rw-r-- 1 kermit kermit 13 Sep 8 07:30 Hello World.txt!partial-commandwill execute the last command beginning withpartial-command. For example,!echwould re-run the lastechocommand.
[kermit@swinetrek ~]$ !ech

echo "Hello, World!"

Hello, World!
Programming the Shell
The shell itself can be quite a powerful little programming language. It supports looping, branching, variables – everything that constitutes a worthwhile programming environment. These shell programs, called shell scripts, are just text files on which execute permissions are set. The text files contain commands just like those you’d type on the command line:
Example 3.1. hello_world.sh
#!/bin/sh

echo "Hello, World!"
The output of this script is exactly as you’d expect:
Hello, World!Let’s take a look at some of the shell’s more programming language-like features. First, we’ll create a new variable in the shell and print its value.
[kermit@swinetrek ~]$ COUNTER=0

[kermit@swinetrek ~]$ echo $COUNTER

0
Once the variable COUNTER is created, it’s there until you close the terminal window. The value of the variable may change, as you’ll see, but the variable itself remains until the terminal session is ended. This is true of any declared shell variable.
If we use the increment operator (++) to increment the value of COUNTER, then echo it again, you’ll see that the shell does, in fact, track the values of these variables:
[kermit@swinetrek ~]$ let COUNTER++

[kermit@swinetrek ~]$ echo $COUNTER

1
Let’s build a simple script, called counter_test.sh, that will keep on counting until we tell it to stop by pressing Ctrl-C.
Sorry to Interrupt…
You can abort any process on the command line by pressing Ctrl-C. This is referred to as sending the program an interrupt signal.
This same keyboard shortcut will throw away a command and start you on a new, blank prompt if you’re not happy with what you’ve typed.
The first line of any shell script is what’s commonly referred to as the shebang: a pound sign, followed by an exclamation point, followed by the path to the shell. (/bin/sh is a standard shortcut to the shell program on Linux systems. Usually, this file is just a link to the actual shell program (e.g. /bin/bash), but using the standard name ensures that you script will still work on a system that uses a different shell.)
#!/bin/shEvery shell script must begin with this line. The next line of our script will set a value for the COUNTER variable:
COUNTER=0In other words, we’re starting the counter at zero. Next, we’ll add a loop to the program. We’ll make it an infinite loop, so the user will have to send an interrupt signal to quit the program.
while true;

do

  # contents of loop go here

done
Now all we need to do is define just what it is that the shell is going to do as long as the condition is true: print the value of COUNTER, increment COUNTER, and wait for one second:
while true;

do

  echo $COUNTER

  let COUNTER++

  sleep 1;

done
If you’re following along closely, you’ll already know what we’ll see on the screen: a count up from 0. Here’s the script in its entirety:
Example 3.2. counter_test.sh
#!/bin/sh


COUNTER=0

while true;

do

  echo $COUNTER

  let COUNTER++

  sleep 1;

done
We’ve created a good shell script, but we still have one loose end to tie up before we can run it. For our script to execute, we need to set the appropriate permissions.
[kermit@swinetrek ~]$ chmod u+x counter_test.sh

[kermit@swinetrek ~]$
Now we can run the script:
[kermit@swinetrek ~]$ ./counter_test.sh

0

1

2

3

4
This tells the shell to execute a file named counter_test.sh within the current working directory. You should see the screen start to count from zero, pausing for a second between increments. Ctrl-C will stop the counting.
That’s but a small taste of the process of writing a shell script. Remember, as well, that shell scripts can access most of the single commands you’ll utilize in your day-to-day Linux use. A script that elegantly combines these tasks into a single executable file can be a thing of beauty and a real time-saver.
If you’ve had previous programming experience, you’re likely to find the shell a bit lightweight for programming purposes. Clearly, the shell isn’t a powerful development environment. If it doesn’t meet your needs, you should probably begin to dig more deeply into powerful scripting languages like Perl. Shell scripts, however, have the advantage of being a good hacker’s tool. They’re quick, they can accomplish many of the daily administrative tasks you’ll face in Linux, and many pieces of each script can be tested directly in the shell prior to being rolled into a script.
Further exploration of the possibilities of shell scripting can be found in the detailed online tutorial A Quick Guide to Writing Scripts Using the Bash Shell.
The PATH Environment Variable
Now, remember that all of the command line tools are binary files located somewhere in the filesystem: the ls command, for example, actually lives in the directory /bin. But how does the shell know to find /bin/ls when you type ls at the command prompt?
The shell looks through all the directories listed in its built-in PATH variable, in search of a file that has the same name as the command you’re after. The PATH environment variable for a default Fedora Core installation will look something like this:
[kermit@swinetrek ~]$ echo $PATH

/usr/kerberos/bin:/usr/local/bin:/usr/bin:/bin:/usr/X11R6/bin
So when you type the ls command, the shell would first look for an executable file /usr/kerberos/bin/ls, without success. Is there a /usr/local/bin/ls? No. What about a /usr/bin/ls? Sorry. How about a /bin/ls? Bingo!
Remember that, when we ran our counter_test.sh script, we needed to prefix the script filename with ./ to tell the shell that the executable file was in the working directory. If we were to add this directory to the PATH variable, we could simply enter counter_test.sh to run this script regardless of the working directory.
Built-in variables such as PATH are known as environment variables. These are the variables that describe the environment in which a process is running. Examples of other environment variables are HOME, which contains the path of the user’s home directory, and MAIL, which is the name of the file that stores the user’s email. Environment variables work just like normal shell variables, except they can be accessed by programs that are launched from the shell too.
To set or modify an environment variable, you must use the export command:
[kermit@swinetrek ~]$ export PATH=$PATH:/home/kermit

[kermit@swinetrek ~]$ echo $PATH

/usr/kerberos/bin:/usr/local/bin:/usr/bin:/bin:/usr/X11R6/bin

:/home/kermit/bin:/home/kermit
Note how we’ve used the PATH environment variable’s existing value ($PATH) in specifying its new value. This technique allows us to tack an additional directory onto the end of the existing PATH. You can see that the /home/kermit directory has been added to the PATH variable. You should now be able to run counter_test.sh as easily as you’d run ls.
[kermit@swinetrek ~]$ counter_test.sh

0

1

2

3

4
Setting the PATH environment variable in this way will allow you to run a shell script from any directory for the remainder of this terminal session, but the modified PATH will be lost as soon as you exit the terminal. In Chapter 4, System Administration, we’ll see how to modify the default PATH used whenever a new shell is launched.
Summary
As useful as it is, the Linux command line can seem pretty cryptic when you first open a terminal. There is logic to the commands, but it will likely take a bit of experimentation before you feel comfortable with them. In order to set you on the right path, we’ve laid out some of the most common terminal commands, and explained their use in your Linux system, in Appendix A, Command Line Reference.
It’s possible to use a Linux system without going anywhere near the command line. If you do so, however, you’ll forego accessing the true power of the operating system. Linux’s roots lie in the command line interface. Certainly, you can use the terminal to achieve tasks more efficiently than would be possible using the graphical interface, but, even more importantly, the command line allows you to execute tasks that would be impossible to complete via the gui.
In a discussion on the intuitiveness of interfaces in the comp.os.linux.misc newsgroup, Mark van Hoeij wrote “How do I type ‘for i in *.dvi do xdvi i done‘ in a GUI?”, and his point is a valid one; the command line lets you do things easily that the GUI does not. Mastery of the command line is a big step on the ladder to achieving status as a Linux guru.
Chapter 4. System Administration
So far, we’ve looked at installing Linux, and we’ve become reasonably comfortable with both the graphical and the command line interfaces. Now, it’s time to delve a little deeper into administrating our Linux Web server.
Creating New Users and Groups
The concepts of users and groups are important in Linux and, as an administrator, you’ll surely find the need to add new users as you become more comfortable with the system, or begin to share some of your server’s administrative duties. As with other tasks, you can add new users with either a graphical or text-based interface.
The User Manager Tool
In Fedora Core, user and group management tasks are handled by the User Manager tool, which you can start by selecting Desktop > System Settings > Users and Groups, as depicted in Figure 4.1.
Figure 4.1. Opening the User Manager.
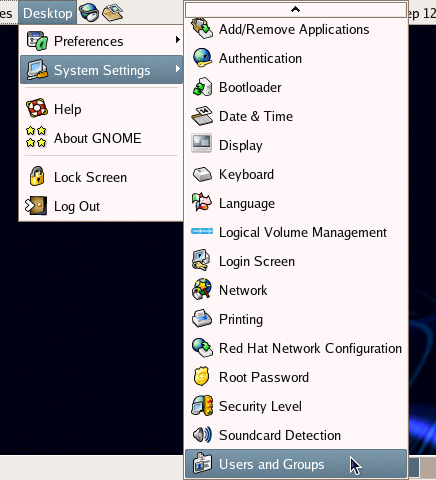
Getting Authorized
System Administration tools will often require root access. When they do, GNOME will prompt you for the root password via the dialog shown in Figure 4.2.
Figure 4.2. GNOME displaying a prompt for the root password.
Provided you enter the password correctly, you’ll become authorized to perform system configuration actions as root without having to re-enter the root password. That authorization is signified by the badge icon in the top right panel, like that shown in Figure 4.3. Once you’re done making configuration changes, you can end this authorization by clicking on the badge icon, then clicking the Forget Authorization button on the dialog that appears. The badge icon should then disappear.
Figure 4.3. Displaying the authorization badge.
Managing Users
The User Manager, shown in Figure 4.4, displays all the user accounts that currently exist on your system. It also displays for each user the User ID number, the group to which that user belongs, the user’s full name (optional), the user’s default shell, and the home directory. To add a user, click Add User. The dialog shown in Figure 4.5 will appear.
Figure 4.4. The user listing.
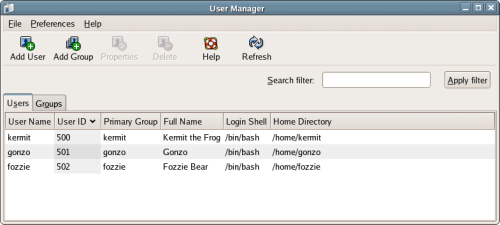
As you can see in Figure 4.5, a Fedora administrator has plenty of options to consider when adding a new user. These include defining the home directory, creating a private group for the user, manually assigning a user ID, and selecting the user’s shell. While the defaults are perfectly acceptable in most cases, the process is very flexible and caters well for unusual cases.
Figure 4.5. The Create New User dialog.
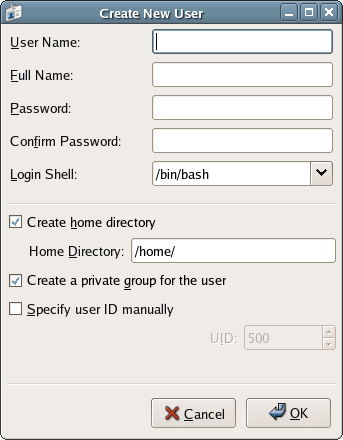
Managing Groups
Users within a Linux system may be consolidated into groups, which can ease the management of file permissions for groups of users. You might, for example, create a “developers” group, into which you’ll add all the Web developers who create code for your server. You’d give that group appropriate permissions to the files of your Web application, providing each developer the ability to edit those files without allowing ordinary users access to them.
To add a new group, select Add Group from the User Manager window. The dialog shown in Figure 4.6 will appear.
Figure 4.6. The Create New Group dialog.
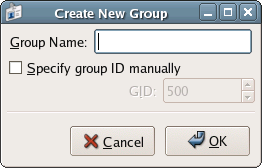
First, you’ll need to name the group. In our example, you might, for instance, name the group “Developers.” You can also accept the pre-assigned group ID, or GID (500, in this case), or check the Specify group ID manually checkbox to manually assign the group a group ID. (NB. You’ll almost always want to accept the pre-assigned ID, because it doesn’t matter what a group’s ID is, except in very rare cases. If you come across one of those rare cases, you’ll know why you want a specific ID; otherwise, accept the suggestion.)
To view the current groups, and add a user to an existing group, select the Groups tab in the User Manager window, as illustrated in Figure 4.7.
Figure 4.7. The User Manager’s Groups tab.
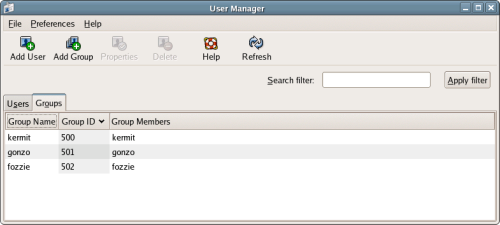
There are two methods by which we can add a user to a group. The first is to select a group in the User Manager and click the Properties button. In the dialog that appears, select the Group Users tab to see a list of users you can add to this group, as shown in Figure 4.8.
Figure 4.8. Adding users to a group.
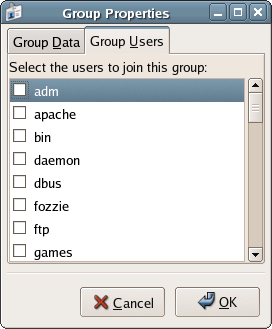
Ensure that you’ve checked all of the users you’d like to include as members of this group, and click OK.
The other way we can add a user to a group is via the User Manager’s Users view. In the User Manager, click on the Users tab, select the user you’d like to add to a group, and click Properties. Clicking the Groups tab displays a list of all of the groups of which this user can become part, as shown in Figure 4.9.
Figure 4.9. Adding a user to groups.
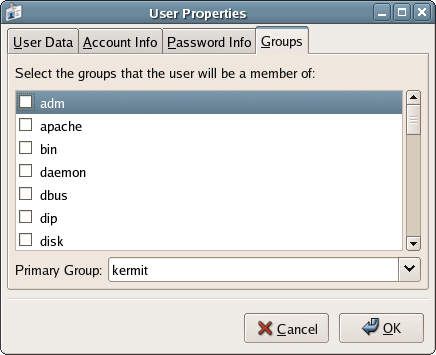
Deleting a user or group within the User Manager window is as easy as creating one. Simply highlight the user or group, then click the Delete button in the User Manager window’s toolbar.
Managing Users from the Command Line
Creating Users and Groups with useradd and groupadd
To add users and groups from the command line, we use the groupadd and useradd commands.
Using .bashrc
Unfortunately, you can’t use groupadd or useradd as easily as you might use ls in the default installation of Fedora Core. The groupadd and useradd tools are located in the directory /usr/sbin, which isn’t part of the default PATH. To add this directory to the PATH variable, enter export PATH=$PATH:/usr/sbin at the command prompt, as we discussed in Chapter 3, The Command Line. This will only take effect for the current shell session; as soon as you close the terminal window, this value will disappear.
If you’d rather have this command run automatically every time you start the shell, you can add the command to .bashrc, a hidden file that’s automatically executed every time you start up the bash shell. To open this file in gedit, select File > Open…. In the Open File… dialog, right-click in the area in which the files are listed, and click Show Hidden Files, as depicted in Figure 4.10.
Figure 4.10. Opening .bashrc in gedit.

Locate .bashrc and open it. Add the export command to the end of the file, as shown below.
Example 4.1. .bashrc
# .bashrc


# User specific aliases and functions


# Source global definitions

if [ -f /etc/bashrc ]; then

    . /etc/bashrc

fi


export PATH=$PATH:/usr/sbin
The next time you open a terminal window, this command will be executed automatically. Note that this won’t affect any shells you have open at the moment – you’ll need to close and reopen them in order for the command to execute.
Let’s look at an example of these commands, which we’ll run as root.
[kermit@swinetrek ~]$ su

Password:

[root@swinetrek kermit]# groupadd muppets

[root@swinetrek kermit]# useradd -G muppets -c "Miss Piggy"

> misspiggy

[root@swinetrek kermit]# passwd misspiggy

Changing password for user misspiggy.

New UNIX password:

Retype new UNIX password:

passwd: all authentication tokens updated successfully.

[root@swinetrek kermit]# exit

exit

[kermit@swinetrek ~]$
In this example, we can see that the groupadd command has been used to create a group called “muppets.” Remember that groupadd is located in /usr/sbin, so you might need to enter /usr/sbin/groupadd instead.
Next, we use the useradd command to create a user called “misspiggy,” and add her to the “muppets” group (as specified by the -G option) with the full name “Miss Piggy” (as specified by the -c option). When a user is created using useradd, that user’s password is locked; we need to change it in order to unlock it. To do so, we use the passwd tool.
Deleting Users and Groups with userdel and groupdel
You can delete users and groups using the userdel and groupdel commands. Note that userdel will leave the users’ home directory intact; you might want to delete this directory while you’re logged in as root:
[kermit@swinetrek ~]$ su

Password:

[root@swinetrek kermit]# groupdel muppets

[root@swinetrek kermit]# userdel misspiggy

[root@swinetrek kermit]# rm -rf /home/misspiggy/

[root@swinetrek kermit]# exit

exit

[kermit@swinetrek ~]$
Mounting and Filesystems
We briefly touched on the concepts of devices, mount points and filesystems in Chapter 2, Day-to-day Usage. In Linux, when we insert removable media of any kind, we need to mount the filesystem stored on that media device. This concept is fairly unfamiliar to Windows users, but once you get the hang of it, it becomes second nature. In fact, Windows does the same thing; the difference is simply that the Windows operating system automates the mounting process, so users are usually unaware that it takes place. Nautilus largely automates this process, too, but it’s still important for system administrators to know how devices are mounted, and how mounting is accomplished from the command line.
Mounting a Filesystem with the mount Command
Let’s look at the process of mounting a floppy disk from the command line:
[kermit@swinetrek ~]$ su

Password:

[root@swinetrek kermit]# mount -t vfat /dev/fd0 /media/floppy

[root@swinetrek kermit]# exit

exit

[kermit@swinetrek ~]$
The mount command loads a device’s filesystem into our server’s filesystem. In this case, the device is the floppy disk drive (/dev/fd0), and that device’s filesystem is loaded into /media/floppy – the mount point. We also need to tell Linux what kind of filesystem it can expect to find on the device. In this case, we’re using a disk formatted as FAT32, and we’ve specified this with -t vfat.
Let’s take a closer look at what’s going on here. We’re using a floppy disk from an old Windows machine; a couple of directories are stored on the disk, as shown in Figure 4.11.
Figure 4.11. Viewing the floppy disk’s filesystem in Windows.
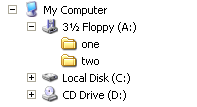
As we saw in Chapter 2, Day-to-day Usage, there is no A: drive in Linux; removable media devices appear as part of the filesystem within the /media directory. So, when we mount the floppy disk, it appears inside the /media/floppy directory, as depicted in Figure 4.12.
Figure 4.12. The floppy disk’s filesystem displaying as part of the Linux filesystem.
Unmounting a Filesystem with the umount Command
Before removing the floppy disk, we should unmount it, thereby removing it from the filesystem. We can do so using the umount command – note the missing “n” – as shown below.
[kermit@swinetrek ~]$ umount /media/floppy

[kermit@swinetrek ~]$
For some devices, the unmounting process is very important. A floppy disk is a good example of this. It can take a long time to save a file to a floppy disk; the unmounting process ensures that any programs that are writing to the disk complete their writes before the device is removed.
The Filesystem Table (fstab) File
Many of the configuration options for your server’s filesystem are contained in a single text file, /etc/fstab. As this file is critical to the operation of your system, the file is owned by root and only root can write to the file. That ownership and permissions structure prevents any potentially catastrophic alteration to, or deletion of the file by non-root users. It’s strongly advised that you refrain from adjusting these permissions, and treat the file with the respect it deserves when logged in as root.
Editing Read-only Files
There are numerous ways to edit a text file as root. Perhaps the easiest is to launch your preferred text editor from the command line after switching to the root user. The text editor will run as if you were logged in as root, but GNOME will insist on returning to the terminal an ugly looking warning message:
[kermit@swinetrek ~]$ su

Password:

[root@swinetrek kermit]# gedit /etc/fstab


(gedit:2066): GnomeUI-WARNING **: While connecting to

session manager:

Authentication Rejected, reason : None of the

authentication protocols specified are supported and

host-based authentication failed.
There’s absolutely no problem with using this approach to edit files. Kate, gedit, or the text editor of your choice will run without a problem. However, if you’d prefer to get rid of this warning, Bruce Wolk suggested the following script as a solution in the newsgroup linux.redhat.
Example 4.2. ~/bin/xroot.sh
#!/bin/sh


if [ $# -lt 1 ]

then echo "usage: `basename $0` command" >&2

      exit 2

fi

su - -c "exec env DISPLAY='$DISPLAY'

    XAUTHORITY='${XAUTHORITY-$HOME/.Xauthority}'

    "'"$SHELL"'" -c '$*'"
Save this file as xroot.sh in a directory named bin inside your home directory. You’ll probably need to create this directory yourself, and you’ll also need to give yourself execute permissions on this file. You can do so by running chmod u+x ~/bin/xroot.sh, or by changing the file’s permissions in Nautilus.
Because /home/username/bin is automatically included in the PATH environment variable, you should be able to run this from the command line simply by typing xroot.sh.
[kermit@swinetrek ~]$ xroot.sh gedit

Password:fstab, which is an abbreviation of "filesystem table," provides instructions to the operating system as to where devices should be mounted.The /etc/fstab file will appear similar to the following:
Example 4.3. /etc/fstab
# This file is edited by fstab-sync - see 'man fstab-sync' for

# details

/dev/VolGroup00/LogVol00 /              ext3   defaults        1 1

LABEL=/boot              /boot          ext3   defaults        1 2

/dev/devpts              /dev/pts       devpts gid=5,mode=620  0 0

/dev/shm                 /dev/shm       tmpfs  defaults        0 0

/dev/proc                /proc          proc   defaults        0 0

/dev/sys                 /sys           sysfs  defaults        0 0

/dev/VolGroup00/LogVol01 swap           swap   defaults        0 0

/dev/fd0                 /media/floppy  auto   pamconsole,exec,

                                               noauto,managed  0 0

/dev/hdc                 /media/cdrom   auto   pamconsole,exec,

                                               noauto,managed  0 0
Comments
In most Linux configuration files, lines that start with # are comment lines, and are ignored by the operating system.
Each line of /etc/fstab contains five fields which, together, specify the configuration of a single device. Let’s look at what each field means.
- The first element specifies the device. The second line, which starts with
LABEL=/boot, is a special case – the label/bootis defined elsewhere in the system. You can treat this as a synonym for/dev/hda1. - The second item identifies the mount point for the device. The last two lines –
/media/floppyand/media/cdrom– define the mount points for/dev/fd0(the floppy disk drive) and/dev/hdc(the CD-ROM drive). The first line, which deals with the device/dev/VolGroup00/LogVol00(this is the first partition on the first hard disk), tells the system to mount this disk as the root of the filesystem. - The third element defines the type of filesystem Linux should expect. Here we can see that
/dev/VolGroup00/LogVol00has an ext3 filesystem. - The fourth element lists mounting options for the device and the filesystem. Available options include:
auto: This device should be mounted automatically when the system is started.noauto: This device should not be mounted automatically when the system is started.owner: The device and filesystem may only be mounted by the owner of the device file.kudzu: The device will be checked for changes by the Red Hat kudzu system.rw: The filesystem will provide read and write access.ro: The filesystem will provide read only access.
There are several other options for mounting devices and filesystems, as you can see in the default fstab file, but these are the ones in which we’re interested. In our example, many of the options are set to defaults. In a Fedora Core system, this is equivalent to auto,owner,kudzu,rw.
fsck (filesystem check) utility. ext3 filesystems very rarely benefit from such a check. If you do want to perform such checks, you should number the filesystems in the order in which you’d like them checked – 1 for the first, 2 for the second, and so on.
With a correctly formatted fstab file, using the mount command becomes much easier:
[kermit@swinetrek ~]$ su

Password:

[root@swinetrek kermit]# mount /media/floppy

[root@swinetrek kermit]# exit

exit

[kermit@swinetrek ~]$
Here, we’ve specified only the mount point. mount is able to look in fstab to identify the device to which this mount point relates.
Whether or not you will be able to mount the device as a normal user depends upon the options noted in fstab, and the permissions on the device file. If the mount point is owned by root, and you attempt to mount a device on it as a normal user, you’ll be presented with a Permission denied error.
Making a Mount Point
Until now, we’ve only talked about Fedora Core’s conventions for mount points. Other Linux systems use different conventions, in order to make the mount point name slightly more recognizable. SuSE, for example, creates a /floppy mount point when the system is installed, as opposed to Fedora’s /media/floppy. The fact that other distributions can use different conventions should tell you that the naming of mount points is not standard, nor should it be. Remember that a mount point is merely another directory on the system. If you’re confused by the convention employed by the distribution you’re using, use the convention you prefer.
For example, you can use the SuSE convention mentioned above on your Fedora system:
[kermit@swinetrek ~]$ su

Password:

[root@swinetrek kermit]# mkdir /floppy

[root@swinetrek kermit]# exit

exit

[kermit@swinetrek ~]$ mount -t vfat /dev/fd0 /floppy

[kermit@swinetrek ~]$
Here, we’ve mounted the floppy disk’s filesystem at a new mount point: /floppy. We can edit fstab to make this change more permanent.
Example 4.4. /etc/fstab
# This file is edited by fstab-sync - see 'man fstab-sync' for

# details

/dev/VolGroup00/LogVol00 /              ext3   defaults        1 1

LABEL=/boot              /boot          ext3   defaults        1 2

/dev/devpts              /dev/pts       devpts gid=5,mode=620  0 0

/dev/shm                 /dev/shm       tmpfs  defaults        0 0

/dev/proc                /proc          proc   defaults        0 0

/dev/sys                 /sys           sysfs  defaults        0 0

/dev/VolGroup00/LogVol01 swap           swap   defaults        0 0

/dev/fd0                 /floppy        auto   pamconsole,exec,

                                               noauto,managed  0 0

/dev/hdc                 /media/cdrom   auto   pamconsole,exec,

                                               noauto,managed  0 0
We can now mount a floppy disk by just entering mount /floppy.
Automatically Mounting Filesystems
We can use the auto option in fstab to make the mounting process automatic for some devices. To mount a CD-ROM automatically once it’s inserted, change the options listed for /dev/hdc from noauto to auto.
Example 4.5. /etc/fstab
# This file is edited by fstab-sync - see 'man fstab-sync' for

# details

/dev/VolGroup00/LogVol00 /              ext3   defaults        1 1

LABEL=/boot              /boot          ext3   defaults        1 2

/dev/devpts              /dev/pts       devpts gid=5,mode=620  0 0

/dev/shm                 /dev/shm       tmpfs  defaults        0 0

/dev/proc                /proc          proc   defaults        0 0

/dev/sys                 /sys           sysfs  defaults        0 0

/dev/VolGroup00/LogVol01 swap           swap   defaults        0 0

/dev/fd0                 /media/floppy  auto   pamconsole,exec,

                                               noauto,managed  0 0

/dev/hdc                 /media/cdrom   auto   pamconsole,exec,

                                               auto,managed    0 0
Now, whenever you insert a CD-ROM, it will be mounted automatically.
Services
Like every modern operating system, Linux has quite a bit going on in the background. If you’re an average computer user – on a Linux, Mac, or Windows system – you’ll rarely have a compelling reason to interact with these background tasks. Most of the time, you won’t even realize they’re there. The tasks execute on their own and, provided you stay out of their way, they’ll stay out of yours. Even as an administrator, you’re not likely to need to do much more than start, stop, or restart these services. But don’t let the lack of direct contact fool you: these services are critical to the operation of your system.
Linux’s system services are generally referred to as daemons. They’re applications that run in the background, providing such critical functionality as file and printer sharing, power management, automatic task scheduling, and system logging. For example, your Web server will be running httpd, the HTTP daemon that lies at the heart of Apache. If you make use of MySQL, you’ll also need to run the MySQL daemon, mysqld.
The Service Configuration Tool
The Service Configuration tool, which you can start by selecting Desktop > System Settings > Server Settings > Services, can be used to stop and start services. The tool is shown in Figure 4.13.
Figure 4.13. The Service Configuration tool.
To stop or start a service, select it from the list in the left-hand panel. A brief description, along with that service’s current status, will be presented on the right. To start a stopped service, click the Start button at the top of the window; to stop a running service, click the Stop button. There is also a Restart button, which can be used to restart a service – an action that can be necessary for certain configuration changes to take effect.
You can also use this tool to configure services to start automatically when the machine is switched on. To do this, check the checkbox next to the service name, and click Save.
Services and Runlevels
Runlevels are basically a convenient way of describing the facilities that are currently available to the system. In runlevel 5, all system functions are available: multiple users can log in, networking features are available, and the GUI is up and running. As the system starts, and system functions become available, other runlevels are triggered:
- Runlevel 1: This is known as single user mode. Only one user can be logged in at a time. No network resources are available.
- Runlevel 2: Multiple users may be logged in simultaneously, but no network support is available. This is known as multi-user mode.
- Runlevel 3: This is the same as runlevel 2, except that network resources have become available. This runlevel is sometimes referred to as full multi-user mode.
- Runlevel 5: In addition to everything that’s available in runlevel 3, the GUI server is also available at this runlevel.
What Happened to Runlevel 4?
There is no default runlevel 4 – this is reserved for definition by system administration gurus.
The Service Configuration tool allows us to set services to start at runlevels 3, 4, or 5. To alter the services that start at a given runlevel, select an option from the Edit Runlevel menu. You can choose to edit a single runlevel at a time, or edit all three at once by selecting Runlevel All, as shown in Figure 4.14.
Figure 4.14. Editing all runlevels.
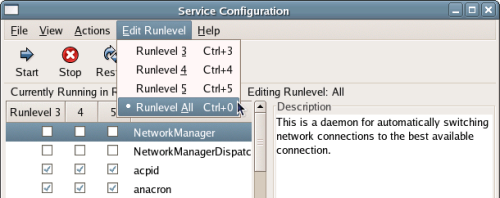
Check the boxes to specify which daemons you’d like to have start automatically, and when you’d like them to start, then click Save at the top of the window. Note that if you want a daemon to run in runlevels 3, 4, and 5, you need to check all three boxes. If you only check the box for runlevel 3, the service will be stopped when the system reaches runlevel 5.
Using service to Start and Stop Services
To stop, start, or get the status of a service from the command line, you can use Fedora Core’s service tool, which is located in the /sbin directory. Remember that, if you added /sbin to the PATH environment variable, you won’t need to prefix the command name with /sbin/ to run it.
[kermit@swinetrek ~]$ su

Password:

[root@swinetrek kermit]# /sbin/service httpd status

httpd is stopped

[root@swinetrek kermit]# /sbin/service httpd start

Starting httpd:                                           [  OK  ]

[root@swinetrek kermit]# /sbin/service httpd status

httpd (pid 2928 2927 2926 2924 2923 2922 2921 2920 2917) is

running...

[root@swinetrek kermit]# /sbin/service httpd stop

Stopping httpd:                                           [  OK  ]

[root@swinetrek kermit]# exit

exit

[kermit@swinetrek ~]$
This tool takes two parameters: the name of the daemon (in this example, httpd) and the action to execute. All services will support the actions start, stop, restart, and status.
Using ntsysv to Start Services Automatically
ntsysv is an unusual command line tool in that it offers an interface similar to the text-based install discussed in Chapter 1, Building The Linux Environment, as you can see in Figure 4.15.Figure 4.15. ntsysv running in the terminal.
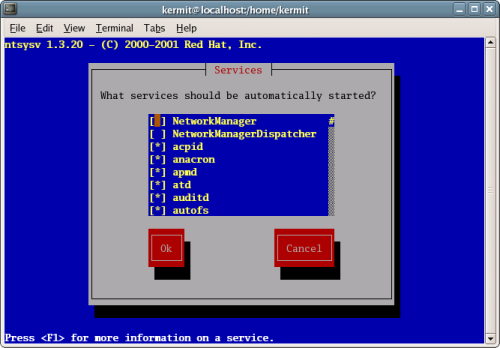
By default, ntsysv only edits runlevel 5. You can change this by starting ntsysv with the --level option. For example, ntsysv --level 3 will edit runlevel 3.
Automatically Starting Services with chkconfig
The more traditional command line equivalent of ntsysv is chkconfig.
[kermit@swinetrek ~]$ su

Password:

[root@swinetrek kermit]# /sbin/chkconfig --level 345 httpd on

[root@swinetrek kermit]# exit

exit

[kermit@swinetrek ~]$
This command sets httpd to start at runlevels 3, 4, and 5. You can get a list of the services that start at each level by running chkconfig --list.
Automating Routine Tasks
Computers are intended to do things for us. Yet, we spend much of our computing lifetimes repeatedly performing the same tasks, many of which are, in the end, rather mindless. System administration can sometimes become a chore chock-full of tedium and routine: the same keystrokes, the same checks, the same results. Wouldn’t it be ideal if we were able to put the computer to its intended use, and have it do these things for us?
Linux provides an abundance of ways to automate tasks. Shell scripts can help, but the real power lies in two particular facilities: cron and, to a lesser extent, at. These are tools you’ll rely upon to perform such routine tasks as archiving logs, updating the system database with newly installed applications, writing server statistics, and much, much more.
cron
cron is a Linux system daemon that executes scheduled scripts. The cron daemon, or crond, runs as a service that starts when your system starts. Every minute, it checks its own schedule database for tasks that need to be performed.
The heart of cron is the /etc/crontab file, which is shown below from the default, unaltered Fedora Core installation:
Example 4.6. /etc/crontab
SHELL=/bin/bash

PATH=/sbin:/bin:/usr/sbin:/usr/bin

MAILTO=root

HOME=/


# run-parts

01 * * * * root run-parts /etc/cron.hourly

02 4 * * * root run-parts /etc/cron.daily

22 4 * * 0 root run-parts /etc/cron.weekly

42 4 1 * * root run-parts /etc/cron.monthly
The crontab file first defines some environment variables: the shell in which the tasks will run, the PATH environment variable, the system account to which mail notifications will be sent, and the home directory to use. After the run-parts comment, the command schedule is listed.
The crontab Command Schedule Syntax
Believe it or not, a single line in this file provides all the information required for the system to perform a full set of tasks. In order to understand it, we need to break this line out into fields.
24-Hour Time
cron always deals in 24-hour time: 7:24 means 7:24 a.m., and 19:24 means 7:24 p.m.
- The first field defines how many minutes of each hour must pass before the task will be performed. In the above default
crontabfile, the first task is scheduled to start one minute past the hour; the last task is scheduled to commence at 42 minutes past the hour. - The second field defines the hour in which the task will be completed. From this, we can tell that the second task is scheduled to run at 4:02. An asterisk indicates that the task should be executed every hour. Therefore, we can tell that the first task is scheduled to be run at 0:01, 1:01, 2:01, and so on, all the way to 23:01, after which it starts all over again.
- The third field defines the day of the month – numbered from 1 to 31 – on which the task will run. The last command is scheduled to run at 4:42 on the first day of the month. Again, an asterisk indicates that the task should be run every day of the month.
- The fourth field determines the month in which the task should run; as you’d expect, the months are numbered from 1 to 12. If you had a task to perform only once a year, say in July, this field would contain a 7. If you had a task to perform every day in December, this field would contain twelve. Since, in our example, this field always contains an asterisk, we know that all of our tasks will be performed every month.
- The fifth field defines the day of the week on which the task will run. 0 represents Sunday, 1 represents Monday, and 6 represents Saturday. Our third task has a 0 in this field: it will be executed at 4:22 on Sundays. Once more, an asterisk in this field indicates that the task will be performed on every day of the week.
- The next field identifies the user who will complete the task. In all cases here, it’s root.
- The final field defines the actual task that is to be run. Here, we use run-parts to execute every script inside the
/etc/cron.scheduledirectories. Scripts inside the/etc/cron.hourlydirectory are run every hour, scripts inside/etc/cron.dailyare run daily, and so on.
Adding to crontab
Let’s put this to more practical use with the scenario mentioned back in Chapter 3, The Command Line. You may remember that we introduced the power of the command line with the command find /var/backups/* -ctime +5 -exec rm {} ;, which I use to remove backups that are more than five days old three times a week. This automated process is powered by cron, so let’s take a look at how this is configured on my system:
Example 4.7. /etc/crontab
SHELL=/bin/bash

PATH=/sbin:/bin:/usr/sbin:/usr/bin

MAILTO=root

HOME=/


# run-parts

01 * * * * root run-parts /etc/cron.hourly

02 4 * * * root run-parts /etc/cron.daily

22 4 * * 0 root run-parts /etc/cron.weekly

42 4 1 * * root run-parts /etc/cron.monthly

12 5 * * 2,4,6 root find /var/backups/* -ctime +5 -exec rm {} ;
The first two fields tell us that this task will be run at 5:12 – for purity’s sake, I’ve scheduled the task to run at a time when I’m not using the system, though it probably won’t make much of a difference in terms of performance. The next two fields are filled with asterisks, meaning they’ll be run regardless of the date. The potentially interesting value here, though, is the fifth “day of week” field, which has the value 2,4,6 – this means that the task is scheduled for Tuesday, Thursday, and Saturday. crontab also allows for ranges. 1-5 in the fifth would schedule a task to run Monday to Friday.
cron can just as easily execute shell scripts. Let’s create a script named backup.sh to actually create these backups. Save this file in the /home/username/bin directory – you may need to create this directory if you haven’t done so already.
Example 4.8. ~/bin/backup.sh
#!/bin/sh


# Create a directory for this backup.

# Its name depends on the date and time so backups can't overwrite

# each other, unless they're executed in the same minute.

DATE=`/bin/date +%Y%m%d%H%M`

mkdir /var/backup/$DATE

# Backup the Apache logs.

mkdir /var/backup/$DATE/apache-logs

for f in /var/log/httpd/*;

do

  cp -fr "$f" --target-directory /var/backup/$DATE/apache-logs

done

# Backup kermit's home directory

mkdir /var/backup/$DATE/kermit-home

for f in /home/kermit/*;

do

  cp -fr "$f" --target-directory /var/backup/$DATE/kermit-home

done
The above script achieves several tasks:
DATE=`/bin/date +%Y%m%d%H%M`declares a variable namedDATEand fills it with the output of the date command. The+%Y%m%d%H%Moption on the date command instructs it to format the date in YYYYmmddHHMM format. That is, the minute before midnight on December 31, 2006 becomes 200612312359. The backticks, or backward quotes around the date command, tell the system that this is a command embedded in your script that should be run to obtain the required text value.- Next,
mkdir /var/backup/$DATEcreates a directory for our backups based on this date. mkdir /var/backup/$DATE/apache-logscreates a subdirectory for Apache logs.- The
for fin/var/log/httpd/*;line sets up a loop to go through each file in the/var/log/httpddirectory. Inside this loop, the variablefwill refer to the current file. cp -fr "$f" --target-directory /var/backup/$DATE/apache-logscopies the current file (f) to the target directory,/var/backup/current-date/apache-logs.- The previous three steps are then repeated, copying everything in
/home/kermitto/var/backup/current-date/kermit-home.
Before we go ahead and run this script, we need to create the /var/backup directory, grant everyone write access to this directory, and make the backup.sh script executable:
[kermit@swinetrek ~]$ su

Password:

[root@swinetrek kermit]# mkdir /var/backup

[root@swinetrek kermit]# chmod a+w /var/backup

[root@swinetrek kermit]# exit

exit

[kermit@swinetrek ~]$ chmod u+x ~/bin/backup.sh

[kermit@swinetrek ~]$
Let’s test the script before we modify the crontab file to ensure that it works as we think it should:
[kermit@swinetrek ~]$ backup.sh

cp: cannot stat `/var/log/httpd/*': Permission denied

[kermit@swinetrek ~]$
We get this error message because we don’t have access to the /var/log/httpd directory; we need to run this script as root:
[kermit@swinetrek ~]$ su

Password:

[root@swinetrek kermit]# backup.sh

[root@swinetrek kermit]# exit

exit

[kermit@swinetrek ~]$ ls /var/backup

200612312359

[kermit@swinetrek ~]$
In the file listing, we can see that a directory has been created with the current date and time. Delve deeper into this directory until you’re satisfied that the script is working as expected.
The last step in the process is to add the execution of the script to the crontab file on the schedule we’ve already defined:
Example 4.9. /etc/crontab
SHELL=/bin/bash

PATH=/sbin:/bin:/usr/sbin:/usr/bin

MAILTO=root

HOME=/


# run-parts

01 * * * * root run-parts /etc/cron.hourly

02 4 * * * root run-parts /etc/cron.daily

22 4 * * 0 root run-parts /etc/cron.weekly

42 4 1 * * root run-parts /etc/cron.monthly

12 5 * * 2,4,6  find /var/backups/* -ctime +5 -exec rm {} ;

32 5 * * * root /home/kermit/bin/backup.sh
This entry differs from the original only in that it executes a script rather than executing a lone command. Because the script can contain commands and logic, it’s a sound approach to solving more complex routine operations.
Using the /etc/cron.schedule Directories
We’ve already discussed what the default crontab entries do. The first line runs the command run-parts /etc/cron.hourly every hour: run-parts will go into the /etc/cron.hourly directory and execute every executable file it finds there. Entries also exist for cron.daily, cron.weekly, and cron.monthly directories. If you prefer, you can simply store your backup.sh script in the /etc/cron.daily directory. It will run with the other daily scripts.
Anacron
Anacron is, to some extent, an extension of cron. Like cron, it’s intended to execute commands on a schedule, taking care of routine tasks. However, unlike cron, Anacron makes no assumption that the machine is up and running 24/7. In that sense, Anacron provides some measure of redundancy to the functions of cron.
Like other Linux applications, Anacron gets its direction from a text configuration file. In Fedora, this file is /etc/anacrontab. At first glance, the anacrontab file looks less daunting than crontab, even though we know how simple the crontab file can actually be.
Example 4.10. /etc/anacrontab
# /etc/anacrontab: configuration file for anacron


# See anacron(8) and anacrontab(5) for details.


SHELL=/bin/sh

PATH=/usr/local/sbin:/usr/local/bin:/sbin:/bin:/usr/sbin:/usr/bin


1        65      cron.daily            run-parts /etc/cron.daily

7        70      cron.weekly           run-parts /etc/cron.weekly

30       75      cron.monthly          run-parts /etc/cron.monthly
As in crontab, the first few lines of this file define some environment variables: in this case, SHELL and PATH. The remaining lines describe, over a number of fields, the jobs that Anacron must carry out. From left to right, these fields are as follows:
- period: The period field identifies the number of days that constitute the “period” in which the job will run once. In this example, the first job will be run every day, the second job will run once every seven days, and the last job will run once every thirty days.
- delay: When it’s time for a task to be executed, Anacron will wait this many minutes before executing the task. This is potentially useful when a machine is turned on after a long period of being switched off. For example, imagine if our machine was turned off for more than thirty days. When we turn it back on, Anacron will realize that it’s time to execute all of it’s scheduled tasks. It will execute the daily tasks in 65 minutes time, the weekly tasks in 70 minutes time and the monthly tasks in 75 minutes time. This staggering stops the machine becoming bogged down by three competing jobs.
- job identifier: The job identifier field is as it sounds: a means by which the system can identify each Anacron task. This field can contain any character, barring spaces, tabs and slashes.
- command: Finally, similar to crontab, anacrontab specifies the command that will be executed. Again, Anacron will execute
run-partsto work its way through the scripts in/etc/cron.daily.
The operation of Anacron is pretty straightforward. When run, it reads the list of jobs from /etc/anacrontab and checks whether or not each job has been run in the last specified number of days. If not, Anacron runs the job after waiting for the delay period. If the job has been run in the specified time period, it leaves it alone. It’s pretty simple.
We can start the Anacron daemon using one of the service tools we looked at earlier in this chapter. By default, it should be set up to start with your machine, but you can change this setting if you like.
Running cron and Anacron Together
By default, both cron and Anacron are configured to run all of the scripts in the /etc/cron.schedule directories. However, only one of cron or Anacron will actually run the scripts.
Each of these directories contains a script to keep Anacron up to date. For example, whenever cron runs the scripts in /etc/cron.daily, one of those scripts updates the file that Anacron uses to record when the task was last run. Later, when Anacron goes to run these scripts, it will see that cron has already run them, so it won’t run them again.
at
Now, we’ve got cron to perform regularly scheduled tasks on your system. We’ve got Anacron to pick up cron’s slack if the machine isn’t up and running 24/7. That seems like a pretty full complement of task scheduling methods, doesn’t it? As true as that may be, we’ve still left one piece out of the automated task puzzle: at.
at is a classic Linux hack, intended to take up where other applications leave off. In the cases of both cron and anacron, it’s not a trivial task to add a simple, one-off task to the schedule. Let’s say, for example, that you need to download a very large file, and you want to do it at a time when there’s no-one else on the network, so plenty of bandwidth is available. You could add an entry to /etc/crontab, but you’d have to remember to remove it in order to avoid downloading the same file again in the future. at serves this niche purpose perfectly. Better yet, the syntax for using at couldn’t be simpler:
[kermit@swinetrek ~]$ at 3:00

at> wget https://www.sitepoint.com/verylargefile.zip

at> <EOT>

job 1 at 2005-12-31 03:00

[kermit@swinetrek ~]$


<EOT>
<EOT> stands for end of transmission, and is triggered by hitting Ctrl-D. Use this to indicate that you have finished entering commands to be executed at the given time.at schedules the task for the next instance of the time you specify. In the above example, at would execute the given command at 3:00 a.m.
24-Hour Time
Remember that at, like cron and Anacron, uses 24-hour time.
In summary, if you’re looking to schedule tasks, Linux has you well covered. You have cron and Anacron for repeating tasks, and at for those one-off, occasional jobs.
Sending Email
By default, mail on Fedora Core 4 is handled by the sendmail program. sendmail can be configured to perform very complicated tasks, like running all the email for a company or an ISP. Entire books can (and have) been written about it. However, you’re unlikely to want to make your LAMP server double as your mail server, and you’re already likely to have a mail server. Some services on your LAMP server will generate email; for example, if a cron job fails, it will often email a description of its error to root@localhost, the root user’s account’s mailbox. That mail needs to be read, sometimes urgently, and it would be a pain to have to log in to your server to do so. The best approach is to ensure that all mail that goes to your Web server is sent to an address at which the system administrator can read it. We’ll set up the Web server so that all the mail it receives is forwarded automatically to another email address.
The aliases File
Mail direction is controlled by the file /etc/aliases, which is shown below.
Example 4.11. /etc/aliases
#

#  Aliases in this file will NOT be expanded in the header from

#  Mail, but WILL be visible over networks or from /bin/mail.

#

#       >>>>>>>>>>      The program "newaliases" must be run after

#       >> NOTE >>      this file is updated for any changes to

#       >>>>>>>>>>      show through to sendmail.

#


# Basic system aliases -- these MUST be present.

mailer-daemon:  postmaster

postmaster:     root


# General redirections for pseudo accounts.

bin:            root

daemon:         root

adm:            root

...

marketing:      postmaster

sales:          postmaster

support:        postmaster


# trap decode to catch security attacks

decode:         root


# Person who should get root's mail

#root:          marc
Each line in this file is an email alias; the line postmaster: root means “if mail comes to the postmaster account, put it in root’s mailbox.” By default, Fedora’s aliases file ensures that mail for all the “system” accounts on the machine (i.e., all the accounts that the computer creates, rather than the ones that you create) goes to root’s mailbox. This is very useful, because then, all you have to do is ensure that the mail that’s sent to root ends up in the administrator’s mailbox. This is a two-step process. First, record in the aliases file that root’s mail should go to the administrator’s mailbox. To do so, uncomment the last line in /etc/aliases, and change marc to the administrator’s email address.
Example 4.12. /etc/aliases (excerpt)
# Person who should get root's mail

root:          kermit@myisp.net
Second, tell sendmail that the aliases file has changed by running the command newaliases:
[kermit@swinetrek ~]$ su

Password:

[root@swinetrek kermit]# newaliases

/etc/aliases: 77 aliases, longest 16 bytes, 785 bytes total

[root@swinetrek kermit]# exit

exit

[kermit@swinetrek ~]$
That’s all that’s required. From now on, any mail that’s sent to root by any cron jobs (or similar) on your Web server will end up in your mailbox. If you’ve created additional accounts on your server (say, for individual system administrators), then you may wish also to add those accounts to /etc/aliases, making them forward their mail to root or other email addresses. Remember to run newaliases after you make the change.
Example 4.13. /etc/aliases (excerpt)
# Person who should get root's mail

root:          kermit@myisp.net

kermit:        root

gonzo:         gonzo@myisp.net

fozzie:        fozzie@myisp.net
Other Services
As you might expect, your Fedora Core system installs with a full set of graphical tools to ease the administration of various services on the system. There are too many tools to cover in depth here; instead, we’ll look at the tools you’ll use most frequently to configure and maintain both your system and the services it provides.
Preferences vs Settings
In Linux, the general convention is to call user-specific options “preferences.” Those that affect the whole system are called “settings.”
Samba
Samba allows you to share directories and printers with other machines. Typically, these machines are Windows machines, though they don’t have to be. To start up the Samba Server Configuration tool shown in Figure 4.16, select Desktop > System Settings > Server Settings > Samba.
Figure 4.16. The Samba Server Configuration tool.
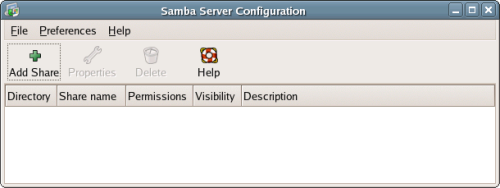
To share a directory on your Linux server with others, click the Add Share button. The dialog shown in Figure 4.17, “The Create Samba Share dialog.” will display.
Figure 4.17. The Create Samba Share dialog.
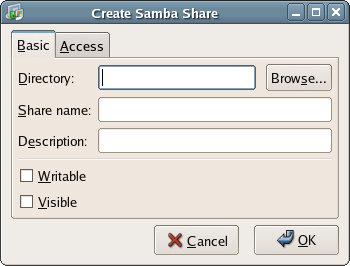
The main Samba Configuration window displays a list of all the shares you’ve defined. By highlighting a share, you can glean more information about it; you can adjust its settings by clicking on the Properties button.
NFS
NFS, or Network File System, is the Linux-native equivalent to Samba. It allows client machines to mount parts of your machine’s filesystem as if they were other devices.
The interface for the NFS configuration (accessible via Desktop > System Settings > Server Settings > NFS) is much the same as that provided for Samba configuration. The directory, the allowed hosts, and the permissions are all displayed in the main window. You can add or delete a share and, as with the Samba configuration, check and alter the properties of existing shares.
Mounting NFS Shares
You can mount NFS shares quickly and easily using the mount command. Instead of specifying a device file, such as /dev/fd0, you simply specify a server name and the name of the shared directory, separated by a colon.
[root@swinetrek kermit]# mkdir /mnt/kermit-oldserver

[root@swinetrek kermit]# mount oldserver:/home/kermit

> /mnt/kermit-oldserver

[root@swinetrek kermit]#
Apache Web Server
The Server Settings menu includes an HTTP option, which launches the graphical tool shown in Figure 4.18, “The graphical HTTP configuration tool.”, allowing you to configure your Apache server.
Figure 4.18. The graphical HTTP configuration tool.
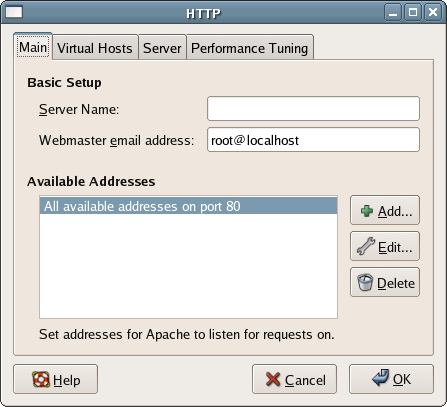
We won’t dig too deeply into the configuration tool here: we’ll cover it in depth in Chapter 5, Building The Server. However, you can see that nearly every configuration option for your Apache server is available in this window.
Package Management
The Package Management tool shown in Figure 4.19, “The Package Management tool.” is available by selecting Desktop > System Settings > Add/Remove Applications.
Figure 4.19. The Package Management tool.
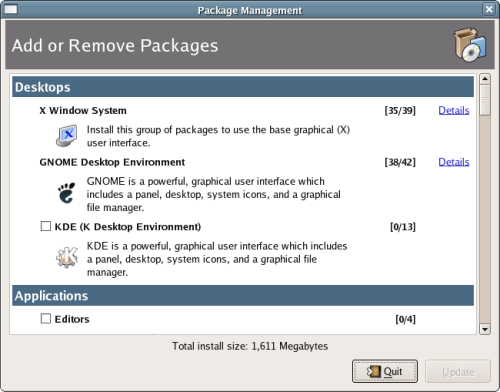
This tool provides a means to add and remove applications from your system. You can adjust individual packages within groups, or remove an entire group.
Boot Configuration
The Boot Configuration tool shown in Figure 4.20, “The bootloader configuration tool.” is available from Desktop > System Settings > Bootloader. It’s a very simple tool for configuring the GRUB bootloader we discussed in Chapter 1, Building The Linux Environment, allowing you to select the kernel your system will use at boot.
Figure 4.20. The bootloader configuration tool.
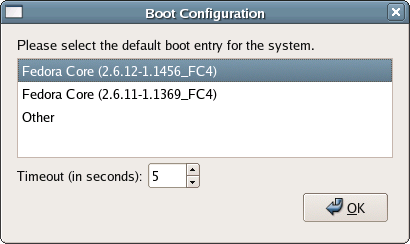
When automatic updates to the Linux kernel are allowed, it’s likely you’ll end up with multiple kernels on the system. By default, the system will choose the newest kernel version when booting, but this tool allows you to select from any of the kernels installed on the system. It also provides a tool to set the boot timeout: the period of time the system will wait for you to select a kernel during boot before automatically booting the default kernel version.
Date and Time
Figure 4.21. The Date/Time Properties window.
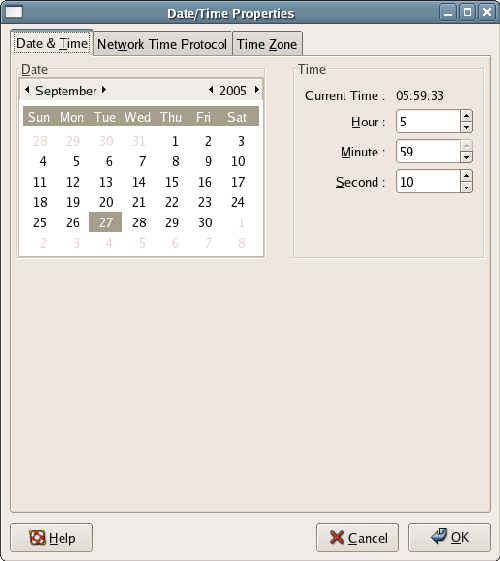
The Date/Time Properties tool (Desktop > System Settings > Date & Time), shown in Figure 4.21, “The Date/Time Properties window.”, serves several purposes. First, it provides a means to immediately adjust the system date and time. This is important for time-stamping and logging activity on the server.
In the Network Time Protocol tab, you can configure the server to make use of the Network Time Protocol (NTP) so that your system will connect with NTP servers around the world to automatically adjust its own internal clock. This will help ensure near-atomic-clock time accuracy on the server. To make use of NTP, check the Enable Network Time Protocol checkbox in the Network Time Protocol tab. Below this checkbox is a list of NTP servers to use; you can manage this list with the Add and Delete buttons.
Finally, in the Time Zone tab, the Date/Time Properties tool allows you to select the time zone in which the server is located. If you prefer that the server keep time based on the Coordinated Universal Time (UTC), check the System clock uses UTC checkbox.
Display Settings
The Display settings tool in Fedora Core (Desktop > System Settings > Display), shown in Figure 4.22, allows you to set the resolution and color depth, identify the hardware you’re using (which has probably been auto-detected by the system), and set up “dual head” (or dual monitor) systems.
Figure 4.22. The Display settings dialog.
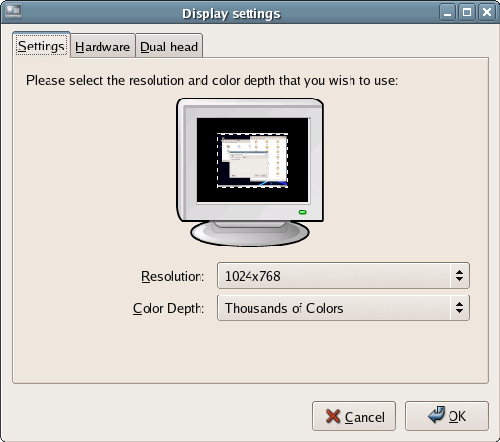
Network Settings
The network settings on your machine can be configured via the graphical Network Configuration tool shown in Figure 4.23 (Desktop > System Settings > Network).
This tool allows you to configure all elements of your network devices, from the actual hardware, to IP addressing, to DNS and DHCP. Additionally, the devices can be activated or deactivated from within the graphical interface. Advanced operations, such as configuring individual interfaces to allow activation by normal users, or on system start, can also be performed.
Figure 4.23. The Network Configuration tool.
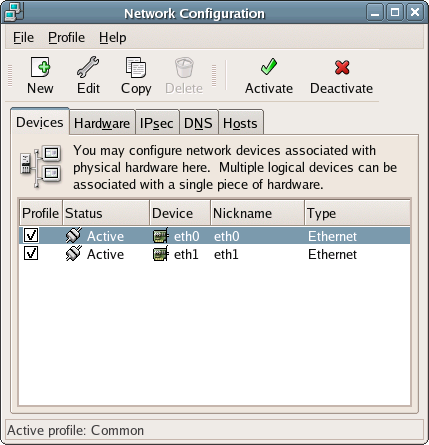
Printers
Fedora provides the tool depicted in Figure 4.24 to configure the printers on your system (Desktop > System Settings > Printing).
Figure 4.24. The Printer configuration tool.

The New button will launch a wizard that allows you to use a printer that’s connected directly to the server, or one that’s on the network.
Security Level Configuration
The firewall and Security Enhanced Linux (SELinux) are configured using the Security Level Configuration tool shown in Figure 4.25. To launch it, select Desktop > System Settings > Security Level.
Figure 4.25. The Security Level Configuration tool.
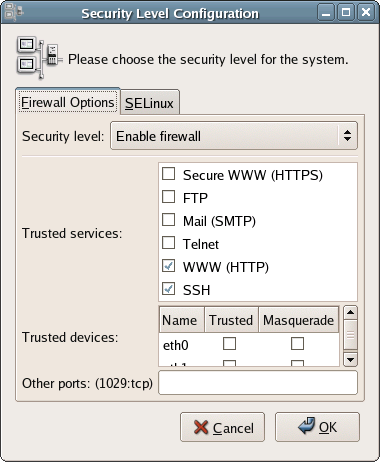
This tool is a graphical front end for the iptables command-line tool and SELinux configuration.
iptables provides the capability to limit the network traffic coming in and out of your system to known traffic types, to specific ports, and/or to specific devices. This is all configured in the Firewall Options tab of the Security Level Configuration window. Clearly, if you’re configuring and administering a Web server, it’s important to allow WWW (HTTP) traffic on the machine. You can also optionally allow Secure WWW (HTTPS) traffic. For remote administration, it’s useful to allow SSH (Secure Shell) traffic: this will allow you to log into the machine from a remote location and perform administrative duties securely, as if you were sitting at the server. Telnet should seldom be allowed: this protocol has many, many known security issues.
If, instead of allowing traffic types, you’d prefer to allow all traffic across a specific interface (the first ethernet device, for example, or eth0), select that option from the Trusted devices list. Note that this is less secure than limiting traffic to specific protocols, as all traffic across the chosen interface will be allowed.
You may also want to allow traffic through specific ports. You can define these ports in the Other ports text field of the Security Level Configuration window, separated by commas. Of all the options in the Firewall Options tab, this is the most secure, as it limits traffic to very specific entry points. We’ll look at this in more detail in Chapter 9, Server Security.
SELinux is a new addition to Fedora Core, available as a standard option only since Fedora Core 3. It’s a series of security related enhancements to the Linux kernel, largely written by the US National Security Administration (NSA). SELinux is such a rich tool that detailed configuration information is beyond the scope of this book. You can access more information about SELinux, including an extensive FAQ list, online at http://www.nsa.gov/selinux/.
Archive Manager
The Archive Manager depicted in Figure 4.26 is used to create archives of files on your system. It can handle a number of different archive formats, from the .zip format with which Windows users will be familiar, through to Java’s .jar format, and Unix’s .tar.
Figure 4.26. The Archive Manager application.
It’s available from Applications > System Tools > Archive Manager.
The Archive Manager can be used to create a new archive or to add files to an existing archive. It’s also used to view the contents of existing archives. To create a new archive, click on the New icon, then select the name and location of the new archive.
Next, you’ll want to click the Add button in the main Archive Manager toolbar. In the resulting window, click to the location in which you’d like to store the new archive, and give it a name.
You can add files one at a time by clicking the Add button, or by dragging and dropping files or folders from Nautilus, as shown in Figure 4.27.
Figure 4.27. Adding a directory.

The Archive Manager can also be used to view or extract the contents of an archive. Click Open and select an archive, then click Extract on the toolbar. Archive Manager will display the Extract dialog which, as you can see in Figure 4.28, “Archive Manager’s Extract dialog.”, contains many options for extracting archived files.
Figure 4.28. Archive Manager’s Extract dialog.
Floppy Formatter
To format a floppy disk, enter the path to the floppy device in the Floppy device text box; if the machine has only a single floppy, /dev/fd0 will be grayed in this text field. Select the density, the filesystem type and, if desired, add a volume name. You can also select the mode for formatting, including quick, standard, or thorough. When all the parameters are complete, click the Format button to complete the format. The Floppy Formatter, which is shown in Figure 4.29, is available from Applications > System Tools > Floppy Formatter.
Figure 4.29. The Floppy Formatter.
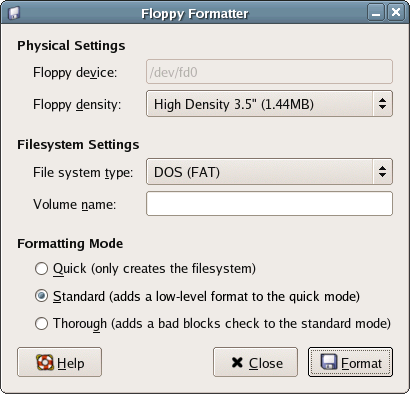
Hardware Browser
Figure 4.30. The Hardware Browser.
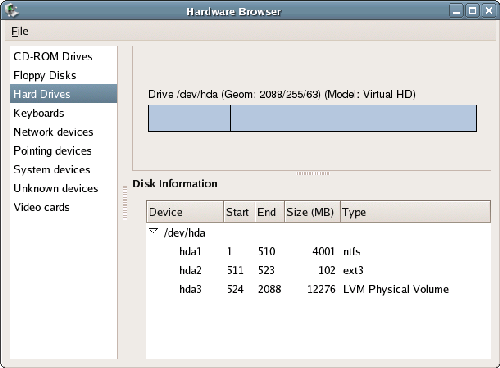
Fedora Core’s Hardware Browser provides a view of all the hardware installed on your system. Detailed views can be gained by highlighting a device, as seen in the Hard Drive view in Figure 4.30.
Pointing devices, network devices, printers, and all other hardware devices are viewable from this window. You can launch the Hardware Browser by selecting Applications > System Tools > Hardware Browser.
Network Devices and Internet Connection
Fedora, of all the Linux distributions, is especially easy to configure for Internet access. The Internet Configuration Wizard shown in Figure 4.31 (Applications > System Tools > Internet Configuration Wizard) provides a complete, step-by-step walkthrough for configuring Ethernet cards, dialup and DSL modems, wireless cards, and other connection types.
Figure 4.31. The Internet Configuration Wizard.
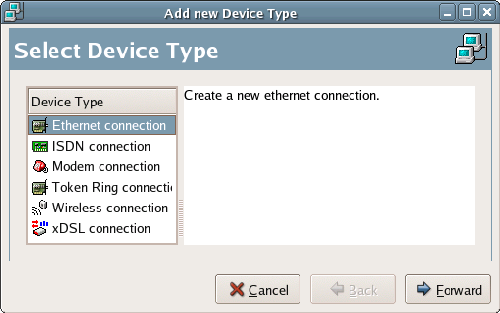
Fedora’s parent distribution, Red Hat, pioneered the process of probing and detecting hardware devices. Network devices are no exception, as can be seen in Figure 4.32. The majority of commercially available network devices can be detected and displayed within this window.
Figure 4.32. Probing network devices.
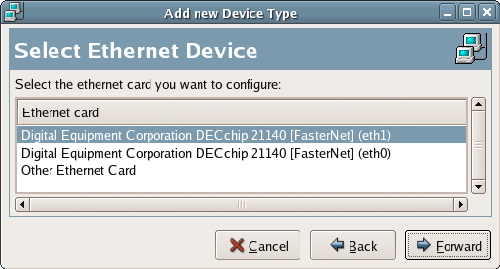
The Configure Network Settings dialog (shown in Figure 4.33), within the Internet Configuration Wizard, allows you to select your connection type – DHCP or static – and to provide a hostname for identification on the network.
Figure 4.33. The Configure Network Settings dialog.
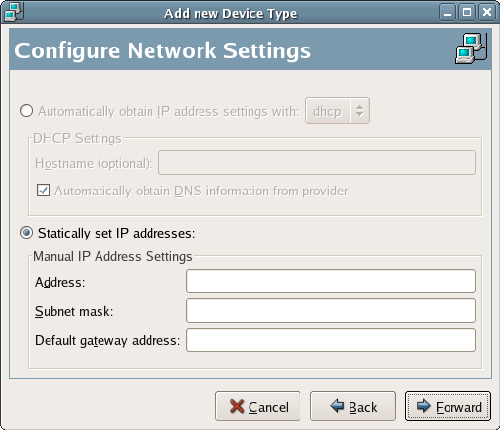
Kickstart
Fedora provides a tool that’s intended primarily for administrators in a large environment: the Kickstart Configurator shown in Figure 4.34.
Need a Kick?
Kickstart is not included in the standard server installation of Fedora Core 4. If you need to install it, run the Package Management application discussed previously, and select the system-config-kickstart package from the Administration Tools group.
Figure 4.34. The Kickstart Configurator.
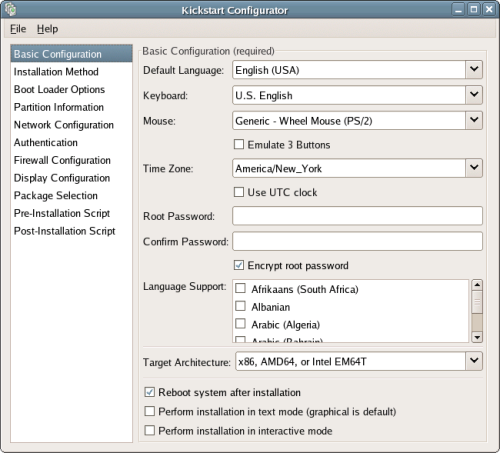
Kickstart provides a way to create a common system configuration that can later be leveraged in the installation of Fedora on multiple systems across a network. All the installation options are contained in a single text file that’s written by the Kickstart Configurator tool. The parameters of the text file include boot loader options, partition information, network configuration, authentication, firewall configuration, display, RPM package selection, and other items. This is a favorite Fedora tool, as the Configurator makes it possible to install Fedora on all the machines in an entire office without ever leaving the server room.
System Monitor
The System Monitor shown in Figure 4.35 provides a constantly updated view of the processes running on your system. This can be useful when you sense, but can’t quite quantify, a lag in your system. The listing displays the process name, the user under which the process is running, the memory used, and the process ID for each application currently in use. As an administrative user, you can view your processes, all processes, or only the active processes.
Figure 4.35. The System Monitor.
You can obtain detailed information on any process by highlighting the process and clicking the More Info button in the process listing window. If necessary, a running process can be stopped by highlighting the process and clicking the End Process button.
Figure 4.36. The Resources tab of the System Monitor.
The Resources tab of the System Monitor provides high-level, real-time graphs of your system’s resource usage, like those shown in Figure 4.36. CPU and memory usage are shown in graphs that are updated at regular intervals. The lower pane in the window contains a view of hard drive usage, including the percentage of space used on each device.
Summary
Linux is a powerful operating system, and can fulfil a variety of server roles. In this chapter, we’ve discussed the basics: how to administer a Linux system, how to configure it to provide new services, and how the filesystem is put together. Now it’s time to move on to the real topic of this book: building your own Web server.
That wraps up this sample of “Run Your Own Web Server Using Linux & Apache“.
Download this article in PDF format for future reference. The complete Table of Contents covers all the other topics that are explained in this new release, and you can see what other readers think of the book with our live customer reviews.
Frequently Asked Questions (FAQs) about Linux Server
What are the basic commands to start a Linux server?
Starting a Linux server involves a series of commands. The first command is ‘sudo systemctl start ssh’ which starts the SSH service. The ‘sudo systemctl enable ssh’ command ensures the SSH service starts automatically at boot. To check the status of the SSH service, use ‘sudo systemctl status ssh’. If you want to stop the service, use ‘sudo systemctl stop ssh’. Remember, these commands are executed in the terminal.
How can I create users and groups in Linux?
Creating users and groups in Linux is a straightforward process. To add a new user, use the ‘adduser’ command followed by the username. For instance, ‘sudo adduser john’. To create a new group, use the ‘groupadd’ command followed by the group name, like ‘sudo groupadd developers’. To add a user to a group, use the ‘usermod’ command, for example, ‘sudo usermod -a -G developers john’.
How can I secure my Linux server?
Securing a Linux server involves several steps. First, ensure you have the latest security updates by running ‘sudo apt-get update’ and ‘sudo apt-get upgrade’. Second, configure a firewall using ‘ufw’ commands. Third, disable root logins and create a non-root user with sudo privileges. Fourth, install and configure ‘fail2ban’ to protect against brute-force attacks. Lastly, regularly monitor system logs for any suspicious activity.
How can I manage services in Linux?
Linux uses ‘systemd’ to manage services. The ‘systemctl’ command is used to start, stop, enable, disable, and check the status of services. For example, ‘sudo systemctl start apache2’ starts the Apache2 service, while ‘sudo systemctl enable apache2’ ensures it starts at boot.
How can I monitor system performance in Linux?
Linux provides several tools to monitor system performance. ‘top’ provides a real-time view of system performance, ‘vmstat’ reports virtual memory statistics, ‘iostat’ reports CPU statistics and I/O statistics, ‘free’ displays the amount of free and used memory, and ‘netstat’ displays network connections.
How can I manage files and directories in Linux?
Linux provides several commands to manage files and directories. ‘ls’ lists directory contents, ‘cd’ changes the current directory, ‘pwd’ prints the current directory, ‘cp’ copies files and directories, ‘mv’ moves or renames files and directories, ‘rm’ removes files and directories, and ‘find’ searches for files in a directory hierarchy.
How can I install software in Linux?
Linux uses package managers to install software. The ‘apt-get’ command is used in Debian-based distributions, while ‘yum’ is used in Red Hat-based distributions. For example, ‘sudo apt-get install apache2’ installs the Apache2 web server.
How can I configure network settings in Linux?
Network settings in Linux can be configured using the ‘ifconfig’ command. This command allows you to configure network interfaces, set IP addresses, enable or disable network interfaces, and much more.
How can I manage processes in Linux?
Linux provides several commands to manage processes. ‘ps’ displays the currently running processes, ‘top’ provides a real-time view of running processes, ‘kill’ terminates processes, and ‘nice’ and ‘renice’ change the priority of a process.
How can I troubleshoot problems in Linux?
Troubleshooting in Linux involves several steps. First, check the system logs using the ‘dmesg’ and ‘journalctl’ commands. Second, use debugging tools like ‘strace’ and ‘ltrace’. Third, monitor system performance using tools like ‘top’, ‘vmstat’, and ‘iostat’. Lastly, don’t forget to search the internet for the error message or problem description.

