

 I am going to be posting a few articles related to Software Design Patterns and how they are applicable to Ruby. The first two patterns that will be covered are the Observer Pattern and the Singleton Pattern.
Key Takeaways
- The Observer Pattern in Ruby is a design pattern where an object (the subject) maintains a list of its dependents (observers) and notifies them of any state changes. This pattern is primarily used to implement distributed event handling systems. The Observable module in the Ruby standard library provides the mechanism to implement this pattern.
- The Singleton Pattern in Ruby is a design pattern that ensures only a single instance of a class can exist. This pattern is useful when an application allows only one object to be instantiated for a given class. The Singleton module in the Ruby standard library can be used to implement this pattern.
- To implement the Observer Pattern, the Observable module needs to be included in the class. An observer is added when an instance of the class is created and observers are notified when the object state changes. The Singleton Pattern is implemented by making the constructor private and controlling the instantiation process in the class itself.
- While design patterns offer many benefits, they can add complexity to your code if used unnecessarily. They should be used judiciously, only when they genuinely provide the best solution to a particular problem. They encapsulate the experience of numerous software developers over a significant period of time, so using them can speed up the development process by providing tested, proven development paradigms.
Observer Pattern
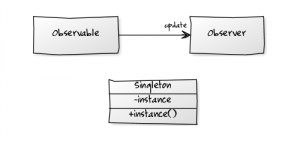
If you are not familiar with this pattern, no worries, it is basically a mechanism for one object to inform other ‘interested’ objects when its state changes. To be a little more descriptive, here is a direct quote from Wikipedia:
The observer pattern (aka. Dependents, publish/subscribe) is a software design pattern in which an object, called the subject, maintains a list of its dependents, called observers, and notifies them automatically of any state changes, usually by calling one of their methods. It is mainly used to implement distributed event handling systems.
The Observable module in the Ruby standard library provides the mechanism necessary for us to implement this pattern, and it is fairly easy to use.
The Planning
In order to use this pattern, we first need to come up with a scenario. An example would be an application that keeps track of the car mileage and reminds us of when we need to take the vehicle in for a service. It is a very simple example, but it will allow us to explore this pattern.
The Basic Structure
The first thing that we are going to do is create a basic structure for our Notifier class that will act as an observer. One item that you really need to pay attention to here is the update() method . This is the callback that the Observable module will use when notifying changes to the observer, and the method name needs to be update().
Let us start by putting together a simple Notifier class:
class Notifier

  def update()

  end

end
That is as simple as it gets. Next, let us create the structure for the subject, our Car class:
class Car

  attr_reader :mileage, :service
  def initialize(mileage = 0, service = 3000)

    @mileage, @service = mileage, service

  end
  def log(miles)

    @mileage += miles

  end

end
It contains the attributes mileage and service, and methods initialize() and log(). The initialize() method will set the initial values for the car’s current mileage and the mileage that it needs to be taken to service. The log() method will log how many miles it has been driven recently and add it to the total vehicle mileage.
Fixing the Notifier Class
Now that we have an understanding of what our Car class does, we can go ahead and fill in the logic of what we want the notifier to do:
class Notifier

  def update(car, miles)

    puts "The car has logged #{miles} miles, totaling #{car.mileage} miles traveled."

    puts "The car needs to be taken in for a service!" if car.service <= car.mileage

  end

end
This means that every time the observer gets notified, it will print to the screen a message about the mileage usage, along with an additional message about the service status if the total mileage exceeds the service mileage.
Putting It All Together
With the basic structure for the Car class completed and the Notifier class in place, the only thing left for us to do is to put the Observable module in place.
First, we need to include it in our Car class:
require 'observer'
class Car

  include Observable

  ...

end
Next, we will add an observer each time a new instance of the Car class is created. Let us modify the initialize method:
def initialize(mileage = 0, service = 3000)

  @mileage, @service = mileage, service

  add_observer(Notifier.new)

end
The last change we need to do in this class is in our log method. We need to tell the observer that our object has changed every time we log new miles:
def log(miles)

  @mileage += miles

  changed

  notify_observers(self, miles)

end
Here we are calling changed, which sets the changed state of the object (true by default). And notify_observers(self, miles), which notifies the observer of a change.
The complete Car class looks like this:
require 'observer'
class Car

  include Observable
  attr_reader :mileage, :service
  def initialize(mileage = 0, service = 3000)

    @mileage, @service = mileage, service

    add_observer(Notifier.new)

  end
  def log(miles)

    @mileage += miles

    changed

    notify_observers(self, miles)

  end

end
To summarize, here are the changes that we made to our Car class:
- In order to use the Observable module, we first need to
requireit; - Next, we include it with
include Observable; - When an instance of our Car class is created, an observer is added;
- When the log() method is called, it notifies the observers by asserting that the object has changed
Running the code
Now is the fun part, let us see what happens when we create a new instance of the Car class and call log:
car = Car.new(2300, 3000)

car.log(100)

=> "The car has logged 100 miles, totaling 2400 miles traveled."

car.log(354)

=> "The car has logged 354 miles, totaling 2754 miles traveled."

car.log(300)

=> "The car has logged 300 miles, totaling 3054 miles traveled."

=> "The car needs to be taken in for service!"
First, we create an instance of the Car class with 2300 miles, and we set that it needs to be taken for service when it reaches 3000 miles.
Every time a new mileage is logged, the Notifier class outputs the mileage added as well as the tally for the miles traveled. When the total miles for the vehicle is greater than the mileage set to be taken in for service, another output is generated. Pretty cool, huh?
Singleton Pattern
The concept of the Singleton pattern is fairly straightforward: only a single instance of a class can exist. This can be useful when an application allows only one object to be instantiated for a given class.
Even though there are mixed feelings amongst developers about this pattern, it is often used in other languages, such as Java and C-based languages. In Ruby, the Singleton module in the standard library can be used to implement this pattern.
Planning
Let’s say that we need to design a class to hold configuration data for our application, and there can only ever exist one instance of this configuration. Sure, we could simulate a Singleton by creating a module, but we would have to make sure that it could not be duplicated or cloned, otherwise it would lose its purpose.
Integration
The first step in creating a Singleton class is to require and include the Singleton module in a class:
require 'singleton'
class AppConfig

  include Singleton

end
If you try to instantiate this class as you normally would a regular class, a NoMethodError exception is raised. The constructor is made private to prevent other instances from being accidentally created:
AppConfig.new
#=> NoMethodError: private method `new' called for AppConfig:Class
To access the instance of this class, we need to use the instance() method provided by the Singleton module. When this method is first called, an instance of the class is created, and all subsequent calls return the created instance. Curious to see if this is actually true?
first, second = AppConfig.instance, AppConfig.instance

first == second
#=> true
True indeed! Now that we now how it works, let’s modify the AppConfig class and add a few things.
#...
  attr_accessor :data
  def version

    '1.0.0'

  end
Here we added a data attribute that will hold the data about the configuration, and a version method that returns the current version. Putting it all together, here is the full class:
require 'singleton'
class AppConfig

  include Singleton

  attr_accessor :data
  def version

    '1.0.0'

  end

end
Congratulation, you have just implemented a Singleton pattern in Ruby! Now, let’s play with it:
AppConfig.instance.data = {enabled: true}

=> {:enabled=>true}

AppConfig.instance.version

=> "1.0.0"
second = AppConfig.instance

second.data = {enabled: false}

=> {:enabled=>false}

AppConfig.instance.data

=> {:enabled=>false}
We first set the data attribute with arbitrary values and check its version.Next, we duplicate the singleton instance, change its data value, and confirm that the value changed in the single instance.
Conclusion
This article demonstrated how the Observer Pattern and the Singleton Pattern can be used with Ruby, and I hope the examples presented here can give you the basis for implementing them on your own applications.
(Note: The diagrams in the image for this article were made with http://yuml.me)
Frequently Asked Questions (FAQs) about Design Patterns in Ruby
What is the Observer Design Pattern in Ruby?
The Observer Design Pattern in Ruby is a behavioral design pattern that allows an object, known as the subject, to notify other objects, known as observers, about changes in its state. The observers are loosely coupled to the subject and can subscribe or unsubscribe to these notifications at any time. This pattern is particularly useful in situations where a change to one object requires changing others, and where it’s not desirable or feasible to tightly couple the objects together.
How does the Singleton Design Pattern work in Ruby?
The Singleton Design Pattern in Ruby ensures that a class has only one instance and provides a global point of access to it. This is achieved by making the constructor private and controlling the instantiation process in the class itself. The Singleton pattern is useful when exactly one object is needed to coordinate actions across the system, such as in logging, driver objects, caching, thread pools, and database connections.
How can I implement the Observer Design Pattern in Ruby?
Ruby’s standard library provides the ‘observer’ module which simplifies the implementation of the Observer Design Pattern. You can include this module in the class that will act as the subject. This class can then use methods like ‘add_observer’, ‘delete_observer’, and ‘notify_observers’ to manage its observers and notify them about changes.
What are the benefits of using design patterns in Ruby?
Design patterns in Ruby provide solutions to common programming challenges and improve the structure of your code, making it more efficient, flexible, and maintainable. They encapsulate the experience of numerous software developers over a significant period of time, so using them can speed up the development process by providing tested, proven development paradigms.
Are there any drawbacks to using design patterns in Ruby?
While design patterns offer many benefits, they can also add complexity to your code if used unnecessarily. It’s important to understand that design patterns are not silver bullets and should not be used to try to solve every problem. They should be used judiciously, only when they genuinely provide the best solution to a particular problem.
How does the Observer Design Pattern differ from the Singleton Design Pattern?
The Observer and Singleton design patterns serve different purposes. The Observer pattern is a behavioral pattern that defines a one-to-many dependency between objects so that when one object changes state, all its dependents are notified and updated automatically. On the other hand, the Singleton pattern is a creational pattern that restricts the instantiation of a class to a single instance.
Can I use multiple design patterns in a single Ruby application?
Yes, it’s quite common to use multiple design patterns in a single application. Each design pattern addresses a specific problem, so in a complex application, you might find that you need to use several different patterns. However, it’s important to ensure that the patterns are implemented correctly and that they genuinely provide the best solution to the problems at hand.
How can I decide which design pattern to use in Ruby?
The choice of design pattern depends on the specific problem you’re trying to solve. Each design pattern is suited to solving a particular type of problem, so you should choose the pattern that best fits your needs. Understanding the problem thoroughly and having a good grasp of the various design patterns and their uses will help you make the right choice.
Can design patterns be used in other programming languages?
Yes, design patterns are not specific to any particular programming language. They are a general concept that can be applied in any object-oriented programming language. However, the implementation of these patterns may vary from one language to another.
Are there other design patterns available in Ruby apart from Observer and Singleton?
Yes, Ruby supports a variety of design patterns apart from Observer and Singleton. Some of the other commonly used design patterns in Ruby include Factory, Builder, Prototype, Adapter, Bridge, Decorator, Facade, Flyweight, Proxy, Chain of Responsibility, Command, Interpreter, Iterator, Mediator, Memento, State, Strategy, Template Method, and Visitor.