


It’s IoT Week at SitePoint! All week we’re publishing articles focused on the intersection of the internet and the physical world, so keep checking the IoT tag for the latest updates.
The Tessel 2 is a JavaScript-focused microcontroller that has a range of pre-built modules you can attach to extend its functionality. In this article, we will explore what we can do when attaching a GPS module to a Tessel 2.
If you are new to working with the Tessel 2, I covered the basics of getting started with the Tessel 2 earlier this year. Have a read of that first to get a grip on the basics of setting up the Tessel on your Wi-Fi and pushing code to it. It also teaches you how to make the LEDs on your Tessel blink like crazy. Very valuable skills to know!
Key Takeaways
- The Tessel 2 is a versatile microcontroller that supports JavaScript and can be extended with various modules, including GPS for tracking data.
- Setting up the GPS module involves connecting it to the Tessel 2’s port A and installing necessary packages via npm to ensure proper functionality.
- Tessel’s JavaScript code handles the GPS data by setting coordinate formats, capturing events like coordinates, fix, dropped, and errors, and communicating with a server via WebSockets.
- The Node.js server setup includes a WebSocket server that receives GPS data from the Tessel and broadcasts it to all connected clients, facilitating real-time GPS tracking.
- Integration with Google Maps on the front end allows visual representation of the GPS data, with additional features like heatmaps to display location accuracy and movements.
Connecting the GPS Module
To bring some GPS functionality to your Tessel, connect it up to port A on your Tessel 2 — this is the one closest to the USB power connector:
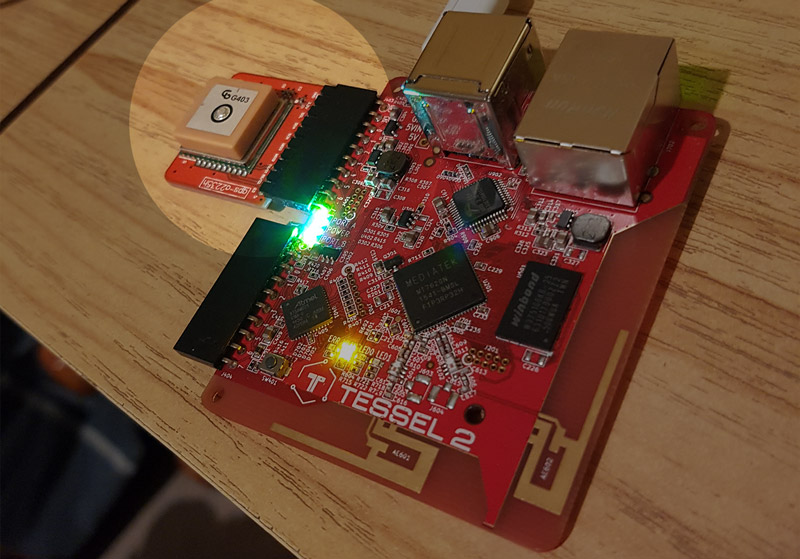
As you can see above, you’ll want to connect it with the large bulky rectangle bit and electrical components facing up. If you look at the pin connectors, you will see one which says GND — that should match with the GND on the Tessel 2’s port A. Basically, there are plenty of telltale signs if you are connecting it incorrectly!
Starting Our GPS Tessel App
Create a folder for your Tessel app called “gps” (or whatever name you’d prefer). Go to that folder in your Terminal/Command Prompt and type the following to initialize a new project:
t2 init
Then, run the following command in npm to install the GPS module:
npm install gps-a2235h
gps-a2235h should match the name on your GPS module (this is important to note, in case future GPS modules are a little different).
If you find you get an error message like this:
> cd examples ; pakmanager build || echo 'Could not build pakmanager package. Please make sure pakmanager is globally installed'
sh: pakmanager: command not found

Could not build pakmanager package. Please make sure pakmanager is globally installed
You’ll want to install that globally first like so (and then attempt the gps module installation again):
npm install pakmanager -g
Our Tessel’s JavaScript
Our Tessel 2 JavaScript code is relatively simple and looks like so:
var tessel = require("tessel"),

gpsLib = require("gps-a2235h"),

gps = gpsLib.use(tessel.port["A"]),

WebSocket = require('ws'),

ws = new WebSocket('ws://192.168.0.30:5000'),

latestCoords;
gps.setCoordinateFormat({

'format': 'deg-dec'

});
gps.on('ready', function() {

console.log('GPS module now searching for satellites...');
gps.on('coordinates', function(coords) {

console.log('Lat:', coords.lat, '\tLon:', coords.lon, '\tTimestamp:', coords.timestamp);

latestCoords = coords.lat + ',' + coords.lon;

});
gps.on('fix', function(data) {

console.log(data.numSat, 'fixed.');

});
gps.on('dropped', function(){

console.log('GPS signal dropped');

});

});
gps.on('error', function(err){

console.log('GPS Error: ', err);

});
ws.on('open', function() {

setInterval(function() {

if (latestCoords !== undefined) {

console.log('Trying to send coords of ' + latestCoords);
try {

ws.send(latestCoords, function ack(error) {

console.log('Error detected while sending: ' + error);

});

} catch (e) {

console.log('Error caught while sending: ' + error);

}

} else {

console.log('No coords coming through');

}

}, 10000);

});
Let’s go over what is actually happening here. We start by requiring the Tessel module and our GPS’ module:
var tessel = require("tessel"),

gpsLib = require("gps-a2235h"),
We then set up the GPS module by telling it which port our Tessel’s physical GPS module is located in. I placed mine in port A, which I defined like so:
gps = gpsLib.use(tessel.port["A"]),
In order to send data back and forth between our Tessel and our server, we will be using WebSockets. Due to the wonderful fact that the Tessel 2 runs JavaScript and npm modules, we can run the commonly used ws WebSocket module on the Tessel. We add in the ws module and set it up to watch for our server location. I ran this all locally, with my Mac running the Node server connected to my 4G router and my Tessel also connected to the same 4G router. This allowed me to directly use an IP address to refer to the server.
WebSocket = require('ws'),

ws = new WebSocket('ws://192.168.0.30:5000'),
If you wanted to have this run over the web, you could host this on a publicly accessible server and change the WebSocket set up to:
ws = new WebSocket('ws://www.myfancynodeserver.com'),
Finally, we set up a variable called latestCoords which we will use to store the latest coordinates the GPS module returns back to the Tessel.
Tessel’s GPS Functions
Following our variable and module declarations, we move into the actual functionality of our Tessel which all focuses on the GPS functions provided by the Tessel’s gps-a2235h module.
To start with, we set the format for our GPS coordinates to be returned in. There are a range of different options you can try out, including 'deg-min-sec', 'deg-dec', 'deg-min-dec' and 'utm'. For our example, we’ll use 'deg-dec' which results in degrees that look like so: [ 31, 46, 5401.2, 'E' ]. To set the format, we use the following:
gps.setCoordinateFormat({

'format': 'deg-dec'

});
In order to respond to GPS data when it comes through, we need to first wait to receive the "ready" event from our GPS module. Like many other JavaScript frameworks, we use the on() function for this. All of our GPS event detection occurs within this:
gps.on('ready', function() {

console.log('GPS module now searching for satellites...');
// Further functionality will be here.

});
The most useful of the GPS events we’ll be watching for is the 'coordinates' event. When this event fires, our GPS module has returned a series of coordinates of its location. In our example, it provides these within a variable called coords that has both coords.lon for its longitude and coords.lat for its latitude. We join both of these values together in a string and save that inside latestCoords:
gps.on('coordinates', function(coords) {

console.log('Lat:', coords.lat, '\tLon:', coords.lon, '\tTimestamp:', coords.timestamp);

latestCoords = coords.lat + ',' + coords.lon;

});
Another event you can watch for is the 'fix' event. This returns how many GPS satellites our module has been able to fix onto to work out the location. My demo typically find five or six while in Sydney, so you could use that as a baseline for what a regular number would be. I log these values when they come through using:
gps.on('fix', function(data) {

console.log(data.numSat, 'fixed.');

});
If the GPS signal is lost for any reason, the 'dropped' event will fire. We log that like so:
gps.on('dropped', function(){

console.log('GPS signal dropped');

});
Outside of the 'ready' event, if there is a GPS error where the module cannot search for satellites at all, we detect that using the 'error' event:
gps.on('error', function(err){

console.log('GPS Error: ', err);

});
Sending Regular WebSocket Updates
Rather than sending GPS signals constantly, which might be a bit too frequent and unnecessary, we set up a simple interval timer that runs every 10 seconds. This starts once our WebSocket connection is open and ready to go:
ws.on('open', function() {

setInterval(function() {

// Our functionality will be in here

}, 10000);

});
Within our setInterval, we check if we have any coordinates stored within latestCoords. If so, we try to send those through our WebSocket connection. This is placed within a try/catch loop to avoid crashing our Tessel if anything goes wrong:
if (latestCoords !== undefined) {

console.log('Trying to send coords of ' + latestCoords);
try {

ws.send(latestCoords, function ack(error) {

console.log('Error detected while sending: ' + error);

});

} catch (e) {

console.log('Error caught while sending: ' + error);

}

}
Our Node.js Server
Our Node.js server is a typical WebSocket server that watches for WebSocket messages and then broadcasts those messages to all clients connected to the WebSocket server. This will broadcast the coordinates from our Tessel to any web browser which is waiting to find out the latest coordinates:
var http = require('http'),

url = require('url'),

express = require('express'),

app = express(),

bodyParser = require('body-parser'),

server = require('http').Server(app),

WebSocketServer = require('ws').Server,

wss = new WebSocketServer({server: server}),

port = process.env.PORT || 5000,

latestCoords;
app.use(bodyParser.json());
app.use(express.static(__dirname + '/public'));
wss.on('connection', function connection(ws) {

ws.on('message', function incoming(message) {

console.log('received: %s', message);
if (message) {

latestCoords = message;

broadcast(latestCoords);

}

});

});
function broadcast(message) {

if (message) {

wss.clients.forEach(function each(client) {

client.send(message);

});

}

}
server.listen(port, function() {

console.log('Listening on ' + port);

});
It is also running Express, which allows us to serve up webpages through it. We add our static web content within the “/public” folder in our “server” folder, as defined by our Node server:
app.use(express.static(__dirname + '/public'));
This is where we will place our front-end code to display a map — however it is important to note that you could host this content absolutely anywhere. I’ve kept it on the same server just to keep everything as self-contained as possible for this tutorial.
Adding Google Maps
Our front-end will all be within a single public/index.html file for simplicity. I won’t cover the absolute basics of using the Google Maps API, as we’ve covered it here at SitePoint before on Harnessing the Google Maps JavaScript API the Right Way and even have a whole online course by Robert Dickerson called the Introduction to Google Maps API.
If you are wanting to follow along and already have an idea of how Google Maps works, continue! Here’s our basic HTML layout:
<!DOCTYPE html>

<html>

<head>

<title>MAPS!</title>

<style>

html, body {

height: 100%;

margin: 0;

padding: 0;

}

#map {

height: 100%;

}

</style>

</head>

<body>

<div id="map"></div>

</body>

</html>
At the bottom of the body tag, I inlined my JavaScript — you could place it in a separate file or however you prefer. The JavaScript begins like so:
var clientWebSocket = new WebSocket('ws://192.168.0.30:5000'),

map,

markers = [],

heatmap,

centered = false;
The clientWebSocket variable is where we store our client-side WebSocket which connects to our running Node.js server. map will be our Google Map, markers will be an array of coordinates our Tessel has returned, heatmap will be a Google Map API heatmap and centered just tracks whether the map has centered on our location rather than the generic lat/long we provide by default.
Everything else in our JavaScript is initialized by once the Google Maps callback function is run. I put the Google Maps API into my project like so:
<script src="https://maps.googleapis.com/maps/api/js?key=YOURKEY&libraries=visualization&callback=initMap"

async defer></script>
Then everything runs within the initMap() function:
function initMap() {

map = new google.maps.Map(document.getElementById('map'), {

center: {lat: -34.397, lng: 150.644},

zoom: 12

});
// The rest of our WebSocket functionality will be here

}
After that, we set up a check for any WebSocket messages. If we receive them, we filter them into the format of {lat: -34.397, lng: 150.644} and log them in the console:
clientWebSocket.onmessage = function(e) {

var latLngRaw = e.data.replace(/ /g, ''),

latLngSplit = latLngRaw.split(','),

lat = latLngSplit[0] * (latLngSplit[1] === 'S' ? -1 : 1),

lng = latLngSplit[2] * (latLngSplit[3] === 'W' ? -1 : 1),

pos = {lat: lat, lng: lng};
console.log(pos);
// Google Map marker functionality will go here

}
After that, we add it into our markers array. If we have both a latitude and longitude value, then we are ready to do so. We also center the map to that initial location:
if (!isNaN(pos.lat) && !isNaN(pos.lng)) {

marker = new google.maps.LatLng(lat, lng);
markers.push(marker);
if (!centered) {

map.setCenter(marker);

centered = true;

}

}
// Heatmap functionality will go here
Finally, with our updated markers array, we add that into a heatmap (or reset the heatmap to our updated array) using the Google Maps API:
if (heatmap) heatmap.setMap(null);

heatmap = new google.maps.visualization.HeatmapLayer({

data: markers

});

heatmap.setMap(map);
You might not need to do the initial setting to null bit (it will cause a flicker each update), however I added it in there to be certain the map was clear for performance purposes (didn’t want more than one array added at a time as my GPS heatmaps end up pretty big after it has been running for a while!). Feel free to remove it and see how well it runs for you. I might end up removing it on my own version too later on.
It is also good practice to have a way of reacting to any WebSocket errors:
clientWebSocket.onerror = function(error) {

console.log('Error with WebSocket: ' + error);

};
In Action
If we first run our server by running:
node index.js
Then, run our Tessel GPS code by running:
t2 run index.js
Initially, on the terminal for the Tessel app, we’ll see:
0 'fixed.'

0 'fixed.'

0 'fixed.'

0 'fixed.'

0 'fixed.'
That is showing that no satellites have been found just yet. Try to ensure it has a line of sight with the sky — that’ll help your chances! Once it finds some satellites, you’ll see:
3 'fixed.'

Lat: [ 33.8666, 'S' ] Lon: [ 151.08533333333332, 'E' ] Timestamp: 75903.769

Lat: [ 33.8666, 'S' ] Lon: [ 151.08533333333332, 'E' ] Timestamp: 75903.769

3 'fixed.'

Lat: [ 33.866595, 'S' ] Lon: [ 151.085355, 'E' ] Timestamp: 75904.765

Lat: [ 33.866595, 'S' ] Lon: [ 151.085355, 'E' ] Timestamp: 75904.765
On the Node.js server, once coordinates start to come through, you’ll see the following in the terminal:
received: 34.27340792375617,S,146.02321379585192,E

received: 33.786892811069265,S,147.00557255884632,E

received: 32.00388987502083,S,145.91804205672815,E

received: 34.48931397567503,S,148.91048887046054,E

received: 34.59769207518548,S,145.09519725223072,E

received: 33.53758704382926,S,145.1981749490369,E

received: 33.66241379012354,S,149.52391665312462,E
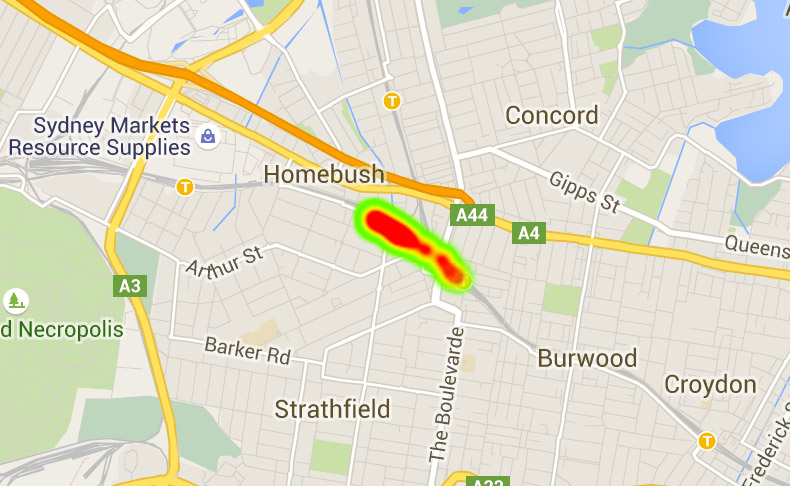
If we load up our front-end web interface with Google Maps by going to http://localhost:5000, we should see a Google Map with a heatmap of the area the GPS has been found. I ran this while on a train going to Sydney’s CBD and it looked like so:
Conclusion
That concludes a rather fun project pulling in GPS data using a Tessel 2 and GPS module. Using the heatmap actually allows you to see the GPS tracking get more and more accurate, which I found fascinating. Running the GPS app throughout the day from home, it started by tracking a few doors down from me, but then I could see the GPS heatmap slowly get closer and closer to my actual location as the day went by. Pretty neat!
If you have a Tessel 2 and have built something fun with it, I’d love to hear what you’ve built! Let me know in the comments below, or get in touch with me on Twitter at @thatpatrickguy.
Frequently Asked Questions (FAQs) about Tracking GPS Data with the Tessel 2
How can I use GPS with Node.js?
Node.js is a powerful tool that can be used to interact with GPS data. To use GPS with Node.js, you will need to install a GPS module. This can be done using npm (Node Package Manager) by running the command ‘npm install gps’. Once installed, you can require the GPS module in your Node.js script and use it to parse GPS data. The GPS module provides several events that you can listen to, such as ‘data’ and ‘fix’, which are triggered when raw data is received from the GPS device and when a GPS fix is obtained, respectively.
How can I build a location-aware application using Node.js and GPS?
Building a location-aware application involves using GPS data to determine the location of a device. With Node.js, you can use the GPS module to interact with a GPS device and obtain location data. This data can then be used in your application to provide location-based services. For example, you could use the location data to display the device’s current location on a map, provide directions to a destination, or show nearby points of interest.
How can I track real-time location with Node.js and Socket.IO?
Tracking real-time location involves obtaining location data from a GPS device and updating the location in your application in real-time. This can be achieved using Node.js and Socket.IO. Node.js can be used to interact with the GPS device and obtain location data, while Socket.IO can be used to send this data to the client in real-time. When the location data is received on the client-side, it can be used to update the location on a map or provide other real-time location-based services.
How can I use the GPS-tracking-nodejs library?
The GPS-tracking-nodejs library is a powerful tool for interacting with GPS devices and tracking location data. To use this library, you will first need to install it using npm by running the command ‘npm install gps-tracking-nodejs’. Once installed, you can require the library in your Node.js script and use it to interact with a GPS device. The library provides several methods for interacting with the GPS device and obtaining location data, such as ‘getDevice’, ‘getDevices’, and ‘getLocation’.
What is the Tessel 2 and how can it be used for GPS tracking?
The Tessel 2 is a development board that can be programmed using JavaScript and Node.js. It has built-in WiFi and Ethernet, as well as support for a variety of modules, including a GPS module. This makes it a powerful tool for GPS tracking. To use the Tessel 2 for GPS tracking, you will need to connect a GPS module to the Tessel 2 and use Node.js to interact with the module and obtain GPS data. This data can then be used in your application to provide location-based services.