Easy Deployment of PHP Applications with Deployer

This article has updated for the most recent version of Deployer on March 26th, 2017.
Everybody tries to automate their development process, testing, code formatting, system checks, etc. This is also the case for deploying our applications or pushing a new version to the production server. Some of us do this manually by uploading the code using an FTP client, others prefer Phing, and Laravel users will prefer Envoyer for this process. In this article, I’m going to introduce you to Deployer – a deployment tool for PHP.

Key Takeaways
- Deployer is a PHP tool used to automate the deployment process of PHP applications. It supports SSH authentication, allows for defining specific deployment servers, and tasks can be defined and run through the ‘dep’ command.
- Deployer enables zero downtime deployment by creating a list of releases and pointing the server’s root to a ‘current’ directory, which links to the latest release. This avoids the need to put the server into maintenance mode during deployment.
- The tool includes a list of common tasks used by most PHP apps, and also provides pre-configured recipes for well-known frameworks such as Laravel, Symfony, Yii, and Zend.
- Deployer also supports atomic deployments, ensuring that the application remains in a consistent state even if the deployment process is interrupted. It also provides a built-in task called ‘rollback’ to revert the application to the previous release if needed.
Demo Application
I will be using an application from a previous article for the demo. The application will be deployed to a DigitalOcean droplet. To follow along, you can clone the demo application’s source code from GitHub.
Installation
Deployer is packaged as a PHAR file that we can download to our local machine. We can also move it to the user’s bin directory to make it global. Check the documentation for more details.
mv deployer.phar /usr/local/bin/dep
chmod +x /usr/local/bin/dep
Defining Servers
After cloning the demo repository, we need to create a new file called deploy.php where we’ll define our deployment steps.
The first step is to define our deployment servers. We can authenticate normally using a username and a password.
// deploy.php

server('digitalocean', '104.131.27.106')
    ->user($_ENV['staging_server_user'])
    ->password($_ENV['staging_server_password']);
We can also define the type of this server (staging, production, etc), which allows us to run tasks (more on tasks later) in a specific server stage.
// deploy.php
use function Deployer\set;
use function Deployer\server;

set('default_stage', 'staging');

server('digitalocean', '104.131.27.106')
    ->user($_ENV['staging_server_user'])
    ->password($_ENV['staging_server_password'])
    ->stage('staging')
    ->env('deploy_path', '/var/www');
We need to add the default_stage attribute when using the stage method. Otherwise, we’ll get the You need to specify at least one server or stage. error.
Note: If you’re using PHP 7, you can group use statements in one line like this (use function Deployer\{set, server}). You can read more about new PHP 7 features here.
SSH Authentication
It’s a common practice to use SSH authentication on production servers. If you’re not familiar with using SSH keys for authentication, check out this guide for a detailed walkthrough.
// deploy.php
use function Deployer\{set, server};

set('default_stage', 'staging');

server('digitalocean', '104.131.27.106')
    ->identityFile()
    ->user($_ENV['staging_server_user'])
    ->password($_ENV['staging_server_password'])
    ->stage('staging');
By default, the identityFile method uses the current user’s ~/.ssh/id_rsa identity file. We can change that if needed.
// deploy.php

// ...
    ->identityFile('path/to/id_rsa', 'path/to/id_rsa.pub', 'pass phrase')
// ...
Deployer supports multiple types of SSH connections, and it defaults to native which uses native system commands to authenticate.
Install SSH2 Extension
Deployer also supports using the PHP SSH2 extension. After installing the extension and enabling it, we need to require the herzult/php-ssh package which provides an OOP wrapper for the PHP extension, and sets the ssh_type config option to ext-ssh2.
// deploy.php

set('ssh_type', 'ext-ssh2');
// ...
The only problem here is that Deployer doesn’t have the php-ssh package shipped with the PHAR archive. We’ll need to clone the Deployer repository, require the package, and finally use the build script to generate a new PHAR archive.
Using Configuration Files
We can also define our servers using a YAML configuration file, and pass the file to the serverList method. You can read more about servers in the documentation.
// servers.yml

digitalocean:
  host: 104.131.27.106
  user: root
  identity_file: ~
  stage: staging
  deploy_path: /var/www/
We can now load the file inside our deploy.php file.
serverList('servers.yml');
Defining Tasks
Tasks are commands that can be run through the dep command.
dep deploy:staging
The deploy:staging argument should be a task inside our deploy.php file. We can upload files, run commands on the server, etc.
// deploy.php
use function Deployer\{server, task, run, set, get, add, before, after, upload};
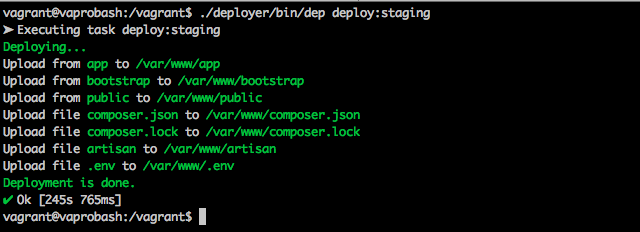
task('deploy:staging', function() {
writeln('<info>Deploying...</info>');
$appFiles = [
'app',
'bootstrap',
'public',
'composer.json',
'composer.lock',
'artisan',
'.env',
];
$deployPath = get('deploy_path');
foreach ($appFiles as $file)
{
upload($file, "{$deployPath}/{$file}");
}
cd($deployPath);
run("composer update --no-dev --prefer-dist --optimize-autoloader");
run("chown -R www-data:www-data app/storage");
set('writable_dirs', ['app/storage']);
writeln('<info>Deployment is done.</info>');
});
The file looks overwhelming at first, but there’s nothing special here. First, we print a message using the writeln method to notify the user that the deployment process has started. Next, we define the application folders that need to be uploaded.
The upload method will send our local application files to the server inside the for loop. Check the documentation for the list of available functions.
We cd to the server directory and update our Composer dependencies using the run method, which lets us run any shell command on the server.
The next and final step is to make the necessary directories writable by the server user, in this case www-data for Apache. The writable_dirs parameter tells Deployer about our writable directories. We can achieve the same thing using a shell command, too.
dep deploy:staging
task("deploy:staging", function () {
    // ...
})->desc('Deploy application to staging.');
The desc method will add a help message to our task (command).
Our current file has one big task to handle the whole deployment process. We’ll split it into small reusable tasks and run them one after the other in the deploy:staging task.
task('deploy:started', function() {
    writeln('<info>Deploying...</info>');
});

task('deploy:done', function() {
    writeln('<info>Deployment is done.</info>');
});
The above tasks are just to notify the user of the deployment state. Deployer provides after and before methods (hooks) to run tasks when other tasks are fired.
before('deploy:staging', 'deploy:started');
after('deploy:staging', 'deploy:done');
task('deploy:upload', function() {
    $appFiles = [
        'app',
        'bootstrap',
        'public',
        'composer.json',
        'composer.lock',
        'artisan',
        '.env',
    ];
    $deployPath = get('deploy_path');

    foreach ($appFiles as $file)
    {
        upload($file, "{$deployPath}/{$file}");
    }
});

task('deploy:writable_dirs', function() {
    $deployPath = get('deploy_path');
    cd($deployPath);

    run("chown -R www-data:www-data app/storage");
    set('writable_dirs', ['app/storage']);
});

task('deploy:composer', function() {
    $deployPath = get('deploy_path');
    cd($deployPath);

    run("composer update --no-dev --prefer-dist --optimize-autoloader");
});
All that’s left is to run all the tasks in the deploy:staging task.
task('deploy:staging', [
    'deploy:upload',
    'deploy:writable_dirs',
    'deploy:composer',
]);
Because we split our tasks into meaningful parts, we can re-use them later for another production server, and even for other projects!
Zero Downtime Deployment
Currently, our Apache server root is pointing to the /var/www/public directory. When we’re deploying a new version of our application, we need to put the server in maintenance mode for a few minutes to avoid any downtime for users.
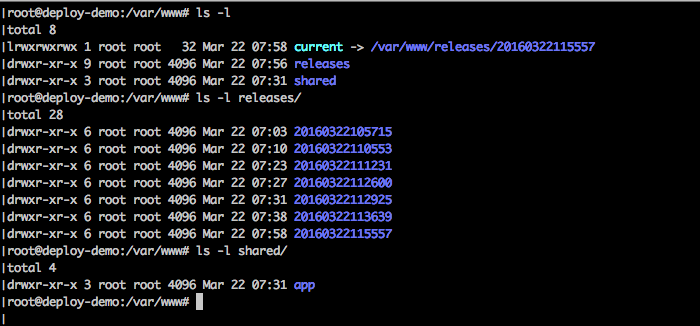
A simple solution for this problem is to create a list of releases, and point our server’s root to a current directory, which will link to the latest release.
/current (link pointing to the current release)
/releases
    /realease_1
    /realease_2
    /realease_3
Common Deployment Tasks
Deployer has a list of common tasks used by most PHP apps, something like we did earlier. We’ll re-factor our deploy.php to re-use those common tasks where possible.
// deploy.php

require_once "recipe/common.php";

set('ssh_type', 'ext-ssh2');
set('default_stage', 'staging');
set('deploy_path', '/var/www');
set('copy_dirs', [
    'app/commands',
    'app/config',
    'app/controllers',
    'app/database',
    'app/lang',
    'app/models',
    'app/src',
    'app/start',
    'app/tests',
    'app/views',
    'app/filters.php',
    'app/routes.php',
    'bootstrap',
    'public',
    'composer.json',
    'composer.lock',
    'artisan',
    '.env',
]);
set('shared_dirs', [
    'app/storage/cache',
    'app/storage/logs',
    'app/storage/meta',
    'app/storage/sessions',
    'app/storage/views',
]);
set('writable_dirs', get('shared_dirs'));
set('http_user', 'www-data');
First we set the some variables that we’ll be using inside our tasks. shared_dirs, writable_dirs and http_user are all used by the common tasks..
task('deploy:upload', function() {
    $files = get('copy_dirs');
    $releasePath = get('release_path');

    foreach ($files as $file)
    {
        upload($file, "{$releasePath}/{$file}");
    }
});
We kept the deploy:upload task in this case, but you can also use the deploy:update_code task to pull your application from remote Git hosts. Don’t forget to set the necessary attributes when using it.
set('repository', 'http://github.com/whyounes/500pxAPI_Test.git');
set('branch', 'master');
// deploy.php
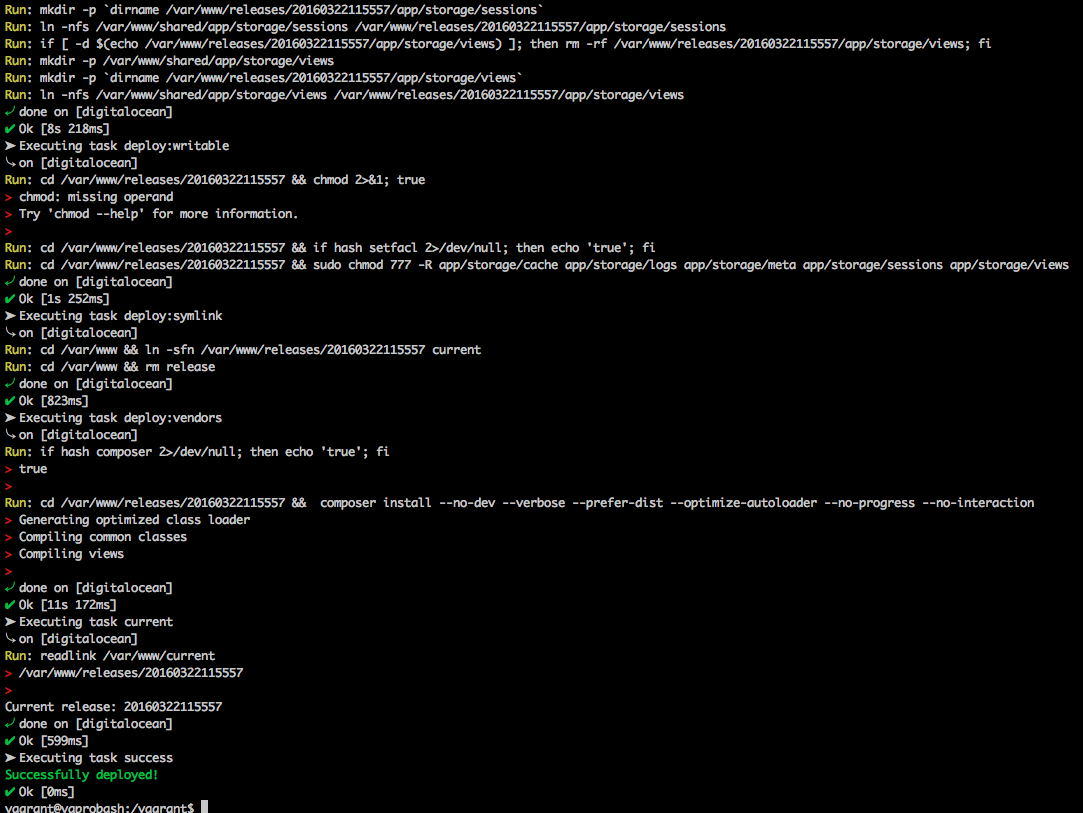
task('deploy:staging', [
'deploy:prepare',
'deploy:release',
'deploy:upload',
'deploy:shared',
'deploy:writable',
'deploy:symlink',
'deploy:vendors',
'current',
])->desc('Deploy application to staging.');
after('deploy:staging', 'success');
deploy:prepare: Test the connection, shared folder, releases folder, etc.deploy:release: Create the release directory.deploy:upload: Our task for uploading files.deploy:shared: Create shared folders if they do not exist. Uses theshared_dirsattributes we set earlier.deploy:writable: Set writable directories.deploy:symlink: Create a symbolic link from the release tocurrent.deploy:vendors: Run Composer installation.current: Print the current release name.success: Print a success message.
Deployment Recipes
Because most of us are using frameworks for our projects, Deployer has some pre-configured recipes for well-known frameworks like Laravel, Symfony, Yii, Zend, etc. Check the recipes section in the documentation for more details.
Conclusion
Deployer has a really nice API to make the deployment process easy and configurable. If you’ve never used a deployment tool to automate your deployment process, we really encourage you to try it!
If you’ve used Deployer before we would love to hear what you think! If you have any questions, you can post them below!
Frequently Asked Questions (FAQs) about Deploying PHP Applications with Deployer
What is Deployer and why should I use it for deploying PHP applications?
Deployer is a deployment tool written in PHP, primarily used to automate the deployment process of PHP applications. It offers a clean and straightforward syntax that allows you to define tasks in PHP without dealing with the complexities of shell scripting. Deployer provides out-of-the-box support for popular PHP frameworks, including Laravel, Symfony, and Yii. It also supports atomic deployments, meaning your application remains in a consistent state even if the deployment process is interrupted.
How do I install Deployer on my system?
Deployer can be installed globally on your system using Composer, a dependency management tool for PHP. You can install Deployer by running the following command in your terminal: composer global require deployer/deployer. Make sure to place Composer’s system-wide vendor bin directory in your $PATH so the dep executable can be located by your system.
How do I define a deployment task in Deployer?
In Deployer, a deployment task is defined in a deploy.php file. This file contains a series of tasks that are executed in sequence during the deployment process. A task is defined using the task function, which accepts a task name and a closure function. The closure function contains the commands to be executed for the task. For example, a simple task to print a greeting can be defined as follows: task('greet', function () { writeln('Hello, world!'); });.
How do I execute a deployment task in Deployer?
To execute a deployment task, you use the dep command followed by the task name. For example, to execute the ‘greet’ task defined in the previous question, you would run dep greet in your terminal. If the task is defined correctly, you should see the output ‘Hello, world!’.
How do I handle task failures in Deployer?
Deployer provides a fail function that you can use to handle task failures. This function accepts a task name and a closure function, which is executed when the task fails. The closure function can contain logic to handle the failure, such as sending a notification or rolling back changes.
How do I configure server environments in Deployer?
Server environments in Deployer are configured using the host function. This function accepts a hostname and returns a Host object, which you can use to set various properties such as the deployment path, user, and PHP binary. For example, to configure a server with the hostname ‘myserver.com’, you would use the following code: host('myserver.com')->set('deploy_path', '/var/www/myapp');.
How do I deploy to multiple servers with Deployer?
Deployer allows you to deploy your application to multiple servers by defining multiple hosts. Each host is defined using the host function, and you can set different properties for each host. When you run a deployment task, it is executed on all defined hosts.
How do I use atomic deployments in Deployer?
Atomic deployments ensure that your application is only switched to the new version once all deployment tasks have been successfully completed. This is achieved by deploying the new version to a separate directory and then using a symbolic link to switch to the new version. In Deployer, you can enable atomic deployments by setting the atomic_symlink property to true.
How do I roll back a deployment in Deployer?
Deployer provides a built-in task called rollback that you can use to roll back a deployment. This task reverts the application to the previous release. If the previous release is not available, the rollback task will fail. To execute the rollback task, you run dep rollback in your terminal.
How do I define shared files and directories in Deployer?
Shared files and directories are common resources that should be kept between deployments. In Deployer, you can define shared resources using the set function with the shared_files or shared_dirs property. For example, to share a .env file and a storage directory, you would use the following code: set('shared_files', ['.env']); set('shared_dirs', ['storage']);.
Younes is a freelance web developer, technical writer and a blogger from Morocco. He's worked with JAVA, J2EE, JavaScript, etc., but his language of choice is PHP. You can learn more about him on his website.
Published in
·Extensions·JavaScript·Libraries·Miscellaneous·Performance·Performance & Scaling·PHP·Scaling·September 14, 2017