Key Takeaways
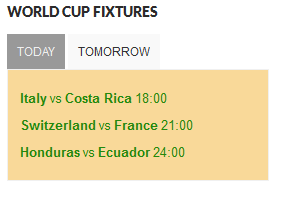
- The World Cup 2014 WordPress Widget was created to display the schedule of matches for the day and the next day, using data from the World Cup API. The widget was developed as a solution for football enthusiasts who have busy schedules and want to stay updated on match schedules.
- The widget was built using PHP and extends the standard WP_Widget class in WordPress. The widget’s functionality includes querying the World Cup API, retrieving match data, and displaying it with the time of play. It also includes a backend settings form for customizing the widget’s title and an update method for saving data to the database.
- The World Cup 2014 WordPress Widget is compatible with most WordPress themes, mobile-friendly, and supports multiple instances on a website. Although it was specifically designed for the 2014 World Cup, similar widgets are available for other football tournaments. The widget is free to download and use, but donations to support its development and maintenance are appreciated.
Football (soccer) is undoubtedly the most popular and prestigious sporting game in the world. It is globally governed by the Fédération Internationale de Football Association (FIFA), the sport’s international administrative body.
The FIFA World Cup, usually referred to simply as the World Cup is a competition hosted every four years, contested by the senior men’s national teams of qualified countries. This year’s tournament hosted in Brazil is currently ongoing.

While reading Hacker News, I stumbled upon an API for the World Cup that scrapes current match results and outputs match data as JSON.
You can get the following World Cup data from this API:
- All match data, updated every minute
- Today’s matches
- Tomorrow’s matches
- Matches for any country by entering their FIFA Code
- The current match if a match is happening, otherwise nothing.
- Results for group stage (wins, losses, draws, goals_for, goals_against)
I love football and I know a lot of us do too. Due to my busy schedule, I always find myself asking friends about the match schedule.
To eliminate this barrier, I decided to build a Match Fixtures widget for WordPress that displays a list of matches to be played today and tomorrow, powered by the World Cup API.
If you want to jump ahead of the tutorial below, you can view a a demo of the Fifa fixtures widget here and download the widget plugin files here.
Building the Fixtures Widget
The Fixture widget to be developed at the end of this tutorial will be a tabbed widget; the first tab displays matches for today and the second tab displays matches for the next day.

Let’s get started with widget plugin development.
First, we need to include the plugin header. Without the header, WordPress won’t recognize the widget plugin.
<?php
/*
  Plugin Name: FIFA World Cup Widget
  Plugin URI: http://tech4sky.com
  Description: Fifa World Cup Widget
  Version: 1.0
  Author: Agbonghama Collins
  Author URI: http://tech4sky.com
 */
Building Widgets in WordPress is easy and straightforward. Extend the standard WP_Widget class and include the required widget class methods, and finally register the widget.
Create a child-class extending the WP_Widget class.
class Fifa_WC_Fixtures extends WP_Widget {
// ...
Give the widget a name and description using the __construct() magic method.
function __construct() {
    parent::__construct(
        'fifa', // Base ID
        __('Fifa World Cup', 'text_domain'), // Name
        array('description' => __('World Cup Fixtures for Today and Tomorrow\'s Games', 'text_domain'),)
    );
}
The class method matches_today(), shown below, queries the World Cup API, retrieves the matches to be played today and displays it together with the time of play.
If no match is scheduled for that day, a No match for today message is shown.
public function matches_today() {
    $today_matches = file_get_contents('http://worldcup.sfg.io/matches/today');
    $today_matches_data = json_decode($today_matches);
    echo ' <div><ul class="orange">';
    if (Count($today_matches_data) > 0) {
        foreach ($today_matches_data as $match) {
            echo '<li>';
            echo '<a class="widget-list-link"><strong>';
            echo $match->home_team->country;
            echo '</strong><span>vs</span><strong>' . $match->away_team->country;
            echo '</strong><span>' . (substr($match->datetime, 11, 2) + 5) . ':00' . '</span>';
            echo '</a>';
            echo '</li>';
        }
    } else {
        echo '<li>';
        echo 'No match for today';
        echo '</li>';
    }
    echo '</ul></div>';
}
Similar to the matches_today() class method above, the matches_tomorrow() method display matches to be played the following day:
public function matches_tomorrow() {
    $tomorrow_matches = file_get_contents('http://worldcup.sfg.io/matches/tomorrow/');
    $tomorrow_matches_data = json_decode($tomorrow_matches);
    echo ' <div><ul class="green">';
    if (Count($tomorrow_matches_data) > 0) {
        foreach ($tomorrow_matches_data as $match) {
            echo '<li>';
            echo '<a class="widget-list-link"><strong>';
            echo $match->home_team->country;
            echo '</strong><span>vs</span><strong>' . $match->away_team->country;
            echo '</strong><span>' . (substr($match->datetime, 11, 2) + 5) . ':00' . '</span>';
            echo '</a>';
            echo '</li>';
        }
    } else {
        echo '<li>';
        echo 'No match for today';
        echo '</li>';
    }
    echo '</ul></div>';
}
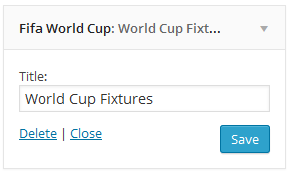
The back-end widget settings form is created using the form() method. The fixture widget will consist of a form field that will contain the title of the widget.
public function form($instance) {
   if (isset($instance['title'])) {
        $title = $instance['title'];
    } else {
        $title = __('World Cup Fixtures', 'text_domain');
    }
    ?>
    <p>
        <label for="<?php echo $this->get_field_id('title'); ?>"><?php _e('Title:'); ?></label>
        <input class="widefat" id="<?php echo $this->get_field_id('title'); ?>"
               name="<?php echo $this->get_field_name('title'); ?>"
               type="text" value="<?php echo esc_attr($title); ?>">
    </p>
    <?php
}
When data are entered into the form widget fields, they need to be saved to the database for reuse. The update() method sanitizes and saves the data to the database.
public function update($new_instance, $old_instance) {
    $instance = array();
        $instance['title'] = (!empty($new_instance['title']) ) ? strip_tags($new_instance['title']) : '';
    return $instance;
}
Next is the widget() method that displays the match fixtures at the front-end of WordPress.
public function widget($args, $instance) {
    ?>
    <script type="text/javascript" >
    $('document').ready(function(){
        $('#flip-container').quickFlip();
        $('#flip-navigation li a').each(function(){
            $(this).click(function(e){
                $('#flip-navigation li').each(function(){
                    $(this).removeClass('selected');
                });
                $(this).parent().addClass('selected');
                var flipid=$(this).attr('id').substr(4);
                $('#flip-container').quickFlipper({ }, flipid, 1);
                e.preventDefault();
            });
        });
    });
    </script>
    <?php
    $title = apply_filters('widget_title', $instance['title']);
    echo $args['before_widget'];
    if (!empty($title))
        echo $args['before_title'] . $title . $args['after_title'];
    echo '<div id="flip-tabs" >
    <ul id="flip-navigation" >
        <li class="selected"><a href="#" id="tab-0" >Today</a></li>
        <li><a href="#" id="tab-1">Tomorrow</a></li>
    </ul>
    <div id="flip-container" >';
    $this->matches_today();
    $this->matches_tomorrow();
    echo '</div>';
    echo '</div>';
    echo '</div>';
    echo $args['after_widget'];
}
Let me briefly explain what the codes in widget() does. The JavaScript code adds a tabbing and flipping effect to the widget. The matches_today() and matches_tomorrow() methods that return the matches for today and tomorrow also get included for display in the WordPress front-end.
Our fixture widget class Fifa_WC_Fixtures need to be registered using the widgets_init hook for it to be recognizable by WordPress.
function register_fifa_widget() {
    register_widget('Fifa_WC_Fixtures');
}
add_action('widgets_init', 'register_fifa_widget');
We still need to include jQuery and the QuickFlip library to get the tab and flipping effect in the widget working and also the widget CSS.
function fifa_widget_lib() {
    wp_enqueue_style('fifa-widget', plugins_url('styles.css', __FILE__));
    wp_enqueue_script('fifa-widgets', plugins_url('js/jquery.js', __FILE__));
    wp_enqueue_script('fifa-widget-js', plugins_url('js/jquery.quickflip.js', __FILE__));
}
add_action('wp_enqueue_scripts', 'fifa_widget_lib');
View a demo of the Fifa fixtures widget.
Conclusion
We are done coding the World Cup Fixtures widget. To further understand how the widget was built and how to implement it on your WordPress site, download the widget plugin, which includes the jQuery, Quickflip, and stylesheet files.
I hope this helps some of you in learning how to build WordPress widgets and in enjoying this year’s World Cup. Let me know your thoughts in the comments.
Frequently Asked Questions about World Cup 2014 WordPress Widget
How do I install the World Cup 2014 WordPress Widget on my website?
Installing the World Cup 2014 WordPress Widget on your website is a straightforward process. First, download the widget from the WordPress plugin directory. Then, go to your WordPress dashboard, click on ‘Plugins’, and then ‘Add New’. Upload the downloaded file and click ‘Install Now’. Once the installation is complete, click ‘Activate Plugin’. You can then add the widget to your desired location on your website through the ‘Appearance’ and ‘Widgets’ menu.
Can I customize the appearance of the World Cup 2014 WordPress Widget?
Yes, the World Cup 2014 WordPress Widget offers a range of customization options. You can adjust the size, color scheme, and layout of the widget to match your website’s design. These settings can be accessed and modified from the widget’s settings page in your WordPress dashboard.
Is the World Cup 2014 WordPress Widget compatible with all WordPress themes?
The World Cup 2014 WordPress Widget is designed to be compatible with most WordPress themes. However, due to the vast number of themes available, there may be some exceptions. If you encounter any compatibility issues, please contact the widget’s support team for assistance.
Does the World Cup 2014 WordPress Widget update in real-time?
The World Cup 2014 WordPress Widget updates regularly to provide the latest scores and match updates. However, it may not be in real-time due to potential delays in data transmission. Rest assured, the widget strives to provide the most accurate and up-to-date information.
Can I use the World Cup 2014 WordPress Widget for other football tournaments?
The World Cup 2014 WordPress Widget is specifically designed for the 2014 World Cup. However, there are other similar widgets available for different football tournaments. You can search for these in the WordPress plugin directory.
Is the World Cup 2014 WordPress Widget mobile-friendly?
Yes, the World Cup 2014 WordPress Widget is designed to be responsive and mobile-friendly. It should display correctly on all devices, including smartphones and tablets.
Does the World Cup 2014 WordPress Widget support multiple languages?
The World Cup 2014 WordPress Widget currently supports English. However, you can use a translation plugin to translate the widget into your desired language.
Is the World Cup 2014 WordPress Widget free to use?
Yes, the World Cup 2014 WordPress Widget is free to download and use. However, donations to the developer are appreciated and help support the continued development and maintenance of the widget.
Can I display more than one World Cup 2014 WordPress Widget on my website?
Yes, you can display multiple instances of the World Cup 2014 WordPress Widget on your website. Each instance can be customized independently, allowing you to display different information in each widget.
What do I do if I encounter a problem with the World Cup 2014 WordPress Widget?
If you encounter any issues with the World Cup 2014 WordPress Widget, you can contact the support team through the WordPress plugin directory. They will be able to assist you with troubleshooting and resolving the issue.
Collins is a web developer and freelance writer. Creator of the popular ProfilePress and MailOptin WordPress plugins. When not wrangling with code, you can find him writing at his personal blog or on Twitter.


