Drupal is a very flexible content management system for building websites. It provides many great features out of the box which enable us to build comprehensive sites without writing any PHP code. It also provides features to add more functionality through the use of modules.
By default, the Drupal node types are an article and a page. This might be good for basic sites, but if we plan on having a more complex website, we’ll want to add different node types. We can even define those by writing a module!
In this article you’ll see how to write a custom Drupal module which will install new node types using the Drupal hooks and API.
Key Takeaways
- Drupal is a flexible content management system that allows the creation of new node types through writing a custom module; this is beneficial for building more complex websites beyond the default article and page node types.
- Creating a new node type involves creating a module with three files: .info (contains information about the module), .install (details about what the module will install or uninstall), and .module (contains the code to implement the Drupal hooks used by the module).
- The new node type is installed using the Drupal hooks and API, and fields such as title, description, etc., are defined. The module should also include code for cleaning up any data or types added when it is uninstalled.
- Additional fields can be added to the new node type by creating the fields and field instances in the .install file of the module. This allows for more customized content, such as product price and quantity in a product node type.
Creating Your Module
Let’s start by creating the basic structure of a module in which we’ll create our new content type.
To create a module, in the sites/all/modules directory of your Drupal installation create a new directory named productcustomtype. In that folder, then create three files:
productcustomtype.info– will contain the information about the module so that Drupal will recognize it and show it in the list.productcustomtype.install– will have details about things you are going to install or uninstall for the module.productcustomtype.module– will contain code to implement the Drupal hooks used by the module.
Once you have made the directory, open productcustomtype.info and add the following code to it:
name = productcustomtype
description = A new content type of Product
package = Product Custom node Type
core = 7.x
files[] = productcustomtype.install
files[] = productcustomtype.module
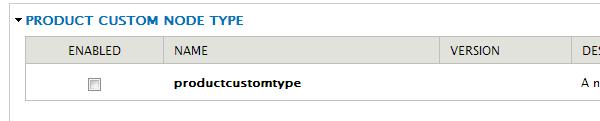
The above simply defines some parameters for our module so Drupal can use it and display the information about our module. Once this is done we should see our module in the module list as shown below. But don’t enable it just yet – we’ll do that after the next step.
Installing and Uninstalling the Node
Once we have the basic files for the module in place, we can start writing code for installing the custom node type. The first hook we need to implement is hook_node_info. Using this hook, a module can define one or more node types in Drupal. The hook implementation returns an array defining the new node type which the module is going to add.
To implement this hook, add the following code to productcustomtype.module:
<?php
/**
 * Implements hook_node_info()
 */
function productcustomtype_node_info() {
    return array(
        'product' => array(
            'name' => t('Product'),
            'base' => 'product',
            'description' => t('You can define new Products here'),
            'has_title' => TRUE,
            'title_label' => t('Product title')
         )
    );
}
The implementation returns an array defining a new node type product along with some of its properties, such as its name, description, if it has a title, and base (which is used in different hooks for this content type).
As we have defined that this node type has a title, we need to show the title text field when the form for this node is displayed to add content. To do this, we will have to implement the hook hook_form.
The hook_form hook is used to show the form used to create/edit nodes. The hook is implemented in productcustomtype.module as follows:
<?php
/**
 * Implement hook_form()
 */
function product_form($node, $form_state) {
    return node_content_form($node, $form_state);
}
We simply use the Drupal API which gives an implementation of hook_form and adds a title field provided the node definition has the has_title attribute set (which we do have set in our case).
Once we’ve got this done, we need to implement the hook_install hook to add the body field to the new node type.
Add the implementation to productcustomtype.install as follows:
<?php
/**
 * Implements hook_install().
 */
function productcustomtype_install() {
    node_types_rebuild();
    $types = node_type_get_types();|
      node_add_body_field($types['product']);
}
We first save all of the new node types created by different modules (including ours) by calling the Drupal API node_types_rebuild() function. Then we get all of the node types and call node_add_body_field() on our type to add the body field.
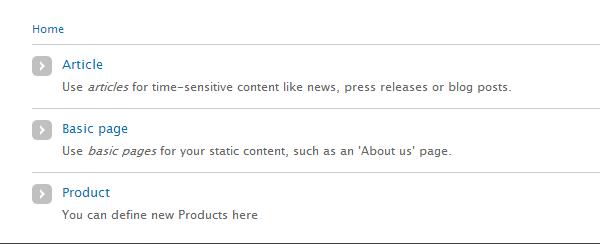
Once we have done this we can enable our module which will install our new node type. Then we should be able to see our new type when we click on add content as follows:
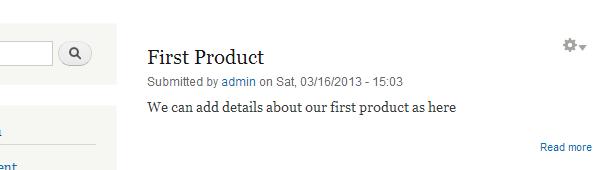
If we add a new product, it will also be seen on the Drupal home page.
All modules in Drupal should clean up any data they create in the database or any types they have added when it is uninstalled by the user. To support this, we have to implement the hook_uninstall in our productcustomtype.install file as follows:
<?php
/**
 * Implements hook_uninstall().
 */
function productcustomtype_uninstall() {
    $ournewtype = 'product';
    $sql = 'SELECT nid FROM {node} n WHERE n.type = :type';
    $result = db_query($sql, array(':type' => $ournewtype));
    $nodeids = array();
    foreach ($result as $row) {
        $nodeids[] = $row->nid;
    }
    node_delete_multiple($nodeids);
    node_type_delete($ournewtype);
}
we first find out all of the node IDs which are nodes of our installed content type. Once we have collected the IDs, we use the API function node_delete_multiple() to deletes multiple nodes. Then we use the node_type_delete() function to delete our node type.
Now if we uninstall our module, all of the nodes of our type and our type itself should be deleted.
Creating Extra Fields
Once we’ve added the new node type we have functionality similar to that of a node. But what if we want to add more fields depending on the node type? For example, if it’s a product type then we might want to add two more fields like price and quantity.
For this, we have to first create the fields and then then create field instances on our node type. We write two new functions in the productcustomtype.install file to define the fields and the field instances.
<?php
function _productcustomtype_installed_fields() {
    $t = get_t();
    return array(
        'productcustomtype_price' => array(
            'field_name' => 'productcustomtype_price',
            'label' => $t('Price of the product'),
            'type' => 'text'
        ),
        'productcustomtype_quantity' => array(
            'field_name' => 'productcustomtype_quantity',
            'label' => $t('Quantity of the product'),
            'type' => 'text'
        )
    );
}
function _productcustomtype_installed_instances() {
    $t = get_t();
    return array(
        'productcustomtype_price' => array(
            'field_name' => 'productcustomtype_price',
            'type' => 'text',
            'label' => $t('Price of the product'),
            'widget' => array(
                'type' => 'text_textfield'
            ),
            'display' => array(
                'example_node_list' => array(
                    'label' => $t('Price of the product'),
                    'type' => 'text'
                )
            )
        ),
        'productcustomtype_quantity' => array(
            'field_name' => 'productcustomtype_quantity',
            'type' => 'text',
            'label' => $t('Quantity of the product'),
            'widget' => array(
                'type' => 'text_textfield'
            ),
            'display' => array(
                'example_node_list' => array(
                    'label' => $t('Quantity of the product'),
                    'type' => 'text'
                )
            )
        )
    );
}
We then create a function add_custom_fields() in productcustomtype.install which will read the array from and create the fields and instances.
<?php
function add_custom_fields() {
    foreach (_productcustomtype_installed_fields() as $field) {
        field_create_field($field);
    }
    foreach (_productcustomtype_installed_instances() as $fieldinstance) {
        $fieldinstance['entity_type'] = 'node';
        $fieldinstance['bundle'] = 'product';
        print_r($fieldinstance);
        field_create_instance($fieldinstance);
    }
}
Now we can just call the add_custom_fields() function in productcustomtype_install() so that the fields and field instances are installed when the module is installed.
<?php
function productcustomtype_install() {
    node_types_rebuild();
    $types = node_type_get_types();
    node_add_body_field($types['product']);
    add_custom_fields();
}
We also need to update our productcustomtype_uninstall() function to remove the fields and field instances.
<?php
function productcustomtype_uninstall() {
$ournewtype = 'product';
$sql = 'SELECT nid FROM {node} n WHERE n.type = :type';
$result = db_query($sql, array(':type' => $ournewtype));
$nodeids = array();
foreach ($result as $row) {
$nodeids[] = $row->nid;
}
node_delete_multiple($nodeids);
delete_custom_fields();
node_type_delete($ournewtype);
field_purge_batch(500);
}
function delete_custom_fields() {
foreach (array_keys(_productcustomtype_installed_fields()) as $field) {
field_delete_field($field);
}
$instances = field_info_instances('node', 'product');
foreach ($instances as $instance_name => $fieldinstance) {
field_delete_instance($fieldinstance);
}
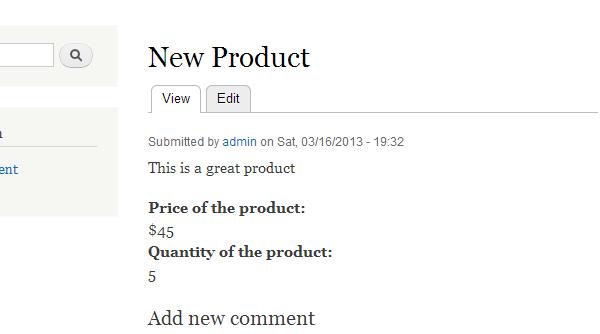
}Install the module again and click on product to add a new product and we should see the two fields as shown below:
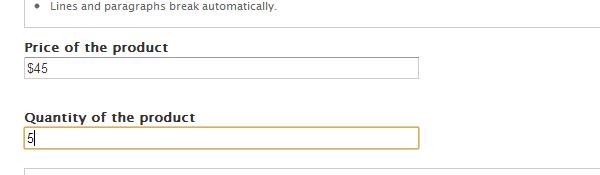
After we save the node and see it in the preview, we will see the fields as follows:
Conclusion
The Drupal CMS provides many useful hooks and a powerful API which allow us to perform various customizations. In this article we were able to create a completely new node type which will appear in Drupal’s content section. And using Drupal’s API we also attached fields to this new node type so that anyone can easily add content using the new node type. So have fun creating your next new node type for your Drupal site.
Image via Fotolia
Frequently Asked Questions about Creating a New Drupal Node Type
What is a Drupal Node Type and why is it important?
A Drupal Node Type, also known as a content type, is a pre-defined collection of data types (fields) which relate to each other by an informational context. This could be a simple blog post, an article, a news story, a forum topic, or a tutorial, among others. Node types are important because they provide a structured way to input, display, and manage content in Drupal. They allow for the customization of data input, validation, and display settings, which can greatly enhance the user experience and the overall functionality of a Drupal site.
How can I create a new Node Type in Drupal?
Creating a new Node Type in Drupal is a straightforward process. First, navigate to the “Structure” menu in your Drupal admin dashboard, then select “Content types”. Click on the “Add content type” button. You will be prompted to fill in the name, description, and settings for your new Node Type. Once you’ve filled in the necessary information, click on the “Save and manage fields” button to add fields to your new Node Type.
Can I customize the fields in my Drupal Node Type?
Yes, you can customize the fields in your Drupal Node Type. After creating a new Node Type, you can add, edit, or delete fields as needed. This allows you to tailor the Node Type to your specific content needs. For example, you might add a text field for an article summary, an image field for a featured image, or a date field for a publication date.
How can I manage the display settings for my Drupal Node Type?
Drupal provides a “Manage display” tab for each Node Type. This allows you to control how each field is displayed when the Node is viewed. You can adjust the label, format, and order of each field. You can also group fields into custom display modes, such as a teaser view or a full content view.
Can I use Drupal’s Node API to programmatically create Nodes?
Yes, Drupal’s Node API provides a powerful way to programmatically create, update, and delete Nodes. This can be useful for tasks such as importing content from another system, generating test data, or creating custom workflows. The Node API is a part of Drupal’s core system, so it’s available in all Drupal installations.
What are the core Node Types in Drupal?
Drupal comes with several core Node Types, including Article, Basic page, Blog entry, Forum topic, and Poll. These provide a starting point for managing content in Drupal. However, you can also create your own custom Node Types to suit your specific needs.
How can I control access to my Drupal Nodes?
Drupal provides a robust system for controlling access to Nodes. You can set permissions based on user roles, allowing you to control who can view, create, edit, and delete Nodes of each type. You can also use Drupal’s Node Access API to create more complex access rules.
Can I use Drupal’s Views module to display my Nodes?
Yes, Drupal’s Views module is a powerful tool for displaying Nodes. You can create custom views that display Nodes based on various criteria, such as Node Type, publication status, or author. You can also customize the display format, sorting, and pagination of your views.
How can I theme my Drupal Nodes?
Drupal provides a flexible theming system that allows you to control the look and feel of your Nodes. You can create custom templates for each Node Type, and you can use Drupal’s Theme API to add custom CSS and JavaScript to your Nodes.
Can I extend the functionality of my Drupal Nodes with modules?
Yes, Drupal’s modular architecture allows you to extend the functionality of your Nodes with modules. There are thousands of contributed modules available that can add features such as image galleries, comments, ratings, and social media integration to your Nodes. You can also create your own custom modules if you have specific needs that aren’t met by the available modules.
Sharing our passion for building incredible internet things.