Create a Sleek Book App Icon in Illustrator


Key Takeaways
- Designing a stunning and eye-catching book app icon can significantly increase downloads, purchases, and trust in your brand.
- Illustrator provides various tools and options, such as shape tools, gradient tools, and the object and effect menu, to create a sleek book app icon.
- The process involves creating a new document, designing the basic shape of the icon, adding details like gradients, shadows, and highlights, and exporting the icon in the appropriate format.
- Best practices for designing a book app icon include keeping the design simple and clear, using bold and contrasting colors, and ensuring the icon is recognizable at small sizes.
Resources:
Free Leather TexturesFinal result:
 (Download the finished, layered Illustrator file.)
Step 1
Create a new document in Illustrator with a 600px width and a 500px height.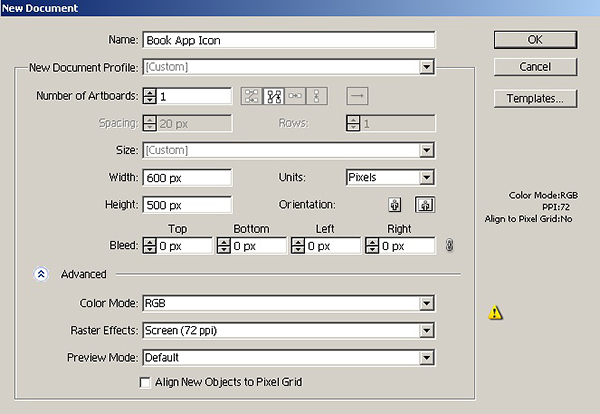
Step 2
Now, set #C63D21 as your fill color and select the rectangle tool (“M”) to draw the rectangle shown below. Press the “Shift” key while drawing the rectangle to get a perfect square. Label it as “Frame”. Select it by pressing the ring-shaped target present at the right side of respective layer and go to “Effect” > “Stylize” > “Round Corners”. Enter a 30px value here to turn it into a rounded rectangle, and go to “Object” > “Expand Appearance”. Once you are done, lock this layer and hide it. This is the base of our app icon, which we’ll use later to crop out other details.
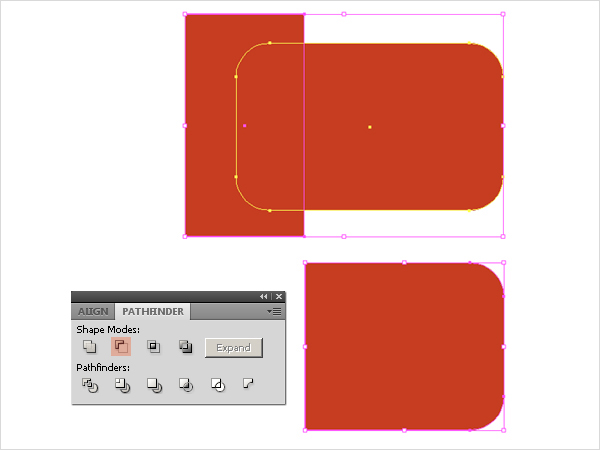
Step 3
Next, we’ll make the icon’s front. Draw another rectangle like the one shown below. Select it and go to “Effect” > “Stylize” > “Round Corners”. Again, enter a 30px value. After that, go to “Object” > “Expand Appearance”. Draw another vertical rectangle covering the left corners of the previous rectangle. Now, select both rectangles and hit “Minus Front” in the pathfinder panel (Shift + Ctrl + F9).
Step 4
Next, we’ll give our book cover some thickness. Select the new shape and press Ctrl + “C” to copy it. Now, press Ctrl + “B” to paste in back. Drag the copy downwards 5-6 steps and change its fill color to #8E1F10.
Step 5
To make highlights, select the top cover layer and press Ctrl + “C” to copy it. Now press Ctrl + “F” twice to paste in front. Click on the topmost copy and drag it 2 steps upwards using the selection tool (“V”). After that, select the two copies and hit “Minus Front” in the pathfinder panel (Shift + Ctrl + F9). Change the fill color of the resulting shape to #FFFFFF. Change its blending mode to “Soft Light” and reduce its opacity to 75% within the transparency panel (Shift + Ctrl + F10).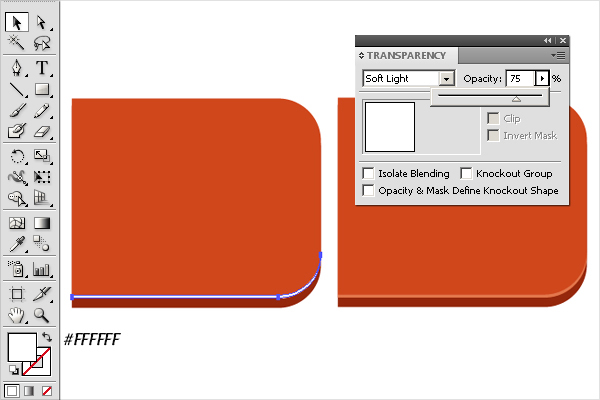
Step 6
Select all of the layers comprising the front book cover and choose “Collect in New Layer” from the fly-out menu present at the top-right corner of the layers panel. Label it as “Front”. Duplicate and place it behind the original layer. Label this new duplicate as “Back”. Unhide the “Frame” layer and position the “Back” layer along the lower border of “Frame” as shown below.
Step 7
Next, we’ll make the book cover binding. Draw a rectangle with #272727 as your fill color. To confine it within the icon, duplicate the “Frame” layer and place this new copy above the rest of the layers. Now, select the rectangle and “Frame copy” layer and hit “Intersect” within the pathfinder panel to get the shape shown below. Change its fill color once again to #272727.
Step 8
Now, select the ellipse tool and draw an ellipse as shown below. Set its fill color to “none” and give it color #272727 as a stroke color (Stroke weight: 6.65pt). It should be on top of the book cover thickness but not the highlights. Make sure that stroke is aligned to “Inside”. You can ensure this through the stroke panel. Label the layer as “Curve”.
Step 9
Select the “Curve” and go to “Object” > “Expand Appearance”. Draw a rectangle covering the right half of the ring. Now, select both the rectangle and curve layers and hit “Minus Front” within the pathfinder panel. To make highlights, select the “Curve” layer and press Ctrl + “C” to copy it. Now press Ctrl + “B” to paste in back. Change its fill color to #58595B and drag it 2 steps upward.
 Select the highlight “Curve” layer; press Ctrl + “C” to copy it. Now press Ctrl + “B” to paste in back. Change its fill color to black and drag it 3-4 steps upwards as shown below.

Step 10
Now, duplicate the highlight “Curve” layer and place it above the binding rectangle layer. Select both layers and hit “Minus Front” within the pathfinder panel.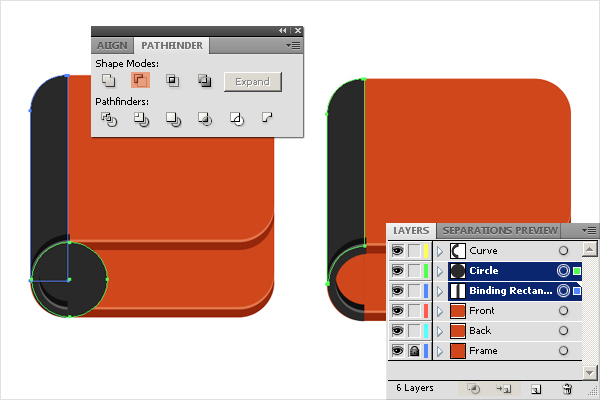 Place the black curve layer behind the book binding layer.

Step11
Next, we’ll make the book pages. Select the rectangle tool to draw the rectangle shown below with #F1F2F2 as the fill color and #BCBEC0 as the stroke color (Stroke weight: 0.75pt). Convert it into a rounded rectangle by going to “Effect” > “Stylize” > “Round Corners”. Enter a 30px value. After that, go to “Object” > “Expand Appearance”.
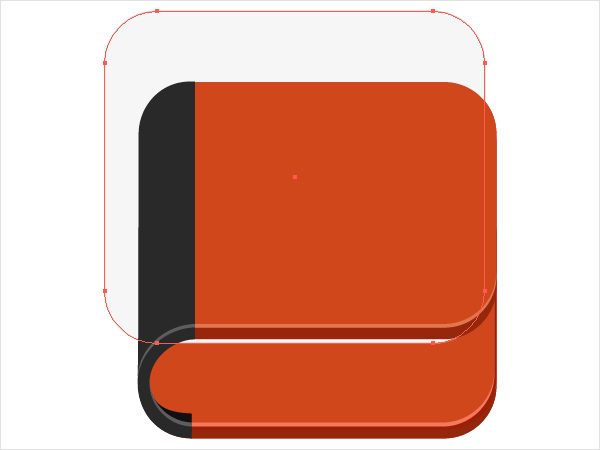
Step 12
Select the rectangle and go to “Effect” > “Distort & Transform” > “Transform”. Enter the following values here to make more pages.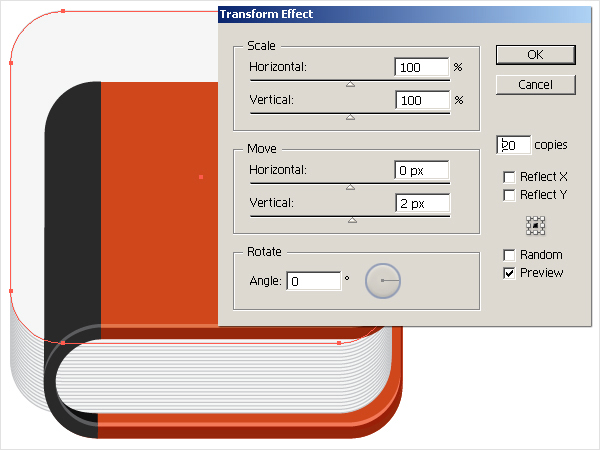 Now, go to “Object” > “Expand Appearance”. To confine the pages within the icon, duplicate the frame layer, set its fill to “none,” and bring it above the pages. Now, select both the frame copy and pages and go to “Object” > “Clipping Mask” > “Make”.

Step 13
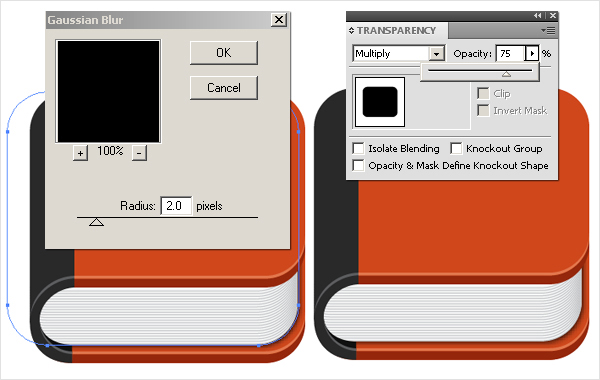
To make a shadow, select the bottom most page and press Ctrl + “C” to copy it. Now, press Ctrl + “B” to paste in back. Change its fill color to black and drag it 1 step downwards and towards the right. Select it and go to “Effect” > “Blur” > “Gaussian Blur”. Apply a 2px Gaussian blur effect to it. After that, change the blending mode of this layer to “Multiply” and reduce its opacity to 75%.
Step 14
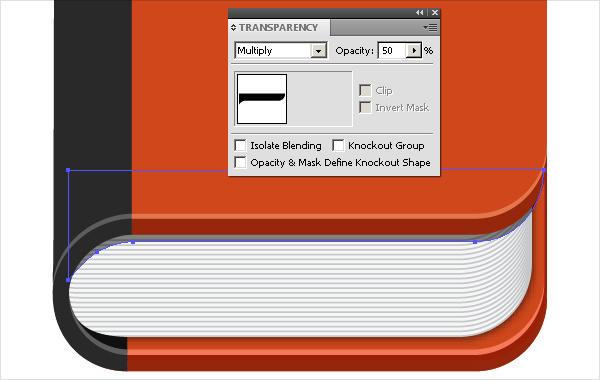
Select the pen tool and draw the following shape above the pages with a black fill color. Change its blending mode to “Multiply” and set its opacity to 50%. You can blur it using a 1-2px Gaussian blur effect.
Step 15
We’ll apply some shading over the pages now. Duplicate the lower most page layer and place it above the rest of the pages but below the clipping mask. Apply the following gradient on it using the gradient tool.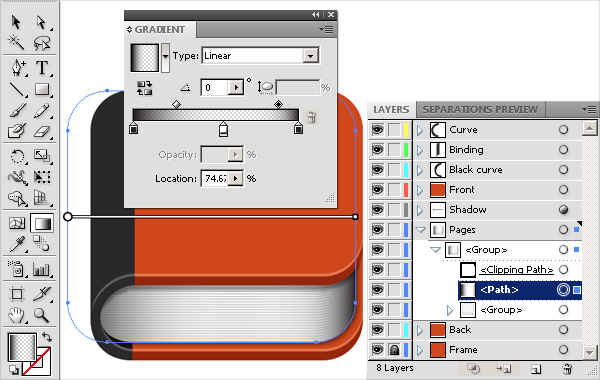 Change the blending mode of gradient layer to “Multiply” with 75% opacity.
Step 16
Next, we’ll apply the leather texture over the book. Load the texture file in Illustrator, copy, and paste it in your document above the rest of the layers. Resize it using the selection tool (“V”). Now, apply book’s front layer clipping mask to it using the same technique used before in step 12.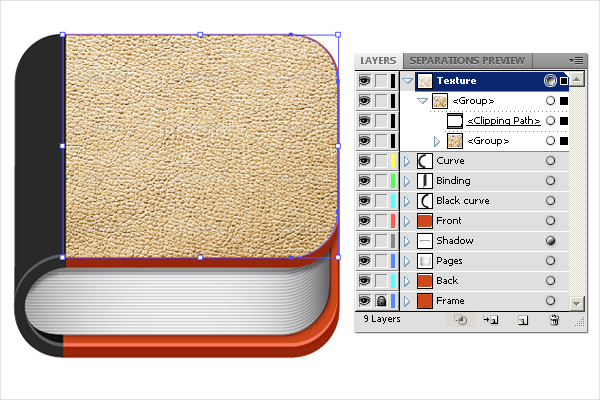 Change the blending mode of texture to “Soft light” and set opacity to 60%.

Step 17
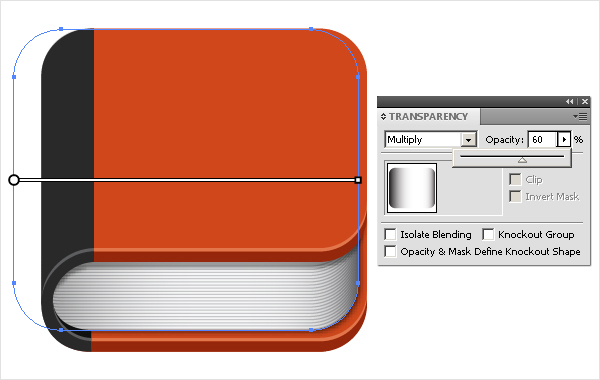
Duplicate the front layer and place it above the texture. Now, apply the following gradient on it. Change its blending mode to “Soft light” and set opacity to 50%.
Step 18
Now, apply leather texture and the following gradient over the binding layer. Change the blending mode of the gradient layer to “Overlay” and set its opacity to 40%.
Step 19
Select the pen tool to draw the curve shown below. Set the fill color to “none” and pick #5E5D5B as your stroke color (Stroke weight: 4pt). Select the stroke and go to “Object” > “Expand Appearance”. Now, select the stroke layer and double-click the contents in the appearance panel (Shift + F6). Select the “Fill” attribute and click on the “Duplicate Selected Item” icon present at the bottom of the appearance panel. Apply the following gradient to this new fill attribute. Change its blending mode to “Color Dodge” with 25% opacity.
 Duplicate the current shape; remove the gradient attribute from the appearance panel. Place it below the original layer and drag a bit downwards. Now, duplicate both of these curves and position them as shown below. Once you are done, apply a clipping mask to confine them to the binding shape.
Step 20
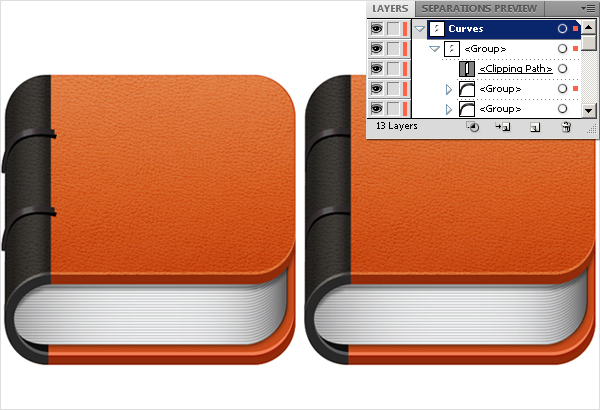
Next, we’ll apply a few stitches to the book cover. Draw a line using the pen tool with a 2pt black stroke. Apply the following settings within the stroke panel to get the same stitched effect that I employed.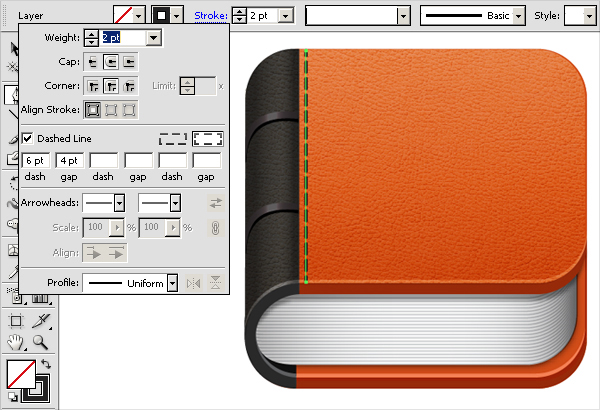 Duplicate this layer, change the stroke color of the original layer to white, and drag it 1 step towards the left. Decrease its opacity to 75%. Now, select both the black and white strokes, duplicate them, and position them at the junction of the binding and the front cover as shown below.

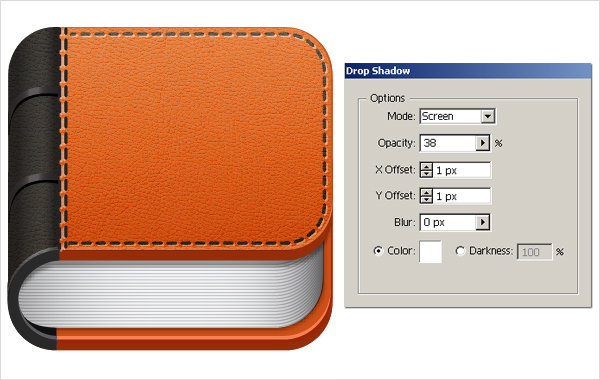
Step 21
Select the front cover layer and go to “Object” > “Path” > “Offset Path”. Apply the following settings here. Set the fill to “None” for this new shape and give it a 2pt dashed stroke with the same settings as explained in step 20. After that, go to “Object” > “Expand Appearance”. Now, select the eraser tool and erase the stitches from the area shown below. Select the stitches and go to “Effect” > “Stylize” > “Drop Shadow”. Apply the following settings here.
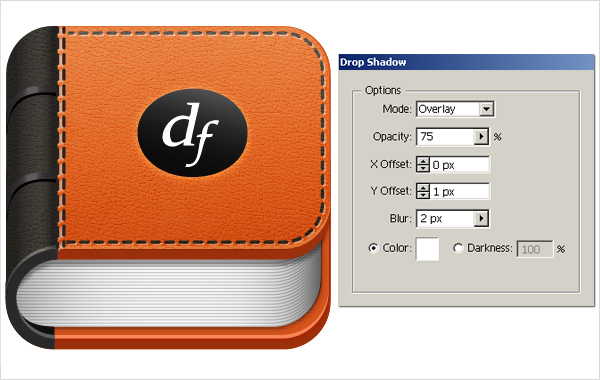
Step 22
Paste your logo onto a new layer and decrease its height using the selection tool (“V”). Duplicate it and apply the following gradient to it. Change the blending mode of this new gradient layer to “Screen” with 30% opacity.
Step 23
Our book app icon is almost ready; now we’ll make its shadow. Draw a thin rectangle below the rest of the layers using the rounded rectangle tool with a pure black fill color.
Step 24
Select the rectangle and apply a 3px Gaussian blur effect to it.
Final result:
That’s it guys. I Hope you enjoyed the tutorial and learned something useful. Let us know what you think!
Frequently Asked Questions about Creating a Sleek Book App Icon in Illustrator
What are the basic steps to create a book app icon in Illustrator?
Creating a book app icon in Illustrator involves several steps. First, you need to create a new document and set up your workspace. Then, you can start designing your icon by creating a basic shape, such as a rectangle or circle. After that, you can add details to your icon, such as gradients, shadows, and highlights. Finally, you can export your icon in the appropriate format for use in your app.
How can I make my book app icon stand out?
There are several ways to make your book app icon stand out. One way is to use bold, contrasting colors. Another way is to use unique shapes or symbols that are relevant to your app. You can also add a 3D effect to your icon to make it more visually appealing. Lastly, keep your design simple and clear, as overly complex icons can be confusing to users.
What are the best practices for designing a book app icon?
Some best practices for designing a book app icon include keeping the design simple and clear, using bold and contrasting colors, and making sure the icon is recognizable at small sizes. It’s also important to test your icon on different devices and screen resolutions to ensure it looks good in all situations.
How can I export my book app icon in Illustrator?
To export your book app icon in Illustrator, go to the File menu and select Export. Then, choose the format you want to export your icon in, such as PNG or JPEG. You can also choose the resolution and other settings for your exported icon.
Can I use Illustrator to design icons for other types of apps?
Yes, you can use Illustrator to design icons for any type of app. The process is similar to designing a book app icon, but you may need to use different shapes, colors, and symbols depending on the type of app.
What are some common mistakes to avoid when designing a book app icon?
Some common mistakes to avoid when designing a book app icon include making the design too complex, using colors that don’t contrast well, and not testing the icon on different devices and screen resolutions. It’s also a mistake to not consider the context in which the icon will be used, such as the app store or the user’s home screen.
How can I add a 3D effect to my book app icon in Illustrator?
To add a 3D effect to your book app icon in Illustrator, you can use the 3D effect tool. This tool allows you to apply a 3D effect to any shape or object in your design. You can adjust the perspective, lighting, and shading of the 3D effect to achieve the look you want.
Can I use Illustrator to design a book app icon for both iOS and Android?
Yes, you can use Illustrator to design a book app icon for both iOS and Android. However, you should be aware that the design guidelines and requirements for app icons are different for each platform. Therefore, you may need to make some adjustments to your design to ensure it meets the guidelines for each platform.
What are some resources for learning more about designing book app icons in Illustrator?
There are many resources available for learning more about designing book app icons in Illustrator. These include online tutorials, design blogs, and books on graphic design. You can also find resources on the Adobe website, including tutorials and forums where you can ask questions and get help from other designers.
How can I improve my skills in designing book app icons in Illustrator?
To improve your skills in designing book app icons in Illustrator, practice is key. Try designing icons for different types of apps and experimenting with different styles and techniques. You can also learn from other designers by studying their work and seeking feedback on your own designs.
Anum is Web and Graphic designer. Addicted to Photoshop and crazy for pixel perfection. She is also an active blogger, sharing her passions, skills and creative details on her blog Websoulz. She loves to connect with the community, sharing the latest design gossips and rolling her eyes on boring trends.


Published in
·Design·Design & UX·Illustration·Photography & Imagery·Review·Sketch·Software·March 16, 2015
Published in
·Design·Design & UX·Illustration·Photography & Imagery·Review·Software·UI Design·Web·July 10, 2015