Create a Gorgeous American Football from Scratch in Photoshop

It’s football season in the United States, and many Americans are spending their free time in the fall captivated on their couch watching an oddly-shaped ball being thrown and wrestled back and forth on a field. Few things are as strange as this sport, but the strangest facet of all may be the football itself. If you can design a convincing American football — complete with realistic shape, shadows and texture — you can call yourself a truly versatile designer.
Are you game?
In this tutorial, I’ll walk you through the process of create a gorgeous American football from scratch. We’ll make everything in Photoshop except for the grass field. Along the way, you will learn to use various shape tools, pen tools, filters, and different blending options to achieve the final result. So, let’s get started!
Resources:
Grass By Merlin dobaryan
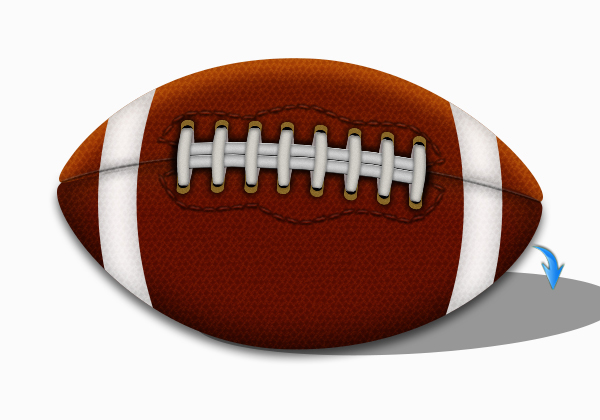
Final result:

Key Takeaways
- This tutorial provides a step-by-step guide on creating a realistic American football from scratch using Photoshop, including the creation of the ball’s shape, texture, stitches and shadows.
- Various Photoshop tools are utilized in the process, such as shape tools, pen tools, filters, and different blending options.
- The tutorial also includes instructions on how to create a realistic grass field as the background for the football.
- The guide is suitable for both beginners and experienced Photoshop users, providing tips and techniques that can be applied to other design projects.
Step 1
Create a new document in Photoshop with an 800px width and a 550px height.

Step 2
First of all, we’ll draw the basic football shape. Set #641002 as your foreground color and select the pen tool (Tool mode: Shape) to draw the shape shown below.

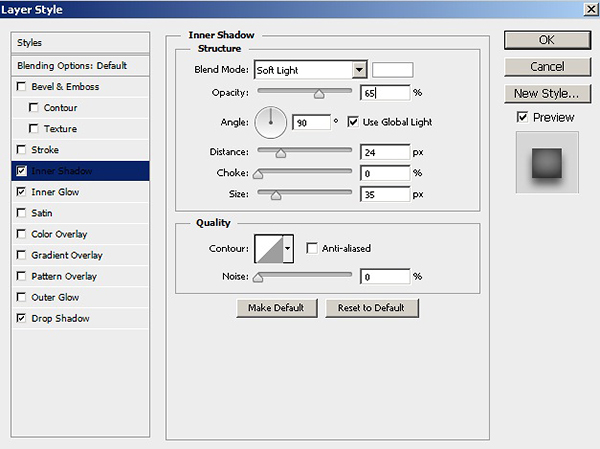
Step 3
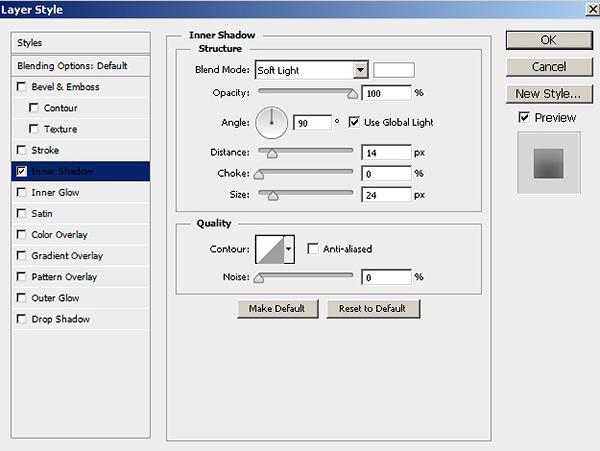
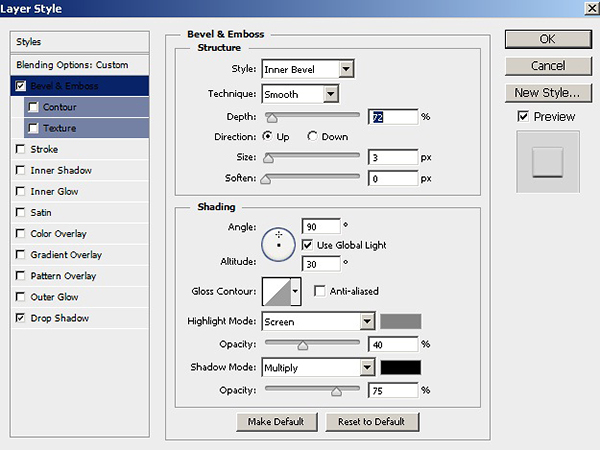
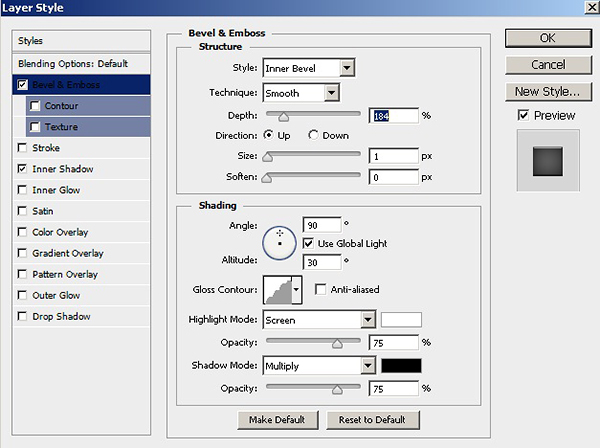
Double-click on this layer to open the layer style window and apply the following settings.
Step 4
Now, draw the top half of the football using the pen tool (Tool mode: Shape). This time, use color #6e1802.

Double-click on this new shape layer and apply the following inner shadow settings.

Step 5
To accentuate the top highlighting effect, create a new layer and press Ctrl + <thumbnail of the football’s upper half layer> to make a selection around it. Now, select the soft round brush tool and apply it on this new layer near top edges of the selection, as shown below.
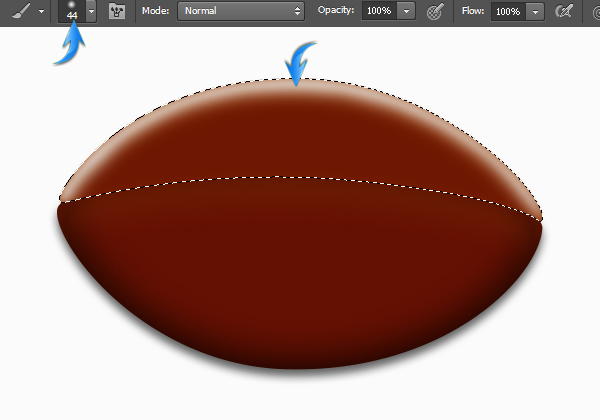
Now, change the blending mode of highlighting layer to “Overlay” and reduce its opacity to 35% to get the effect shown below.

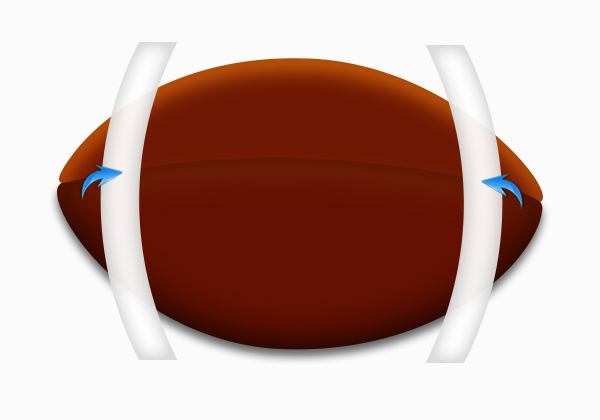
Step 6
Next, we’ll add white stripes to both sides of football. Select the rectangle tool to draw a horizontal rectangle and then go to “Edit” > “Transform” > “Warp.” Choose “Arch” with a 30% bend at the top properties bar.

Now rotate these stripes 90⁰ using the free transform tool (Ctrl+ “T”).
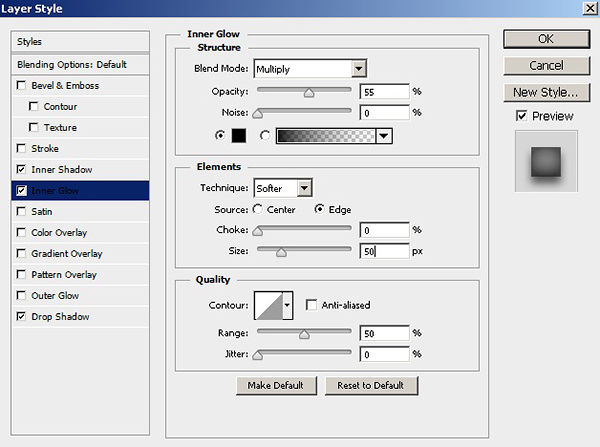
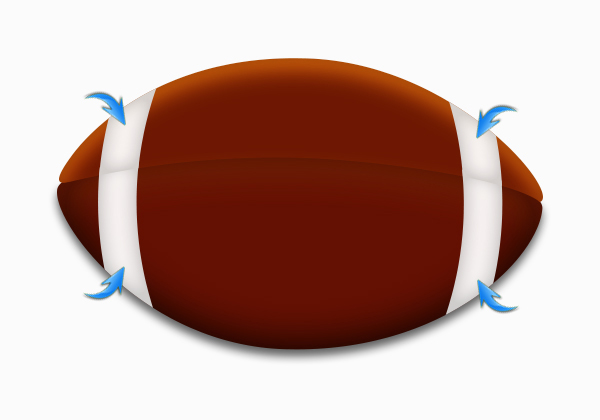
Step 7
Apply the following settings for inner glow on this arched layer.

Duplicate this layer and flip it horizontally by going to “Edit” > “Transform” > “Flip Horizontal.”
Now, duplicate both of these layers. Click on one of these layers and then press ctrl + <click on lower half of football layer> to make a selection around it. After that, click on the “Add layer mask” icon, which is present at the bottom of the layers panel. Add layer masks to the rest of the copies covering all halves of the football, as shown below.
Step 8
Next, we’ll draw a partition between these halves. To do so, firstly, select the 4px hard round brush tool and press “D” to set default colors. Now, select the pen tool (Tool mode: Path) to draw the curved line shown below on a new layer.

Once you are done, right click and choose the option of “Stroke path” > “Brush” to get a black curved line. Press “Delete” to get rid of the path.
Step 9
Reduce the fill of the partition layer to 45%. Now, apply the following settings for Bevel and Emboss and Drop Shadow on this new layer.


Step 10
Let’s create the football’s texture now. Create a new layer at top of the rest of the layers and fill it with pure white using the paint bucket tool. Press “D” to set default colors and go to “Filter” > “Filter Gallery” > “Texture” > “Stained Glass.” Use the following values here.

Now go to “Filter” > “Filter Gallery” > “Brush Strokes” > “Ink Outlines.” Apply the following settings here.

Step 11
Now press Ctrl + “I” to invert the texture. Merge both layers of the texture.
Step 12
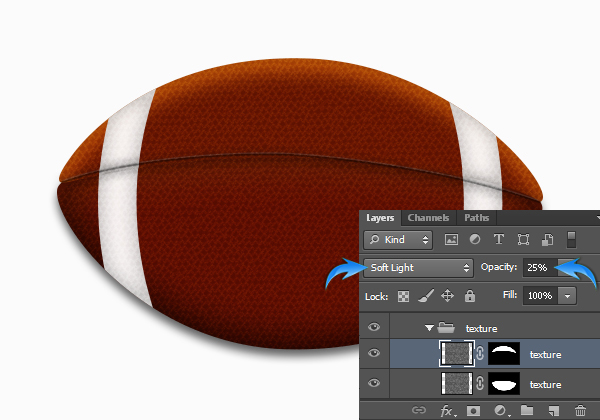
Now, resize the texture according to the football’s lower half and arrange it over it using the free transform tool. Duplicate this layer and place it over the upper half of football. Now, confine both the texture layers to the respective football halves by adding layer masks as we did in step 7. Change the blending mode of these layers to “Soft Light” and reduce their opacity to 25%.
Step 13
Next, select the pen tool (Tool mode: Path) and draw the path shown below.
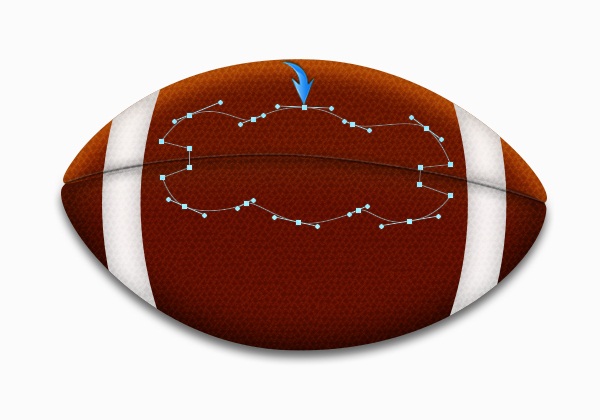
Select the hard round brush tool and apply the same settings in the brush panel as applied in step 5 of the Diary vector tutorial. After that, select the pen tool once again and right-click on the “Path” > “Stroke Path” > “Brush.”
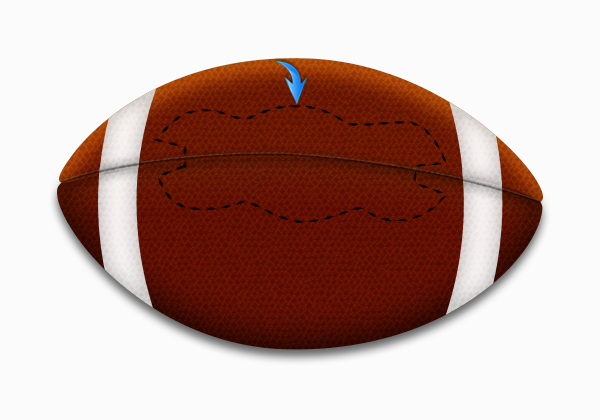
Step 14
Set the fill of the stitches layer to 0% and apply the following layer style settings.


Step 15
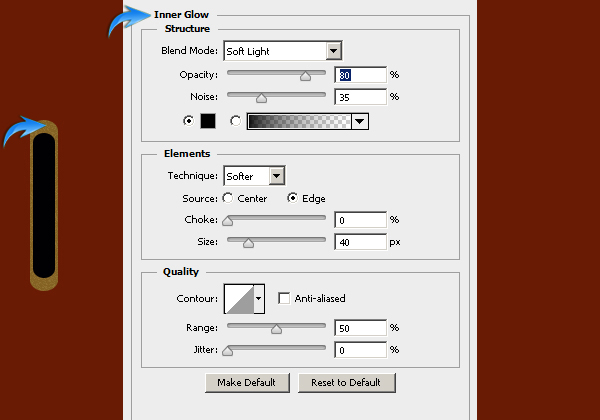
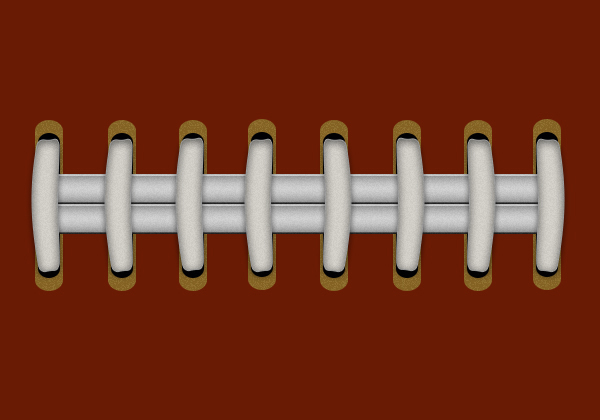
Select the rounded rectangle tool with a 15px radius and draw two vertical rectangles as shown below. Use color #b09450 for the larger rectangle and apply the following inner glow settings.
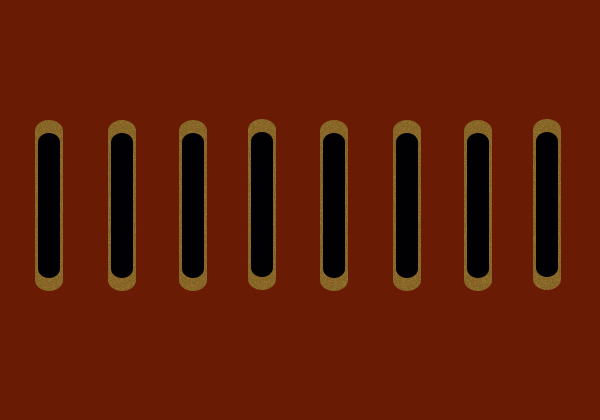
Collect both rectangles into a single group and duplicate this new group seven times. Arrange these copies as shown below.
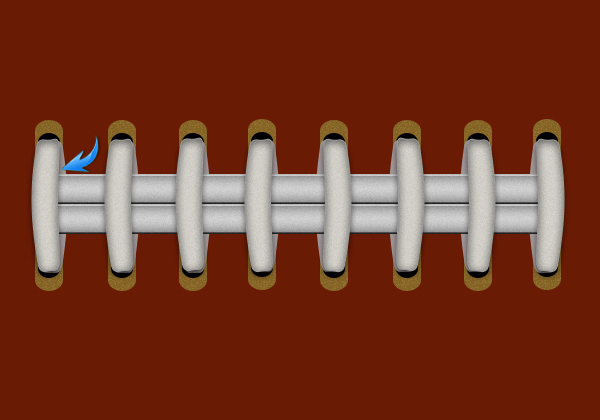
Step 16
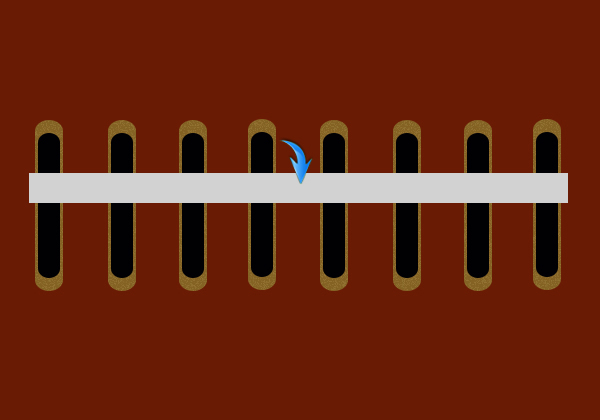
Create a rectangle as shown below and apply the following layer style settings to it.
Right-click on this layer and select “Covert to Smart Object.” Now go to “Filter” > “Noise” > “Add Noise.” Use a 2px value here.

Duplicate it and place the copy just below the original layer.

Step 17
Select the pen tool (Tool mode: Shape) to draw the shape shown below. Apply the same settings for inner glow and noise on this shape a wes applied for the rectangle in step 16. Also, add some drop shadow.

Keep on duplicating and arranging these shapes to create the intended stitching.
Step 18
Place one copy of the shape formed in step 17 below the two rectangles, flip it horizontally and arrange it as shown below.
Step 19
Create a new layer below these layers, select the soft round brush tool, and apply it to form the shadow in pure black color.

Collect all these layers in a group, resize it, and place it as shown below.

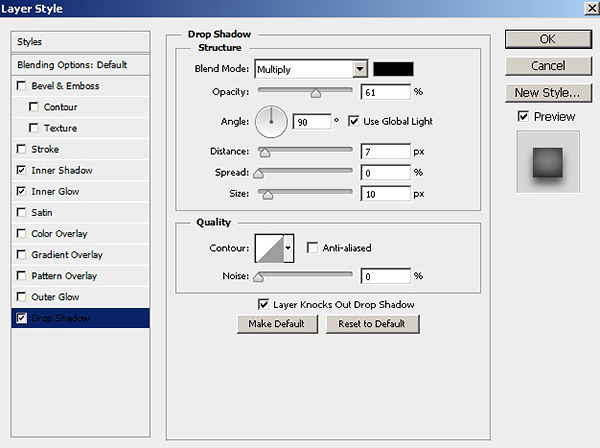
Step 20
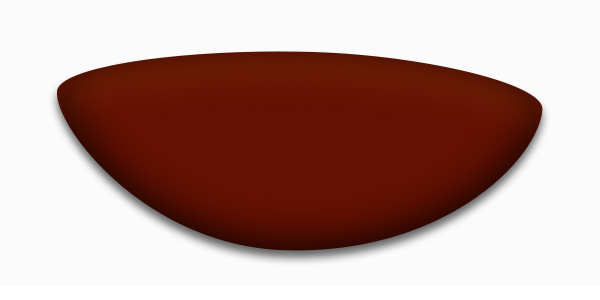
Next, to form the shadow of the football, create a new layer just above the background and make the shape shown below using the ellipse tool. Once you are done, reduce the opacity of the shadow layer to 65%.
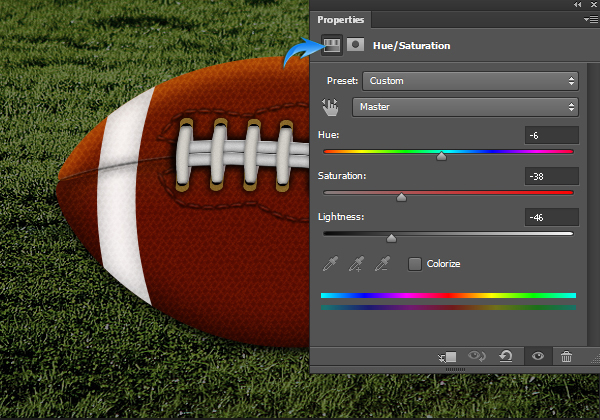
Step 21
Our football is ready; now we’ll create a background for it. Paste the grass image just above the background layer and create a Hue/ Saturation adjustment layer above it. Apply the following Hue/Saturation adjustment settings here.
Step 22
You can make a white stripe using brush tool on a new layer. Change the blending mode of this layer to “Color.” Duplicate this layer and change its blending mode to “Overlay” to get the effect shown below.

Step 23
Now, we’ll create a glow in front of the football. Select an appropriately-sized soft round brush tool and apply it on a new layer at the top of rest of the layers in pure white color.

Change the blending mode of this layer to “Overlay,” duplicate this layer and change its blending mode to “Vivid Light” to get the effect below.

Step 24
Lastly, create a “Levels” adjustment layer at the top of all the layers and use the following settings for it.


That’s it guys. Hope you enjoyed the tutorial and learned something new. Do share your thoughts!
Frequently Asked Questions about Creating an American Football from Scratch in Photoshop
What are the basic tools I need to create an American football from scratch in Photoshop?
To create an American football from scratch in Photoshop, you will need to familiarize yourself with several tools. These include the Ellipse Tool, which is used to create the basic shape of the football, the Gradient Tool for adding color and depth, and the Pen Tool for creating the laces and other details. You will also need to use the Layer Styles panel to add effects such as Bevel and Emboss, Stroke, and Gradient Overlay.
How can I create a realistic texture for the football?
Creating a realistic texture for the football involves using the Noise Filter and the Motion Blur Filter. First, you create a new layer and fill it with a solid color. Then, you apply the Noise Filter to add a grainy texture. After that, you use the Motion Blur Filter to create the illusion of a leather-like texture. Finally, you adjust the blending mode and opacity of the layer to make the texture blend seamlessly with the football.
How can I create the laces of the football?
The laces of the football can be created using the Pen Tool. You start by drawing the outline of the laces, then you fill it with a solid color. After that, you can add details such as shadows and highlights using the Brush Tool and the Dodge and Burn Tools. You can also use the Layer Styles panel to add effects such as Bevel and Emboss to make the laces look more realistic.
How can I create a realistic lighting effect on the football?
Creating a realistic lighting effect on the football involves using the Gradient Tool and the Layer Styles panel. You can use the Gradient Tool to create a gradient that mimics the way light falls on a spherical object. Then, you can use the Layer Styles panel to add effects such as Inner Glow and Outer Glow to enhance the lighting effect.
How can I create a background for the football?
Creating a background for the football can be done using the Gradient Tool and the Brush Tool. You can use the Gradient Tool to create a gradient background, and then use the Brush Tool to add details such as grass or a stadium. You can also use the Layer Styles panel to add effects such as Drop Shadow to make the football stand out from the background.
How can I make the football look more three-dimensional?
Making the football look more three-dimensional involves using the Gradient Tool and the Layer Styles panel. You can use the Gradient Tool to create a gradient that gives the illusion of depth. Then, you can use the Layer Styles panel to add effects such as Bevel and Emboss and Inner Shadow to enhance the three-dimensional effect.
How can I add a logo or text to the football?
Adding a logo or text to the football can be done using the Text Tool or the Custom Shape Tool. You can use the Text Tool to type the text, and then use the Layer Styles panel to add effects such as Drop Shadow and Bevel and Emboss to make the text stand out. If you want to add a logo, you can use the Custom Shape Tool to draw the logo, and then use the same techniques to make it stand out.
How can I save and export my football design?
Saving and exporting your football design can be done using the File menu in Photoshop. You can save your design as a PSD file to preserve the layers and effects, or you can export it as a JPEG or PNG file for use in other applications or for sharing online.
Can I use this technique to create other sports equipment?
Yes, you can use this technique to create other sports equipment. The basic principles of creating shapes, adding textures and details, and creating lighting effects are the same. You just need to adjust the shapes and details to match the specific equipment you want to create.
I’m a beginner in Photoshop, can I still create a football from scratch?
Absolutely! While creating a football from scratch in Photoshop does require some knowledge of the software, the tutorial is designed to be easy to follow even for beginners. Just take your time, follow the steps carefully, and don’t be afraid to experiment and make mistakes. With practice, you’ll be able to create a realistic football from scratch in no time.
Anum is Web and Graphic designer. Addicted to Photoshop and crazy for pixel perfection. She is also an active blogger, sharing her passions, skills and creative details on her blog Websoulz. She loves to connect with the community, sharing the latest design gossips and rolling her eyes on boring trends.


Published in
·automation·Cloud·Debugging & Deployment·Meta·Open Source·PHP·Programming·Web·July 19, 2014