
Key Takeaways
- Creating a vibrant, energetic spark effect in Photoshop involves a combination of different tools, techniques and effects, including custom brushes and layer styles.
- The effect is best achieved on a black background for strong contrast, and using a typeface that suits the desired effect. The brush tool is used to follow the contour of the type and create a custom effect.
- The brush presets offer numerous options for customizing brushes. Adjusting the settings under brush tip shape, shape dynamics, scattering and transfer can create a more natural, randomized effect.
- Layer styles such as Inner Glow and Outer Glow are applied to the type and brush layers to enhance the effect. The process is repeated multiple times, each on its own layer, for a more natural look. The color of the Outer Glow can be changed for added depth.
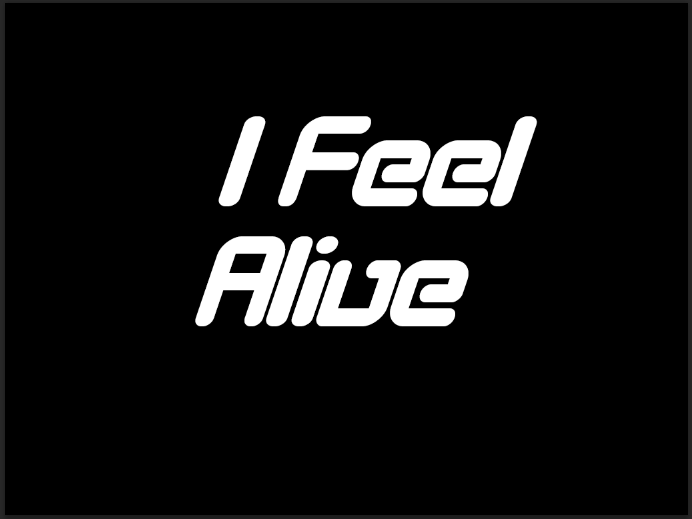
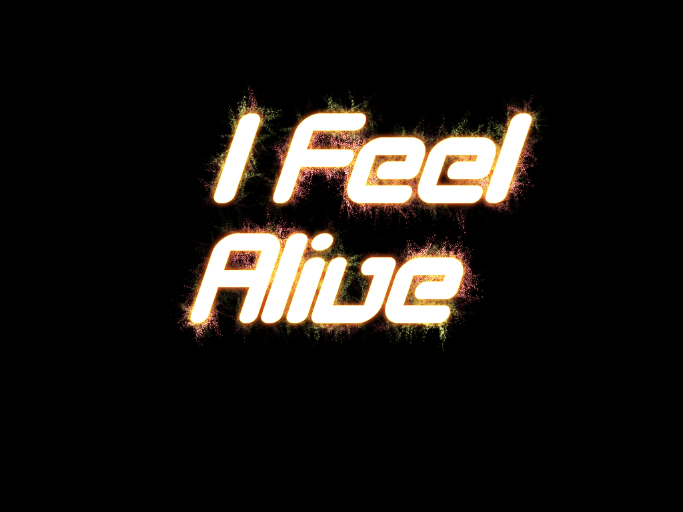
Almost anything can be made with Photoshop. All it takes is the right combination of tools to get the job done. Type is no exception, and in Photoshop, you can make your type stand out with a variety of eye-catching techniques. The possibilities are endless. Combining different techniques and effects can make your work stand out and help your message make a strong impression. Today, I’ll teach you how to create a vibrant, energetic spark effect with your type. You can follow the tutorial, or download the finished PSD here.

Open Photoshop and create a new document. My document is 1024px by 768px. I set the color to black, so that the effect will show up with strong contrast. I also do this for any type of document that will have glow effects, because it helps me to see exactly how my effect look in a colorless backdrop. I can always change the background later.
Next, you have to select the right kind of typeface for your purposes. I chose the typeface called “Designer Block,” which you can download for free here. Create your message and arrange your type how you wish. I liked the look of the type, but I actually wanted an italic appearance, so I broke a cardinal rule of typography and transformed the type to get the look that I wanted.
The first impulse is to try to combine a number of different filters to get the look we are after, but for a more natural look, we are going to create our own brushes and use them to follow the contour of our type and create a truly custom effect. Right-click on your type layer and choose “Create Work Path” from the flyout menu.

Hold Command/Ctrl and click on the new layer icon to create a new layer below your type layer. This layer is going to be for our actual brush strokes. To create our effect, we need to create our own custom brush.

Select the brush tool and choose one of the default brushes called “Dry brush tip light flow,” which is a default scattered brush that is supposed to simulate realistic painting with a dry paintbrush. We aren’t going to use this brush as-is, so we need to open up our brush panel.
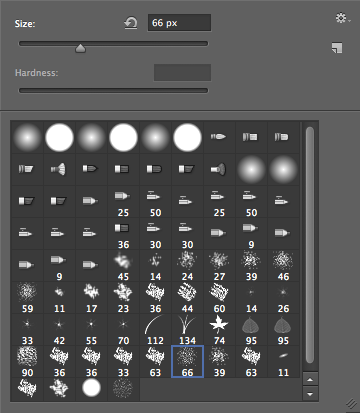
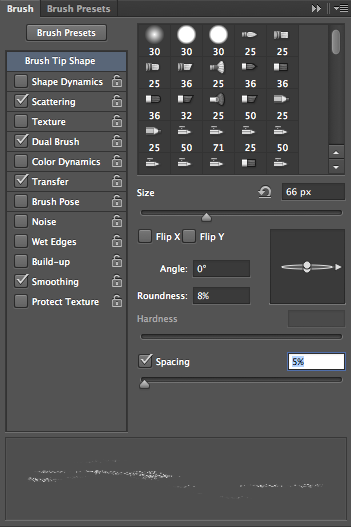
The brushes presets give you a plethora of options for customizing your brushes. First, we want to flatten the brush itself, so under brush tip shape, we want to set the roundness to around 8%. I also set the spacing to 5%.
Under “Shape Dynamics,” I bumped the size jitter all the way up to 100%. We want the angles to be random in order to give us the illusion of sparks and particles flying in different directions. I set the angle jitter to 31%. If any of the control options are set to anything, I turned them off.

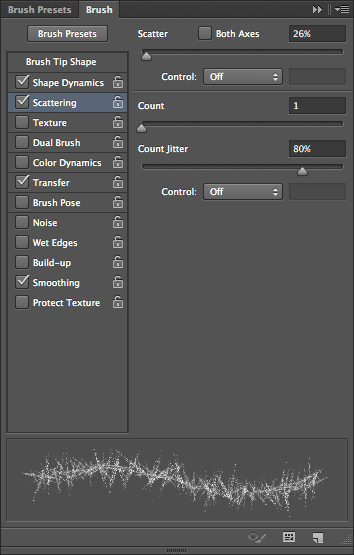
Under Scattering, I set the scatter setting to 26%, and I set the count jitter to 80%. This scattered the effect, and the count jitter is set high to provide a wide range of values that gives it a more randomized effect.
Under Transfer, I set the flow jitter all the way to 100%. This gives it a wide range, allowing our brush to have a heavy flow in places and a light flow in others. This gives us a more natural look. In all of the tabs, I left the control off, so that the effect is more randomized than controlled. We can sometimes give our work too much of a uniform look, so having the values randomly generated via a high jitter value will give us more realism.

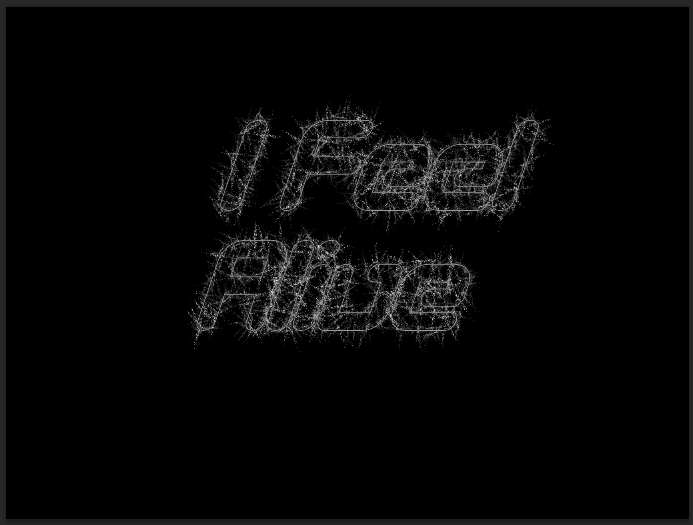
The overall look of your brush preview should be a criss-crossed particle effect. In order to implement our brush, we need to make sure that the brush tool is selected. We also need to make sure that the empty layer below our type is selected, and in the paths panel, we are going to make sure that the paths of our type are active. Then, at the bottom of the paths panel, click the second icon called Stroke Path with brush icon. You will see the path outlined with your new brush.
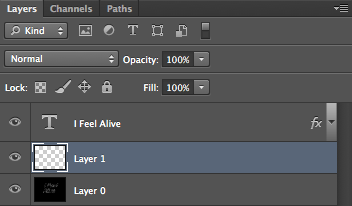


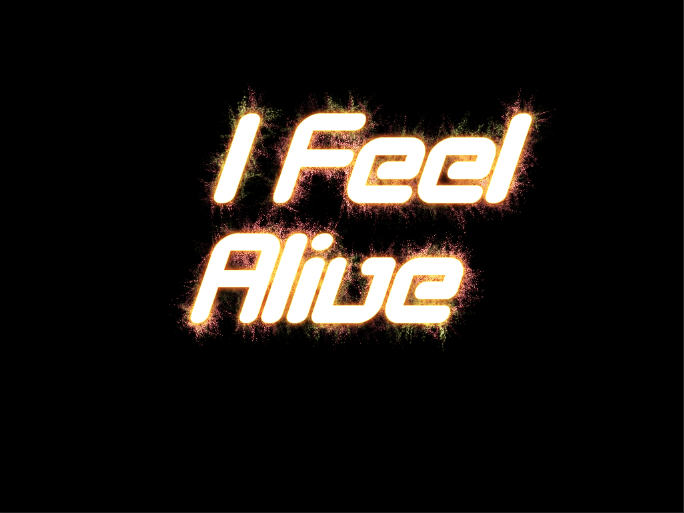
Make the type layer active again by clicking on the eye icon, and you can see how the effect interacts with the type. We will need to add some layer styles to the type and the brush layers next.
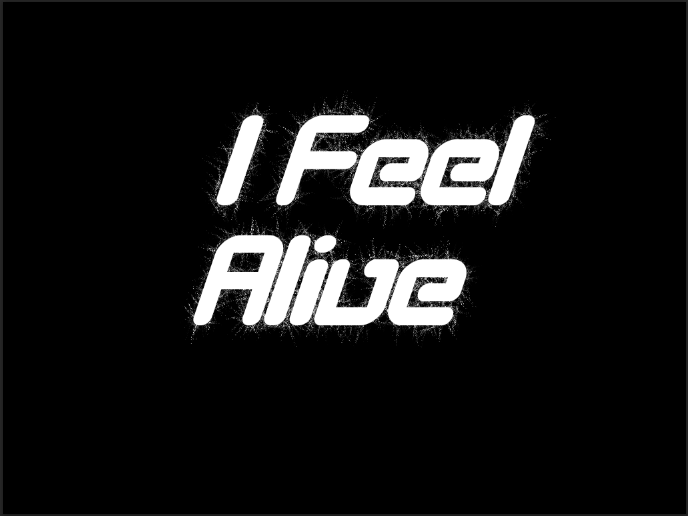
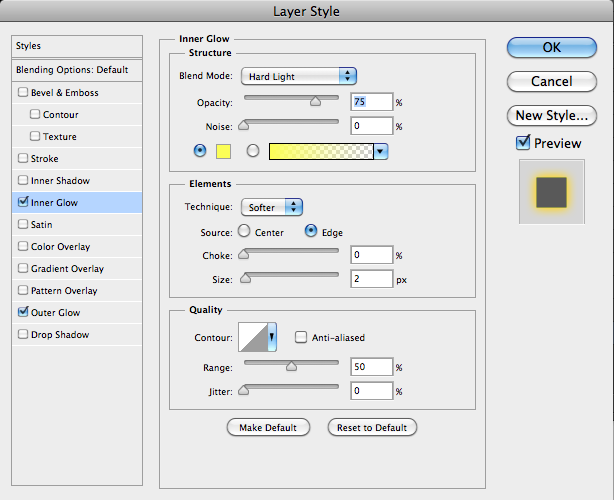
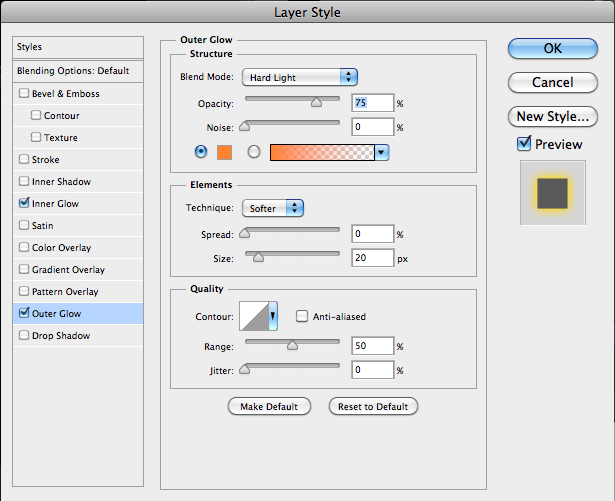
Double-click on the type layer to bring up the layers styles dialog box. Select Inner Glow, and set the blend mode to Hard Light. Set the color to a bright yellow. I chose #fcff00, but anything close to that should work. I set the size to 2px to give it a subtle inner glow. Select Outer Glow and set the blend mode to Hard Light. Select a strong orange for the glow, and set the size to around 20px. I chose #ff8400 as the color for the outer glow.
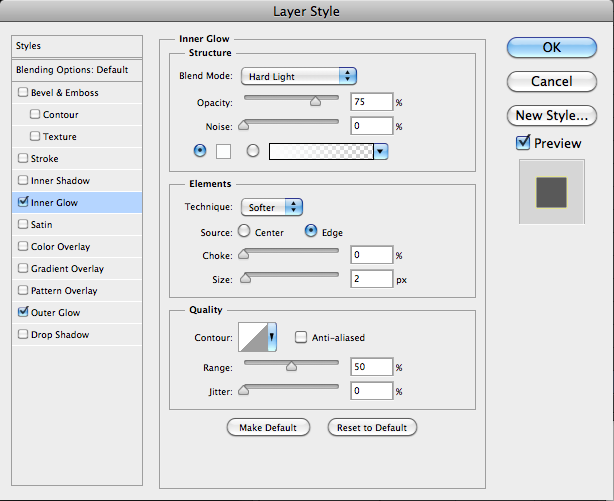
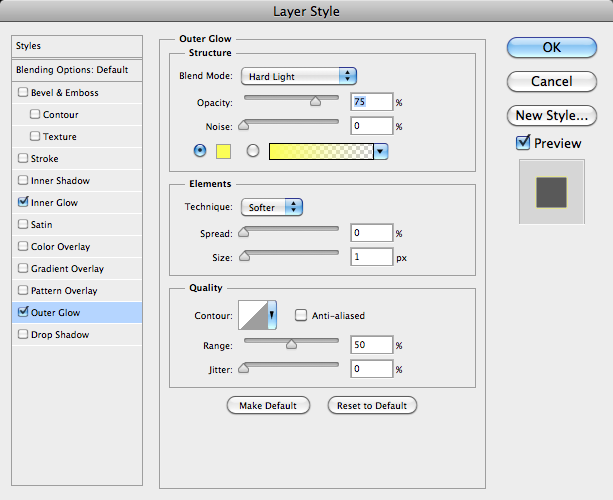
Now, we need to set the effects for the brush effects layer that we created. Double-click the brush effects layer, and choose Inner Glow. Set the color to white, and set the blend mode to hard light. Since the effects are small, we will set the size to 2px. Select Outer Glow and choose a bright yellow as your glow color. Choose Hard Light as your blend mode and set the size to 1px.

We are going to repeat the previous process twice more. You can do it as many times as you’d like, because this is strictly done to taste. You may find that you only need to repeat it once to get the effect that you are looking for, or you may have to do it 3 or 4 times. Simply create a new blank layer, select your custom brush, go to the paths panel and select “stroke path with brush.”
What’s happening here is that each time you do this, you get different results from the random brush pattern that we created. After doing this multiple times — each on its own layer — we need to lessen the effect. You could spend a lot of time with a soft brush, painting out some areas with a layer mask, but a quick way to mask out random areas of your brush layers is to use a clouds mask.
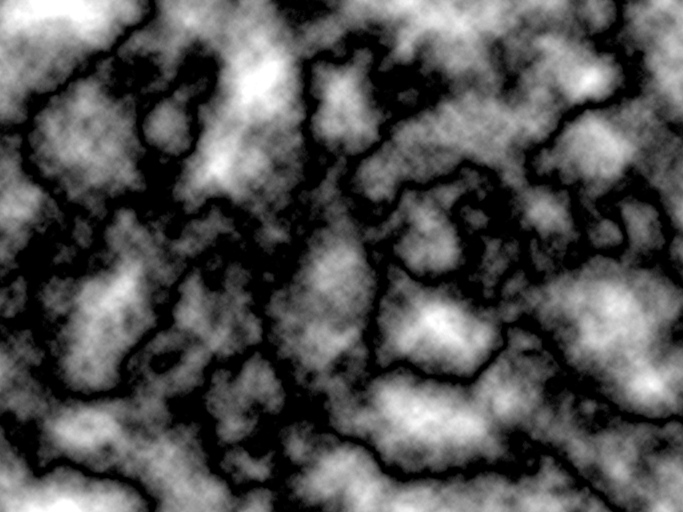
On your first custom brush effects layer, click the layer mask icon. You can alt/option-click your mask icon in the layer to show the actual mask. Then, simply go to “Filter” > “Render” > “Clouds.” This will create a random clouds effect. Take it a step further and go to “Filter” > “Render” > “Difference Clouds” to get a randomized darker cloud mask effect. This randomizes the mask, making your brush effects layer look more natural.

Repeat this for each layer behind your type, giving your brush effects a much more natural look.
To make this much more natural, go into the layer styles for each brush effects layer after the first one that we created, and change the Outer Glow colors. For example, on my second version, I chose an orange value of #ff8400 instead of yellow, and on the third version, I chose an intense orange value of #ff5502. This adds a lot of depth to your sparks and looks much more like fire or heat coming from your sparks.
With the 2nd Brush Layer:
With the 3rd Brush Layer:
Next, we are go you add some sparks shooting off from different areas of the type. Create a new layer, and with your pen tool, draw a couple of arcs coming from your type.
Select all three paths and just as we did with the type paths earlier, make sure the brush tool is selected, make sure your are on a blank new layer, and choose “stroke path with brush” from your Paths Panel.

As you can see, it is a bit too streamlined and uniform in its flow. As we did earlier with our effects around our text, add a clouds/difference clouds layer mask. This will break up the monotonous brush effect, making it look much more natural.
The only problem with this method is that it darkens the sparks too much, so feel free to duplicate this layer to brighten the effect.

The next thing that we want to do is add in our color. To save some time, simply copy the layer styles from one of the path/type layers by right-clicking on it and selecting “Copy Layer Style.” Then, right-click on the two layers that we just created and choose “Paste Layer Style.” The only change that we are going to make to both of these layers is adding a gradient overlay layer style to them.
Set the blend mode to Multiply, and create a gradient that goes from black to red, then yellow, to light yellow(faded), and ends at white. Set the angle at 3° and click “OK.” This gradient overlay will darken the spark trails and lighten them where the source of the sparks will be located.


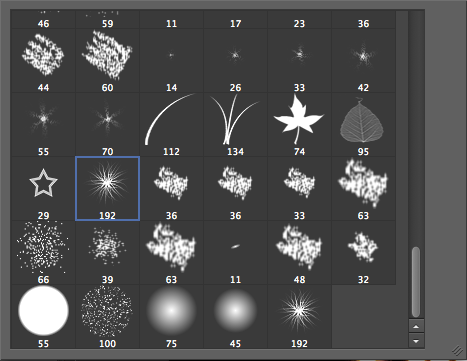
The last thing that we are going to do is add the hot sparks to the end of our spark trails. Go back to the paths panel and select the path layer that has your spark trails on it. Then, select the brush tool and in the brush options, change the brush to a soft edged round brush with a size of 1-2px. Choose white as your foreground color and on a new layer choose the “stroke path with brush” icon in the Paths Panel. Select the brush in your default brushes presets called Fuzzball, and click at the ends of your spark trails, as if you were making a comet. The result should be similar to the one shown below:

Now, all we have left to do is add a couple of glow effects. Double-click this layer and choose Outer Glow. Choose Hard Light and choose a bright yellow. Set the size to 5px and click “OK.” The final result is shown below:

Conclusion
With the ability to create custom brushes with their own behaviors and combine those with different layer styles and effects, you can create almost anything. Randomizing the effects with Difference Clouds applied to layer masks can make your effects look much more natural. Imperfections and random effects happen naturally in nature, so in order to emulate those, we need to implement randomization and imperfects in our artwork.
Frequently Asked Questions about Creating a Bursting Spark Effect in Photoshop
How can I create a more realistic spark effect in Photoshop?
To create a more realistic spark effect, you can use the Brush tool to add individual sparks. Select a hard, round brush and set the size to around 2-3 pixels. Change the foreground color to white and add sparks around your main burst. You can also use the Eraser tool to remove any unwanted sparks. Remember, randomness and variation are key to achieving a realistic effect.
Can I use different colors for the spark effect?
Absolutely! You can use any color you want for the spark effect. Simply change the foreground color before you start drawing your sparks. You can also use the Color Overlay layer style to change the color of your sparks after they have been drawn.
How can I make the spark effect more dynamic?
To make the spark effect more dynamic, you can add motion blur. Go to Filter > Blur > Motion Blur and adjust the Angle and Distance settings to your liking. This will give your sparks a sense of movement and make your effect more exciting.
Can I use the spark effect on other images?
Yes, you can use the spark effect on any image. Simply create the spark effect on a new layer and then drag and drop that layer onto your other image. You can then use the Free Transform tool to resize and position the spark effect as needed.
How can I create a glowing spark effect?
To create a glowing spark effect, you can use the Outer Glow layer style. Go to Layer > Layer Style > Outer Glow and adjust the settings to your liking. You can change the color, size, and spread of the glow to achieve the desired effect.
Can I animate the spark effect?
Yes, you can animate the spark effect using Photoshop’s timeline feature. Simply create different frames with your sparks in different positions and then play them in sequence to create an animation.
How can I make the spark effect look more random?
To make the spark effect look more random, you can use the Scatter setting in the Brush tool options. This will make your sparks appear in a more random pattern, making the effect more realistic.
Can I save the spark effect as a brush preset?
Yes, you can save the spark effect as a brush preset. This allows you to quickly and easily apply the effect in the future. Simply go to Edit > Define Brush Preset and give your new brush a name.
How can I make the spark effect more intense?
To make the spark effect more intense, you can duplicate the spark layer. This will double the number of sparks and make the effect more dramatic. You can also adjust the layer’s opacity to control the intensity of the effect.
Can I use the spark effect in other Adobe programs?
Yes, you can use the spark effect in other Adobe programs. Simply save your spark effect as a PNG file with a transparent background and then import it into your other Adobe program.