

Key Takeaways
- Composer is a critical tool for managing PHP project dependencies, offering access to hundreds of libraries via Packagist.org, and the Composer cheat sheet is an excellent resource for understanding its full functionality.
- The Composer cheat sheet consists of two main parts: the composer.phar command line switches and the composer.json file configuration. It provides a comprehensive list of command line options and configurations, complete with examples and detailed descriptions.
- Despite its one-page length, the Composer cheat sheet is a useful tool for developers to understand and maximize the use of Composer. It offers sufficient detail without being overwhelming and is open source, allowing for community contributions and improvements.
This article was sponsored by AppDynamics. Thank you for supporting the sponsors who make SitePoint possible!
Unless you’ve been living under a rock, today’s PHP isn’t your grandmother’s PHP; it’s an entirely different, much more elegant and mature language with countless improvements and additions.
One of the key additions is Composer, the de facto standard for managing PHP project dependencies which, by default, gives you access to hundreds of ready-made libraries, via Packagist.org.
I’m not going to go over how to use Composer, as it’s been covered so well here on SitePoint already; especially by this article, by Alexander Cogneau.
Instead, I’m approaching it from a different angle, taking you through the excellent Composer cheat sheet, which I came across recently.
If you’d rather watch a quick video overview, play the embedded one below. Otherwise, continue reading. I encourage you to do both.
Like any complex, feature rich, tool there’s so much that you can do with Composer. For example, you can use the composer.phar file to:
- Add composer support to an existing project
- Run scripts in response to various events, such as pre and post install, pre and post package updates
- Specify custom autoloaders
- Differentiate dependencies, based on whether the project is in development, testing, live, or another specific environment
- Make use of the hundreds of readily available packages via Packagist.org
Through these samples alone, you can see that there’s a lot of functionality, as well as a lot to remember.
So whilst you use it in every project, do you know all that it has to offer? Or do you use the same set of command line switches and configuration options time and time again, without thinking about what else is available?
I’d suggest, if you’re anything like me, you’re in the latter camp. Today I want to help you rectify that and really get the most out of Composer, by going through the cheat sheet.
I’m sure you’ll see just why it’s so well deserving of the name; and before long you’ll start having it in a pinned tab, much like the PHP manual. It’s that good!
2 Key Parts
Essentially, it’s comprised of two key parts:
- The composer.phar command line switches
- The composer.json file
The composer.phar Command Line Switches
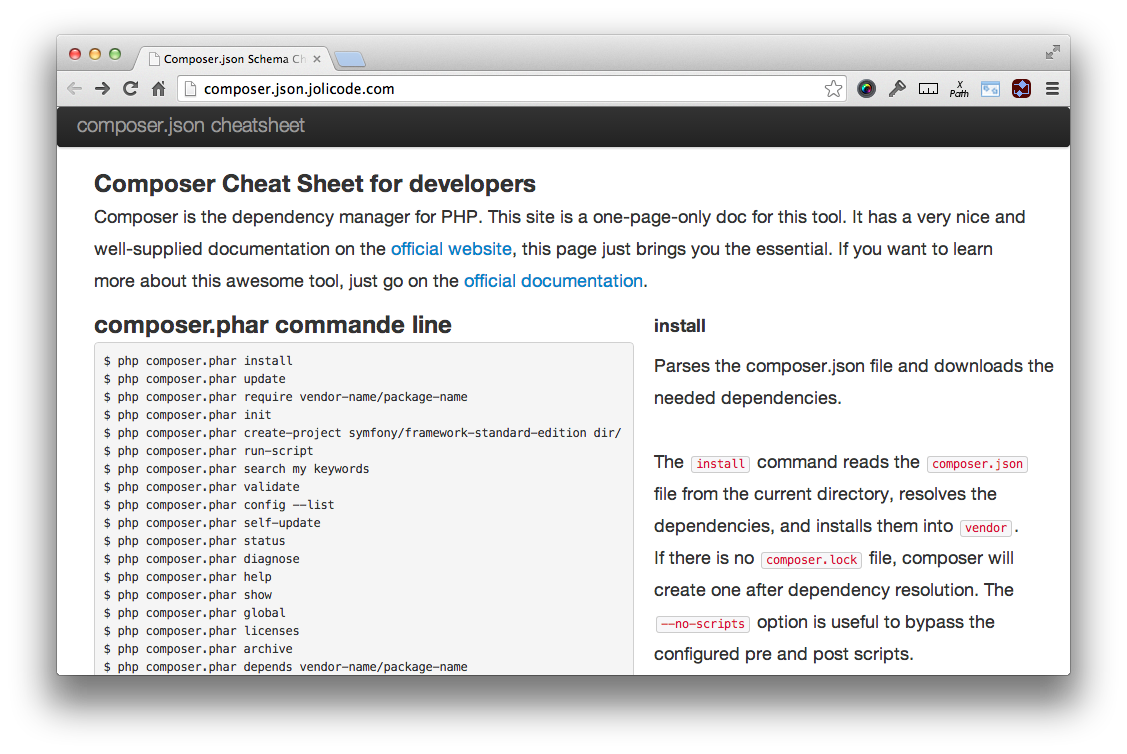
This section lists all of the command line switches you can pass to composer.phar, at the command line. What’s more, by mousing over them, on the right hand side, you’ll see a fuller description of what each one does.
It lists everything from the most common, regularly, used options to the more advanced. Here’s a sample:
- install – which sets up the dependencies in the vendor directory
- self-update – which updates the composer.phar file to the latest version
- init – which sets up composer support in an existing, or new, project
- validate – which valises an existing composer.json file
- diagnose – for performing automated checks
- archive – which creates an archive of the composer package.
By using the cheat sheet, I learned that by passing the --optimize switch to dump-autoload, you can get anything up to a 20% performance boost in your projects.
None too shabby, wouldn’t you say? Ok, I could have found this out through testing, or dug through the documentation, but the cheat sheet made it quick and easy to find.
The composer.json File Configuration

I’d suggest this is the section where you’ll spend most of your time with the cheat sheet. Whilst calling composer.phar can largely be scripted away, the per/project configurations you need may differ regularly enough to require a variety of different options each time.
So the composer.json section is definitely your friend in this regard. As with composer.phar, it displays an example, utilising every option. It lists all the options right from the most common, such as name, description, authors, and require which provide key information about the package, along with its dependencies.
Authors is a good example, showing the name, email, homepage, and role of 2 sample authors, which you can see below:
"authors": [
    {
        "name": "Xavier Lacot",
        "email": "xlacot@jolicode.com",
        "homepage": "http://www.lacot.org",
        "role": "Developer"
    },
    {
        "name": "Benjamin Clay",
        "email": "bclay@jolicode.com",
        "homepage": "http://ternel.net",
        "role": "Developer"
    }
],
Then there’s the more advanced ones which we likely use not as often.
- support – where you find the list of support options, for when users need assistance
- autoload – where you can set specific autoload mapping options for the PHP autoloader
- repositories – allowing you to go beyond the standard Packagist backend, adding PEAR, use version control tools, such as GitHub, Bitbucket or a self-hosted, private, packages using Satis.
Here’s a sample of the scripts section. You can see that it lists how to use static class methods, of namespaced classes, to respond to several events.
"scripts": {
    "post-update-cmd": MyVendor\\MyClass::postUpdate",
    "post-package-install": [
        "MyVendor\\MyClass::postPackageInstall"
    ],
    "post-install-cmd": [
        "MyVendor\\MyClass::warmCache",
        "phpunit -c app/"
    ]
},
As with the composer.phar section, by mousing over them, you’ll see the section specifics, on the right hand side, as well as example uses.
Conclusion
I believe it’s a great tool for getting the most out of Composer. Some might say that at one page long, it’s not sufficiently detailed; I disagree.
The way the cheat sheet is composed, showing sample usages of each command line option, and listing out a complete composer.json file example, combined with a detailed description and further usage examples of each aspect, is an elegant approach.
You’re able to get as much information as you need, without being overloaded. What do you think? Do you think it could go further, and provide more information? Or is it just the right length? Share your thoughts in the comments.
As it’s Open Source, if you see something that needs improving, a typo, or generally want to add more information, get in there, fork it and send a Pull Request.
Otherwise, enjoy.
Frequently Asked Questions about Composer Cheat Sheet
What is the purpose of the Composer cheat sheet?
The Composer cheat sheet is a quick reference guide for developers who use Composer, a dependency management tool in PHP. It provides a list of commands and their descriptions, which are used to manage and install dependencies for a project. This cheat sheet is designed to help developers save time and increase productivity by having all necessary commands in one place.
How do I install Composer?
To install Composer, you need to have PHP installed on your system. You can download the Composer installer from the official website, then run it in your terminal or command prompt. The installer will check your PHP settings and download the composer.phar file in your project directory. You can then move this file to a directory in your PATH to make it globally accessible.
What is the use of the “require” command in Composer?
The “require” command in Composer is used to add new packages to your project. When you run this command followed by the package name, Composer will find the package in the Packagist repository, download it, and add it to your composer.json file. It also updates the composer.lock file with the exact version of the package installed.
How can I update the packages in my project?
You can update the packages in your project by running the “update” command in Composer. This command will check the Packagist repository for newer versions of the packages listed in your composer.json file. If a newer version is found, Composer will download it and update your composer.lock file.
What is the difference between “require” and “require-dev” in Composer?
The “require” and “require-dev” sections in the composer.json file specify the packages your project depends on. The “require” section lists the packages that are necessary for your project to run, while the “require-dev” section lists the packages that are only needed for development, such as testing tools and documentation generators.
How can I remove a package from my project?
You can remove a package from your project by running the “remove” command in Composer, followed by the package name. This command will remove the package from your composer.json and composer.lock files, and also delete the package files from the vendor directory.
What is the purpose of the composer.lock file?
The composer.lock file is a snapshot of the exact versions of the packages that your project depends on. When you run the “install” command, Composer reads this file and installs the packages listed in it. This ensures that everyone working on the project is using the same package versions.
How can I list all installed packages in my project?
You can list all installed packages in your project by running the “show” command in Composer. This command will display a list of all packages installed in your project, along with their versions.
What is the “autoload” section in the composer.json file?
The “autoload” section in the composer.json file specifies how Composer should autoload your project’s classes. Autoloading is a mechanism that automatically includes or requires a class file when a class is used. This eliminates the need to manually include or require class files in your code.
How can I specify a specific version of a package to install?
You can specify a specific version of a package to install by appending the version number to the package name in the “require” command. For example, “composer require vendor/package:1.2.3” will install version 1.2.3 of the package. You can also specify version constraints in your composer.json file.