


Key Takeaways
- From Android Marshmallow (API 23) onwards, users are asked for permissions while the app is running, allowing them to choose which permissions to grant without disrupting the application flow.
- To request permissions, a method is used that checks if the permission is already granted. If not, it checks if the user has previously denied this permission. If the permission is important for the app, it should be requested again.
- Each permission request requires three parameters: context, a String array of permission(s), and a requestCode of type Integer. The requestCode is a random code attached to the request, used to differentiate multiple results from each other.
- Handling the results of a permission request involves checking whether the permission was granted or not. If it was, the requestCode is used to differentiate the results. If the permission was not granted, the app can handle this gracefully, for example by explaining why the permission is needed and how to grant it.
Starting from Android Marshmallow (API 23), users will be asked for permissions while the app is running. This way, a user is able to choose which permissions they should grant without affecting the application flow. In this tutorial I will cover requesting runtime permissions in Android M and N, how to perform a request, get its result and then handle it.
There are many user-permissions in Android but I am only going to focus on some of the most used.
You can find the code for this project in github.
To begin, create a new project in Android Studio, choosing a minimum API level of 23 and adding an Empty Activity. This will be the only activity in the project.
Declaring Permissions
Open AndroidManifest.xml and add the following permissions:
<uses-permission android:name="android.permission.ACCESS_COARSE_LOCATION"/>
<uses-permission android:name="android.permission.ACCESS_FINE_LOCATION"/>

<uses-permission android:name="android.permission.CALL_PHONE"/>
<uses-permission android:name="android.permission.WRITE_EXTERNAL_STORAGE"/>
<uses-permission android:name="android.permission.READ_EXTERNAL_STORAGE"/>

<uses-permission android:name="android.permission.CAMERA"/>

<uses-permission android:name="android.permission.GET_ACCOUNTS"/>
The permissions above are some of the most used in android apps, but all of them work in a similar way.
Asking for Permission
Each of this permissions will be asked for by using a button. Update the code inside activity_main.xml to:
<?xml version="1.0" encoding="utf-8"?>
<RelativeLayout xmlns:android="http://schemas.android.com/apk/res/android"
    xmlns:tools="http://schemas.android.com/tools"
    android:layout_width="match_parent"
    android:layout_height="match_parent"
    android:paddingBottom="@dimen/activity_vertical_margin"
    android:paddingLeft="@dimen/activity_horizontal_margin"
    android:paddingRight="@dimen/activity_horizontal_margin"
    android:paddingTop="@dimen/activity_vertical_margin"
    tools:context="com.example.theodhor.runtimepermissions.MainActivity">

    <LinearLayout
        android:orientation="vertical"
        android:layout_width="wrap_content"
        android:layout_height="wrap_content"
        android:layout_centerHorizontal="true">

        <Button
            android:layout_width="match_parent"
            android:layout_height="wrap_content"
            android:text="Location"
            android:id="@+id/location"
            android:layout_marginBottom="10dp"
            android:onClick="ask" />

        <Button
            style="?android:attr/buttonStyleSmall"
            android:layout_width="match_parent"
            android:layout_height="wrap_content"
            android:text="Write ExStorage"
            android:id="@+id/write"
            android:onClick="ask"
            android:layout_marginBottom="10dp" />

        <Button
            android:layout_width="match_parent"
            android:layout_height="wrap_content"
            android:text="Read ExStorage"
            android:id="@+id/read"
            android:layout_marginBottom="10dp"
            android:onClick="ask" />

        <Button
            android:layout_width="match_parent"
            android:layout_height="wrap_content"
            android:text="Call"
            android:id="@+id/call"
            android:layout_marginBottom="10dp"
            android:onClick="ask" />

        <Button
            android:layout_width="match_parent"
            android:layout_height="wrap_content"
            android:text="Camera"
            android:id="@+id/camera"
            android:layout_marginBottom="10dp"
            android:onClick="ask" />

        <Button
            android:layout_width="match_parent"
            android:layout_height="wrap_content"
            android:text="Get Accounts"
            android:id="@+id/accounts"
            android:layout_marginBottom="10dp"
            android:onClick="ask" />
    </LinearLayout>

</RelativeLayout>
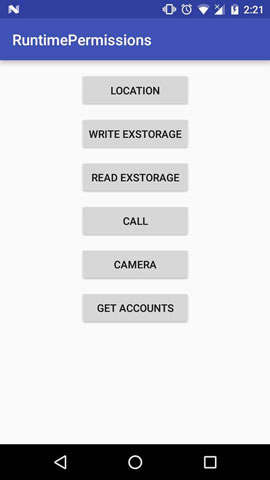
This is the layout you just created:
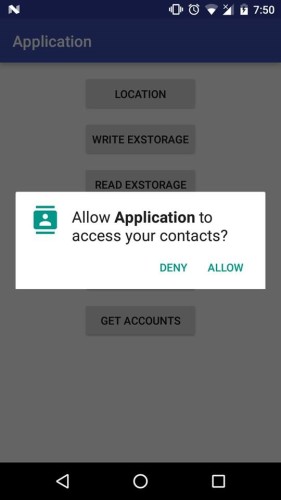
At this stage, if a user installed the application, it would require the following permissions:
Inside MainActivity.java, after onCreate add this method:
private void askForPermission(String permission, Integer requestCode) {
    if (ContextCompat.checkSelfPermission(MainActivity.this, permission) != PackageManager.PERMISSION_GRANTED) {

        // Should we show an explanation?
        if (ActivityCompat.shouldShowRequestPermissionRationale(MainActivity.this, permission)) {

            //This is called if user has denied the permission before
            //In this case I am just asking the permission again
            ActivityCompat.requestPermissions(MainActivity.this, new String[]{permission}, requestCode);

        } else {

            ActivityCompat.requestPermissions(MainActivity.this, new String[]{permission}, requestCode);
        }
    } else {
        Toast.makeText(this, "" + permission + " is already granted.", Toast.LENGTH_SHORT).show();
    }
}
This method asks a user for permissions. Firstly it checks whether the permission you are asking for is granted or not. If it is, then the app shows a Toast saying that the permission was already granted. If the permission is not granted, it checks if the user has denied this permission before. If the permission is important for the app, it should be requested again. If the permission was not denied before, perform a request by calling ActivityCompat.requestPermissions(MainActivity.this, new String[]{permission}, requestCode);
Each permission request needs three parameters. The first is context, the second a String array of permission(s), and the third the requestCode of type Integer. The last parameter is a random code attached to the request, and can be any number that suits your use case. When a result returns in the activity, it contains this code and uses it to differentiate multiple results from each other.
The method is ready to perform requests, and now it should be linked with the corresponding buttons. Each of the buttons created has an android:onClick="ask" property.
You need to create a public method called ask that will be called on each click of the buttons. It’s code is:
public void ask(View v){
    switch (v.getId()){
        case R.id.location:
            askForPermission(Manifest.permission.ACCESS_FINE_LOCATION,LOCATION);
            break;
        case R.id.call:
            askForPermission(Manifest.permission.CALL_PHONE,CALL);
            break;
        case R.id.write:
            askForPermission(Manifest.permission.WRITE_EXTERNAL_STORAGE,WRITE_EXST);
            break;
        case R.id.read:
            askForPermission(Manifest.permission.READ_EXTERNAL_STORAGE,READ_EXST);
            break;
        case R.id.camera:
            askForPermission(Manifest.permission.CAMERA,CAMERA);
            break;
        case R.id.accounts:
            askForPermission(Manifest.permission.GET_ACCOUNTS,ACCOUNTS);
            break;
        default:
            break;
    }
}
The second parameter of the askForPermission method are some random integers. Add their declarations before the onCreate() method:
static final Integer LOCATION = 0x1;
static final Integer CALL = 0x2;
static final Integer WRITE_EXST = 0x3;
static final Integer READ_EXST = 0x4;
static final Integer CAMERA = 0x5;
static final Integer ACCOUNTS = 0x6;
static final Integer GPS_SETTINGS = 0x7;
Now the application can perform requests. The next step is handling the request results.
Handling the Results
To handle the results of a permission request, the onRequestPermissionsResult method is called. It’s code is below:
@Override
public void onRequestPermissionsResult(int requestCode, String[] permissions, int[] grantResults) {
    super.onRequestPermissionsResult(requestCode, permissions, grantResults);
    if(ActivityCompat.checkSelfPermission(this, permissions[0]) == PackageManager.PERMISSION_GRANTED){
        switch (requestCode) {
            //Location
            case 1:
                askForGPS();
                break;
            //Call
            case 2:
                Intent callIntent = new Intent(Intent.ACTION_CALL);
                callIntent.setData(Uri.parse("tel:" + "{This is a telephone number}"));
                if (ActivityCompat.checkSelfPermission(this, Manifest.permission.CALL_PHONE) != PackageManager.PERMISSION_GRANTED) {
                    startActivity(callIntent);
                }
                break;
            //Write external Storage
            case 3:
                break;
            //Read External Storage
            case 4:
                Intent imageIntent = new Intent(Intent.ACTION_PICK, android.provider.MediaStore.Images.Media.EXTERNAL_CONTENT_URI);
                startActivityForResult(imageIntent, 11);
                break;
            //Camera
            case 5:
                Intent takePictureIntent = new Intent(MediaStore.ACTION_IMAGE_CAPTURE);
                if (takePictureIntent.resolveActivity(getPackageManager()) != null) {
                    startActivityForResult(takePictureIntent, 12);
                }
                break;
            //Accounts
            case 6:
                AccountManager manager = (AccountManager) getSystemService(ACCOUNT_SERVICE);
                Account[] list = manager.getAccounts();
                Toast.makeText(this,""+list[0].name,Toast.LENGTH_SHORT).show();
                for(int i=0; i<list.length;i++){
                    Log.e("Account "+i,""+list[i].name);
                }
        }

        Toast.makeText(this, "Permission granted", Toast.LENGTH_SHORT).show();
    }else{
        Toast.makeText(this, "Permission denied", Toast.LENGTH_SHORT).show();
    }
}
When a result is returned, it checks whether the permission was granted or not. If it is, the requestCode is passed to a switch statement to differentiate the results. I added extra lines inside each case to show further steps, but they are just examples.
Location Request
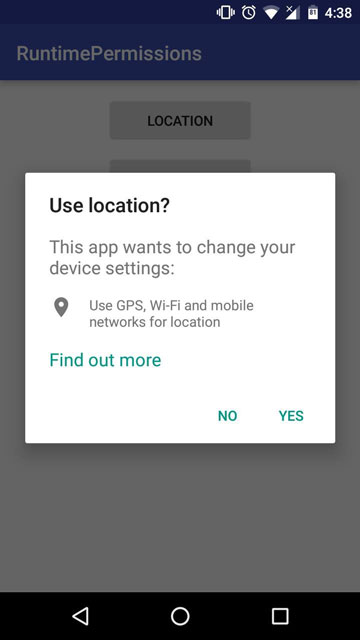
At case 1: there is a function called askForGPS(). This function prompts the user to enable GPS if it’s not enabled. If the device is not connected to GPS after the user has granted the location permission, the dialog below is shown:
To show this dialog, you need a GoogleApiClient. First, declare some variables by adding these lines before onCreate:
GoogleApiClient client;
LocationRequest mLocationRequest;
PendingResult<LocationSettingsResult> result;
And build the client inside the onCreate method:
client = new GoogleApiClient.Builder(this)
    .addApi(AppIndex.API)
    .addApi(LocationServices.API)
    .build();
Now the client is built, it needs to connected when the app starts and disconnect when it stops. Add these two overriden methods to MainActivity:
@Override
public void onStart() {
    super.onStart();
    client.connect();
}

@Override
public void onStop() {
    super.onStop();
    client.disconnect();
}
Finally, add the function that shows the GPS dialog:
private void askForGPS(){
    mLocationRequest = LocationRequest.create();
    mLocationRequest.setPriority(LocationRequest.PRIORITY_HIGH_ACCURACY);
    mLocationRequest.setInterval(30 * 1000);
    mLocationRequest.setFastestInterval(5 * 1000);
    LocationSettingsRequest.Builder builder = new LocationSettingsRequest.Builder().addLocationRequest(mLocationRequest);
    builder.setAlwaysShow(true);
    result = LocationServices.SettingsApi.checkLocationSettings(client, builder.build());
    result.setResultCallback(new ResultCallback<LocationSettingsResult>() {
        @Override
        public void onResult(LocationSettingsResult result) {
            final Status status = result.getStatus();
            switch (status.getStatusCode()) {
                case LocationSettingsStatusCodes.SUCCESS:
                    break;
                case LocationSettingsStatusCodes.RESOLUTION_REQUIRED:
                    try {
                        status.startResolutionForResult(MainActivity.this, GPS_SETTINGS);
                    } catch (IntentSender.SendIntentException e) {

                    }
                    break;
                case LocationSettingsStatusCodes.SETTINGS_CHANGE_UNAVAILABLE:
                    break;
            }
        }
    });
}
Conclusion
In this tutorial, I showed how to ask for permissions, and handle the results with Android’s new permission model. The aim of this new model is to put users in control of what our apps need to do. I’d love to hear your comments and opinions on this change and how to handle it below.
Frequently Asked Questions (FAQs) about Requesting Runtime Permissions in Android M and N
What are the key differences between runtime permissions in Android M and N?
Android M introduced the concept of runtime permissions, which means that permissions are requested at the point of use rather than at the point of installation. This was a significant shift from the previous model where all permissions were granted at install time. Android N, on the other hand, did not introduce any major changes to the permissions model but it did introduce some new permissions related to telephony and SMS. It also introduced improvements to the permissions request dialog, making it more user-friendly.
How can I handle the denial of a permission request in my Android app?
When a user denies a permission request, your app should be prepared to handle this gracefully. You can check if the user has denied the permission by calling the shouldShowRequestPermissionRationale() method. If this method returns true, it means the user has denied the permission. In this case, you should show a message explaining why the permission is needed and how to grant it.
What happens if I don’t request runtime permissions in my Android app?
If your app does not request the necessary permissions at runtime, it will not be able to access certain features or data on the user’s device. This can lead to a poor user experience and may even cause your app to crash. Therefore, it’s important to always request the necessary permissions at runtime.
How can I check if a permission has been granted in my Android app?
You can check if a permission has been granted by calling the checkSelfPermission() method. This method returns PackageManager.PERMISSION_GRANTED if the permission has been granted and PackageManager.PERMISSION_DENIED if it has not.
Can I request multiple permissions at once in my Android app?
Yes, you can request multiple permissions at once by passing an array of permissions to the requestPermissions() method. The user will be shown a dialog for each permission, and they can choose to grant or deny each one individually.
How can I handle the result of a permission request in my Android app?
You can handle the result of a permission request by overriding the onRequestPermissionsResult() method in your activity. This method is called when the user has either granted or denied a permission.
What are some best practices for requesting permissions in Android?
Some best practices for requesting permissions in Android include explaining why the permission is needed before requesting it, requesting permissions at runtime rather than at install time, and handling the denial of a permission gracefully.
How can I test the permissions flow in my Android app?
You can test the permissions flow in your app by using the Android Emulator or a physical device. You can also use the adb command-line tool to revoke permissions and simulate different scenarios.
What are some common issues developers face when requesting permissions in Android?
Some common issues developers face when requesting permissions in Android include not explaining why the permission is needed, not handling the denial of a permission gracefully, and not testing the permissions flow thoroughly.
Can I request a permission without showing a dialog to the user in my Android app?
No, you cannot request a permission without showing a dialog to the user. The dialog is a key part of the permissions model in Android, as it gives the user control over what data and features your app can access.