

The Hypertext Transfer Protocol, HTTP, was first used in the “World Wide Web global information initiative” in 1990. Since then, it has become a part of our everyday lives, whether we think about it or not.
Usually, we make use of this protocol without giving it a second thought, like when we surf the Web. Sometimes, though, we have to actively use HTTP to solve problems. ColdFusion has built-in tags for HTTP support and, as Web developers, it is to our advantage to know how to use these tags efficiently. So, let’s take a trip down HTTP lane and see what can be done with this technology.
Key Takeaways
- HTTP is integral to web surfing and problem-solving within ColdFusion, which offers built-in tags for HTTP support.
- Understanding HTTP methods like “GET” and “POST” is crucial, as they dictate how data is transmitted and received between client and server.
- MIME types are essential for handling various file formats across the web, impacting how information is returned in ColdFusion.
- ColdFusion tags such as cfhttp, cfhttpparam, cfheader, and cfcontent are versatile tools for managing HTTP requests, responses, and content delivery.
- The cfhttp tag can be used to retrieve data from URLs, manage timeouts, and handle file downloads, enhancing data interaction and user experience.
- Effective use of HTTP in ColdFusion requires careful error handling and performance considerations to ensure reliability and efficiency of web applications.
How HTTP Works
If we dumb it down to the lowest level, HTTP is a way for clients to request information from a Web server, and for Web servers to provide responses to those requests. When you type https://www.sitepoint.com/ into your browser’s address bar, your browser (the client) sends an HTTP request to SitePoint’s server. SitePoint’s server then processes your request, pulling data out of the database, creating the HTML, and returning it to your browser.
There are two kinds of requests commonly made to a server: “GET” and “POST” requests (and yes, this is why HTML forms let you set a submission method of “GET” or “POST”). The method used specifies how the data is sent. You’ll notice that if you create a form with the “GET” method, the values entered in the form are passed on the URL. If you use the “POST” method, they are sent behind the scenes. That’s why, for example, Internet Explorer always asks if you want to resend the data when you reload the result of a “POST” request — it’s letting you know that something was sent behind the scenes and must be resent for the request to process correctly.
We should also touch briefly on MIME types. MIME stands for Multipurpose Internet Mail Extensions. This standard was originally intended to define the types of files that are exchanged via email, but has since been extended to the World Wide Web. Knowing about MIME types will allow us to return information in various formats and it will be a key part of our demonstration code below.
There’s much, much more to HTTP than I’ve described in these brief paragraphs. In fact, entire books have been written on the topic. But, for our purposes, we’ll leave the discussion here. If you want more information, you can find an excellent HTTP reference at the W3C Website.
HTTP and ColdFusion – The Tags
First, let’s cover the basic tags we’ll be using in our sample application. We’ll be using cfhttp, cfhttpparam, cfheader, and cfcontent.
First, let’s look at CFHTTP. The most common use for CFHTTP is to retrieve data from another page or site. For example, if you wanted to put an RSS feed of my SitePoint Blog, The Fuse, on your site, you would formulate an HTTP call that would look like this:
<cfhttp url="https://www.sitepoint.com/blog.rdf?blogid=7" method="get" timeout="5">First, you want to specify the URL of the blog with the url attribute, of course. The method we’re using is “GET”, and we specify that we want a five second timeout. This way, if the server is slow, it will timeout, and not hold up our application unnecessarily. The cfhttp tag returns a structure to us called cfhttp and it contains several variables that may be of use to us. First, we have the FileContent variable. This holds all the data returned to us by the URL we called. So when we display a raw text dump of CFHTTP.FileContent, we see the raw XML that is returned from the blog’s RSS feed:
<cfoutput>#HTMLCodeFormat(cfhttp.FileContent)#</cfoutput>Other variables returned by cfhttp are MimeType, Header, and ResponseHeader. ResponseHeader is a struct that contains several variables dealing with the response received from the URL. If we had attempted to access a binary file, such as a .jpg or .gif file, on a server somewhere, the MimeType would have been something like “image/jpeg” or “image/gif”. You can perform a simple text dump of the cfhttp struct like this:
<cfdump var="#cfhttp#">This works on ColdFusion 5 and up, and it will show you exactly what comes back when you use this particular tag.
You can also have ColdFusion automatically save the file to the server when it gets the information back from the URL, by passing it both the path and the file attributes like this:
<cfhttp url="https://www.sitepoint.com/blog.rdf?blogid=7"

  method="get"

  timeout="5"

  path="C:temp"

filename="thefuse.rdf">
This will save the file directly to the server so that you can use it later. For example, if you didn’t want to access SitePoint’s server every time the RSS feed was displayed on your site, you could cache the file on your server using the code above, then implement some logic that would refresh the cached copy every day. It might look something like this:
<cfdirectory action="list"

directory="C:temp"

name="TheFuseCache"

filter="thefuse.rdf">


<cfif TheFuseCache.RecordCount eq 0

or DateDiff("d", TheFuseCache.DateLastModified, Now()) gt 1>

  <!--- use the CFHTTP call as you see above and then do this:--->

  <cfset TheFuse = cfhttp.FileContent>

<cfelse>

  <cffile action="read"

file="C:tempthefuse.rdf"

variable="TheFuse">

</cfif>
Now you’ve got the RSS feed updated once a day and you only have to make one call per day to SitePoint’s server (which will reduce their bandwidth costs and yours, ease the load on their server, and free up their resources to provide you with more excellent ColdFusion content!). Everyone wins!
Another attribute worth mentioning with regards to cfhttp is the ResolveUrl attribute. If you used cfhttp to call a site that had relative paths in its image sources, links or style sheets, you might want to set the ResolveUrl attribute to “yes”. This makes sure that all the links still point to the correct path or URL when you get the file content back. Otherwise, you’ll have broken links, style sheets, images, and the like if you try to reuse the raw HTML on your own site.
Now, let’s talk about cfhttpparam. This allows you to specify a parameter to send to the URL in the url attribute of the cfhttp tag. This tag lets you simulate HTML form submissions by adding parameters – GET and POST variables, cookies, and more – to your HTTP request. Let’s see this in action.
In this example, we’ll set a form variable, a cookie, a URL (query string) variable, and a file upload using our HTTP parameter tag. We’ll also send a file for the target to upload. If you try this code out on your own server, you’ll want to replace “www.example.com” with the path to your server.
<cfif not isDefined("Form.aFormField")>

  <!--- this file (receive.cfm) requests itself --->

  <cfhttp url="http://127.0.0.1/receive.cfm" method="post" timeout="10">

     <cfhttpparam name="aFormField" type="FormField" value="I'm in a form.">

     <cfhttpparam name="aCookie" type="Cookie" value="I'm a Cookie">

     <cfhttpparam name="aUrlField" type="URL" value="I'm a URL variable">

     <cfhttpparam name="aFile" type="File" file="C:temptest.txt">

  </cfhttp>


  <cfoutput>

     Here is what the server said:<br />

     #cfhttp.filecontent#<br />

     #cfhttp.mimetype#<br />

  </cfoutput>


  <!--- end of the request --->

<cfelse>

  <!--- receives the variables --->

  <cfoutput>

     <cfif isDefined("Form.aFormField")>

        Form Field: #form.aFormField#<br />

     </cfif>

     <cfif isDefined("Cookie.aCookie")>

        Cookie Variable: #Cookie.aCookie#<br />

     </cfif>

     <cfif isDefined("URL.aUrlField")>

        URL Variable: #URL.aUrlField#<br />

     </cfif>

     <cfif isDefined("Form.aFile")>

        <cffile action="upload" filefield="aFile" destination="C:tempnew_test.txt" nameconflict="makeunique">

     </cfif>

  </cfoutput>

  <!--- end of the receipt --->

</cfif>
What output is generated when you run this? Well, first the script requests itself using cfhttpparam to send some request parameters. When it is requested with those parameters, the script lists the parameters that it was sent. This output gets put into the cfhttp.FileContent variable back in the script that performed the request. It is then displayed along with the cfhttp.MimeType.
As you can see, cfhttp and cfhttpparam provide you a great deal of flexibility over your applications, and they can help you manipulate your ColdFusion scripts to behave like real people surfing a Website. I’m sure that you can probably think of a thousand different uses for these tags.
I should warn you, though, that you’ll want to do plenty of error handling when using these tags. If the server you’re calling is down, you’ll need to allow your script to continue seamlessly (or at least fail gracefully). Any information for which you rely on that server will not be available. Also, use good judgment when using these tags. Making many HTTP calls will certainly cause problems on your site and could slow your server down considerably if you’re not judicious.
Be aware that you must specify the absolute URL. If you try to specify just the relative filename, it will not resolve, and you’ll get a connection failure.
cfheader and cfcontent Tags
The next thing we should discuss is the use of the cfheader tag. This can be used to manually set HTTP response headers along with the contents of a page. HTTP headers are sent with every request. They describe the type of data that’s being sent back, along with various other attributes of the request. Let’s say that you recently found the SitePoint article on No-Refresh links, and you wanted to attempt to implement that in a ColdFusion application (having first given attention to any usability issues that might arise, of course, as described in that article).
Once you decide how you want to implement this, you can do so very easily in ColdFusion:
<cfheader statuscode="204" statustext="No Content">This sets the “no content” status code, which lets the browser know that there’s no need to refresh, as there is no content. You could choose to set the status code to 404 (page not found) if you wanted, or even 500 (internal server error). Any valid HTTP response code can be specified in there (I don’t know why you’d want to intentionally return a 404, though).
You might also use this tag if you were setting up search engine/user friendly URLs. You could set up a 404 error handler that would decide if there was a valid page to display for the user’s request. If there was, you would set the status code to 200 (successful) and display the content. If it really was a page not found, you’d simply leave it as is, letting it return a 404, and tell the user that you couldn’t find the page. We’ll see yet another use of the cfheader tag in a moment.
Note that you must set up the 404 handler as a URL handler, not a File handler. The File handler will dump out your ColdFusion code in the browser as if it were a text file.
To illustrate this tag a little better, I put together this little bit of code. Here’s the call.cfm file:
<a href="receive.cfm">Call</a>It’s just one simple link to call the receiving page. In the receive.cfm page, I have code that looks like this:
<cfheader statuscode="204" statustext="No Content">

<cffile action="write" file="C:Temptest.txt" output="file written successfully">
Now, run the call.cfm page and click the link. You’ll notice the status bar loads but the page remains on the call.cfm page. Open your Windows Explorer and go to C:Temp and you’ll see that the text.txt file was written with the string in the “output” attribute. So, it worked! Just be sure that you set the header before you output anything at all (if you’re returning no content, there should really be no content output to the browser in the receive.cfm file, though).
Keep in mind that you’ll need to alert the user that some action has taken place and has been successfully completed — this could be done using JavaScript or DHTML. However you do it, don’t confuse your visitors.
Now, let’s delve into the cfcontent tag a bit before we move on to our project. This tag allows you to specify the MIME type that is returned by the file. If you output anything before the cfcontent tag, it will be ignored, just as with cfheader. You’ll actually have to use cfcontent in conjunction with cfheader to make sure it works properly. What we’re going to do with this tag is return an image in response to a request for a .cfm file. It’s very simple to do:
<cfheader name="Content-Disposition" value="inline; filename=help.gif">

<cfcontent type="image/gif" deletefile="no" file="C:Inetpubwwwroothelp.gif">
When you run this file, you’ll see that it simply returns an image. Now create a new HTML document and insert this image tag in it:
<img src="returnimage.cfm" />This assumes you have named your file with the cfcontent tag in it returnimage.cfm. Go to that file and you’ll see that it’s displayed right there on the page. You can return practically any file type you want. Simply specify the content disposition in the cfheader tag as shown above, and the content type (and, optionally, the name of the file to be sent from the server, and whether to delete the file) in the cfcontent tag, and you’re done. For another example of how to use cfcontent and cfheader, check out Macromedia’s Live Docs on the topic.
Time for Some Fun
Okay, so we’ve gotten through the dirty work — it’s time to have a little fun. Let’s pretend we’re building an image server and we want to track every image that’s displayed. I’m not going to go through the whole application from start to finish, but I’m going to show you how to return the images using ColdFusion, and how to track them each time they’re displayed.
First, we need a database table to store each image. This will be a very simple table that will hold an image identifier, the absolute path to the image, and a descriptive image name. When building a real image server you may want to include the ID of the user who uploaded it, the date and time it was uploaded, the page the image was displayed on, and any other information you may want regarding the image. You might also track the image size so that you can measure how much disk space and bandwidth each user is utilizing. But for simplicity’s sake, my measly little table looks like this:
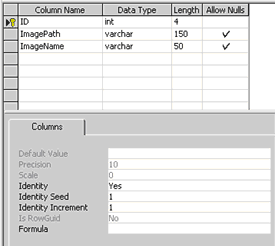
This table will store the full path to the image, a brief description of the image (so we can know what it is when looking at it through an administrative interface or in the database table itself), and a unique ID. I’m using SQL Server for this, but you can replicate the code in Access or MySQL pretty easily.
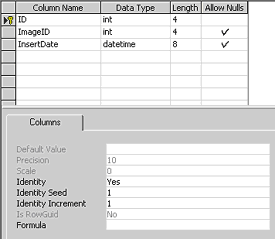
I also want to count every time that an image is accessed. Again, for simplicity’s sake I’m going to track only the Image ID and the date and time it was accessed. Here’s what my table looks like:
Once you’ve created your tables, you’ll want to think about your directory structure. For our simple image server, we’re going to store our images in the /images/ directory on our server. We’ll have a page that returns the images and it will be stored under the root directory, just for this application. We’ll also have an anonymous upload page that will allow users to put images up.
We’ll start off with the upload script. Here’s what our form will look like:
<form name="upload" action="upload.cfm" enctype="multipart/form-data" method="post">

   <input type="file" name="uploadFile" size="20" />

   <input type="submit" value="Upload File" />

</form>
Allowing anonymous uploads does open security hazards, so it’s best to have some sort of authorization in place before allowing people to upload files. This is a simple example, though, so we’ll work with what we’ve got. Take special note of the enctype="multipart/form-data"" attribute. This is essential for uploading a file. I’ve named this page index.cfm.
In the upload.cfm file, we first want to make sure the file name was specified. That code will look like this:
<cfif not isDefined("Form.uploadFile") or (isDefined("Form.uploadFile") and Form.uploadFile eq "")>

  <p>

    You must select a file to upload.

  </p>

  <cfabort>

</cfif>
I always check to make sure that the field is there, and that it’s not empty, to prevent people from directly accessing the URL and to keep them from submitting the form without uploading a file. Next, we’ll set the file name and the destination for the file:
<cfset fileName = DateFormat(Now(), "yyyymmdd") & TimeFormat(Now(), "HHmmss")>

<cfset destination = GetDirectoryFromPath(CGI.Path_Translated) & "images" & fileName>
The file name will be the date and time in a single, long string. The destination will be the images directory underneath the directory that the current file is in (the CGI.Path_Translated variable gives us the absolute path to the current file). Now we can upload the file to this location:
<cffile action="upload"
filefield="uploadFile"
destination="#destination#"
accept="image/gif,image/jpeg"
nameconflict="makeunique">
<cfset FullFilePath = "#CFFILE.ServerDirectory##CFFILE.ServerFileName#.#CFFILE.ServerFileExt#">Note that ColdFusion generates its own temporary filename under which to store the file until you decide what to do with it. As a result, if you output the value of
Form.uploadFileto the screen, the filename extension is ".tmp". But, in thecffilestruct, we get the actual file name and the file extension. Make sure that you limit the types of files that can be uploaded, using the "accept" attribute as above, and specifying GIF and JPEG images. You could also specify bitmaps and PNGs as well. Now, we'll put this in the database.
<cfquery name="InsertFile" datasource="kodefusion_mssql">

  INSERT INTO Images (

    ImagePath,

    ImageName

  )

  VALUES (

    '#FullFilePath#',

    'ANONYMOUS USER UPLOAD'

  )

</cfquery>
Here, we simply insert the full path to the image, along with a note that this was uploaded by an anonymous user. When we uploaded the file above, it didn’t have an extension, so now we need to rename it to match what was in the database. Here’s how we’ll do that:
<cfif FileExists(destination) and not FileExists(FullFilePath)>

  <cffile action="rename" source="#destination#" destination="#FullFilePath#">

</cfif>
Now that the file is in the correct place, we’ll retrieve the URL to put in our <img> tag, and display it to the user. You’ll need to change the URL based on the way you’ve set up your directory structure.
<cfquery name="GetFileID" datasource="kodefusion_mssql">

  SELECT ID

  FROM Images

  WHERE ImagePath = '#FullFilePath#'

</cfquery>


<cfoutput>

  Here's your URL: http://127.0.0.1/imagetracking/returnimage.cfm?ImageID=#GetFileID.ID#

</cfoutput>
The next step is to create the returnimage.cfm file. This is a pretty big chunk of code, so take a look first, then we’ll talk about it:
<cfif not isDefined("URL.ImageID") or (isDefined("URL.ImageID") and not isNumeric(URL.ImageID))>

  <!--- no image specified. you could return a default graphic here if you want. --->

<cfelse>

  <cfquery name="GetImagePath" datasource="kodefusion_mssql">

    SELECT ImagePath

    FROM Images

    WHERE ID = #URL.ImageID#

  </cfquery>

  <cfif GetImagePath.RecordCount neq 0>

    <cfquery name="InsertTracking" datasource="kodefusion_mssql">

      INSERT INTO ImageTracking (

        ImageID,

        InsertDate

      )

      VALUES (

        #URL.ImageID#,

        GetDate()

      )

    </cfquery>

    <cfset fileExt = ListLast(GetFileFromPath(GetImagePath.ImagePath), ".")>

    <cfif fileExt eq "jpg" or fileExt eq "jpeg">

      <cfset contentType = "image/jpeg">

    <cfelse>

      <cfset contentType = "image/gif">

    </cfif>

    <cfheader name="Content-Disposition" value="inline; filename=#GetFileFromPath(GetImagePath.ImagePath)#">

    <cfcontent type="#contentType#" deletefile="no" file="#GetImagePath.ImagePath#">

  <cfelse>

    <!--- no image. return default graphic. --->

  </cfif>

</cfif>
The first thing we do is check to make sure there’s an image ID available. If not, we could return a default “Graphic Not Available” type of graphic. If we don’t, an infamous red X will appear there.
Assuming an ID is provided, we use it to select the ImagePath field from our Images table. We check to make sure the query returned a result, and we put a row in the ImageTracking table to indicate that the image was accessed. We then figure out if this was a JPEG or a GIF image, and set the content type variable accordingly. You could create a separate “FileExtension” field in the Images table and eliminate this bit of work by storing the file extension or even the content type in there.
Once we have the content type figured out, we send our cfheader, then push our image along using cfcontent. Make sure that the deletefile attribute is set to “no”, so that the file isn’t removed after it’s used. If there are no images matching that ID in the database, we could return our “Image Not Available” graphic, or just let it display a red X.
Be sure to specify in the cfheader value attribute that this is inline data. This means that it will be displayed in the Web page, not downloaded as an attachment. (Hint: If you want to track downloads of a file, you could use this method and set the value attribute to “attachment”.) Also, note that the value should be the file name only, not the full path.
Conclusion
There you have it: a very basic start on an image server. There are many, many things that you can do with the tags and techniques we’ve discussed in this article. Your assignment now is to take the above application and build it into something more comprehensive. Add a way for users to name images, a report to show how often the images are accessed, and the ability to store more data about each image upload and each time the file is accessed. There are plenty of things you can do!
In this article, we’ve covered a lot of ground (and I’m pretty much exhausted, believe me!). We’ve discussed using the cfhttp tag to retrieve an RSS feed, using the cfhttpparam tag to send form, URL, and cookie variables, as well as files, to a remote Website, and how to return file types other than text and HTML, using ColdFusion. The more applications you develop, the more ways you will find to apply these tags in your code. Until next time, have fun in the wide world of ColdFusion.
Frequently Asked Questions about ColdFusion Practical Uses of HTTP
What is ColdFusion and how does it relate to HTTP?
ColdFusion is a rapid web application development platform created by J.J. Allaire in 1995. It is designed to be expressive and powerful, with a tag-based, scripting language that is easy to use. HTTP, or Hypertext Transfer Protocol, is the foundation of any data exchange on the web. ColdFusion uses HTTP to send and receive data, making it a crucial part of web development.
How can I use ColdFusion to make HTTP requests?
ColdFusion provides the cfhttp tag for making HTTP requests. This tag allows you to specify the URL, method (GET, POST, etc.), and any necessary headers or parameters. You can also use the cfhttpparam tag to specify parameters in a more structured way.
What are some practical uses of HTTP in ColdFusion?
HTTP in ColdFusion can be used for a variety of tasks, such as interacting with APIs, scraping web pages, downloading files, and more. For example, you could use HTTP to retrieve data from a RESTful API, or to post data to a web service.
How can I handle HTTP responses in ColdFusion?
When you make an HTTP request with ColdFusion, the response is stored in a variable that you specify. This variable contains all the information about the response, including the status code, headers, and body. You can use this information to handle the response appropriately in your code.
Can I use ColdFusion to make asynchronous HTTP requests?
Yes, ColdFusion 10 introduced the ability to make asynchronous HTTP requests using the cfhttp tag with the async attribute. This allows you to send a request without waiting for the response, which can improve the performance of your application.
How can I debug HTTP requests in ColdFusion?
ColdFusion provides several tools for debugging HTTP requests. The cfhttp tag includes a result attribute that you can use to store detailed information about the request and response. You can also use the cfdump tag to output this information in a readable format.
What are some common issues with HTTP in ColdFusion and how can I solve them?
Some common issues with HTTP in ColdFusion include timeout errors, SSL errors, and issues with character encoding. These can often be solved by adjusting the timeout value, installing the correct SSL certificates, or specifying the correct character encoding.
Can I use ColdFusion to interact with RESTful APIs?
Yes, ColdFusion provides excellent support for interacting with RESTful APIs. You can use the cfhttp tag to make requests to the API, and the cfhttpparam tag to specify any necessary parameters.
How can I use ColdFusion to download files over HTTP?
You can use the cfhttp tag with the GET method to download files over HTTP. The fileContent variable in the response will contain the downloaded file data, which you can then save to disk using the cffile tag.
Can I use ColdFusion to scrape web pages?
Yes, you can use the cfhttp tag to retrieve the HTML of a web page, and then use ColdFusion’s powerful string manipulation functions to extract the data you need. However, be aware that web scraping should be done responsibly and in accordance with the website’s terms of service.

