


In this tutorial, we will create a minimal lyrics web site using Laravel Scout and Algolia. To do so, we need a CRUD app to work with our data, and a search interface to let users search through the content. However, instead of creating the full app from scratch, let’s just install the finished CRUD app that we’ve created for this tutorial.
Algolia is a hosted search engine API, providing us with all the tools and resources we’ll ever need to create products with awesome search capabilities.

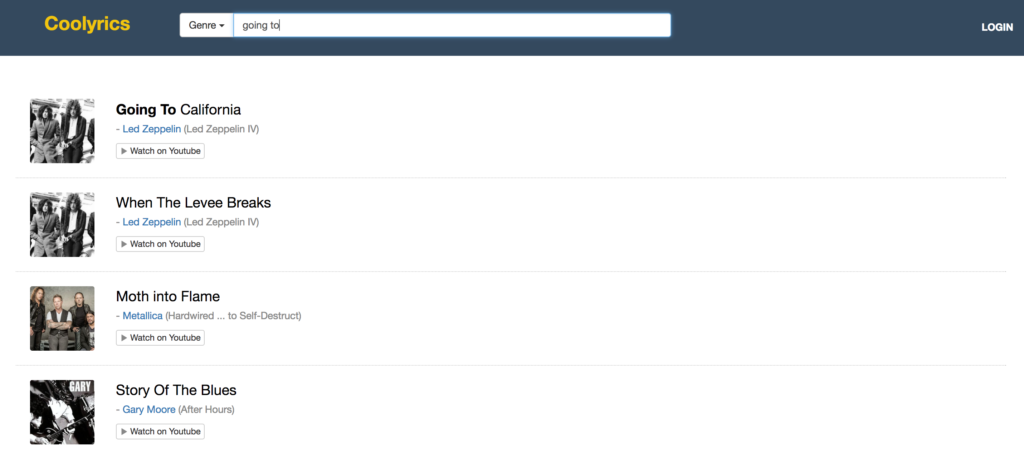
By the end of the tutorial, we’ll have a product like this:
Key Takeaways
- Utilize Laravel Scout for indexing and Algolia for search capabilities to enhance user experience in a lyrics website.
- Bootstrap the application using a pre-built CRUD app to manage data efficiently.
- Configure the Algolia search engine API with Laravel Scout to optimize search functionalities.
- Implement data indexing in Algolia to maintain a clean and optimized search index.
- Develop a user-friendly search interface using Instantsearch.js, allowing real-time search results without backend processing.
- Ensure continuous synchronization between the database and Algolia index for up-to-date search results.
Bootstrapping the Application
I assume you already have your development environment up and running. However, If you need a good development environment to get into action right away, you should use Homestead Improved.
Stranger to Vagrant? Read this. Want to go more in depth? Buy our book on PHP Environments!
Feel free to skip this part if you already have a similar application or you have enough experience to build one relatively quickly.
CRUD Application
The most convenient way to download the pre-built CRUD project is to clone it:
git clone git@github.com:lavary/lyrics-crud.git coolyrics
cd coolyrics
composer install
Setting up the Database
Now, let’s create a MySQL database. The settings below apply to the Homestead Improved environment mentioned above. Change as needed.
mysql -h localhost -u homestead -psecret
mysql> CREATE DATABASE lyrics
After the database has been created, we make a copy of .env.example (located in our project’s root directory) and name it .env. This is where we put our database credentials:
#...

DB_CONNECTION=mysql
DB_HOST=127.0.0.1
DB_PORT=3306
DB_DATABASE=lyrics
DB_USERNAME=root
DB_PASSWORD=password

# ...
Again, apply to your own preferences as needed.
Now, we run the migration command to create the tables:
php artisan migrate
Filling up the Database with Sample Data
A lyrics website contains information about musicians and their work, and, of course, their songs’ lyrics. To make a bare minimum data structure, we have created only two Eloquent models for this project, namely Artist and Song. The Artist model has a one-to-many relationship with the the Song model. This means each artist can have many songs and each song belongs to an artist in our database.
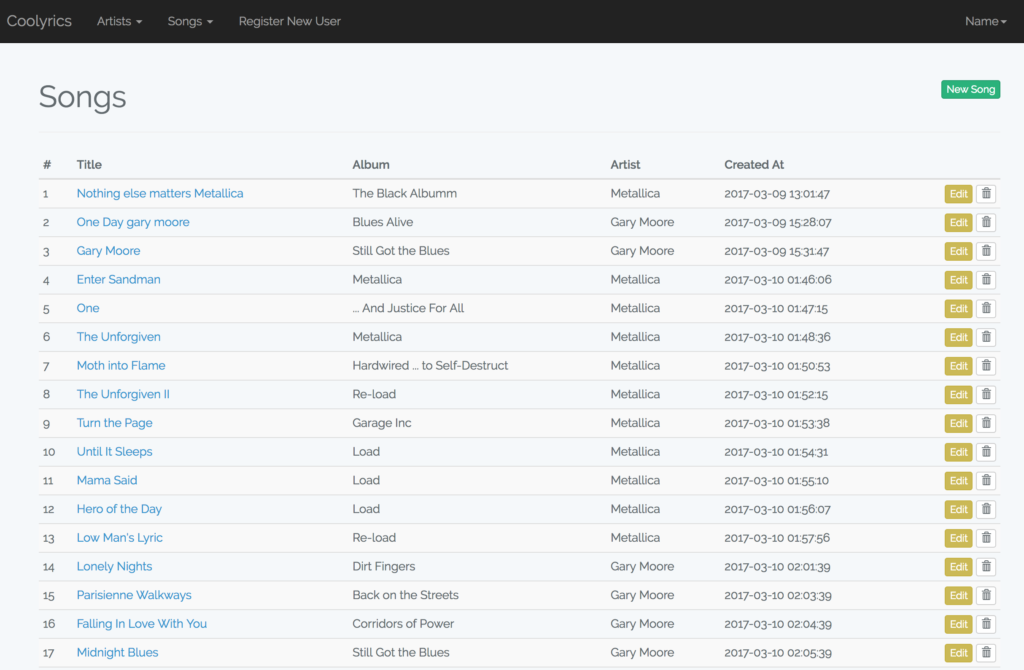
Before moving forward to the next section, you may go ahead and insert a few records into the database, starting with your favorite artists and then adding a few songs for each.
This is what we have so far:
You can also use the SQL file included with the project files and dump it into your database with the following command:
mysql -h localhost -u {USERNAME} -p{PASSWORD} lyrics < /path/to/the/sql/file
You can also import the file by using your favorite MySQL management application, like Sequel Pro, MySQL Workbench or PHPMyAdmin.
Installing Scout
Let’s continue by installing Scout:
composer require laravel/scout
Then, we add the service provider to $providers in the config/app.php file:
Laravel\Scout\ScoutServiceProvider::class,
Now we need to generate the Scout’s configuration file using the publish:config artisan command:
php artisan vendor:publish --provider="Laravel\Scout\ScoutServiceProvider"
As a result, a configuration file named scout.php is generated inside the config directory. We’ll edit this file later.
To make a data model searchable, we need to use the Laravel\Scout\Searchable trait inside the respective model class. That’s the Song model in our case:
<?php

namespace App;

use Illuminate\Database\Eloquent\Model;
use Laravel\Scout\Searchable;

class Song extends Model
{
    use Searchable;

    protected $fillable = ['title', 'album', 'lyrics', 'youtube_link'];

    public function artist()
    {
        return $this->belongsTo('App\Artist');
    }
}
Setting up Algolia
As planned, we’ll use Algolia as our search engine API.
First, let’s create an account to obtain our application ID. Scout requires Application ID and Admin API Key to operate. After the registration is complete, we can find our credentials under API Keys in the left menu.

Now, we open the config/scout.php configuration file and put our credentials there:
<?php
'algolia' => [
        'id' => env('ALGOLIA_APP_ID', ''),
        'secret' => env('ALGOLIA_SECRET', ''),
    ],
It’s a good practice to keep the keys in .env and load them into scout.php using the env() or getenv() functions.
To use the Algolia’s API, we need to install Algolia’s SDK for PHP, which is also available as a Composer package:
composer require algolia/algoliasearch-client-php
Indexing Our Data
At this point, we need to create our index on Algolia. Each record in the index is a schema-less JSON object (each one represents a record in our database) with a set of attributes that can be used for searching, displaying, ranking and filtering data.
Rather than indexing the whole record, we only need to index the data needed for the above operations. This helps keep our index clean and optimized.
Apart from that, the index is not a relational database, meaning when searching through the index, we cannot use complex where clauses or SQL joins. To work around this limitation, we should define a custom structure for our index records. On the other hand, we should join all the needed tables, preparing a customized JSON object before indexing.
To do this, we override the toSearchableArray() method in the Song model (this method is added to the class by the Laravel\Scout\Searchable trait). By default, the toSearchableArray() method returns the $this->toArray() output as our index object (when sending the index record to Algolia), whereas we need additional data, like artist’s name, genres and the image URL, which reside in another table – the artists table.
Here’s how we do it:
<?php

namespace App;

use Illuminate\Database\Eloquent\Model;
use Laravel\Scout\Searchable;

class Song extends Model
{
    use Searchable;

    protected $fillable = ['title', 'album', 'lyrics', 'youtube_link'];

    public function toSearchableArray()
    {
        $genres = array_map(function($item) {
            return trim($item);
        }, explode(',', $this->artist->genres));

        return array_merge( $this->toArray(), ['artist' => $this->artist->name, 'photo' => $this->artist->photo, 'genres' => $genres]);
    }

    public function artist()
    {
        return $this->belongsTo('App\Artist');
    }
}
Since the genres field may contain a comma-separated value in our database (it has a simple text field in our CRUD app), we separate genres using explode. Then, we iterate over the results, stripping off any unwanted spaces before and after each part – using the map() function:
<?php

// ...

$genres = array_map(function($item) {
            return trim($item);
        }, explode(',', $this->artist->genres));

// ...
Finally, we merge the output of $this->toArray() with our desired attributes, returning the final array.
<?php

// ...

return array_merge( $this->toArray(), ['artist' => $this->artist->name, 'photo' => $this->artist->photo, 'genres' => $genres]);

// ...
Why do we need to index a randomly generated string like image URL you may be wondering. We’ll get to this shortly.
For the existing records in the database, we can import the index at once with the scout:import artisan command, like this:
php artisan scout:import "App\Song"
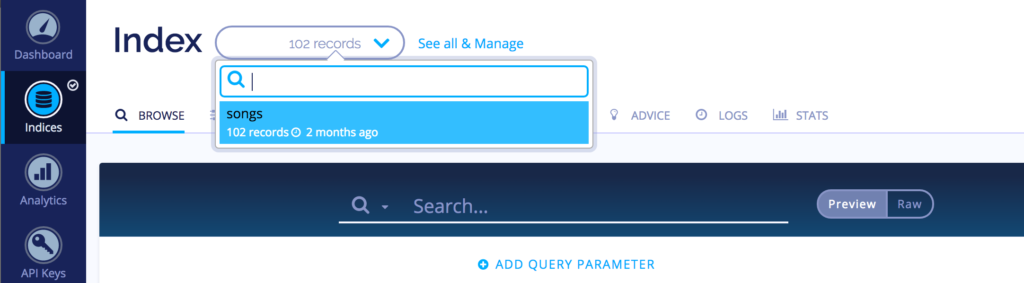
When the indexing process is completed, we can see the index on Algolia by going to Indices and choosing our index name from the drop-down menu:
Indexing is not a one-off task. After the initial import, the index needs to be kept in sync with the database. Since we’re using Scout, everything is already taken care of. From now on, any time a record is inserted, updated, or deleted from the database, the respective index record will be affected accordingly – thanks to Laravel’s model observers.
To learn more about how Scout manages the indexing process, have a look at the documentation.
Configuring Algolia
The next thing to do is to configure our Algolia index for optimal operation. These settings can be modified either from the dashboard or programmatically using Algolia’s API.
The most important configuration options are the Searchable attributes and the Custom Ranking Attributes.
The Searchable attributes setting defines which record attributes are used for searching. The order of these attributes also matters as those at the top are considered more important and control the ranking.
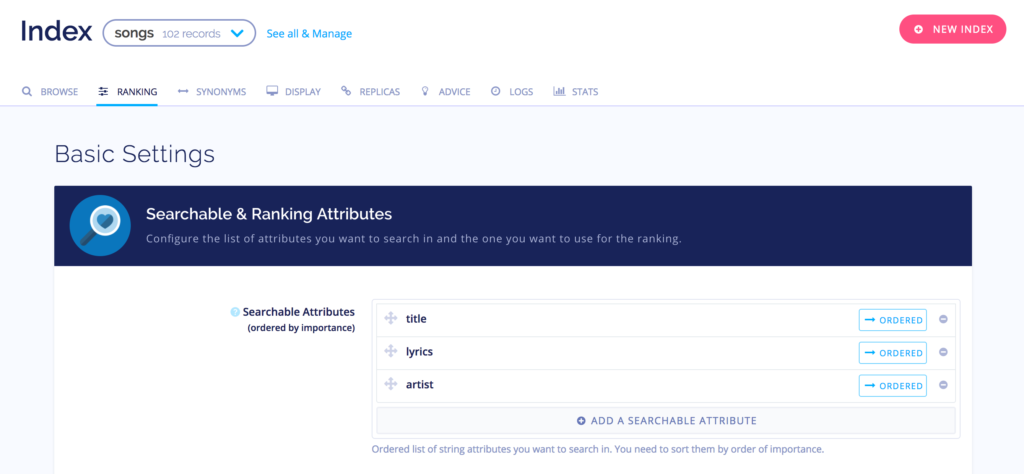
The Custom Ranking Attributes option indicates the popularity of each record which also affects the ranking. They can be anything from the number of likes, views, downloads, to comments. That said, we need to include this information in the index.

Algolia comes with plenty of configuration options. Going through each setting is beyond the scope of this tutorial. To learn more about the configuration options, you should have a look at Algolia’s FAQ on configuration and relevance.
The Website
The last thing to do is to implement the search interface within our lyrics website. The good thing about Algolia is that it doesn’t restrict us to any interface implementation.
Traditional search implementations tend to have the search logic on the backend. To achieve this, we can use Eloquent to search through the records, using the search() method (provided by the Searchable trait). This method is a bit slower as the search request goes through different levels of abstraction. It can be done like this:
<?php

// ...
use Illuminate\Http\Request;

Route::get('/search', function (Request $request) {
    return App\Song::search($request->search)->get();
});

// ...
The other way is to directly issue the search requests from the user’s browser to Algolia’s search API, providing a find-as-you-type experience for our users. This method is much faster than the former as there’s no interface involved. This means every attribute we want in our search results should be present in the index itself.
In this tutorial, we’ll take the second approach. We use Scout for indexing and keeping our index synced with our database, then we use Algolia’s API to do the searching.
By taking the second approach, we will have many options to display the results. We can use AngularJS, Vue.js, or Algolia’s two popular libraries, namely Autocomplete and Instantsearch.js.
For this project, we’ll use Instantsearch.js, which is a library of UI widgets based on React that makes creating search interfaces a breeze.
Our lyrics website consists of two pages, the main searching page, and a single page to display the details of a song.
First, let’s create the routes and the controllers for these two pages. Then we’ll create the views.
File: routes/web.php
<?php

//...

Route::get('/',          'LyricsController@search');
Route::get('song/{id}',  'LyricsController@lyric');

// ...
And the controller:
php artisan make:controller LyricsController
File: app/Http/Controllers/LyricsController.php
<?php


namespace App\Http\Controllers;

use Illuminate\Http\Request;
use App\Song;

class LyricsController extends Controller
{
    public function search()
    {
        return view('search');
    }

    public function song(Request $request, $id)
    {
        $song = Song::find($id);

        return view('lyrics', compact('song'));
    }
}
The song() and search() methods render our website pages.
First, let’s create a master layout template for our pages. Inside resources/views/layouts, create a file named basic.blade.php with the following content:
File: resources/views/layouts/basic.blade.php
<!DOCTYPE html>
<html lang="{{ config('app.locale') }}">
<head>
    <meta charset="utf-8">
    <meta http-equiv="X-UA-Compatible" content="IE=edge">
    <meta name="viewport" content="width=device-width, initial-scale=1">

    <title>{{ config('app.name', 'Coolyrics') }}</title>

    <!-- Latest compiled and minified CSS -->
    <link rel="stylesheet" href="https://maxcdn.bootstrapcdn.com/bootstrap/3.3.7/css/bootstrap.min.css" integrity="sha384-BVYiiSIFeK1dGmJRAkycuHAHRg32OmUcww7on3RYdg4Va+PmSTsz/K68vbdEjh4u" crossorigin="anonymous">

    <!-- Styles -->
    <link rel="stylesheet" type="text/css" href="{{ asset('css/styles.css') }}">

</head>
<body>


@yield('content')

@section('javascript')
@show

</body>
</html>
Having individual Blade sections for the CSS and JavaScript files allows us to have better control over global and page-specific assets as well as internal Javascript code for child templates.
There’s also a CSS file loaded into the page – to make the website a little bit more customized. Please feel free to change the styles if you don’t like the look and feel of it.
For the time being, let’s create a file named styles.css under public/css with the following content:
File: public/css/styles.css
html, body {
  height: 100%;
}

h2 {
  color: #888;
  font-size: 30pt;
}

#header {
  background: #34495e;
  color: #f1c40f;
  height: 80px;
}

#header .input-group {
  margin-top: 20px;
}

#header h1 {
  margin-left: 50px;
  font-size: 20pt;
  font-weight: bold;
}

#header h1 sup {
  font-size: 8pt;
  font-weight: normal;
  display: inline-block;
}

.dropdown-menu .ais-menu {
  padding: 5px 5px;
}

.dropdown-menu .ais-menu--item {
  border-bottom: #ccc 1px dotted;
  padding: 5px 25px 5px 15px;
}

.dropdown-menu .ais-menu--item:last-child {
  border: 0;
}

.container {
  padding: 35px;
}

.container-fluid {
  padding: 40px;
}

#hits-container {
}

.ais-hits__empty {
  height: 100%;
  font-size: 15pt;
  font-weight: bold;
  color: #888;
}

.ais-hits__empty p {
  font-size: 12pt;
  font-weight: normal;
  color: #999;
  padding-top: 5px;
}

.song {
  border-bottom: #ccc 1px dotted;
  padding: 20px;
}

.song a.song-link {
  color: #000;
  font-size: 15pt;
  display: block;
}

.song a.song-link em {
  font-style: normal;
  color: #000;
  font-weight: bold;
}

.song span {
  color: #888;
  display: block;
}

.song span.song-artist {
  margin: 3px 0;
}

.song-youtube-link {
  margin-top: 10px;
}

#pagination-container {
  text-align: center;
  font-size: 11pt;
  margin: 20px 0;
}

#login-link {
  font-weight: bold;
  text-transform: uppercase;
  line-height: 80px;
}

#login-link a {
  color: #fff;
}

/*
  to control the size of the thumbnail adjust the .thumbnail width and height
*/
.band-thumbnail {
  width: 90px;
  height: 90px;
  background-position: center;
  background-size: cover;
  margin-right: 30px;
  border-radius: 3px;
}

#lyrics-container {

}

#lyrics-container p {
  font-size: 13pt ;
}

h1 { font-size: 30pt;  }

#lyrics-container h1 span {
  color: #000;
}

#lyrics-header {
  background: #f5f5f5;
  padding: 60px 0;
}

#lyrics-album-details {
  font-size: 11pt;
  font-weight: normal;
  display: block;
  color: #888;
  margin-bottom: 20px;
}

#lyrics-album-details .glyphicon {
  color: #ccc;
  margin-right: 5px;
}

#lyrics-youtube-link {
  position: absolute;
  left: 0; bottom: 0;
  background: #cc181e;
  width: 100%;
  height: 30px;
  line-height: 30px;
}

#lyrics-youtube-link a {
  color: #fff;
}

#lyrics-thumbnail {
  position: relative;
  width: 370px;
  height: 220px;
  margin: 0 auto;
}

#post-meta {
  margin: 15px 0;
}

#post-meta span {
  color: #ccc;
  font-size: 10pt;
  font-weight: normal;
  margin: 5px 0;
}

#lyrics-content {
  background-color: #f1f1f1;
  padding: 40px 0;
}

.btn-xs .glyphicon {
  color: #888;
  font-size: 8pt;
}
The Lyrics Page
Now, we create a file named song.blade.php inside resources/views with the following content:
File: resources/views/song.blade.php
@extends('layouts.basic')

<div id="lyrics-container" class="text-center">
    <div id="lyrics-header">
        <h1>{{$song->title}}</h1>
        <span id="lyrics-album-details">
            {{$song->artist->name}} - {{$song->album}} Album
        </span>
        <div id="lyrics-thumbnail">
            <img src="{{Storage::url('artists/' . $song->artist->photo)}}">
            <div id="lyrics-youtube-link">
                <a href="{{$song->youtube_link}}"><i class="glyphicon glyphicon-play"></i> Watch on Youtube</a>
            </div>
        </div><!--/#lyrics-thumbnail-->
    </div><!--/#lyrics-header-->
    <div id="lyrics-content">
        <p><strong>"{{$song->title}}"</strong></p>
        <p>{!! nl2br($song->lyrics) !!}</p>
    </div><!--/#lyrics-content-->
</div>
This page is rendered and controlled in the backend – by Laravel.
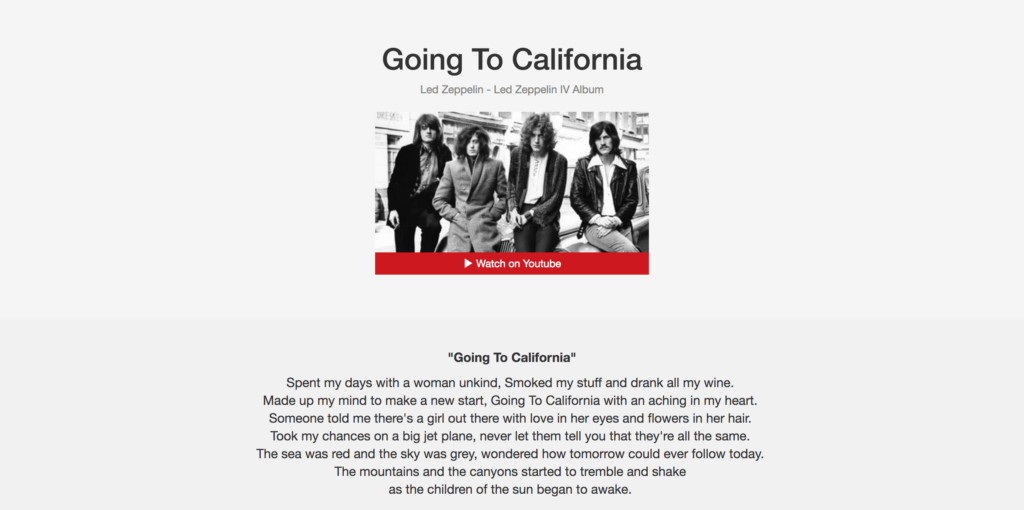
In this template, we extend the layout and echo out the lyrics’ attributes. This is how it should look:
The Search Interface
Now we get to the main part for which we’ve created everything so far, the search interface.
To create the search interface, we need to combine several widgets of Instantsearch.js and configure each widget to fit our needs.
Our search interface will consist of three widgets:
- A search field (SearchBox widget)
- A section to display the results (Hits widget)
- Pagination (Pagination widget)
All the widgets are wired together out of the box and require no extra development on our side. That is to say, whenever a user enters a value into the search box, all the widgets (search box, hits, pagination, etc.) will respond accordingly.
Create a new file named search.blade.php inside the resources/views directory with the following content:
File: resources/views/search.blade.php
@extends('layouts.basic')

@section('content')

<div id="header">
    <div class="col-md-2"><h1>Coolyrics</h1></div>
    <div class="col-md-6">

          <div id="search-box"></div>

    </div>
</div>

<div class="container-fluid">
    <div id="hits-container"></div>
    <div id="pagination-container"></div>
</div>

@endsection

@section('scripts')
<!-- Scripts -->
@parent
<script language="javascript" src="https://cdn.jsdelivr.net/jquery/3.1.1/jquery.min.js"></script>
<script src="https://cdn.jsdelivr.net/instantsearch.js/1/instantsearch.min.js"></script>
@endsection

@section('javascript')
@endsection
In the content section, we have a container with id search-box where we’re going to place our searchBox widget. We also have containers for hits and pagination widgets.
In the scripts section, first, we load the master layout’s scripts using the @parent directive. Then, we add the scripts specific to this template, namely jQuery and Instantsearch.js.
We also have a section (javascript) for our template’s internal Javascript code. This is where we instantiate Instantsearch.js and add our widgets.
Setting up InstantSearch.Js
We can use Bower or NPM to install Instantsearch.js, or simply use the CDN like so:
File: resources/views/search.blade.php
@section('css')
<link rel="stylesheet" type="text/css" href="https://cdn.jsdelivr.net/instantsearch.js/1/instantsearch.min.css" />
@endsection
And the Javascript file:
File: resources/views/search.blade.php
@section('scripts')
@parent
<script language="javascript" src="https://cdn.jsdelivr.net/jquery/3.1.1/jquery.min.js"></script>
<script src="https://cdn.jsdelivr.net/instantsearch.js/1/instantsearch.min.js"></script>
@endsection
Initialization
Now, we need to create a search object with our given Application Id and API Key. In the resources/views/search.blade.php file, add the following JavaScript code inside the javascript section.
File: resources/views/search.blade.php
...

section('javascript')
var search = instantsearch({
    // You should put your keys here:
    appId: 'XXXX',
    apiKey: 'XXX',
    indexName: 'songs'
  });
@endsection

...
In the above code, we need to provide three values to instantiate the search object: appId, ApiKey, and indexName.
Since we’re doing the initialization in a Javascript environment, the keys are visible to everyone. Knowing this, we must use our Search-Only API Key, which is limited to search operations only. You can find it under API Keys in your Algolia profile.
The indexName attribute is the name of the index we want to search through, which is songs in our case.
Adding the Search Box
The searchBox widget creates a smart text field to enter the search keyword.
To add the widget, we call the addWidget method on the search object (that we just created), passing an instance of searchBox to it:
File: resources/views/search.blade.php
...

search.addWidget(
    instantsearch.widgets.searchBox({
      container: '#search-box',
      placeholder: 'Search by artist, song, or lyrics',
      wrapInput: false,
      cssClasses: {
        input: 'form-control'
      }
    })
  );

@endsection

...
As you can see in the above code, we pass a configuration object when instantiating a widget. This object is used to adjust the widget’s behavior.
The container is the place where our searchBox widget sits. The placeholder is an ordinary HTML placeholder for the text field.
If wrapInput is set to true, the text field itself is wrapped by another <div> element with a class named ais-search-box.
Finally, the cssClasses option specifies the additional classes to be added to the widget. In the above settings, we just add a class to the text field itself. We can add classes to the wrapping element as well.
To learn about the other available options for searchBox, you should have a look at the documentation.
Adding the Hits Widget
The hits widget displays the search results based on a set of defined templates.
Add the following code right after the code for searchBox:
File: resources/views/search.blade.php
...

search.addWidget(
    instantsearch.widgets.hits({
      container: '#hits-container',
      templates: {
        item: $('#hits-temp').html(),
        empty: 'No lyrics was found! <p>We will be adding more lyrics to the database.</p>',
        header: '<h2>Lyrics</h2>'
      }
    })
 );

@endsection

...
Again, we have an object of settings to adjust the widget’s behavior. The templates option defines the templates used for rendering different parts of the hits (results) section. In the above code, we define a template for item, which is rendered for each item in the result set. We also define a template for any time the search has no results. There’s also another template for the hits header section.
These templates can be either a Mustache template or just a string, returned by an anonymous Javascript function.
In our case, the item template is a mustache template stored within a <script> tag, which we fetch with jQuery:
// ...
item: $('#hits-temp').html(),
// ...
This is our Mustache template. You can place it any where in the search.blade.php template:
File: resources/views/search.blade.php
<script type="text/javascript" id="hits-temp">

    <div class="row song">
        <div class="pull-left band-thumbnail" style="background-image: url(/storage/artists/@{{photo}});"></div>
        <a class="song-link" href="song/@{{objectID}}">@{{{_highlightResult.title.value}}}</a>
        <span class="song-artist">- <a href="?q=@{{artist}}&hPP=20&idx=songs&p=0&is_v=1">@{{artist}}</a> (@{{album}})</span>
        <span class="song-youtube-link"><a href="@{{youtube_link}}" class="btn btn-default btn-xs"><i class="glyphicon glyphicon-play"></i> Watch on Youtube</a></span>
    </div>

</script>
In this template, we have access to the attributes of each row within the index, like objectID, artist, title, photo, youtube_link, etc.
To prevent Blade from rendering mustache directives, we put a @ before each curly brace set, letting Blade know that this expression should be remained untouched and is handled by Instantsearch.js later on.
Additionally, Algolia provides an object for each item called _highlightResult. This object contains highlighted text for each attribute based on the search keyword. This is useful to show which part of the results are matched by the searched keyword.
<a class="song-link" href="song/@{{objectID}}">@{{{_highlightResult.title.value}}}</a>
Please note that we link each item to its details page.
Adding Pagination
The pagination widget generates the pagination links:
File: resources/views/search.blade.php
...

search.addWidget(
    instantsearch.widgets.pagination({
      container: '#pagination-container'
    })
  );

...
To see all the available options for this widget, you should have a look at the documentation.
Finally, we start the search object:
File: resources/views/search.blade.php
// ...

 search.start();

// ...
The full code should look like this now:
File: resources/views/search.blade.php
@extends('layouts.basic')

@section('content')

<div id="header">
    <div class="col-md-2"><h1>Coolyrics</h1></div>
    <div class="col-md-6">

          <div class="input-group" id="search-box">
             <div class="input-group-btn">
              <button type="button" class="btn btn-default dropdown-toggle" data-toggle="dropdown" aria-haspopup="true" aria-expanded="false">
              <span>Genre</span>
              <span class="caret"></span></button>
              <ul id="genres" class="dropdown-menu">

              </ul>
            </div><!-- /btn-group -->
          </div>

    </div>
    <div  id="login-link" class="col-md-4 text-right">
            <a href="{{route('login')}}">Login</a>
    </div>
</div>

<div class="container-fluid">
    <div id="hits-container"></div>
    <div id="pagination-container"></div>
</div>

@endsection

@section('scripts')

<!-- Scripts -->
@parent
<script language="javascript" src="https://cdn.jsdelivr.net/jquery/3.1.1/jquery.min.js"></script>
<script src="https://cdn.jsdelivr.net/instantsearch.js/1/instantsearch.min.js"></script>
@endsection

@section('javascript')

<script type="text/javascript" id="hits-temp">

    <div class="row song">
        <div class="pull-left band-thumbnail" style="background-image: url(/storage/artists/@{{photo}});"></div>
        <a class="song-link" href="song/@{{objectID}}">@{{{_highlightResult.title.value}}}</a>
        <span class="song-artist">- <a href="?q=@{{artist}}&hPP=20&idx=songs&p=0&is_v=1">@{{artist}}</a> (@{{album}})</span>
        <span class="song-youtube-link"><a href="@{{youtube_link}}" class="btn btn-default btn-xs"><i class="glyphicon glyphicon-play"></i> Watch on Youtube</a></span>
    </div>

</script>

<span></span>


<script>
  var search = instantsearch({
    appId: 'XI8PV16IK6',
    apiKey: '63c96991d445cb2de4fff316ac909c1a',
    indexName: 'songs',
    urlSync: true
  });

  search.addWidget(
    instantsearch.widgets.searchBox({
      container: '#search-box',
      placeholder: 'Search by artist, song, or lyrics',
      wrapInput: false,
      cssClasses: {
        input: 'form-control'
      }
    })
  );

  search.addWidget(
    instantsearch.widgets.hits({
      container: '#hits-container',
      templates: {
        item: $('#hits-temp').html(),
        empty: 'No lyrics was found! <p>We will be adding more lyrics to the database.</p>',
        header: '<h2>Lyrics</h2>'
      }
    })
  );

  search.addWidget(
    instantsearch.widgets.hits({
      container: '#hits-container',
      templates: {
        item: $('#hits-temp').html(),
        empty: 'No lyrics was found! <p>We will be adding more lyrics to the database.</p>',
        header: '<h2>Lyrics</h2>'
      }
    })
  );

  search.addWidget(
    instantsearch.widgets.menu({
      container: '#genres',
      attributeName: 'genres',
      limit: 10,
      templates: {
          header: '',
          footer: '',
          item: '<li><a href="@{{url}}">@{{name}}</></li>'
      }
    })
  );


  search.addWidget(
    instantsearch.widgets.pagination({
      container: '#pagination-container'
    })
  );

  search.start();
</script>

@endsection
Now, if we reload the page, we should see an awesome search interface which works right out of the box. No extra coding, no hassle.
Feel free to play with the interface. Search for different terms and open the links to see how it looks. You can also make some typos on purpose while searching, to see the response. Algolia’s typo tolerance algorithms will automatically detect what your users are searching for and return the correct results.
Alright, I think that does it to get started with Scout and Algolia. You can find the full code on Github in case you want to try it for yourself.
To see a working demo of what we built in this tutorial click here.
Wrapping Up
We created our minimal lyrics website with the help of Laravel Scout and Algolia.
Please note that this project was just for educational purposes, implemented in the most basic form possible, and hence should not be used in a production environment. Please feel free to modify the code in any way you want.
To move even further, you may go to your Algolia profile, and change the settings and see the results. You can also add synonyms for each term, in case you don’t have that term in your database.
If you have any questions on the topic or if we’ve missed anything, let us know in the comments below!
Frequently Asked Questions (FAQs) about Building a Lyrics Website
What is Laravel Scout and Algolia and why are they important in building a lyrics website?
Laravel Scout and Algolia are powerful tools that can significantly enhance the functionality of a lyrics website. Laravel Scout is a simple, driver-based solution for adding full-text search to your Eloquent models. It allows you to efficiently search and retrieve data from your database. Algolia, on the other hand, is a hosted search engine capable of delivering instant and relevant results from the first keystroke. It provides a seamless search experience and can handle typos, synonyms, and sorting, making it ideal for a lyrics website where users may not always know the exact words or spelling of the lyrics they’re looking for.
How can I ensure my lyrics website is user-friendly?
User-friendliness is key to the success of any website. For a lyrics website, this means ensuring that users can easily search for and find the lyrics they’re looking for. This can be achieved by implementing a powerful search engine like Algolia, which can handle typos and synonyms, and by organizing your lyrics in a clear and intuitive way. Additionally, the website should be responsive, meaning it should work well on all devices, and it should load quickly to keep users engaged.
How can I monetize my lyrics website?
There are several ways to monetize a lyrics website. One of the most common methods is through advertising. You can display ads on your website and earn revenue each time a user clicks on an ad. Another method is through affiliate marketing, where you promote products or services related to music and earn a commission for each sale made through your website. You could also offer premium features or content for a fee, or ask for donations from users who find your website useful.
How can I ensure the lyrics on my website are accurate?
Ensuring the accuracy of the lyrics on your website is crucial for building trust with your users. One way to do this is by sourcing your lyrics from reliable sources and double-checking them for accuracy. You could also implement a feature that allows users to report errors in the lyrics, which you can then correct.
How can I make my lyrics website stand out from the competition?
To make your lyrics website stand out from the competition, you need to offer something unique. This could be a unique feature, such as the ability to translate lyrics into different languages, or a unique user experience, such as a beautifully designed interface or personalized recommendations. You could also focus on a specific niche, such as lyrics for a specific genre of music, to attract a specific audience.
How can I optimize my lyrics website for search engines?
Search engine optimization (SEO) is crucial for increasing the visibility of your website. This involves using relevant keywords in your content and meta tags, ensuring your website loads quickly, and making your website mobile-friendly. You should also create high-quality content that provides value to your users, as this can increase the chances of your website being linked to by other websites, which can improve your search engine ranking.
How can I protect my lyrics website from copyright infringement?
Copyright infringement is a serious issue that can result in legal action. To protect your lyrics website, you should ensure that you have the rights to display the lyrics on your website. This may involve obtaining licenses from music publishers or other rights holders. You should also clearly state on your website that the lyrics are for educational or personal use only and are not intended for commercial use.
How can I encourage users to engage with my lyrics website?
Encouraging user engagement can increase the popularity and success of your lyrics website. You could implement features that allow users to comment on or rate lyrics, create playlists, or share lyrics on social media. You could also hold contests or giveaways, or create a community forum where users can discuss their favorite songs and artists.
How can I keep my lyrics website updated with the latest songs?
Keeping your lyrics website updated with the latest songs is crucial for attracting and retaining users. You could do this by regularly checking music charts and new releases, and by listening to feedback from your users about what songs they would like to see on your website. You could also use a web scraping tool to automatically gather lyrics from reliable sources.
How can I measure the success of my lyrics website?
There are several metrics you can use to measure the success of your lyrics website. These include the number of unique visitors, the average time spent on your website, the bounce rate, and the conversion rate. You can track these metrics using tools like Google Analytics. You should also pay attention to user feedback, as this can provide valuable insights into what users like and dislike about your website, and how you can improve it.

