


Key Takeaways
- The Ruby on Rails routing system examines the URL of incoming requests, determines the controller action responsible for handling each request, and uses the routes file (config/routes.rb) to map URLs to controllers and actions.
- Rails allows for the creation of named routes using the :as parameter, which provides URL and path helpers that can be used in the application. For example, ‘get ‘contact’, to: ‘pages#show’, as: ‘contact” provides contact_url and contact_path helpers.
- Rails includes a scope method, which allows for grouping related routes and setting default options for them. This can help create cleaner, more organized routing files.
- Rails comes with a standard Rake task that can be used to view all defined routes in an application. This can be done by typing ‘rake routes’ into the terminal.

The purpose of tutorial is to explain, in a beginner tone, how URL mapping happens in a Rails application. I will not be able to cover all the information about Rails Routing, but I’ll do my best to talk about the basic aspects. This part of the tutorial will focus on Simple Routes, the next part we will talk on Resourceful Routes.
The Ruby on Rails routing system handles requests in a unique way. It examines the URL of incoming requests and determines the controller action responsible for handling each request. It makes use of the special syntax specified in the routes file, config/routes.rb, in doing this mapping. This routes file controls every URL aspect of your web application, thus it is important we look into it.
Rails Routes File
The generated file contains instructions on how it can be used. Let’s leave that and go dig into creation of routes.
Creating a Regular Route
The basic means of creating a route involves mapping a URL to a controller and an action. When the Rails router sees a request it dispatches it to a controller’s action matching the URL.
So a URL looking like this:
/books/2
Will be mapped to a controller’s action assuming the route is defined as:
get 'books/:id' => 'books#show'
That is the shorthand for:
get 'books/:id' to: 'books/show'
Here the controller will be BooksController and there will be a show method. The next line of action is carried out by the controller. You should note the pattern we used in calling the controller and action method
books#show
This is the pattern you will be using in this kind of scenario. The controller is in its plural form and there is a # in front of the method which is the Ruby way of saying that you are talking about an instance method. You might be confused about :id in the examples above, you can be sure I will not leave you in the dark on that :)
There is no magic on how this is handled. When a request is made to your application, Rails grabs all the parameters that comes with it and makes them available in a special hash called params that you can use in your controller. If a request URL looks like this: http://sitepointbooks.com/books/15`, the routes that handles this will look like this:
get 'books/:id' => 'books#show'
The controller and action method will look like this:
class BooksController < ApplicationController
  def show
    @books = Book.find(params[:id])
  end
end
This is obviously not the only way this is done, just for necessity sake I’ll drop another method.
class BooksController < ApplicationController
  before_action :set_book, only: [:show]

  def show
  end

  private

  def set_book
    @books = Book.find(params[:id])
  end
end
This second pattern helps you share the common setup among other actions. If you see something like the above in future, you should understand it. With that established, let’s look into something interesting – the root route. Do not forget the things we talked about above, you will need that knowledge in the next section. You dig?
The Root Route
The root route gets called upon when a request is made to the domain name of your web application depending on the rule you have stated in your routes file. Let’s say your domain name is http://test.com, when someone tries to connect to it, this rule gets executed. Now what is the rule?
The rule in your routes file can look like this:
#config/routes.rb

root to: 'welcome#index'
Like we saw above, it means that there is a WelcomesController and an index method action. Here are some other examples:
root to: 'pages#index'
root to: 'welcome#show'
root to: 'pages#home'
You just need to take note of the convention used in naming root routes and you are good to go. There is a shorthand format for naming root routes and it looks like this:
root 'pages#index'
When you generate a new Rails application and point your browser to the root, you will be presented with a root page even though you have not defined a root route. How is that possible? If you have not seen this give it a shot before you continue reading.
Open up your terminal and generate a new Rails application. bundle install your gems and start your rails server. Fire up your browser and point to http://localhost:3000 and you will see a root page. No, that was not magic :) Let me explain what happens.
When you have not defined a root for your application, Rails, by default, routes to an internal Rails::WelcomeController and renders a welcome page. Did that sink in?
You might be asking; “where the heck is this welcome page in my machine?” You can find the code for Rails::WelcomeController on GitHub – Rails default welcome page.
Rails automatically stops calling this controller (Rails::WelcomeController) the moment you define a root route in the routes file.
With that said, let us look into Named Routes.
Named Routes
Rails allow you to name a route using the :as parameter. Here is one way of doing this:
get 'contact', to: 'pages#show', as: 'contact'
This provides you with contact_url and contact_path helpers that you can call in your application where needed. For example in your views like this:
< %=link_to "Contact", contact_path%>
When the link gets clicked, the show action of the PagesController gets invoked. The path shown in the hyperlink is:
/contact
Another example involves applications that needs authentication. You can have a SessionsController that handles authentication, with the new and destroy actions handling logging in and logging out, respectively. Named routes can come in handy in this scenario:
get 'login', to: 'sessions#new', as: 'login'
get 'logout', to: 'sessions#destroy', as: 'logout'
Now you can use login_path or logout_path in your application where necessary. The hyperlinks show:
/login
/logout
Rails Routes Scoping
Rails provides you with the ability to group related routes and set default options for them. To do this, we make use of the scope method. Let’s see how this works, suppose you have this in your routes file:
get 'articles/new', to: 'articles#new'
get 'articles/edit/:id', to: 'articles#edit'
post 'articles/draft/:id', to: 'articles#draft'
In the code above, all routes map to ArticlesController. Using scope you can tidy things up and make it look like this
scope controller: :articles do
  get 'articles/new' => :new
  get 'articles/edit/:id' => :edit
  post 'articles/draft/:id' => :draft
end
From the above we we are giving the routing system of our application instructions to map the routes in the block to the ArticlesController. We do not have to state this individually for each of the routes. We can also tell it the path to use by modifying the code to look like this:
scope path: '/articles', controller: :articles do
  get 'new' => :new
  get 'edit/:id' => :edit
  post 'post/:id' => :post
end
The scope method, as we saw above, accepts a :controller and :path option. It also accepts an :as option, so we can have
scope :articles, as: 'posts' do
  get 'new' => :new
end
To read more on how scope works, check the following links:
Rake Routes
How do you know what routes exist in your application? Or I should have asked first; is it possible to know the existing routes in your application? When you point your browser to a route that has not been added in your routes file, you’ll get a Rails Routing error page that looks like the image below:
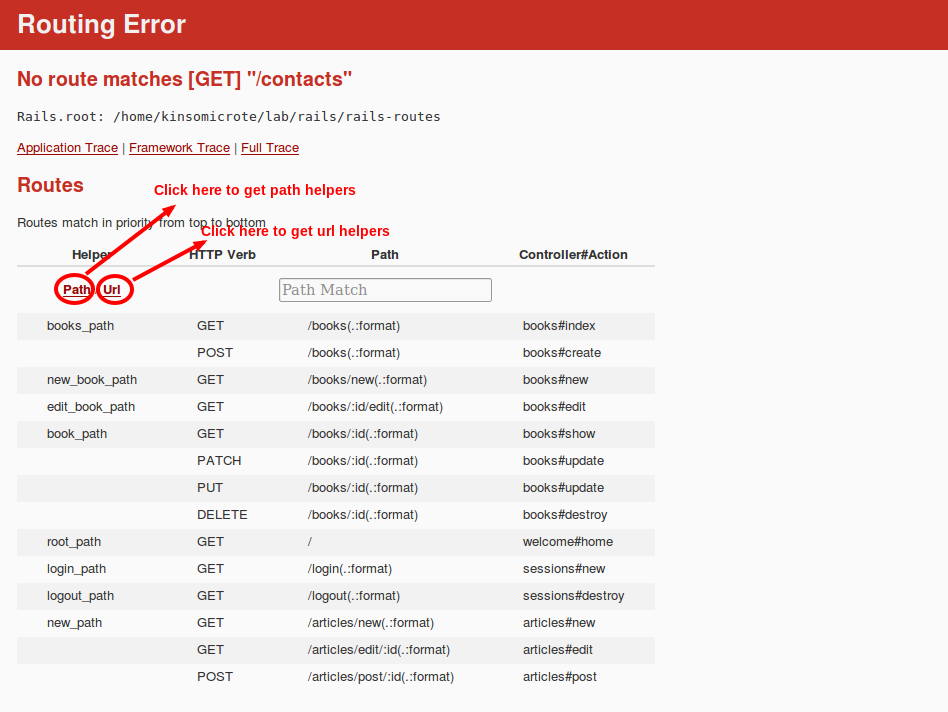
That is the default 404 error page that you’ll see in development environment. It lists all of the routes already defined in your application. As indicated in the image, you can switch between path_hlpers and url_helpers which you can make use of in your application like this
<%= link_to "Login", login_path %>
You can also find the routes defined in your application by making use of a standard Rake task that comes in all Rails application. To see how this works, open up the routes file of the Rails application you generated earlier and paste in the following codes:
#config/routes.rb

Rails.application.routes.draw do
  resources :books
end
Type this command into your terminal rake routes and hit ENTER. This should produce what I have below:
   Prefix Verb   URI Pattern               Controller#Action
    books GET    /books(.:format)          books#index
          POST   /books(.:format)          books#create
 new_book GET    /books/new(.:format)      books#new
edit_book GET    /books/:id/edit(.:format) books#edit
     book GET    /books/:id(.:format)      books#show
          PATCH  /books/:id(.:format)      books#update
          PUT    /books/:id(.:format)      books#update
          DELETE /books/:id(.:format)      books#destroy
Let’s take it further, edit your routes file to look like this:
#config/routes.rb

Rails.application.routes.draw do
  resources :books

  root "welcome#home"

  get 'login', to: 'sessions#new', as: 'login'
  get 'logout', to: 'sessions#destroy', as: 'logout'

  scope path: '/articles', controller: :articles do
    get 'new' => :new
    get 'edit/:id' => :edit
    post 'post/:id' => :post
  end
end
Run rake routes and check out the output. It should look like this:
   Prefix Verb   URI Pattern                  Controller#Action
    books GET    /books(.:format)             books#index
          POST   /books(.:format)             books#create
 new_book GET    /books/new(.:format)         books#new
edit_book GET    /books/:id/edit(.:format)    books#edit
     book GET    /books/:id(.:format)         books#show
          PATCH  /books/:id(.:format)         books#update
          PUT    /books/:id(.:format)         books#update
          DELETE /books/:id(.:format)         books#destroy
     root GET    /                            welcome#home
    login GET    /login(.:format)             sessions#new
   logout GET    /logout(.:format)            sessions#destroy
      new GET    /articles/new(.:format)      articles#new
          GET    /articles/edit/:id(.:format) articles#edit
          POST   /articles/post/:id(.:format) articles#post
The results are always listed in this format:
- The route name.
- The HTTP Verb used.
- The URL pattern to match.
- The routing parameters for the route.
You can restrict the result of rake routes to routes of a given controller. Run this command in your terminal: CONTROLLER=books rake routes and see the result.
Conclusion
At this point, you understand the basic aspects of the Rails routing system. In the next part we will talk about Resourceful Routes. Thanks for reading :)
Frequently Asked Questions (FAQs) about Basic Rails Routing
What is the difference between GET and POST methods in Rails routing?
In Rails routing, the GET and POST methods are HTTP verbs that determine how data is sent and received. The GET method retrieves data from a specific resource and is used for read-only requests. It’s idempotent, meaning making the same request multiple times will yield the same result. On the other hand, the POST method sends data to a server to create a new resource. It’s not idempotent, meaning making the same request multiple times may yield different results.
How can I use the root route in Rails?
The root route in Rails is used to define the default page that loads when a user visits your site’s base URL. You can set the root route in your config/routes.rb file using the root method followed by the controller and action you want to set as the root. For example, root 'pages#home' would set the home action of the pages controller as the root route.
What is the purpose of the resources method in Rails routing?
The resources method in Rails routing is used to declare a standard REST resource. It creates seven different routes in your application, all mapping to the corresponding action in the controller. These routes are index, new, create, show, edit, update, and destroy. This method helps to keep your routing clean and RESTful, and saves you from writing each route individually.
How can I create a nested route in Rails?
Nested routes in Rails allow you to capture relationships in your URL structure. You can create a nested route by using the resources method within another resources block. For example, if you have a Blog and Post model where each blog has many posts, you could create a nested route like this: resources :blogs do resources :posts end. This would create routes like /blogs/:blog_id/posts/:id.
What is the difference between member and collection routes in Rails?
Member and collection routes in Rails are used to add additional routes to a resource that don’t fit into the standard create, read, update, and delete (CRUD) operations. A member route operates on a specific instance of a resource, so it requires an ID in the URL. A collection route operates on a collection of resources, so it doesn’t require an ID.
How can I use the match method in Rails routing?
The match method in Rails routing is a flexible way to define routes. It allows you to match any URL pattern to a specific controller action. You can specify the HTTP verb to match, or use the :via option to match multiple verbs. For example, match 'photos', to: 'photos#show', via: [:get, :post] would match both GET and POST requests to the show action of the photos controller.
What is a named route in Rails?
A named route in Rails is a route that has a name associated with it. Named routes allow you to generate URLs and paths in your views and controllers without having to hardcode the string version of the URL. You can create a named route using the as option in your route definition. For example, get 'photos/:id', to: 'photos#show', as: 'photo' would create a named route called photo.
How can I handle 404 errors in Rails routing?
You can handle 404 errors in Rails routing by using the rescue_from method in your application controller. This method allows you to rescue from a specific exception and respond in a certain way. For example, you could rescue from ActiveRecord::RecordNotFound and render a 404 page like this: rescue_from ActiveRecord::RecordNotFound, with: :render_404.
What is a route globbing in Rails?
Route globbing in Rails is a way to handle wildcard segments in your routes. This is useful when you want to capture multiple segments in a route, for example, to build a catch-all route. You can create a globbed route by adding an asterisk (*) to a route segment. For example, get 'photos/*other', to: 'photos#unknown' would match any path starting with /photos/ and route it to the unknown action of the photos controller.
How can I redirect routes in Rails?
You can redirect routes in Rails by using the redirect method in your routes file. This method takes two arguments: the path to match and the path to redirect to. The redirect can be a string, a symbol representing a named route, or a hash of options. For example, get 'photos', to: redirect('/images') would redirect all requests for /photos to /images.