Adding SMS Capabilities to Your Rails App
Key Takeaways
- The integration of an SMS service into a Rails application can be achieved with relative ease using a service like Twilio, which allows users to validate their accounts via mobile devices and enables the application to send SMS messages to users.
- The process involves signing up for Twilio, creating a basic Rails application, integrating the application with Twilio, and exposing the localhost to the internet, ultimately resulting in a functioning application that can send and receive text messages.
- The article also covers writing unit tests and mocking external calls, which are crucial for avoiding calls to external services during tests, and provides resources for further exploration, including Twilio, Showoff.io, Tunnlr, and RR.
In a recent project, one of the technical requirements was to integrate an SMS service to a Rails application so that users could validate their accounts using their mobile device and also allow the application to send SMS messages to such users.
As it turns out, it is extremely easy to add such capabilities specially when using a service such as Twilio. In my opinion, it is one of the best services in the market today and its simplicity is unmatchable.
This article will guide you through the steps necessary to send and receive text messages through a Rails application. More specifically, it will cover:
- Signing up for Twilio
- Using Twilio’s Sandbox
- Verifying a phone number with Twilio
- Sending and Receiving SMS messages through a Rails application
- Creating a basic application
- Plugging the basic pieces together
- Integrating the app with Twilio
- Exposing your localhost to the Internet
- Writing unit tests and mocking external calls
At the end we should have a functioning application that is able to send and receive text messages. Enjoy!
Signing up for Twilio
The process to sign up for Twilio is really simple: you just need to provide your name, email and a password. Once you are done you will be redirected to their dashboard.
Using Twilio’s Sandbox
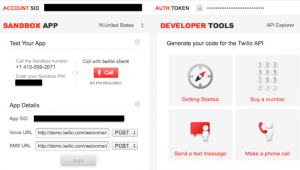
Now that we have signed up, let’s see what happens when we send a simple ‘hello’ text message to Twilio’s phone number. We get the following error message:
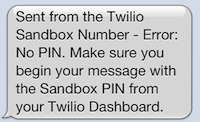
Alright, we need to include the PIN from the dashboard, let’s go ahead and do that. After the message is successfully sent with the format PIN ‘hello’, we get the following automated reply:
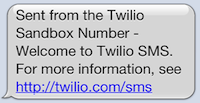
Great! We’ve successfully interacted with the Twilio Sandbox.
Verifying a phone number with Twilio
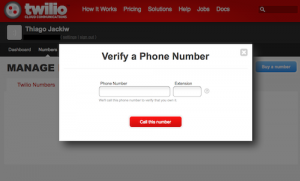
While in Sandbox mode you need to add and verify phone numbers that you want to enable to receive text messages programatically. This is a mandatory step and you will not receive any messages from the Rails application unless you complete this process.
Once you add a phone number and click the ‘Call this number’ button the system will place an automated phone call to the given number. You need to answer the call and enter the code that is displayed on screen. After that you should be good to go.
Sending and Receiving SMS messages through a Rails application
Basic application
For this section I am going to start with a new Rails application based on Ruby 1.9.3 and Rails 3.2.5 on a Mac OSX environment. You are free to use an existing application if you already have one.
First, let’s create a new rails app. I am skipping sprockets and javascript just for the sake of simplicity (and because we don’t need for our example app):
[gist id=”2970864″]
Next, we generate a User resource that will be used as the entry point to create new users and send them the initial account verification text message:
[gist id=”2970871″]
Now, migrate your database and add the following validations to the User model:
[gist id=”2970875″]
For the last step we need to create a controller that will be used to verify a user’s account. This is where our application will be receiving the callbacks from Twilio:
[gist id=”2970877″]
The basic structure is done. The next step will be to to plug the pieces together.
Plugging the basic pieces together
Now that our skeleton structure is ready, let’s start putting the pieces together. The first thing we’re going to do is edit config/routes.rb and add the following routes:
[gist id=”2970879″]
Next, edit app/controllers/users_controller.rb and add the following methods:
[gist id=”2970883″]
For the next step we need to create a view file for Users#new under app/views/users so that we can have users registering for our awesome service:
[gist id=”2970886″]
Finally, open app/controller/verifications_controller.rb and add a placeholder create method:
[gist id=”2970894″]
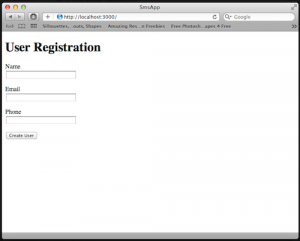
We now have a basic working application. Start the Rails server (rails s) and direct your browser to http://localhost:3000. Make sure you delete public/index.html otherwise you will get Rails’ default index file. You should see something like this:
Integrating our app with Twilio
This is where the fun part begins. First, add the following to your Gemfile and run bundle install:
[gist id=”2970896″]
Next, we are going to create a configuration file that will hold the information needed to use the Twilio API. Create the file config/twilio.yml and add the following:
[gist id=”2970897″]
You should have all the information needed for the configuration file if you signed up for Twilio correctly. And if not, make sure you follow the steps in the beginning of this article.
Having a separate entry for each environment is really helpful and allows you to have different configuration for each environment. You wouldn’t want to use your production account for development and your development account for production, would you?
For the next step we need to load this configuration and make it available app-wide. There are several different ways that we can do this but for this example I am going to use a constant. Create the file config/initializers/twilio.rb and add the following:
[gist id=”2970900″]
Notice that we’re defaulting to a pre-filled Hash if we can’t find the current environment. This is to prevent errors when accessing values for a configuration that does not exist.
Ok! We’re now ready to send our users a text message with information on how to validate their account. Ready?
Modify UsersController#create to include the following:
[gist id=”2970902″]
Next, go back to your browser and open the Rails application. After you register with your cell phone number you will receive a text message similar this:
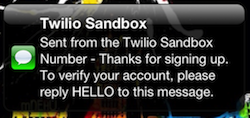
That’s pretty cool, isn’t it?
For the next step we need to modify Verifications#create to be able to receive the callbacks from Twilio and verify the user that is sending us the text message:
[gist id=”2970908″]
When Twilio posts the callback to our application it includes about sixteen parameters. For this example we only care about From. Here are the rest of the parameters in case you’re curious:
[gist id=”2970913″]
Exposing your localhost to the Internet
In order to receive the callbacks from Twilio in our local Rails application we need to expose our local server to the outside “world”. There are three easy options for this:
Static IP address: If you already have an static IP address with your ISP, this is a no-brainer. Just setup your router to redirect requests from the external port 3000 to your internal server on port 3000, and use your external IP as the SMS URL in Twilio.
Showoff.io: According to their website, it’s “the easiest way to share localhost over the web”. And it is quite simple actually. Just install their gem and execute their binary with the internal port that you would like to share, and it will generate a short url that you can use externally. You can use the service for free for five minutes or purchase one of the paid plans. As of the writing of this article, the plans are $1 for a day pass, or $5 unlimited.
Usage example:
[gist id=”2970916″]
Tunnlr: Similar to Showoff.io, it’s a forwarding service that allows you to share your local server to outside users. Their current gem tunnlr_connector (1.0.3) only works with Rails but it can easily be extended to work with other frameworks. As of the writing of this article, you can use the service for free for 30 days and it costs $5/month thereafter. One thing you’re required to do is signup for the service before you can use the gem. It will ask you questions about your account during the configuration process.
Usage example:
[gist id=”2970918″]
From the three options above, I personally use Tunnlr and this is what we will use for this example. It’s extremely useful while working in development and interacting with the Twilio Sandbox.
After starting Tunnlr, copy the generated URL and paste it in the “SMS URL” field in Twilio’s Dashboard. Don’t forget to append /verification to the end of the URL:
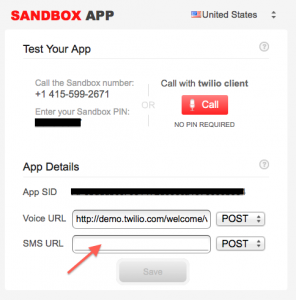
We are all set now. Replying to the verification message that we received earlier will update our user status to verified.
You need to remember to always include the PIN from Twilio’s dashboard to the messages you send while in Sandbox mode, otherwise Twilio will reply with an error message. Go ahead and give it a shot.
Writing unit tests and mocking external calls
The final part is writing tests for our application and mocking external calls to the Twilio API. I must mention that I am only going to cover the functional test for UsersController to demonstrate how mocking works. I leave the other tests as an exercise for the reader.
During tests you should by all means avoid calling external services and sending real text messages. That’s where mocking objects come in handy. For this article, I will be using RR, an awesome “test double” framework.
In your Gemfile, add the following and run bundle install:
[gist id=”2970921″]
Next, open test/test_helper.rb and add the following, which will allow us to use RR to mock the calls to the Twilio API:
[gist id=”2970925″]
Now, open test/functional/users_controller_test.rb and add the following:
[gist id=”2970928″]
If you run this test, it will fail. Not because the test isn’t written properly but because Twilio’s REST client can’t complete the request to the specified resource. This is mainly due to our code trying to send a real text message while in test mode.
Let the mocking begin!
The first thing we need to do is create a mocked class that contains a method_missing method that returns an instance of self. This allows us to mock the method chaining in Twilio’s code client.account.sms.messages.create():
[gist id=”2970932″]
The next step is to use RR‘s mock method to mock Twilio’s client object and return an instance of our MockedTwilioClient class:
[gist id=”2970938″]
Finally, putting it all together, our test should look like this:
[gist id=”2970940″]
When you run the tests now it will not only pass but also mock the external calls to the Twilio API from our UsersController.
Conclusion
This article demonstrated how simple it is to add SMS capabilities to a Rails application and you should have enough knowledge to apply what you learned into your own projects. It also covered the steps you need to take to expose your local Rails server to the Internet; and how object mocking can be applied to avoid calling external services during test.
A few shortcuts were taken in order to keep the example simple and you should use them at your best judgement. Example:
- Better validations, better tests
- In UsersController#create, the code sending the text message should be moved to the User model to an after_create action, and possibly even executed as a background job or send it to a queue to be processed later.
- … you get the idea.
Resources
Twilio:
- Site: www.twilio.com
- Gem: twilio-ruby
Showoff.io:
- Site: www.showoff.io
- Gem: showoff-io
Tunnlr:
- Site: www.tunnlr.com
- Gem: tunnlr_connector
RR:
- Site: www.github.com/btakita/rr
- Gem: rr
Frequently Asked Questions about Adding SMS Capabilities to Your Rails App
How can I send an SMS using Ruby on Rails?
Sending an SMS using Ruby on Rails involves integrating an SMS gateway API into your application. This API allows your application to communicate with the SMS gateway, which then sends the SMS to the recipient’s phone number. You can use various SMS gateway APIs such as Twilio, Vonage, or Courier. These APIs provide Ruby SDKs that you can install into your Rails application using the gem command. Once installed, you can use the API’s methods to send an SMS. The methods usually require the recipient’s phone number and the SMS text as parameters.
How can I receive an SMS in my Rails application?
Receiving an SMS in your Rails application involves setting up a webhook endpoint that the SMS gateway can post the incoming SMS data to. This endpoint is a URL in your application that the SMS gateway sends a HTTP POST request to whenever an SMS is received. The POST request contains the SMS data such as the sender’s phone number and the SMS text. You can then process this data in your application as required.
How can I handle errors when sending an SMS?
Handling errors when sending an SMS involves catching exceptions that the SMS gateway API might throw. These exceptions can occur due to various reasons such as network issues, invalid phone numbers, or insufficient account balance. You can catch these exceptions using the rescue keyword in Ruby and then handle them appropriately, such as by logging the error or displaying an error message to the user.
How can I test the SMS functionality in my Rails application?
Testing the SMS functionality in your Rails application involves using test doubles or mock objects. These are objects that mimic the behavior of the SMS gateway API without actually sending an SMS. You can use these objects in your tests to verify that your application is correctly calling the API’s methods with the correct parameters.
How can I secure the SMS data in my Rails application?
Securing the SMS data in your Rails application involves encrypting the data before storing it and decrypting it when retrieving it. You can use various encryption algorithms such as AES or RSA for this purpose. Additionally, you should also secure the communication between your application and the SMS gateway by using HTTPS instead of HTTP.
How can I monitor the SMS functionality in my Rails application?
Monitoring the SMS functionality in your Rails application involves logging the SMS data and the API calls. You can log the SMS data such as the sender’s phone number, the recipient’s phone number, and the SMS text. You can also log the API calls such as the method name, the parameters, and the response. This log can help you troubleshoot issues and understand the usage patterns of the SMS functionality.
How can I scale the SMS functionality in my Rails application?
Scaling the SMS functionality in your Rails application involves optimizing the SMS sending process and handling high volumes of incoming SMS. You can optimize the SMS sending process by using a background job system such as Sidekiq or Resque. This system can send the SMS in the background, freeing up your application to handle other requests. You can handle high volumes of incoming SMS by using a load balancer or a message queue.
How can I customize the SMS text in my Rails application?
Customizing the SMS text in your Rails application involves using variables in the SMS text. These variables can be replaced with actual values at runtime. For example, you can use a variable for the recipient’s name in the SMS text, and then replace this variable with the actual name when sending the SMS.
How can I send an SMS to multiple recipients?
Sending an SMS to multiple recipients involves looping over an array of phone numbers and calling the SMS gateway API’s method for each phone number. You can use the each method in Ruby for this purpose. However, keep in mind that each SMS will be billed separately by the SMS gateway.
How can I send an SMS at a scheduled time?
Sending an SMS at a scheduled time involves using a background job system that supports scheduling. You can schedule a job to send the SMS at the desired time. The job will call the SMS gateway API’s method at the scheduled time. You can use various background job systems such as Sidekiq or Resque for this purpose.
Thiago Jackiw is a well-rounded Engineering Manager / Senior Software Engineer and Entrepreneur who enjoys exploring new technologies. He has been working with Ruby since 2006 and currently lives in the San Francisco Bay Area. You should follow him on Twitter, and check his latest open source projects on GitHub.

Published in
·APIs·CMS & Frameworks·Frameworks·Laravel·Libraries·Miscellaneous·PHP·Web Services·June 19, 2017

