
Key Takeaways
- The iOS slider control is a useful tool, but can be complicated when trying to create a range of values. The solution is to create a range slider, which is not a default iOS control.
- Creating a range slider requires some work, but once it is created, it can be reused in any project. The process involves setting up graphics, code, and touch events to drag the thumbs.
- Even though Apple does not provide a default range slider, it still uses one in its iPhoto app. When creating custom controls for iOS, usability rules regarding minimum size of controls should be adhered to.
- The process of creating a range slider involves creating a new project, importing images, creating a UIControl subclass, setting up variables, adding slider and thumbs, and setting up touch events.
- By the end of part one of the tutorial, a fully functional range slider with graphics in place and controls responding to touch events should be in place. Part two of the tutorial will focus on adding event actions for when the values change and fixing up the UI.
One of the commonly used iOS controls is the slider control. It’s a great, all purpose slider, that allows you to quickly swipe your finger along the screen to set a value.
Things get a little complicated when you want to create a range of values however. The options are somewhat limited. Should you provide two sliders? One for the minimum range and one for the maximum range? This is sacrificing usability and screen space, and generally isn’t an ideal outcome.
The answer, most of the time, is to create a range slider, something that isn’t in the default range of iOS controls. Here’s a peek at what we’re going to create over this two part tutorial.
And here it is in action, thanks to Martin Wawrusch.

Note, this isn’t a quick and easy job. It takes a fair bit of work to get a range slider just right, but once achieved you’ll be able to reuse it in any project you need. I’d give yourself a minimum of an hour to work through this one.
Part one will cover the basics of initial setup, graphics, code, adding the touch events to drag the thumbs. In part two we’ll add event actions for when the values change, and fix up the UI from where we leave it in Part I.
If it’s a good thing, Apple would have one?
While Apple doesn’t supply an iOS range slider control, it doesn’t mean you shouldn’t create one. In fact, Apple uses a range slider in one of their biggest apps: iPhoto. Edit a video, and you’ll notice that the ‘trim’ slider is in fact a range slider. It has a minimum and maximum bound, to define where you want the video to be trimmed.
One of the biggest things to remember when creating custom controls for the iOS platform is that what you see on screen never equates to the experience you have when using your fingers. There are very specific usability rules as to the minimum size of controls, and we’re going to make sure the range slider we make adheres to them, and is easy to use in all scenarios.
Step 1: The Basics
We’re going to create a new project, and import the images we’ll be needing. We’re going to have four images. Here’s a breakdown, displayed as though freshly created in your favourite image manipulating application.

You’ll note we’ve got the bar slider, bar highlighted color, a thumb image and the thumb image highlighted, for when you’ve got it selected. Most importantly, you’ll note that we’ve got them at two resolutions, one for older iPhones, and one for retina display iPhones.
Create a new navigation based application, if you’re not using this in an existing app. Once that’s done, drag the images folder in the supplied download into your Project area, and make sure that the you select the box to copy the files into the project.

Step 2: Create a UIControl Subclass
This default project is pretty simple, and has just a navigation controller along with a UITableView. We’ll create a custom UIControl subclass, and put it into the first cell in the table view. Cmd+N to create a new file. Select ‘Objective-C class’ and click Next. Change UIView to UIControl and hit Next again. Name your class whatever you like, mine’s called ‘RangeSlider’.
You will now have a basic UIControl subclass, where we’re going to set up some basic instance variables. There are only a few things we need to set and get from our slider, we want to be able to set and get the minimum and maximum values. Lastly we have to be able to set a minimum range, so that we can specify that we want a range that is at least x long. What use is a range of 3 to 3?
In your RangeSlider header file, create your variable definitions and set the properties
@interface RangeSlider : UIControl{
    float minimumValue;
    float maximumValue;
    float minimumRange;
    float selectedMinimumValue;
    float selectedMaximumValue;
}

@property(nonatomic) float minimumValue;
@property(nonatomic) float maximumValue;
@property(nonatomic) float minimumRange;
@property(nonatomic) float selectedMinimumValue;
@property(nonatomic) float selectedMaximumValue;

@end
And then in your main file, synthesize the hell out of those properties.
@implementation RangeSlider

@synthesize minimumValue, maximumValue, minimumRange, selectedMinimumValue, selectedMaximumValue;
Next up we need to set some local variables that we won’t be exposing to the wider world. These ones are just used to track various elements internally for our slider. The things we need are two booleans for our thumb state, called _minThumbOn and _maxThumbOn. We’ll use these to track the current touch state of the slider. Next up we need UIImageView variables for each of the images we talked about earlier. Lastly is a padding value, which will allow as to position room at either side of the slider images. So add this to your header interface.
    BOOL _maxThumbOn;
    BOOL _minThumbOn;

    float _padding;

    UIImageView * _minThumb;
    UIImageView * _maxThumb;
    UIImageView * _track;
    UIImageView * _trackBackground;
The last bit of setup is to add an instance of our RangeSlider into the first cell of our table view. In the RootViewController, import the RangeSlider.h header at the top, change the method numberOfRowsInSection to return 1 not 0 and find the cellForRowAtIndexPath method. We’re going to alloc a new RangeSlider instance, set it’s max, min and min range then initialize it with the same bounds as the cell. You would obviously feel free to initialize it with whatever frame size you wanted!
This goes below the comment “Configure the cell”
    RangeSlider *slider=  [RangeSlider alloc];
    slider.minimumValue = 1;
    slider.selectedMinimumValue = 2;
    slider.maximumValue = 10;
    slider.selectedMinimumValue = 8;
    slider.minimumRange = 2;

    [slider initWithFrame:cell.bounds];
    [cell addSubview:slider];
If you Build and Run your project now, you’ll not see much more than the plain navigation controller and table view. Rest assured there’s actually a RangeSlider control in there. It’s just an empty view at the moment though!
Step 3: Add the Slider and Thumbs
We’re going to start with our initWithFrame method. It’s going to set an initial state, and call the method that redraws our slider. The code for this step is all inside the block.
if(self){
	// Code all in here
}
return self;
Firstly let’s set some initial state values
// Set the initial state
_minThumbOn = false;
_maxThumbOn = false;
_padding = 20; // 20 is a good value
Next up we’re going to add in the track background and highlight images to the control. The frame is being set according to the size of the cell frame, rather than centering based on the cell’s center point (thanks skjolber for pointing that out).
_trackBackground = [[[UIImageView alloc] initWithImage:[UIImage imageNamed:@"bar-background.png"]] autorelease];
_trackBackground.frame = CGRectMake((frame.size.width - _trackBackground.frame.size.width) / 2, (frame.size.height - _trackBackground.frame.size.height) / 2, _trackBackground.frame.size.width, _trackBackground.frame.size.height);
[self addSubview:_trackBackground];
_track = [[[UIImageView alloc] initWithImage:[UIImage imageNamed:@"bar-highlight.png"]] autorelease];
_track.frame = CGRectMake((frame.size.width - _track.frame.size.width) / 2, (frame.size.height - _track.frame.size.height) / 2, _track.frame.size.width, _track.frame.size.height);
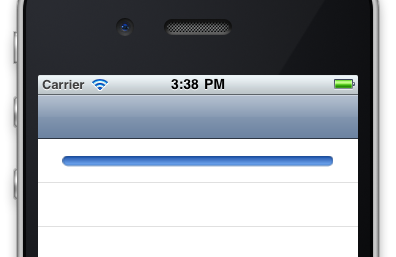
[self addSubview:_track];If you Build the project right now, you should be seeing the blue highlight bar full across the width of the cell, like so.
Next up we’re going to add in the two thumb controls, for min and max. To place these however we’re going to need to call a method that we haven’t written yet called xForValue. This xForValue method takes a slider value, and returns the point on the x axis that the slider value would be at. First up, let’s write the thumb code, picking up where we left off.
_minThumb = [[[UIImageView alloc] initWithImage:[UIImage imageNamed:@"handle.png"] highlightedImage:[UIImage imageNamed:@"handle-hover.png"]] autorelease];
_minThumb.center = CGPointMake([self xForValue:selectedMinimumValue],  self.frame.size.height / 2));
[self addSubview:_minThumb];

_maxThumb = [[[UIImageView alloc] initWithImage:[UIImage imageNamed:@"handle.png"] highlightedImage:[UIImage imageNamed:@"handle-hover.png"]] autorelease];
_maxThumb.center = CGPointMake([self xForValue:selectedMaximumValue],  self.frame.size.height / 2));
[self addSubview:_maxThumb];
Alright, let’s break these down. The code is pretty much the same for each one, just one is for maximum and the other for minimum. We start by initializing a new image with a highlighted state too. We make the center point using the x value for the current minimum or maximum value, at half the height value of our frame. We then add the images to our main control view.
This won’t run in its current state, as some red error flags will be telling you. We need to define and create our xForValue method.
Step 4: Let’s get Mathematical
At the top of our RangeSlider implementation we’re going to add in an area to define private methods – as this method doesn’t need to be made public. Above the @implementation line, add in a new private methods interface with the method definition for our xForValue method.
	@interface RangeSlider (PrivateMethods)
	-(float)xForValue:(float)value;
	@end
And then after the initWithFrame method, we’re going to create xForValue. Now the code here won’t make sense without a diagram. So I made a diagram.
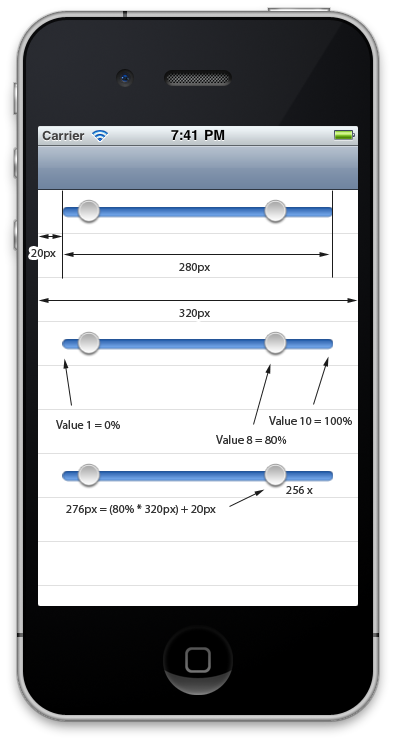
Once you break it down it’s simple, right? The x value is equal to the width of the slider (the frame width minus padding each side), multiplied by the percentage of how far the slider is between the min and max values, added to a single lot of the padding (to move it one padding from the left).
So if the width of the slider is the full width minus 2 * padding then we can call that a. And the percentage of the value is b, with padding being p then we get the following.
x = a * b + p
Replace a with the values for width and padding – self.frame.size.width and _padding, and p with _padding.
x = (self.frame.size.width-(_padding*2))*b+_padding
Figuring out how far our value is across the slider is the next step. To do this, we need to find out what the range is, so that’s the max minus the min. Then how far across that range we are, so the parameter value minus the minimum. Finally we divide how far we are across, by the full range to get the current percentage across.
b = (value - minimumValue) / (maximumValue - minimumvalue)
Drop this into our earlier value and we get:
x = (self.frame.size.width-(_padding*2))*((value - minimumValue) / (maximumValue - minimumValue))+_padding
Now put that into our method definition and we get this!
-(float)xForValue:(float)value{
    return (self.frame.size.width-(_padding*2))*((value - minimumValue) / (maximumValue - minimumValue))+_padding;
}
And finally Build and Run! Look at those perfectly placed thumbs…

Step 5: It’s Time to Move It
It’s time to start looking at how we interact with touch events. There are three methods here that we’re going to implement, beginTrackingWithTouch, endTrackingWithTouch and continueTrackingWithTouch. Here’s our begin tracking method.
-(BOOL) beginTrackingWithTouch:(UITouch *)touch withEvent:(UIEvent *)event{
    CGPoint touchPoint = [touch locationInView:self];
    if(CGRectContainsPoint(_minThumb.frame, touchPoint)){
        _minThumbOn = true;
    }else if(CGRectContainsPoint(_maxThumb.frame, touchPoint)){
        _maxThumbOn = true;
    }
    return YES;
}
As you can see we start by getting the current touch point. We then check if either thumb frame contains our touch point; basically asking if we’ve touched either of the thumbs, and if so we set the associated _minThumbOn or _maxThumbOn variable to true, so when we continue tracking the touch we know which thumb to move!
Our end tracking method simply makes sure both max and min thumbOn variables are false.
-(void)endTrackingWithTouch:(UITouch *)touch withEvent:(UIEvent *)event{
    _minThumbOn = false;
    _maxThumbOn = false;
}
The continue touching method is where the magic happens. Here we move the thumb to the correct place!
-(BOOL)continueTrackingWithTouch:(UITouch *)touch withEvent:(UIEvent *)event{
    if(!_minThumbOn && !_maxThumbOn){
        return YES;
    }

    CGPoint touchPoint = [touch locationInView:self];
    if(_minThumbOn){
        _minThumb.center = CGPointMake(MAX([self xForValue:minimumValue],MIN(touchPoint.x, [self xForValue:selectedMaximumValue - minimumRange])), _minThumb.center.y);

    }
    if(_maxThumbOn){
        _maxThumb.center = CGPointMake(MIN([self xForValue:maximumValue], MAX(touchPoint.x, [self xForValue:selectedMinimumValue + minimumRange])), _maxThumb.center.y);
    }
    [self setNeedsDisplay];

    return YES;
}
We start by returning YES if we’re not actually touching a thumb slider. No point doing extra work, eh? After that we adjust the center of the thumb view to the new thumb point’s x position, but not if it’s outside the maximum range values, or if it’s too close to the other slider (reusing our xForValue method from earlier). The if statements simply differ between whether we want to move the max or the min thumb.
_minThumb.center = CGPointMake(MAX([self xForValue:minimumValue],MIN(touchPoint.x, [self xForValue:selectedMaximumValue - minimumRange])), _minThumb.center.y);The MIN statement says that we want what’s lowest, either the touch point, or the highest point we can move to before the thumb is too close to the max thumb. The MAX statement says we want either the touch point we decided on, or the very lowest position that x can be before it’s running into our padding: the x for our minimumValue.
Lastly we call the controls setNeedsDisplay method so that the underlying UIView is redrawn and the move displays.
If you Build and Run this now, you’ll see you can select the thumbs, and run them up and down. They’ll also only go as far as as our minimumRange defined (2 in our example).
That’s the End of Part One
At the end of part one we have a fully functional range slider in place, with graphics in place and controls responding to touch events. To continue, check out part two where we’ll take the range slider and turn it into something useful!
Frequently Asked Questions (FAQs) about iOS Range Slider
How can I customize the appearance of the iOS Range Slider?
Customizing the appearance of the iOS Range Slider is quite straightforward. You can change the color of the slider, the track, and the thumb image. You can also adjust the size of the thumb image. To change the color of the slider, use the tintColor property. For example, slider.tintColor = UIColor.red. To change the color of the track, use the minimumTrackTintColor and maximumTrackTintColor properties. To change the thumb image, use the setThumbImage(_:for:) method.
How can I set the initial values for the iOS Range Slider?
To set the initial values for the iOS Range Slider, you can use the minimumValue and maximumValue properties. For example, slider.minimumValue = 0 and slider.maximumValue = 100. You can also set the current value using the value property. For example, slider.value = 50.
How can I detect when the value of the iOS Range Slider changes?
To detect when the value of the iOS Range Slider changes, you can use the valueChanged event. You can add a target-action method to handle this event. For example, slider.addTarget(self, action: #selector(sliderValueChanged(_:)), for: .valueChanged). In the sliderValueChanged(_:) method, you can get the current value of the slider using the value property.
How can I implement a range slider in Swift?
To implement a range slider in Swift, you can use the UISlider class. This class provides a visual control that allows users to select a single value from a continuous range of values. You can customize the appearance of the slider, set the initial values, and detect when the value changes.
How can I use the RangeSlider library in my project?
To use the RangeSlider library in your project, you need to install it using CocoaPods. Add the following line to your Podfile: pod 'RangeSlider'. Then, run the pod install command in your terminal. After that, you can import the RangeSlider module in your Swift files and use the RangeSlider class.
How can I customize the appearance of the RangeSlider?
The RangeSlider class provides several properties that you can use to customize its appearance. For example, you can change the color of the track, the thumb images, and the labels. You can also adjust the size of the thumb images and the labels.
How can I set the initial values for the RangeSlider?
To set the initial values for the RangeSlider, you can use the minimumValue and maximumValue properties. You can also set the current values using the selectedMinimumValue and selectedMaximumValue properties.
How can I detect when the values of the RangeSlider change?
To detect when the values of the RangeSlider change, you can use the valueChanged event. You can add a target-action method to handle this event. In this method, you can get the current values of the slider using the selectedMinimumValue and selectedMaximumValue properties.
How can I implement a range seek slider in Swift?
To implement a range seek slider in Swift, you can use the RangeSeekSlider library. This library provides a customisable range slider like the one in Airbnb. It supports both single and double thumb sliders, and it allows you to customize the appearance of the slider.
How can I use the RangeSeekSlider library in my project?
To use the RangeSeekSlider library in your project, you need to install it using CocoaPods. Add the following line to your Podfile: pod 'RangeSeekSlider'. Then, run the pod install command in your terminal. After that, you can import the RangeSeekSlider module in your Swift files and use the RangeSeekSlider class.