Key Takeaways
- Building a Virtual Private Server (VPS) with WordPress on a LEMP Stack (Linux, nginx, MySQL, PHP) can be an affordable alternative to managed WordPress hosting for those comfortable with basic server administration.
- The process involves creating a VPS on a platform like DigitalOcean, logging into the server, installing the LEMP Stack on Ubuntu, and configuring MySQL, PHP, and nginx to work with WordPress.
- A new server user should be created for security reasons and granted permissions on the WordPress installation. The server should then be restarted and WordPress installed.
- The WordPress site on the VPS can be secured and optimized through regular updates, strong unique passwords, security plugins, regular backups, and performance monitoring. Multiple WordPress sites can be installed on a single VPS by setting up virtual hosts in nginx.
Creating a DigitalOcean Virtual Private Server (VPS)
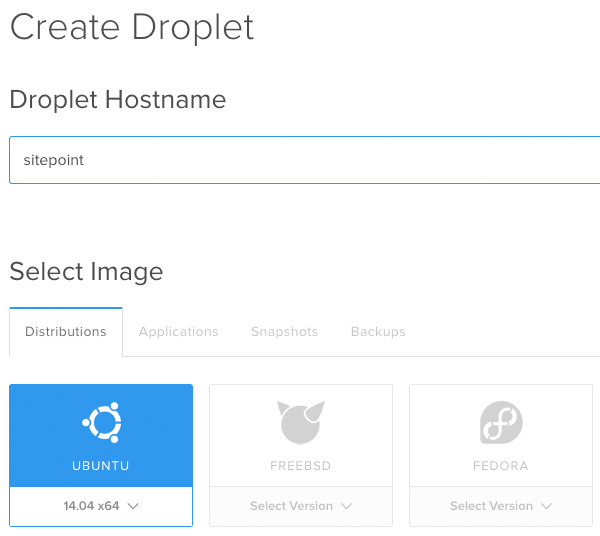
This article uses DigitalOcean, but you can equally use services such as Linode, Vultr or a number of other providers. The other sections of this guide will equally apply, regardless of who you’re using. First, register an account at https://cloud.digitalocean.com/registrations/new. Once completed, click the Create Droplet button: We’ll use the following settings for our VPS:
- Droplet Hostname: Enter something meaningful – perhaps your company or website name
- Select Image: Choose Ubuntu 14.04 x64 – this should be selected by default
- Select Size: We’ll start with the $5/month option, which comes with 512 MB, 1 CPU, 20 GB SSD and 1000 GB Transfer
- Select Region: Choose a region appropriate to your business. If you’re US based, select a USA region. If you’re UK based, select a UK region.
- Available Settings: Enabling the Backups option is recommended, as it’ll take nightly snapshots of your server. If something goes wrong, you can then roll back to the previous day’s backup.
 Click the Create Droplet button, and you’ll then see on screen progress whilst your VPS (Droplet) is created.
 Once completed, you’ll see your VPS on screen. Make a note of the IP address:
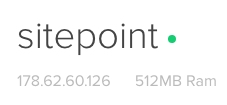 You’ll also receive an email with your root password, which you’ll need as well.
Logging into Your VPS
Next, let’s login to our VPS. NOTE: In our example, to keep things simple, we’ll be using a password to login to our server. I’d recommend looking into using SSH keys for additional security.Windows
For Windows users, download PuTTY. Once downloaded, run PuTTY and enter the following information into the dialog box that appears:- Host Name: Enter the IP address you made a note of above
- Connection type: SSH
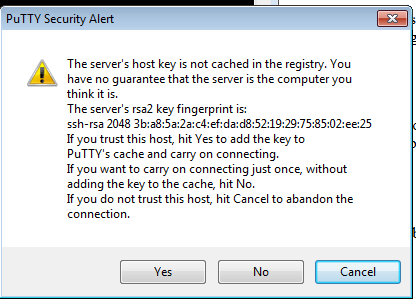
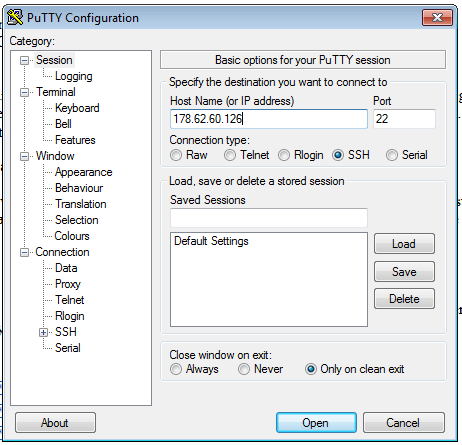 Click ‘Open’, and you should be presented with a security alert. This tells us that the server’s host key is new, and therefore asking us if we want to trust it. Click ‘Yes’.
 Next, let’s login as the root user. Enter
 root for login as, and press ‘Enter’. You’ll then be prompted to enter your password; enter the password that was emailed to you. Don’t worry if you can’t see the password as you type it – this is for security. Press ‘Enter’ when done.
Mac OS X
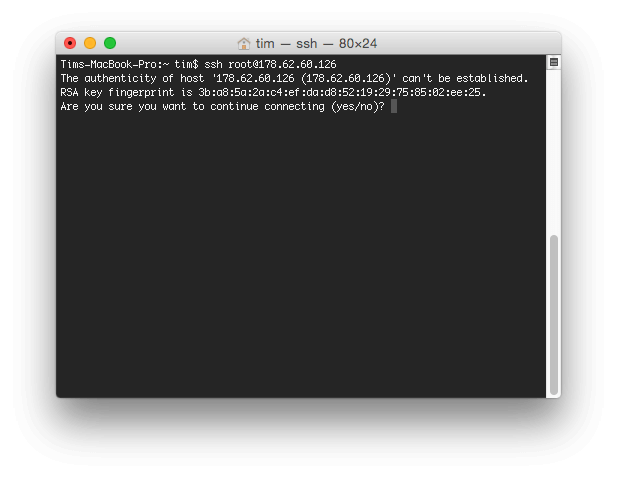
For Mac OS X users, open Terminal and enter the following command, replacing123.123.123.123 with the IP address above:
ssh root@123.123.123.123
You’ll be asked to accept the server key – type yes and press ‘Enter’:
 Next, enter your password and press ‘Enter’.
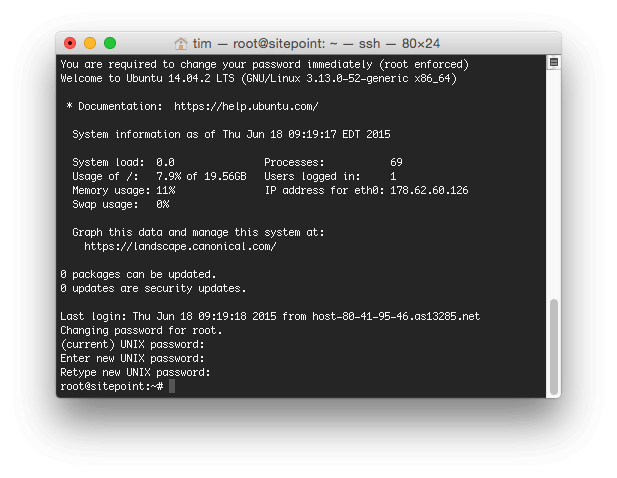
Changing the Root Password
The first time you login to your server, you may be prompted to change the root password: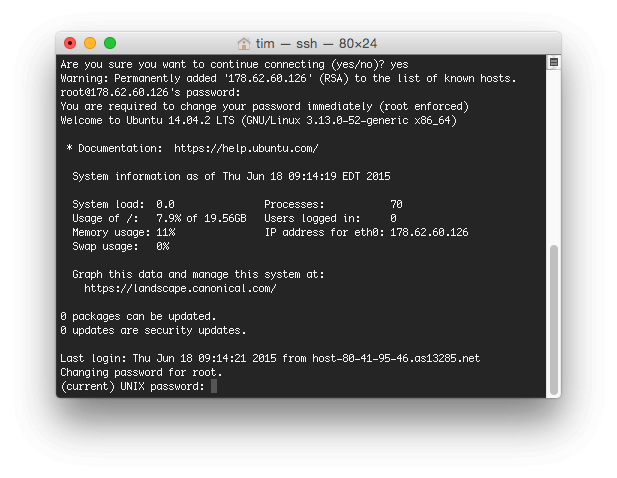 Enter the current password, and then enter a new password when prompted.
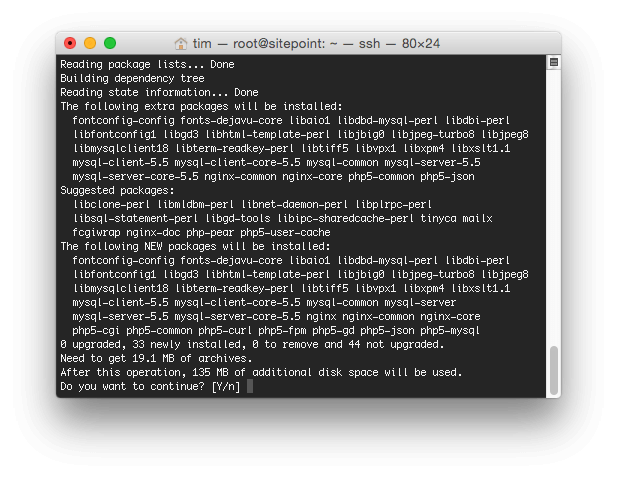
Installing the LEMP Stack on Ubuntu
WordPress requires Apache or nginx, PHP and MySQL, as well as a few other components to get things working. Ubuntu uses a package manager, which can be thought of as a command line based app store. Before we start downloading and installing components from it, we need to update its catalog by entering the following command:sudo apt-get update
Once completed, we can then install our components:
sudo apt-get install nginx mysql-server php5-fpm php5-mysql php5-curl php5-gd php5-cgi
You’ll be asked if you want to continue – type in Y, and press enter.
Configuring MySQL
During the installation process, MySQL will ask you to set a new password for the root database user. Note that this is different from the root login for the server. For security, I’d strongly recommend making this a different password than the root login to your server. Once the installation has completed, we need to run two more commands to complete the MySQL installation. First, enter:sudo mysql_install_db
Then, enter:
sudo mysql_secure_installation
- Type in your current MySQL root password, which you set above.
- Enter
nwhen asked to change the root password (as we’ve already done this, no need to do it again). - Enter
Ywhen asked to remove anonymous users. - Enter
Ywhen asked to disallow root login remotely. - Enter
Ywhen asked to remove the test database and access to it. - Enter
Ywhen asked to reload privilege tables.
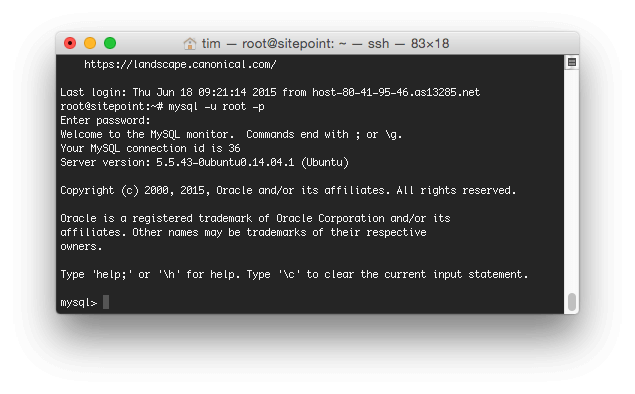
mysql -u root -p
Enter your MySQL password when prompted, and if correct, you’ll be presented with the MySQL prompt:
 Let’s create our new database and user – replace ‘password’ with a unique password:
CREATE DATABASE wordpress;
CREATE USER 'wordpress'@'localhost' IDENTIFIED BY 'password';
GRANT ALL PRIVILEGES ON * . * TO 'wordpress'@'localhost';
FLUSH PRIVILEGES;
exit
Configuring PHP
We need to make a slight alteration to get PHP working with nginx:sudo nano /etc/php5/fpm/php.ini
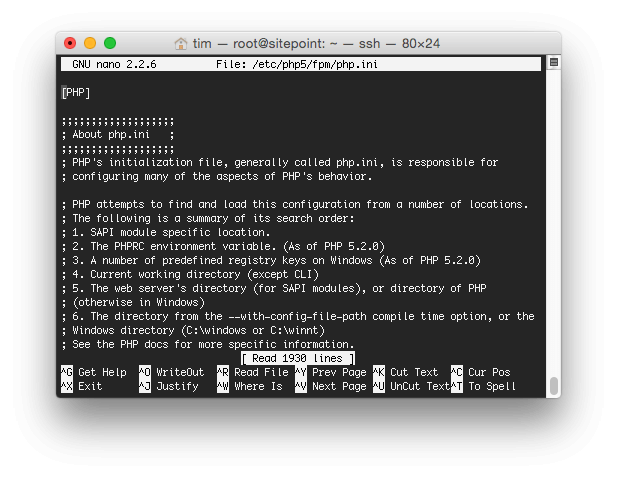 Hold down the
 Ctrl key and press W, and you’ll be asked to type into a Search field. Enter:
fix_pathinfo and press Enter:
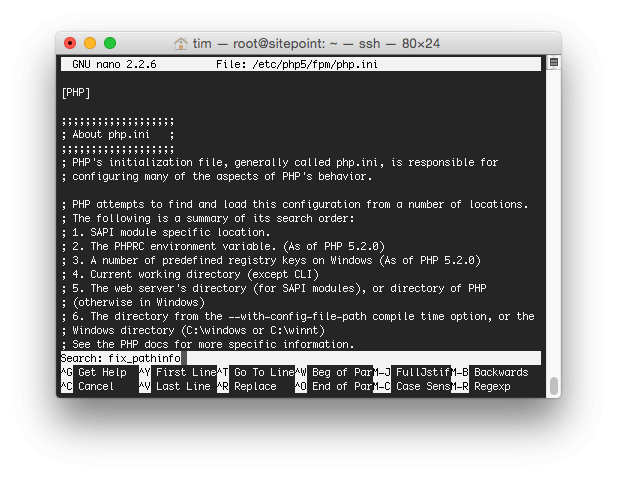 Change the following line:
;cgi.fix_pathinfo=1
to:
cgi.fix_pathinfo=0
To save our changes, hold down the Ctrl key and press X, followed by Y and then the Enter key.
Configuring nginx
We need to change nginx’s configuration to get things working with WordPress:sudo nano /etc/nginx/sites-available/default
 Let’s remove the current configuration. Keep pressing
 Ctrl and K to cut each line of the configuration file, until it’s blank:
 Next, copy the nginx configuration below and paste it into your Terminal/PuTTY window, remembering to change domain.com to your domain name:
server {
# Listen on port 80
listen 80 default_server;
Document Root
root /usr/share/nginx;
Domain(s)
server_name www.domain.com;
Index
index index.php;
GZIP Compression
 gzip on;
gzip_types text/plain image/svg+xml text/javascript application/x-javascript text/xml text/css;
gzip_vary on;
Cache Static Files
 location ~* \.(js|css|png|jpg|jpeg|gif|ico|svg|woff)$ {
expires 1y;
}
Load File
 location / {
try_files $uri $uri/ /index.php?q=$uri&$args;
}
# Pass the PHP scripts to FastCGI server
location ~ \.php$ {
fastcgi_pass unix:/var/run/php5-fpm.sock;
fastcgi_index index.php;
fastcgi_param SCRIPT_FILENAME $document_root$fastcgi_script_name;
include fastcgi_params;
}
}
To save our changes, hold down the Ctrl key and press X
, followed by Y and then the Enter key.
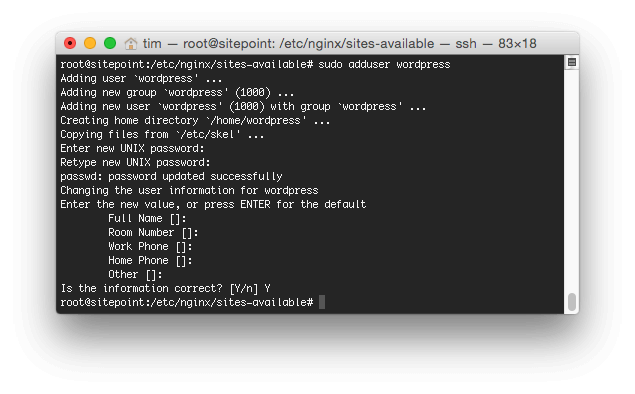
Creating a SSH Login
For security reasons, we don’t want to run WordPress as the root user. Let’s go ahead and create a new server user for that purpose:sudo adduser wordpress
Enter a password for this user, and then just press ‘Enter’ on the other fields.
 Next, add our new
 wordpress user to the www-data group. This is the group used by PHP, so when we go to upload WordPress files, they’ll correctly run:
sudo usermod -a -G wordpress www-data
We need to tell PHP which user and group can run PHP files:
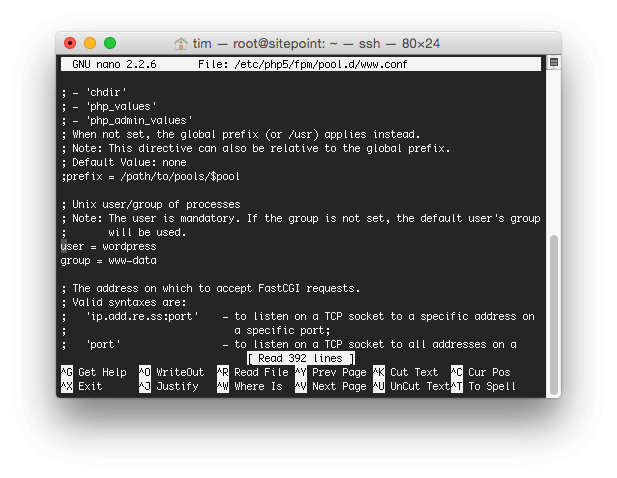
sudo nano /etc/php5/fpm/pool.d/www.conf
Scroll down until you find the user = www-group line, and change this to:
user = wordpress
 To save our changes, hold down the
 Ctrl key and press X, followed by Y and then the Enter key.
Restart the Server
To make sure everything’s working, let’s restart the server:reboot
Login and Install WordPress
To install WordPress, let’s log back into the server and then enter the following commands:cd /usr/share/nginx
wget http://wordpress.org/latest.tar.gz
tar xfz latest.tar.gz
mv wordpress/* ./
rm latest.tar.gz
rmdir wordpress
The above commands download WordPress from wordpress.org, extract/unzip it into the /usr/share/nginx/wordpress folder. We then move the contents of that folder back into /usr/share/nginx before removing the original download file and WordPress directory.
To avoid file permission issues when trying to install Plugins or upload images, let’s recursively set permissions on nginx’s web accessible root folder to the wordpress user and www-data groups that PHP is configured to use:
sudo chmod g+w /usr/share/nginx -R
sudo chown -R wordpress:www-data /usr/share/nginx
Next, in your web browser, load http://123.123.123.123 (or http://www.domain.com, if you’ve set your domain’s A name record to point to your server’s IP address).
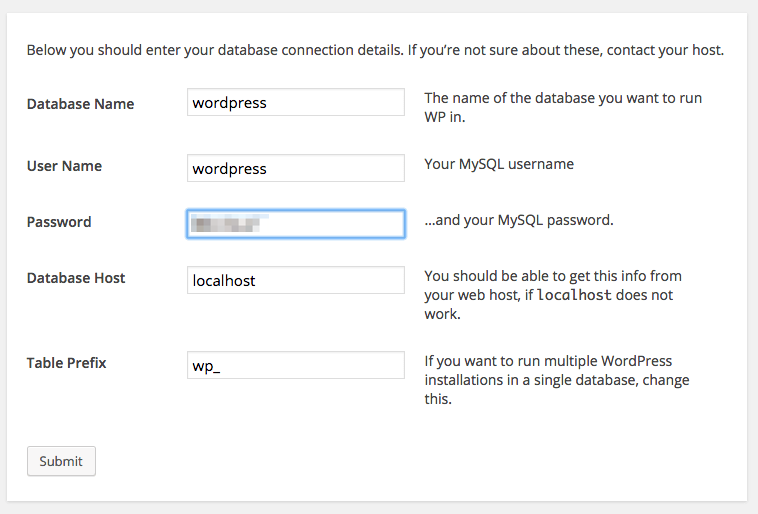
If everything worked, you’ll see the familiar WordPress configuration screen. Click Let’s go!, and then enter the following information on the next screen:
- Database Name: wordpress
- User Name: wordpress
- Password: [the password you entered when setting up MySQL]
- Database Host: localhost
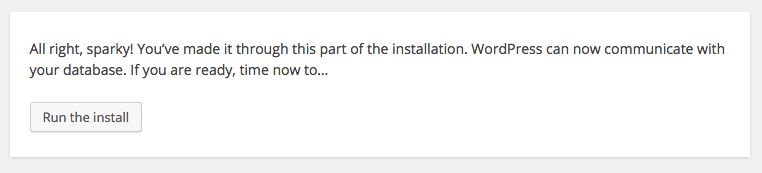
 Click Submit, and if the details are correct, you’ll be asked to run the installation:
 Enter your ‘Site Title’, ‘Username’, ‘Password’ and ‘Email Address’ before clicking Install WordPress
 That’s it!
Conclusion
We’ve successfully created a VPS on DigitalOcean, and logged into it over SSH. We’ve then installed nginx, PHP and MySQL, and configured each to work with WordPress. We’ve also setup a server user, and granted them permissions on our WordPress installation. Finally, we confirmed everything worked by running through the WordPress installation process.Frequently Asked Questions (FAQs) about VPS WordPress LEMP
What is the difference between LEMP and LAMP?
LEMP and LAMP are both software stacks used for hosting websites. The main difference between the two lies in the web server software. LEMP uses Nginx (pronounced as ‘Engine-X’), while LAMP uses Apache. Nginx is known for its high performance and low memory usage, which makes it particularly suitable for high traffic websites. On the other hand, Apache is easier to configure and has widespread community support.
How can I secure my WordPress site on a VPS?
Securing your WordPress site on a VPS involves several steps. First, always keep your WordPress installation, themes, and plugins up-to-date. Second, use strong, unique passwords for your WordPress admin, database, and VPS accounts. Third, install a security plugin like Wordfence or Sucuri. Fourth, regularly backup your site so you can quickly restore it in case of a security breach.
Why should I choose a VPS over shared hosting for my WordPress site?
A VPS offers several advantages over shared hosting. With a VPS, you get dedicated resources, which means your site’s performance won’t be affected by other sites on the same server. You also get root access, which gives you more control over the server environment. This allows you to install any software you need and configure it to your liking.
How can I optimize my WordPress site on a VPS?
Optimizing your WordPress site on a VPS involves several steps. First, use a caching plugin like W3 Total Cache or WP Super Cache to reduce server load and improve page load times. Second, optimize your images using a plugin like Smush or EWWW Image Optimizer. Third, use a CDN to deliver your content faster to users around the world. Fourth, regularly monitor your site’s performance and make necessary adjustments.
Can I install multiple WordPress sites on a single VPS?
Yes, you can install multiple WordPress sites on a single VPS. This is done by setting up virtual hosts in Nginx. Each virtual host corresponds to a separate WordPress site. However, keep in mind that each site will consume resources, so make sure your VPS has enough resources to handle all your sites.
How can I migrate my WordPress site to a VPS?
Migrating your WordPress site to a VPS involves several steps. First, backup your site’s files and database. Second, setup your VPS with LEMP and install WordPress. Third, upload your site’s files and import the database to the new server. Finally, update your DNS records to point to the new server.
What should I do if my WordPress site on a VPS is slow?
If your WordPress site on a VPS is slow, there are several things you can do. First, check your server’s resource usage. If your server is running out of resources, you may need to upgrade your VPS. Second, optimize your WordPress site as mentioned in question 4. Third, consider using a CDN if you’re not already using one.
How can I backup my WordPress site on a VPS?
Backing up your WordPress site on a VPS can be done in several ways. You can use a plugin like UpdraftPlus or BackWPup, which can automatically backup your site to a remote location like Dropbox or Google Drive. Alternatively, you can manually backup your site’s files and database using SSH.
Can I use a control panel with my VPS?
Yes, you can use a control panel with your VPS. Control panels like cPanel or Plesk make it easier to manage your server and sites. However, they consume resources and may increase the cost of your VPS.
How can I troubleshoot errors on my WordPress site on a VPS?
Troubleshooting errors on your WordPress site on a VPS involves several steps. First, check the error message. It often gives clues about what’s wrong. Second, check your server’s error logs. They can provide more detailed information about the error. Third, try disabling plugins and switching to a default theme to see if the error is caused by a theme or plugin.
Tim is a WordPress Developer who builds WordPress web sites, themes and plugins. He runs n7 Studios, providing WordPress development, consultancy & training, and WP Zinc, providing free and premium WordPress Plugins.