
In the first part of our series, we talked about the Github API and built a demo in the process. In this part we are going to explore the Webhooks API, and we will build a demo to showcase the API usage. Let’s get started.
Key Takeaways
- The tutorial demonstrates how to use Github Webhooks API with PHP to create a demo that receives every push from Github and saves it to a database, while also creating a page to display the list of repository committers ordered by the number of commits. Laravel 5 is used as the framework and Heroku is used to host the code.
- The tutorial explains how to set up the environment on Heroku and add MySQL for data storage. It also details how to register a new Github hook and set up an application URL endpoint to receive the payload. A secret key can be set to verify the request origin.
- The tutorial guides through building the demo by creating the necessary database tables, routes, and controllers. It also explains how to retrieve the list of push events from the database and display a chart of project contributors using the ChartJs JavaScript library. The Github API is recommended for its ease of use and extensive offerings.
What We’re Building
In this article we are going to set up a demo that receives every push from Github and saves it to a database. We are also going to create a page to display the list of our repository committers ordered by the number of commits. You can check the final result on Github.
Setting Up the Environment
We will be using Laravel 5 as our framework, and because our application must be accessible from the internet to work with Github Webhooks, we can use Heroku to host our code. You can check this post to get started with Heroku.
Configuration
Adding Mysql
After creating our app on Heroku, we need to add MySQL to store the received data.
heroku addons:add cleardb
You can go to your dashboard to get your database connection credentials. Set the necessary variables inside your config as you can see in the example below.
MYSQL_HOST=‘HOST’

MYSQL_DATABASE=‘DB’

MYSQL_USERNAME=‘USERNAME’

MYSQL_PASSWORD=‘PASSWORD’
Register Github Hooks
To register a new hook, navigate to a repository inside your account, then go to the settings tab and select Webhooks & Services.
After setting your application URL endpoint to receive the payload, you can set a secret key to be sent along with the payload to verify the request origin. By default, Github will send you only push events, but you can select individual events from the list. For our demo, the push event is sufficient.
Building a Demo
Creating The Database Tables
php artisan make:migration create_hooks_table
// database/migrations/XXX_create_hooks_table.php
class CreateHooksTable extends Migration

{
  public function up()

  {

    Schema::create('hooks', function (Blueprint $table) {

      $table->increments('id');

      $table->string('event_name', 100);

      //you can separate the sender, repo...etc. but let's just keep it simple

      $table->text('payload');

      $table->timestamps();

    });

  }
  public function down()

  {

    Schema::drop('hooks');

  }
}
We only need a hooks table to store the incoming requests. Registering the event_name will help us in the future if we plan to track other events, and it will make it easier for us to look up the database.
The payload field holds the request body. You can split this field into multiple parts and create a sender, a repository, a list of commits, etc.
After running the migration using php artisan migrate, we will create our Hook model class.
// app/Hook.php
class Hook extends Model

{
  protected $table = ‘hooks’;
}
Creating Routes
Our demo application will only have two routes.
- an
eventsroute, which will receive the Github event payload. - a
/report/contributionsroute, which will display a chart of project contributors.
// app/Http/routes.php
Route::post(‘/events’, [‘uses’ => ‘GithubController@storeEvents’]);
// app/Http/Controllers/GithubController.php
public function storeEvents(Request $request) {

  $event_name = $request->header(‘X-Github-Event’);

  $body = json_encode(Input::all());
  $hook = new Hook;

  $hook->event_name = $event_name;

  $hook->payload = $body;
  $hook->save();
  return ‘’;// 200 OK

}
The X-Github-Event header value contains the event name that occurred. In this case, it will be equal to push. If you want to test the request origin using the secret key you provided previously on Github, you can use the X-Hub-Signature header value. You can read more in the documentation.
Github will send you an almost real time request. If you are using Heroku for deployment, you can use the logger to monitor requests while testing. You can read more about that in the documentation. You can also navigate to your Webhook configuration on Github and scroll to the Recent Deliveries tab at the bottom.
heroku logs —tail -n 0 —ps router
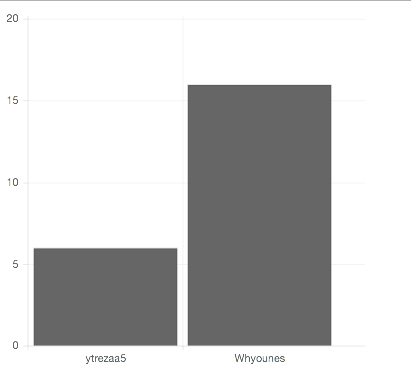
To display the list of contributors I’m going to use the ChartJs JavaScript library. You can check out this getting started guide for a good intro.
// app/Http/routes.php
Route::get(‘/reports/contributions.json’, [‘uses’ => ‘GithubController@contributionsJson’]);
// app/Http/Controllers/GithubController.php

public function contributionsJson()

{

  $hooks = Hook::where('event_name', '=', 'push')->get(['payload']);
  $users = [];

  $hooks->each(function ($item) use (&$users) {

    $item = json_decode($item['payload']);
    $pusherName = $item->pusher->name;

    $commitsCount = count($item->commits);
    $users[$pusherName] = array_pull($users, $pusherName, 0) + $commitsCount;

  });
  return [

      'users'   => array_keys($users),

      'commits' => array_values($users)

  ];

}
The /reports/contributions.json route will retrieve the list of push events from our database and loop through it to retrieve the list of users by commits. We then return the list of users and commits separately to suit the library needs. However, you can also choose to do it on the front-end using some Javascript.
// app/Http/routes.php
Route::get(‘/reports/contributions’, [‘uses’ => ‘GithubController@contributions’]);
// app//Http/Contrllers/GithubController.php
public function contributions()

{
  return View::make('reports.contributions');

}
// resources/views/reports/contributions.blade.php
<canvas id=“contributions” width=“400” height=“400”></canvas>
<script>

    var ctx = document.getElementById(“contributions”).getContext(“2d”);
    $.ajax({

        url: “/reports/contributions.json”,

        dataType: “json”,

        type: “GET”,

        success: function(response){

            var data = {

                labels: response.users,

                datasets: [

                {

                    data: response.commits

                }]

            };
            new Chart(ctx).Bar(data, {});

        }

    });

</script>
After getting the data from our JSON endpoint, we create a new Chart object. You can read more about the available options in the documentation.
Conclusion
Here’s a real world example – if you’ve ever contributed to a Symfony project on Github, you’ll have noticed that when you send a pull request, your code is being checked by an external service called fabbot.io. This service is watching the repository for every new pull request and does some checks on your code. You can visit the website for more info, and you can also register your own repository to be checked.
The Github API has a lot to offer, and the documentation makes it really easy to get started. I do recommend you check it out. Additionally, you can check the final result on Github. And like always, if you have any questions, don’t hesitate to post them below.
Frequently Asked Questions on Using GitHub Webhooks with PHP
How can I secure my GitHub Webhooks with PHP?
Securing your GitHub Webhooks with PHP is crucial to prevent unauthorized access. You can do this by using a secret token. When you set up your webhook on GitHub, you can specify a secret token. This token will be used to create a hash signature for each payload. This signature is then included in the headers of each request. In your PHP script, you can compute the hash signature and compare it with the signature in the headers. If they match, the request is authenticated.
How can I handle errors in GitHub Webhooks with PHP?
Handling errors in GitHub Webhooks with PHP is important to ensure your application runs smoothly. You can do this by using try-catch blocks in your PHP script. If an error occurs while processing the webhook, you can catch the exception and handle it appropriately. You can also log the error for debugging purposes.
How can I test GitHub Webhooks with PHP?
Testing GitHub Webhooks with PHP can be done using tools like ngrok. Ngrok exposes your local development server to the internet, allowing GitHub to send webhook events to your local machine. You can then use your PHP script to process these events and debug any issues.
How can I process different types of events with GitHub Webhooks in PHP?
GitHub Webhooks can send many different types of events. You can process these events differently in your PHP script by checking the ‘X-GitHub-Event’ header. This header contains the type of event that triggered the webhook. You can then use a switch statement or if-else blocks to process each event type differently.
How can I store webhook events in a MySQL database with PHP?
Storing webhook events in a MySQL database with PHP can be done using the PDO or mysqli extension. You can create a table with columns for each piece of data you want to store. Then, in your PHP script, you can insert the data from each webhook event into this table.
How can I retry failed webhook deliveries with PHP?
GitHub automatically retries failed webhook deliveries. However, you can also implement your own retry logic in your PHP script. You can do this by storing failed deliveries in a database or queue and periodically attempting to process them again.
How can I parse the payload of a GitHub Webhook with PHP?
The payload of a GitHub Webhook is sent as JSON. You can parse this JSON in your PHP script using the json_decode function. This will convert the JSON into a PHP object or array, which you can then process.
How can I respond to a GitHub Webhook with PHP?
Responding to a GitHub Webhook with PHP can be done by sending a HTTP response. You can use the http_response_code function to set the status code and the echo function to send a response body.
How can I debug GitHub Webhooks with PHP?
Debugging GitHub Webhooks with PHP can be done by logging the payload and headers of each webhook event. You can then inspect these logs to debug any issues. You can also use tools like Xdebug to step through your PHP script and find any issues.
How can I handle large payloads with GitHub Webhooks in PHP?
Large payloads with GitHub Webhooks can be handled in PHP by increasing the memory limit and max execution time of your PHP script. You can do this with the ini_set function. You can also process the payload in chunks to reduce memory usage.