

Threads have been an essential part of computer science and a versatile tool for programmers for decades. Most modern operating systems support threads, and Android is no exception. Android’s support for threads enables programmers to split their programs into multiple units that execute commands and instructions in parallel.
A thread is the smallest unit of processing that can be scheduled by an operating system. Your app’s main process (or program) can be broken into threads, which can then be scheduled simultaneously by the operating system. This method helps the programmer take care of longer processes in a separate thread, so that the main thread (in which the UI is running) remains quick and responsive to the user.
Key Takeaways
- Android’s support for threads allows programmers to divide their programs into multiple units that execute commands in parallel, enhancing the responsiveness of the application. The main thread handles all commands issued by the Android operating system, while longer processes are managed in separate background threads to prevent the application from becoming unresponsive.
- Android’s UI cannot be updated from a background thread, it must be updated from the main thread. Demonstrations in the text show how to use threads to create a program displaying a progress bar and digital watch, and to read a file in the background using AsyncTask.
- AsyncTask class in Android provides a convenient way to perform complex and time-consuming tasks in the background. It automates the process of creating and destroying the background thread, making it more efficient for the developer. However, it is not suitable for long-running operations or tasks where execution timing needs to be controlled.
Main Thread and Background Threads
Whenever we create an activity, it runs by default in the main thread of your application. All the commands issued by the Android operation system (like onClick, onCreate, etc.) are sent to and processed by this main thread.
But, if you include all of your processing logic in the main thread, your application might not be too busy to respond to the messages sent by the Android operating system. This might even make your application completely unresponsive, which would prompt Android to display the warning of “application not responding” and shut down your app by force.
To prevent this problem, it’s good practice to perform all the tasks that might take a long time in a separate background thread rather than in the main thread. This would leave the main thread free to remain responsive to the user input sent by the Android operating system.
One notable downside to this method is that the UI cannot be updated from the background thread, it has to be updated from the main thread. But, with a little planning ahead, this issue can be easily remedied.
Creating a Program to Show a Progress Bar Using Threads
As a demonstration of the versatility of threads, we are going to create a simple program that displays a background thread and passes information to a handler, which will update the progress bar.
Adding the Progress Bar
Android has a progress bar widget that can be used in the UI to show the progress in the UI.
We are going to add the progress bar by adding the <ProgressBar> tag in the standard layout.xml file.
The following is the layout.xml file:
<?xml version="1.0" encoding="utf-8"?>
<LinearLayout xmlns:android="http://schemas.android.com/apk/res/android"
android:orientation="vertical"
android:layout_width="fill_parent"
android:layout_height="fill_parent"
>
<TextView
android:layout_width="fill_parent"
android:layout_height="wrap_content"
android:text="@string/hello"
/>
<ProgressBar android:id="@+id/progress"
style="?android:attr/progressBarStyleHorizontal"
android:layout_width="fill_parent"
android:layout_height="wrap_content" />
</LinearLayout>
In the example above, we have added a “ProgressBar” with the ID as “progress” and the style as horizontal to display a horizontal progress bar.
Below is the onCreate method of the activity:
@Override
public void onCreate(Bundle savedInstanceState) {
super.onCreate(savedInstanceState);
setContentView(R.layout.main);
PrgBar=(ProgressBar)findViewById(R.id.progress);
}
In the above example, we create the instance of the progress bar and store it in a variable “PrgBar”.
If we run the program now, we should be able to see the following:
Adding a Handler
As mentioned before, we cannot update the UI from the background thread, so we will have to create a handler that will run in the main thread but receive messages from a background thread.
To create a handler, we need to create an instance of the “Handler” class and override the handleMessage function as follows:
Handler handler=new Handler() {
@Override
public void handleMessage(Message msg) {
PrgBar.incrementProgressBy(5);
}
};
As you can see, we’ve chosen to increment the value of our progress bar by 5.
Creating the Thread
Next, we declare “AtomicBoolean” to start and end the thread in the activity.
AtomicBoolean ContinueThread = new AtomicBoolean(false);
Then, we create the thread using the onStart method. The method will look like this:
void onStart() {
super.onStart();
PrgBar.setProgress(0);
Thread background=new Thread(new Runnable() {
public void run() {
try {
while(ContinueThread.get()) {
Thread.sleep(1000);
handler.sendMessage(handler.obtainMessage());
}
}
catch (Throwable t) {
}
}
});
ContinueThread.set(true);
background.start();
}
Using this method, we set the Progress bar value to 0. Then, we create a new thread by passing it an instance of class, which implements the run() method. Within the run method, we have a “while” loop which will continue until the AtomicBoolean ContinueThread is true.
Inside the while loop, we’ve made a thread to sleep for 1 second and then send a message to the handler which will increment the value of ProgressBar .
At the end of onStart, we set the value of ContinueThread to true, and then we start the background thread.
Stopping the Thread When the Activity Stops
To stop the thread, we will just need to set the ContinueThread to “false” within the onStop method of the activity.
public void onStop() {
super.onStop();
ContinueThread.set(false);
}
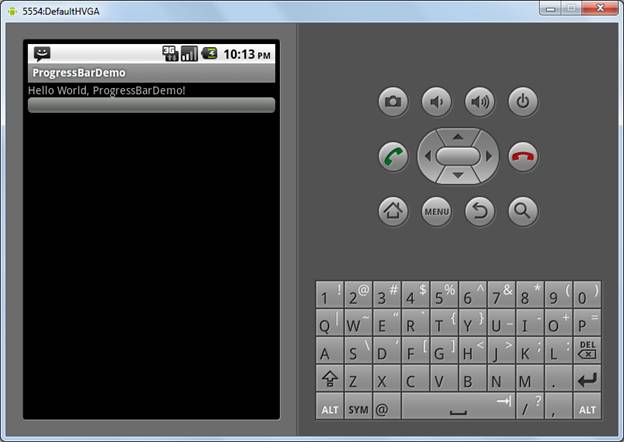
If we run the program, you will see the progress bar updating as shown in the image below.

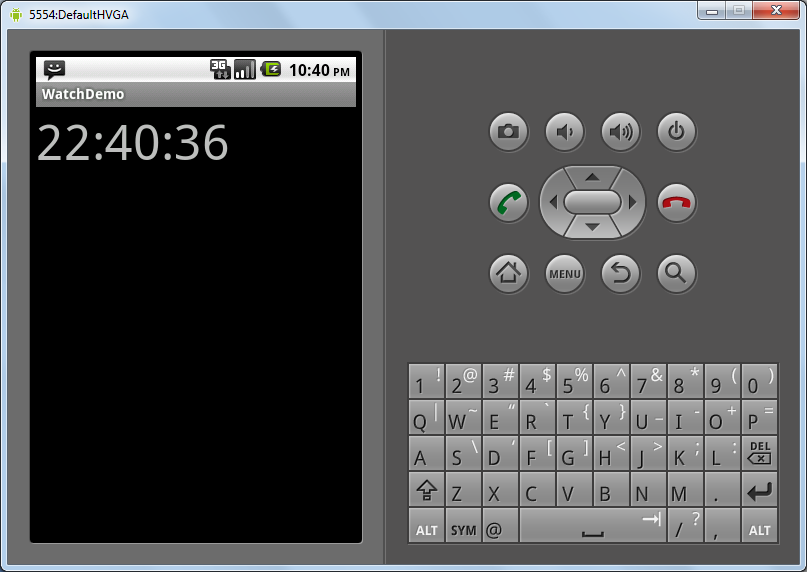
Creating a Program for a Digital Watch
Now, to further develop our use of threads, we are going to create a small digital watch program.
Creating the Activity and the TextView
To create a digital watch, first we will need to create an activity. In the activities main layout, declare a TextView. We are going to increase the font size of the TextView so that the digits in the watch are clear.
Below is the main layout.xml file:
<?xml version="1.0" encoding="utf-8"?>
<LinearLayout xmlns:android="http://schemas.android.com/apk/res/android"
android:orientation="vertical"
android:layout_width="fill_parent"
android:layout_height="fill_parent"
>
<TextView
android:id="@+id/txtWatch"
android:textSize="50dp"
android:layout_width="fill_parent"
android:layout_height="wrap_content"
android:text="@string/hello"
/>
</LinearLayout>
Creating a Function to Display the Current Time
Now, we are going to write a function to display the current time on the TextView. The function is as follows:
public void displayCurrentTime()
{
Date dt = new Date();
int hours = dt.getHours();
int minutes = dt.getMinutes();
int seconds = dt.getSeconds();
String curTime = hours + ":" + minutes + ":" + seconds;
Watch.setText(curTime);
}
In the example above, we create a new “Date” object that initializes with the current time.
Then, we read the hours, minutes, and seconds from that object, and we pass it on the Textiew.
We’ll use the function below to call in the onCreate function and display the current time:
@Override
public void onCreate(Bundle savedInstanceState) {
super.onCreate(savedInstanceState);
setContentView(R.layout.main);
Watch=(TextView)findViewById(R.id.txtWatch);
displayCurrentTime();
}
And in the handleMessage function of our previously-created handler, we’ll add the following:
Handler handler=new Handler() {
@Override
public void handleMessage(Message msg) {
displayCurrentTime();
}
};
Creating the Thread
Now, within the onStart function, we’ll create a Thread that sends a message to the main thread every second. The main thread will then update the TextView so that it displays the current time.
The onStart function is as follows:
public void onStart() {
super.onStart();
Thread background=new Thread(new Runnable() {
public void run() {
try {
while(ContinueThread.get()) {
Thread.sleep(1000);
handler.sendMessage(handler.obtainMessage());
}
}
catch (Throwable t) {
}
}
});
ContinueThread.set(true);
background.start();
}
Async Tasks
Android provides a convenient way to perform complex and time consuming tasks in the background by hiding the process of creating the background thread from the developer. This is done by the AsyncTask class.
To create an AsyncTask, you’ll simply create a child class inheriting from AsyncTask and then just override some of its default methods. The AsyncTask class will take care of creating the background thread, and it will also release and destroy the thread once it’s no longer needed. We will just have to call the execute method on the subclass of AsyncTask .
Creating an Async Task to Read a File in the Background
Now, we are going to create a simple program to read a file in a background thread using AsyncTask.
The code is as follows:
package asyncTaskDemo.com;
import java.io.BufferedReader;
import java.io.IOException;
import java.io.InputStream;
import java.io.InputStreamReader;
import android.app.Activity;
import android.os.AsyncTask;
import android.os.Bundle;
import android.widget.TextView;
public class AsyncTaskDemo extends Activity {
private TextView txtContent;
/** Called when the activity is first created. */
@Override
public void onCreate(Bundle savedInstanceState) {
super.onCreate(savedInstanceState);
setContentView(R.layout.main);
txtContent = (TextView) findViewById(R.id.txtContent);
ReadFileTask task = new ReadFileTask();
task.execute();
}
public InputStream openResourceFile(int id)
{
return getResources().openRawResource(id);
}
private class ReadFileTask extends AsyncTask<Void, Void, String> {
@Override
protected String doInBackground(Void... UnUsed) {
String response = "";
String str="";
StringBuffer buf = new StringBuffer();
InputStream is = openResourceFile(R.drawable.textfile);
BufferedReader reader = new BufferedReader(new InputStreamReader(is));
if (is!=null) {
try {
while ((str = reader.readLine()) != null) {
buf.append(str + "n" );
}
is.close();
} catch (IOException e) {
e.printStackTrace();
}
}
response = buf.toString();
return response;
}
@Override
protected void onPostExecute(String result) {
txtContent.setText(result);
}
}
}
Here we have a TextView within the UI on which we are going to display the contents of a file. This file will be read in the background using a separate thread. In the onCreate method, we simply get the TextView and store it in a member variable of the class. Finally, we create an instance of the AsyncTask class and execute it.
Async Task Arguments
While declaring the subclass to AsyncTask, we can also declare the types of arguments that we will pass to the different methods within our sub class. These arguments will override the defaults.
In our ReadFileTask class, we have used void, void, and string, so void will be the argument passed to the doInBackground function, void will be the argument passed to the onProgressUpdate function, and string will be the argument passed to the onPostExecute function.
private class ReadFileTask extends AsyncTask<Void, Void, String>
The Methods of AsyncTask
Now, we will override the doInBackground method of AsyncTask — the code that will run in background thread. Here, we are just opening a file in the drawable folder, reading it line by line, and storing it within a string buffer.
Then, we override the onPostExecute method, which will be called when the background thread has finished performing the task of displaying the file on the device’s screen.
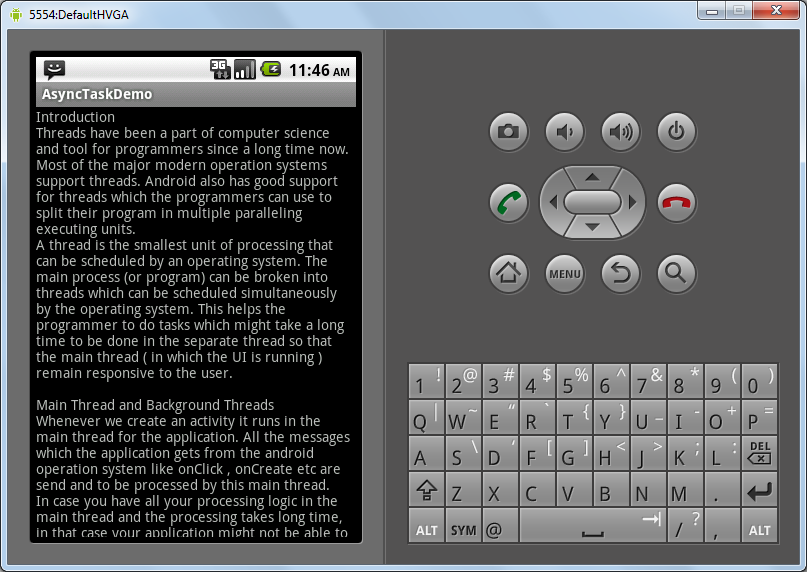
If we run the program now, the output will be as follows:
Conclusion
Developers always have to perform complex and time-consuming tasks within our Android apps. If these tasks aren’t segmented in separate threads, they might cause our application to hang, freeze, crash, or simply be a slow and inefficient. The benefits of using separate threads outweigh the downsides, so you should use them often to make snappy, responsive, crashproof Android apps.
Frequently Asked Questions (FAQs) about Android Threading
What is the main difference between a process and a thread in Android?
In Android, a process and a thread are two fundamental units of execution. A process is a self-contained execution environment that comprises a set of resources, including memory space and a set of system objects. Each Android application runs in its own process, with its own instance of the Dalvik virtual machine. On the other hand, a thread is a unit of execution within a process. Each process can have multiple threads, all of which share the process’s resources, including memory and open files. Threads are sometimes called lightweight processes because they require fewer resources to create and exist in the system.
How does Android handle multiple threads?
Android uses a single thread model, meaning that all components of an application (Activities, Services, Broadcast Receivers, Content Providers) are created in the same thread, known as the main thread or UI thread. However, Android allows you to create additional threads for operations that may block the main thread, such as network operations or heavy computations. These worker threads communicate with the main thread through a mechanism called a Handler.
What is the role of the Handler in Android threading?
A Handler in Android is a utility class used to communicate between threads. It allows you to send and process Message and Runnable objects associated with a thread’s MessageQueue. Each Handler instance is associated with a single thread and that thread’s message queue. When you create a new Handler, it is bound to the thread / message queue of the thread that is creating it.
What is AsyncTask in Android and how does it work?
AsyncTask is an abstract Android class designed to handle background tasks that need to communicate with the main thread. It allows you to perform background operations and publish results on the UI thread without having to manipulate threads and handlers. AsyncTask is designed to be a helper class around Thread and Handler and does not constitute a generic threading framework.
What are the potential issues with using AsyncTask?
While AsyncTask can be very useful for simple background tasks, it has some limitations. For instance, it’s not suitable for long-running operations or for tasks where you need to control the execution timing. Also, since it holds a reference to the Activity, it can cause memory leaks if not managed properly. Lastly, starting from Android 3.0, all AsyncTasks are executed sequentially on a single background thread, which can lead to poor performance for parallel tasks.
What is the difference between a Service and a Thread in Android?
A Service in Android is a component that can perform long-running operations in the background, and it does not provide a user interface. Unlike activities, services can run in the background indefinitely, even if the component that started the service is destroyed. On the other hand, a Thread is a concurrent unit of execution. It has its own call stack, but can access shared data of other threads in the same process.
How can I ensure thread safety in Android?
Thread safety in Android can be achieved through various means. One common method is to use synchronization, which ensures that only one thread can access a shared resource at a time. Another method is to use thread-safe classes provided by Java, such as ConcurrentHashMap, AtomicInteger, and CopyOnWriteArrayList. Lastly, you can use the volatile keyword to ensure that changes to a variable are always visible to other threads.
What is the Looper class in Android?
The Looper class in Android is a part of the Android system’s message handling mechanism. It loops through a thread’s MessageQueue and delivers each Message to the Handler that it is associated with. The Looper class is used in conjunction with the Handler class to schedule and execute tasks at a future point in time or to process messages in a message queue.
What is the purpose of the runOnUiThread method in Android?
The runOnUiThread method is a utility method provided by the Activity class in Android. It allows you to execute a piece of code on the UI thread from a background thread. This is useful when you need to update the UI from a background thread, as UI operations must always be performed on the UI thread.
How can I stop a thread in Android?
Stopping a thread in Android should be done carefully to avoid potential issues. One way is to use a volatile boolean variable as a flag that the thread checks periodically. When you want to stop the thread, you set the flag to false. However, this method only works if the thread is regularly checking the status of the flag. Another way is to use the interrupt method, which sets the thread’s interrupt status. The thread can then check its interrupt status with the isInterrupted method and terminate if it has been interrupted.

