
Object Orientated code is everywhere and WordPress is no exception.
The Core of WordPress is built on series of objects/classes used to control everything from manipulation of the database to the look and feel of your site.
Throughout this tutorial, we will look into Object Orientated design and how you can use these in practical applications when developing for WordPress including:
- Understanding exactly what object orientated design is.
- Discussing why we should use object orientated design.
- Examining a real world example to showcase how it can work.
Note 1: Also note that this tutorial outlines primarily WordPress centric concepts, so if you are entirely new to object orientated design you should probably get a quick overview of OO via the PHP reference guide.
Note 2: If you’re keen on downloading everything right away feel free to download the source from my GitHub repository and follow along with the tutorial.
Let’s jump right into it!
Key Takeaways
- Object Oriented Design (OOD) in WordPress groups related functions and information into classes, enhancing code organization and maintenance.
- OOD offers benefits such as better organization through encapsulation, scalability via inheritance, and modularity for easier code reuse and management.
- The tutorial provides a practical example of creating a custom event showcase in WordPress, demonstrating the implementation of OOD principles.
- Key steps in the example include setting up a directory structure, creating class files, and implementing functions for adding and displaying custom content types and meta boxes.
- The guide emphasizes the advantages of OOD over procedural programming, highlighting organization, scalability, and modularity.
- The tutorial concludes with a call to action to download the source code from GitHub, encouraging readers to apply the demonstrated OOD concepts in their WordPress development projects.
What Is Object Orientated Design Anyway?
Object Orientation Design (OO Design) is a different methodology for solving issues, separate from the traditional procedural approach.
With Object Orientated Design you create a structure (class) that will group together all of your related functions (methods) and information (properties) to solve an issue.
This is different from procedural development in which you create functions and variables to solve issues, however, these elements can be separated across multiple files, re-declared and often loosely related.
In a nutshell, object orientated design is about bringing together related functionality into a single place so that it can be maintained, expanded and used from a single location.
Why Object Orientation Is a Good Idea?
Since procedural code has worked well you might be wondering what’s the point in developing in an object orientated approach?
While there is nothing ‘wrong’ with procedural design, there are several benefits to developing in a more object orientated style.
Organisation
You code is generally better organized when using an object orientated approach. Creating classes means that the functionality for solving your issue is all within a file (unlike procedural development where you may have functions and variables spread everywhere).
Having all of your code in one place helps you keep things organised and assists other developers who may come along and need to understand how your system works.
There’s nothing worse than picking up a project and having to hunt around to find the functions and variables that are used to create various elements of the site (which are invariably spread across multiple files for reasons unknown).
Scalability
When solving issues with an object orientated approach you create classes.
These classes can be expanded or scaled by extending them using inheritance. Inheritance will let you create a class based off another class which gives access to all of its properties and methods to the new class.
You can expand a class to perform additional functionality, or even override its methods and properties to cater to the situation.
With procedural code you would either need to refactor part of your code or create new code entirely to handle additional situations.
Modularity
The purpose of object orientated design is to encapsulate all of the functionality to solve a situation into a class.
Since all of the code to solve an issue is inside a class and that class generally within its own PHP file, you can take an entire file and use it in another location, thus it is modular in nature.
The benefit of this is that if you write classes well enough, you should be able to reuse them later on and only have to perform slight customizations.
While you can copy and paste procedural code, it’s generally not as well organized and you may have to go through several files to ensure you have the functionality needed.
Example Scenario – Creating a Simple Event Showcase
In this scenario, our client wants a location on their website where they can create and manage events. These events will be used to promote upcoming trivia nights, bingo competitions and other fun activities.
The first steps are to break down the desired functionality so we can plan our solution (planning well here will help our object orientated approach going forward). In our scenario, we can see the following set of tasks:
- Create a custom content type to manage these ‘events’.
- Add additional meta boxes to handle additional information processing.
- Save additional meta information.
- Display meta information for our ‘events’.
We can create either a plugin or we can edit the child theme to provide this functionality.
For this scenario, we will create our functionality inside of a file which we can then include in the child theme. I’ve chosen this method because we will want to edit our theme templates so we can output our additional event information.
Getting Your Directory Set up and Creating Your Files
Because we want everything to be easily managed and modular, let’s start by setting up the folder structure inside the child theme.
An easy way to organize everything is by creating an includes directory inside your child theme. This directory will contain other code or functionality your theme will include/implement (you can call this whatever you want, the purpose is to have a single directory inside the theme).
Inside this directory we should make another folder, this time called event_showcase. It is inside this folder we will be placing all of our applicable files for this scenario. We will also need a js and a css folder.
Organizing your functionality into folders will mean that going forward you can more easily see what modules / features your theme implements. For example, you might want to implement another set of functionality for your theme you could just add a new folder and logically everything is neatly organized.
Let’s create the files for our example and move them into their correct directories
event_showcase_class.phpevent_showcase_admin_styles.cssevent_showcase_admin_scripts.jsevent_showcase_public_styles.cssevent_showcase_public_scripts.js
You should have something similar to below:
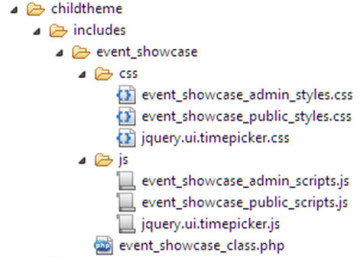
Later on you will need to download and place the jQuery time picker script and style inside this directory. Don’t worry about this for now.
Loading Your Files Inside WordPress
With our files set up we now need to include them inside of our child theme.
Open up your child theme’s functions.php and place the following code at either the top or bottom
//Theme functions for child theme
//load our event showcase class

$event_showcase = get_stylesheet_directory() . '/includes/event_showcase/event_showcase_class.php';

include($event_showcase);
This will load the main class file which will outline our functionality. Inside of this class we will handle script and style enqueuing along with other elements.
Creating Your Class Outline
Our class file called event_showcase_class.php will contain the majority of the functionality used for our events system; as such it’s a good idea to map out a basic outline of what methods and properties we will need to make this work.
Copy the following code into your class file.
/*

 * Event Showcase

 * Creates an 'event' content type to showcase upcoming functions and information

 * Uses hooks and filters inside your theme to output relevant information

 */
 class event_showcase{
	//variables

	private $directory = '';

	private $singular_name = 'event';

	private $plural_name = 'events';

	private $content_type_name = 'event_showcase';
	//magic function, called on creation

	public function __construct(){}

	//sets the directory (path) so that we can use this for our enqueuing

	public function set_directory_value(){}

	//check if we need to flush rewrite rules

	public function check_flush_rewrite_rules(){}

	//enqueue public scripts and styles

	public function enqueue_public_scripts_and_styles(){}

	//enqueue admin scripts and styles

	public function enqueue_admin_scripts_and_styles(){}

	//adding our new content type

	public function add_content_type(){}

	//adding meta box to save additional meta data for the content type

	public function add_meta_boxes_for_content_type(){}

	//displays the visual output of the meta box in admin (where we will save our meta data)

	public function display_function_for_content_type_meta_box($post){}

	//when saving the custom content type, save additional meta data

	public function save_custom_content_type($post_id){}

	//display additional meta information for the content type

	//@hooked using 'display_additional_meta_data' in theme

	function display_additional_meta_data(){}

 }
 //create new object

 $event_showcase = new event_showcase;
Let’s run through the methods and properties so we can understand the process flow:
- Variables – We declare a few variables to make the class more modular (so we can copy this file and change a few properties and the class will handle the other changes).
__construct()– All of our hooks, filters and initializing code will go in here.set_directory_value()– Defines ourdirectoryproperty which will let us easily enqueue files that we place in our CSS or JS directories.check_flush_rewrite_rules()– Handles the flushing of the pretty permalinks when we add our content type (which makes the new items work).enqueue_public_scripts_and_styles()– Loads our public facing scripts and styles.enqueue_admin_scripts_and_styles()– Loads the admin scripts and styles.add_content_type()– Defines the new content type we are creating.add_meta_boxes_for_content_type()– Adds the meta boxes for our new content type.display_function_for_content_type_meta_box– Builds the back-end admin interface for the content type so we can save extra information.save_custom_content_type($post_id)– Handles saving of the custom content type (and our meta information).display_additional_meta_data()– Displays the saved meta information on the front end.
Let’s go through now and update these elements and outline the code
The Class Properties
We declare some properties at the top of our class that will be referenced via our methods. The purpose of these is that they make it easier to re-purpose this class and change its functionality in the future.
//variables

private $directory = '';

private $singular_name = 'event';

private $plural_name = 'events';

private $content_type_name = 'event_showcase';
__construct()
Our __construct function is a magic function. These functions are special PHP5+ functions that classes can access to perform specific actions.
All of them start with the double underscore before their name and can be optionally included in any class definition. Understanding all of the magic functions is best left for another discussion (here is another article on magic functions and constants).
The __construct function is called as soon as a class is initialized so it is the first function that will be triggered. It is here we are adding all of our hooks, filters and startup logic. Update the basic outline with the following code.
//magic function, called on creation

public function __construct(){
	$this->set_directory_value(); //set the directory url on creation

	add_action('init', array($this,'add_content_type')); //add content type

	add_action('init', array($this,'check_flush_rewrite_rules')); //flush re-write rules for permalinks (because of content type)

	add_action('add_meta_boxes', array($this,'add_meta_boxes_for_content_type')); //add meta boxes

	add_action('wp_enqueue_scripts', array($this,'enqueue_public_scripts_and_styles')); //enqueue public facing elements

	add_action('admin_enqueue_scripts', array($this, 'enqueue_admin_scripts_and_styles')); //enqueues admin elements

	add_action('save_post_' . $this->content_type_name, array($this,'save_custom_content_type')); //handles saving of content type meta info

	add_action('display_content_type_meta', array($this,'display_additional_meta_data')); //displays the saved content type meta info

}
You might be thinking that the add_action looks a little different than what you may have seen before and you’re correct.
When using add_action and add_filter calls inside a class you must supply the second argument in an array. The first value of the array is the $this variable (meaning the class itself) and the second is the name of the function that will be used (wrapped in quotes).
For more information view the class footnote for the add_action function on the WordPress Codex.
set_directory_value()
Since we will be enqueuing CSS and JS, it makes sense to store the file directory URL into a variable that we can access. Our directory structure is /includes/event_showcase however it can customized to suit your structure.
//sets the directory (path) so that we can use this for our enqueuing

public function set_directory_value(){

	$this->directory = get_stylesheet_directory_uri() . '/includes/event_showcase';

}
check_flush_rewrite_rules()
Since we are adding a custom content type we need to handle Pretty Permalinks; these permalinks are rewrites that make your page URL look less ugly (instead of having http://mywebsite.com.au/?p=123 you can have http://mywebsite.com.au/my-event).
Rewriting ensures that your content types are converted into the pretty format, however, this rewriting is expensive and if done excessively can slow your site down. Because rewriting can affect your site it is generally only changed on theme/plugin activation or deactivation.
Since you may not want to manually update your permalinks, this function asks WordPress to do it automatically and only once (after your new content type has been added).
This function will check to see if the website needs to be flushed via a theme option. If a flush is required it will update the permalinks and then set the value of the option to false (so it triggers only once, not every time we load a page).
//check if we need to flush rewrite rules

public function check_flush_rewrite_rules(){

	$has_been_flushed = get_option($this->content_type_name . '_flush_rewrite_rules');

	//if we haven't flushed re-write rules, flush them (should be triggered only once)

	if($has_been_flushed != true){

		flush_rewrite_rules(true);

		update_option($this->content_type_name . '_flush_rewrite_rules', true);

	}

}
enqueue_public_scripts_and_styles()
This function handles the enqueuing of the scripts and styles for the website on the front-end.
We use the name of the content type in the enqueue calls so that there shouldn’t be any naming conflicts with other plugins (as it will translate into something unique i.e `event_showcase_public_scripts`).
We call both wp_enqueue_style and wp_enqueue_script to load our resources.
We also use the $directory and $content_type_name properties when loading our resources.
//enqueue public scripts and styles

public function enqueue_public_scripts_and_styles(){

	//public styles

	wp_enqueue_style(

		$this->content_type_name . '_public_styles',

		$this->directory . '/css/' . $this->content_type_name . '_public_styles.css'

	);

	//public scripts

	wp_enqueue_script(

		$this->content_type_name . '_public_scripts',

		$this->directory . '/js/' . $this->content_type_name . '_public_scripts.js',

		array('jquery')

	);

}
enqueue_admin_scripts_and_styles()
This function handles the enqueuing of the scripts and styles for the website on the admin back-end.
We check to see if we are on an edit screen or new screen for our content type and proceed only if we are (no need to load resources when we’re not on the right page).
We call both wp_enqueue_style and wp_enqueue_script to load our resources, essentially the same as our public facing function.
For this example, I am using both the jQuery UI Datepicker (part of the jQuery UI library) and the jQuery UI Time Picker (built to have a similar style as the date picker).
Go and download the Time Picker library from the above link and include the relevant CSS and JS file inside your directory.
//enqueue admin scripts and styles

public function enqueue_admin_scripts_and_styles(){
	global $pagenow, $post_type;
	//process only on post edit page for custom content type

	if(($post_type == $this->content_type_name) && ($pagenow == 'post-new.php' || $pagenow == 'post.php')){
		//admin styles

		wp_enqueue_style(

			$this->content_type_name . '_public_styles',

			$this->directory . '/css/' . $this->content_type_name . '_admin_styles.css'

		);

		//jquery ui styles for datepicker

		wp_enqueue_style(

			$this->content_type_name . '_jquery_ui_style',

			'//code.jquery.com/ui/1.11.4/themes/smoothness/jquery-ui.css'

		);

		//timepicker styles

		wp_enqueue_style(

			'jquery_ui_timepicker_styles',

			$this->directory . '/css/jquery.ui.timepicker.css'

		);

		//timepicker script

		wp_enqueue_script(

			'jquery_ui_timepicker_script',

			$this->directory . '/js/jquery.ui.timepicker.js'

		);

		//admin scripts (depends on datepicker and timepicker)

		wp_enqueue_script(

			$this->content_type_name . '_public_scripts',

			$this->directory . '/js/' . $this->content_type_name . '_admin_scripts.js',

			array('jquery','jquery-ui-datepicker','jquery_ui_timepicker_script')

		);

	}

}
add_content_type()
We declare our custom content type in this function.
The function uses the $singular_name, $plural_name and $content_type_nameproperties to make the registration of this new post type easy.
Structuring the registration function like this means that you can easily change and register a post type by supping only a few pieces of information.
For a more detailed outline on registering custom content types please view the WordPress codex for the register_post_type function
//adding our new content type

public function add_content_type(){

	 $labels = array(

           'name'               => ucwords($this->singular_name),

           'singular_name'      => ucwords($this->singular_name),

           'menu_name'          => ucwords($this->plural_name),

           'name_admin_bar'     => ucwords($this->singular_name),

           'add_new'            => ucwords($this->singular_name),

           'add_new_item'       => 'Add New ' . ucwords($this->singular_name),

           'new_item'           => 'New ' . ucwords($this->singular_name),

           'edit_item'          => 'Edit ' . ucwords($this->singular_name),

           'view_item'          => 'View ' . ucwords($this->plural_name),

           'all_items'          => 'All ' . ucwords($this->plural_name),

           'search_items'       => 'Search ' . ucwords($this->plural_name),

           'parent_item_colon'  => 'Parent ' . ucwords($this->plural_name) . ':',

           'not_found'          => 'No ' . ucwords($this->plural_name) . ' found.',

           'not_found_in_trash' => 'No ' . ucwords($this->plural_name) . ' found in Trash.',

       );
       $args = array(

           'labels'            => $labels,

           'public'            => true,

           'publicly_queryable'=> true,

           'show_ui'           => true,

           'show_in_nav'       => true,

           'query_var'         => true,

           'hierarchical'      => false,

           'supports'          => array('title','editor','thumbnail'),

           'has_archive'       => true,

           'menu_position'     => 20,

           'show_in_admin_bar' => true,

           'menu_icon'         => 'dashicons-format-status'

       );
	//register your content type

	register_post_type($this->content_type_name, $args);
}
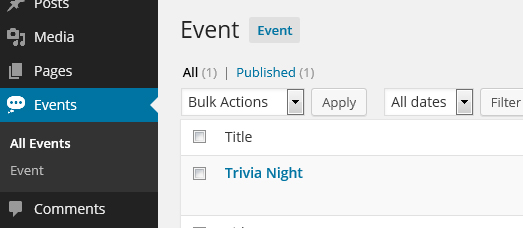
Once you’ve added this step you should see a new item has been added to the back-end WordPress menu.
add_meta_boxes_for_content_type()
We add the meta boxes we need for our content type here. We call the add_meta_box function and provide it with out functionality. The short story is that we use this to create a new admin box to hold our new form elements we want to save.
//adding meta box to save additional meta data for the content type

public function add_meta_boxes_for_content_type(){
	//add a meta box

	add_meta_box(

		$this->singular_name . '_meta_box', //id

		ucwords($this->singular_name) . ' Information', //box name

		array($this,'display_function_for_content_type_meta_box'), //display function

		$this->content_type_name, //content type

		'normal', //context

		'default' //priority

	);
}
display_function_for_content_type_meta_box($post)
We use this function to output the back-end options for the new meta information for our content type.
For our example, we are collecting dates, times and other information about the event that we will show to the end user.
We start by collecting all of the additional post meta into variables and displaying the output of the HTML form. Some of these fields will trigger the date picker interface and others will trigger the time picker (determined by the class used on the element).
In addition, we set a nonce field so that we can verify on save if the request came from this page.
//displays the back-end admin output for the event information
public function display_function_for_content_type_meta_box($post){

	//collect meta information
	$event_subtitle = get_post_meta($post->ID,'event_subtitle', true);
	$event_start_date = get_post_meta($post->ID,'event_start_date', true);
	$event_end_date = get_post_meta($post->ID,'event_end_date', true);
	$event_start_time = get_post_meta($post->ID,'event_start_time', true);
	$event_end_time = get_post_meta($post->ID,'event_end_time', true);
	$event_location = get_post_meta($post->ID,'event_location', true);
	$event_price = get_post_meta($post->ID,'event_price', true);

	//set nonce
	wp_nonce_field($this->content_type_name . '_nonce', $this->content_type_name . '_nonce_field');

	?>
	<p>Enter additional information about your event below</p>
	<div class="field-container">
		<label for="event_subtitle">Subtitle</label>
		<input type="text" name="event_subtitle" id="event_subtitle" value="<?php echo $event_subtitle; ?/>"/>
	</div>
	<div class="field-container">
		<label for="event_location">Event Location</label>
		<textarea name="event_location" id="event_location">< ?php echo $event_location; ?></textarea>
	</div>
	<div class="field-container">
		<label for="event_start_date">Start Date</label>
		<input type="text" name="event_start_date" id="event_start_date" class="admin-datepicker" value="<?php echo $event_start_date; ?/>" required/>
	</div>
	<div class="field-container">
		<label for="event_end_date">End Date</label>
		<input type="text" name="event_end_date" id="event_end_date" class="admin-datepicker" value="<?php echo $event_end_date;  ?/>" required/>
	</div>
	<div class="field-container">
		<label for="event_start_time">Start Time</label>
		<input type="text" name="event_start_time" id="event_start_time" class="admin-timepicker" value="<?php echo $event_start_time; ?/>" required/>
	</div>
	<div class="field-container">
		<label for="event_end_time">End Time</label>
		<input type="text" name="event_end_time" id="event_end_time" class="admin-timepicker" value="<?php echo $event_end_time; ?/>" required/>
	</div>
	<div class="field-container">
		<label for="event_price">Price</label>
		<input type="text" name="event_price" id="event_price"  value="<?php echo $event_price; ?/>"/>
	</div>
	< ?php
}
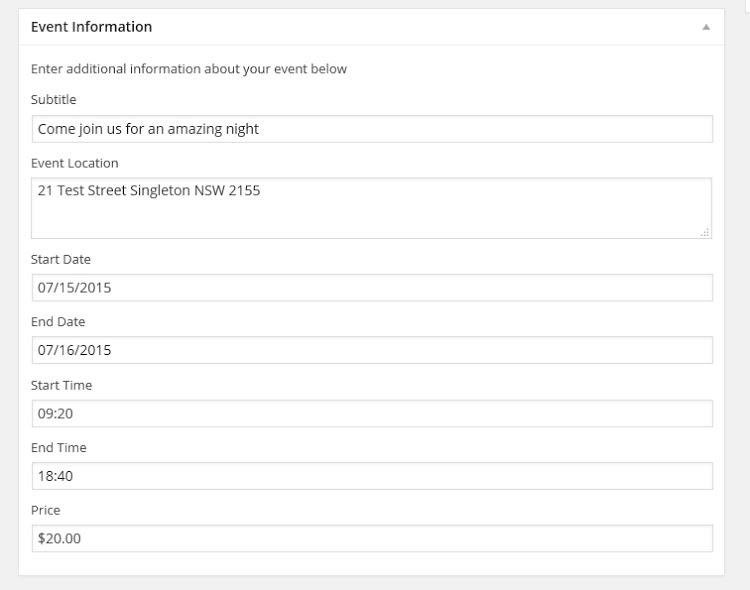
When you’re all done with this step you should see the new empty meta box has been transformed and now can hold all of our new info.
save_custom_content_type($post_id)
Here is where we save our additional meta data for our custom content type.
We first check for the nonce that we added in our meta box and verify its authenticity. After this we check that we are not doing an autosave and that the user can actually edit this page. If all of those checks are passed we move forward.
We collect all of our values into variables and sanitize them using the sanitize_text_field function. After this we call the update_post_meta function to save our data.
//when saving the custom content type, save additional meta data

public function save_custom_content_type($post_id){
	//check for nonce

	if(!isset($_POST[$this->content_type_name . '_nonce_field'])){

		return $post_id;

	}

	//verify nonce

	if(!wp_verify_nonce($_POST[$this->content_type_name . '_nonce_field'] , $this->content_type_name . '_nonce')){

		return $post_id;

	}

	//check for autosaves

	if(defined('DOING_AUTOSAVE') && DOING_AUTOSAVE){

		return $post_id;

	}

	//check if the user can edit

	if(!current_user_can('edit_posts')){

		return $post_id;

	}
	//collect sanitized information

	$event_subtitle =sanitize_text_field($_POST['event_subtitle']);

	$event_start_date =sanitize_text_field($_POST['event_start_date']);

	$event_end_date = sanitize_text_field($_POST['event_end_date']);

	$event_start_time =sanitize_text_field($_POST['event_start_time']);

	$event_end_time = sanitize_text_field($_POST['event_end_time']);

	$event_location = sanitize_text_field(wpautop($_POST['event_location']));

	$event_price = sanitize_text_field($_POST['event_price']);
	//save post meta

	update_post_meta($post_id,'event_subtitle',$event_subtitle);

	update_post_meta($post_id,'event_start_date',$event_start_date);

	update_post_meta($post_id,'event_end_date',$event_end_date);

	update_post_meta($post_id,'event_start_time',$event_start_time);

	update_post_meta($post_id,'event_end_time',$event_end_time);

	update_post_meta($post_id,'event_location',$event_location);

	update_post_meta($post_id,'event_price', $event_price);
}
display_additional_meta_data()
This function displays the saved meta information for a single post of our new content type (single event).
We defined a new action called display_content_type_meta inside of our __construct function, here is what it looked like:
add_action('display_content_type_meta', array($this,'display_additional_meta_data')); //displays the saved content type meta infoThis action’s second value was called display_additional_meta_data and corresponds to this function. This means that any time someone calls do_action('display_content_type_meta'); it will call this function and display the new post meta information.
You can call do_action('display_content_type_meta');from anywhere inside your theme (so long as you are on a single post of this content type) and it will display the meta information.
I am using a parent theme of twenty thirteen so I am hooking into the content.php of the child theme for my display.
This function will get the global $post and $post_type and check that the current item being viewed is of our new content type.
After this the function collects the meta information and displays it (making a few quick checks along the way).
//display additional meta information for the content type

	//@hooked using 'display_additional_meta_data' in theme

	function display_additional_meta_data(){

		global $post, $post_type;
		//if we are on our custom post type

		if($post_type == $this->content_type_name){
			//collect information

			$event_subtitle = get_post_meta($post->ID,'event_subtitle', true);

			$event_start_date = get_post_meta($post->ID,'event_start_date', true);

			$event_end_date = get_post_meta($post->ID,'event_end_date', true);

			$event_start_time = get_post_meta($post->ID,'event_start_time', true);

			$event_end_time = get_post_meta($post->ID,'event_end_time', true);

			$event_location = get_post_meta($post->ID,'event_location', true);

			$event_price = get_post_meta($post->ID,'event_price', true);
			$html = '';

			if(!empty($event_subtitle)){

				$html .= '
' . $event_subtitle . '
';

			}

			$html .= '
';

				$html .= '
Start: ' . $event_start_date . ' - ' . $event_start_time . '
';

				$html .= '
End: ' . $event_end_date . ' - ' . $event_end_time . '
';

			if(!empty($event_location)){

				$html .= '
Location: ' . $event_location . '
';

			}

			if(!empty($event_price)){

				$html .= '
Price: ' . $event_price . '
';

			}

			$html .= '
';
			echo $html;
		}
	}
Additional Files, CSS and JS
Now that the bulk of the functionality has been completed let’s swap into our CSS and JS files to quickly add some styles and interactivity.
event_showcase_admin_styles.css
/*

 * Admin Styles

 * Styling the back-end of our content type

 */
.field-container{

	margin-bottom: 10px;

}

.field-container label{

	display: block;

	margin-bottom: 5px;

	width: 100%;

}

.field-container input,

.field-container textarea,

.field-container select{

	width: 100%;

}
event_showcase_public_styles.css
/*

 * Public Styles

 * Front end stytes to format our additional content meta

 */
.additional-meta{

	margin-bottom: 15px;

}

.additional-meta .meta{

	margin-bottom: 5px;

}

.additional-meta .meta span{

	margin-left: 10px;

}
event_showcase_admin_scripts.js
/*

 * Admin Scripts

 * activates jQuery date picker and time picker on the backend

 */
jQuery(document).ready(function($){
	//activate datepicker

	$('.admin-datepicker').datepicker();
	//activate timepicker

	$('.admin-timepicker').timepicker();

});
Completed Functionality in Action!
When everything is all pieced together you should be able to create a new ‘event’ with additional meta data. When you view your event you should see something to my sample below

You can see the additional subtitle, dates, times and ticket data.
Extending a basic post type like this and adding extra elements helps to create a much more interactive and easy website to manage. No longer will the user have to add all of that information via the content area which can be messy, hard to use and inconsistent. They now have a simple easy to manage the interface.
Where to from Here?
Now that you have seen a practical example of Object Orientated design and how easy it can be to enhance your development, you can can apply these skills and build better themes and plugins.
You might want to download the source of this example from my GitHub page and then alter it suit an upcoming project or extend it to provide additional functionality.
Hopefully this article will help you plan your development and see how an object orientated methodology can save you both time and effort.
Frequently Asked Questions about Object-Oriented Development with WordPress
What is Object-Oriented Programming (OOP) in WordPress?
Object-Oriented Programming (OOP) in WordPress is a programming style that uses “objects” – instances of classes, which are like blueprints. These objects are used to interact with one another to design applications and software. OOP in WordPress is beneficial because it provides a clear modular structure for programs which makes it good for defining abstract datatypes where implementation details are hidden and the unit has a clearly defined interface.
How does Object-Oriented Programming differ from Procedural Programming in WordPress?
Procedural Programming in WordPress involves writing a list of instructions for the computer to follow step-by-step in order to accomplish a task. On the other hand, Object-Oriented Programming organizes a program around its data (objects) and a set of well-defined interfaces to that data. This approach makes it easier to manage and control complex applications by breaking them down into smaller, reusable pieces.
What is the WordPress Object Cache?
The WordPress Object Cache is a system that improves WordPress performance by storing data from the database in memory to prevent unnecessary queries. This can significantly speed up WordPress as it reduces the load on the database.
How can I remove obj in a box in WordPress?
To remove obj in a box in WordPress, you can use various methods such as disabling the object cache, using a plugin, or manually removing it from the code. However, it’s important to note that this should be done carefully to avoid breaking your site.
How can I implement Object-Oriented Programming in my WordPress theme?
To implement Object-Oriented Programming in your WordPress theme, you need to define classes and methods within your functions.php file or within individual template files. These classes and methods can then be used to create objects, which can interact with one another to perform tasks.
What are the benefits of using Object-Oriented Programming in WordPress?
Object-Oriented Programming in WordPress offers several benefits. It makes the code more compact, easier to understand, and easier to maintain. It also makes it possible to create more complex functionality with less code. Moreover, it allows for better data analysis, more accurate coding, and faster development.
What does ‘obj’ that appears in the post title mean in WordPress?
The ‘obj’ that appears in the post title in WordPress is usually a result of a conflict with a plugin or theme. It’s not a standard part of WordPress, and it can be removed by identifying and resolving the conflict.
How can I learn Object-Oriented Programming for WordPress?
There are many resources available to learn Object-Oriented Programming for WordPress. This includes online tutorials, courses, and books. You can also learn by examining the WordPress core code, as it’s written using OOP principles.
Is Object-Oriented Programming necessary for WordPress development?
While Object-Oriented Programming is not strictly necessary for WordPress development, it’s highly recommended. Using OOP principles can help make your code more readable, reusable, and easier to maintain. It can also help you understand the WordPress core code better.
Can I use Object-Oriented Programming with WordPress plugins?
Yes, you can use Object-Oriented Programming with WordPress plugins. In fact, many WordPress plugins are written using OOP principles. This allows for more complex functionality and can make the plugin code easier to manage and maintain.