Three Hidden Photoshop Pen Tool Tips
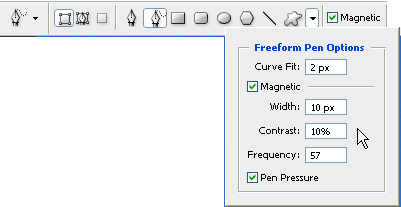
 However, there are more options! Again on the tool options bar, click on the Custom Shape tool icon to reveal a pop-up menu. These give you much more control over how the points on the path will be laid out when you draw. Remember, when drawing paths a good rule of thumb for smooth edges is to use as FEW points as possible.
 Avoiding The Toolbar
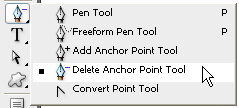
As you might know, after you’ve drawn a path with the Pen tool (or the Shape tools), you can go back and add or delete anchor points. The image below shows the various Pen tools in the toolbox. However, you can save a lot of time by not going back and forward to the toolbar to choose these tools.
 So let’s say you’ve drawn out a path with the pen tool and you now want to add another point. With the Pen tool still active, when you roll the cursor over a line segment, your Pen cursor automatically changes to the Add Anchor Point tool so you can click anywhere along that path to add a point. When you move your cursor over an existing anchor point, the cursor changes into the Delete Anchor Point tool (click on the point, and it’s deleted).
This happens because there is an checkbox called Auto Add/Delete on the Pen tool options bar which is turned on by default.
 This is called “Auto Add/Delete,” and it’s on by default (you can turn if off, should you want to, using the checkbox in the Options Bar). To use the Convert Point tool without going back to the toolbox, simply hold down the Alt/Option key in conjunction with the Pen tool and click and drag any point to convert it from a straight point to a curve or vice versa.
Make A Selection From A Path
After you’ve drawn out a path with the Pen tool, go the the Paths palette where you’ll see a thumbnail version of your path. To change that path into a selection, click on the Load path as a selection icon.
 To save time though, you don’t even have to open the Paths palette. After you draw your path simply use a keyboard shortcut Ctrl+Enter (Win) Cmd+Return
(PC).
Have you got some Pen tool tips you’d like to share?
Frequently Asked Questions about Photoshop Pen Tool Tips
How can I use the Pen Tool to create complex shapes in Photoshop?
The Pen Tool in Photoshop is a versatile tool that can be used to create complex shapes. Start by selecting the Pen Tool from the toolbar. Click on the canvas to create the first anchor point, then click again to create a second point. A line will be drawn between these two points. Continue this process to create your shape. To create curves, click and drag the mouse. The direction and distance you drag the mouse will determine the shape and size of the curve. To close the shape, click on the first anchor point you created.
What are some tips for using the Pen Tool effectively?
One tip for using the Pen Tool effectively is to use as few points as possible. This makes it easier to edit the path later. Another tip is to use the Alt/Option key to adjust the direction of the curve without affecting the other side. Also, remember to use the Shift key to create straight lines.
How can I edit paths created with the Pen Tool?
To edit paths created with the Pen Tool, use the Direct Selection Tool or the Path Selection Tool. The Direct Selection Tool allows you to select and move individual anchor points or segments of the path. The Path Selection Tool allows you to select and move the entire path.
How can I convert paths to selections?
To convert a path to a selection, right-click on the path and choose “Make Selection”. You can then choose the feather radius and whether to create a new selection, add to an existing selection, subtract from an existing selection, or intersect with an existing selection.
How can I use the Pen Tool to create precise selections?
The Pen Tool is ideal for creating precise selections, especially for complex shapes or objects with smooth edges. After creating a path around the object, right-click on the path and choose “Make Selection”. This will create a selection that exactly matches the path.
How can I use the Pen Tool to create vector shapes?
To create vector shapes with the Pen Tool, select the “Shape” option in the options bar before you start drawing. This will create a new shape layer every time you draw a path. You can then fill the shape with color, apply a stroke, or apply layer styles.
How can I use the Pen Tool to draw straight lines?
To draw straight lines with the Pen Tool, click to create the first anchor point, then hold down the Shift key and click to create the second point. The Shift key constrains the line to multiples of 45 degrees.
How can I use the Pen Tool to draw curves?
To draw curves with the Pen Tool, click and drag the mouse. The direction and distance you drag the mouse will determine the shape and size of the curve. You can adjust the curve by moving the direction handles that appear.
How can I use the Pen Tool to add or delete anchor points?
To add an anchor point, select the Add Anchor Point Tool from the toolbar and click on the path. To delete an anchor point, select the Delete Anchor Point Tool and click on the anchor point.
How can I use the Pen Tool to split a path?
To split a path, select the Convert Point Tool from the toolbar and click and drag an anchor point. This will split the path into two separate paths.
Jennifer Farley is a designer, illustrator and design instructor based in Ireland. She writes about design and illustration on her blog at Laughing Lion Design.
Published in
·Design·Design & UX·HTML & CSS·Photography & Imagery·Photoshop·Resources·Review·Software·September 23, 2014
Published in
·Canvas & SVG·Design·Design & UX·HTML·HTML & CSS·Illustration·UI Design·September 16, 2015


