Creating movement is great way to provide an interesting and interactive experience for your viewers. With modern sites providing a greater deal of interactivity, it’s becoming increasingly expected that even simple websites will offer some level of animation / movement to engage their visitors.
Today I will be outlining a technique that you can adapt to your web projects – triggering animations when scrolling into a pre-defined region. These animations will be created using CSS transforms and CSS transitions. We will also use jQuery to detect when the elements are visible and to add/remove the appropriate classes.
For those who want to see examples of this in action, you can jump straight to the demos.
Key Takeaways
- Scroll-based animations can be created using jQuery and CSS3, providing an interactive experience for viewers. These animations are triggered when a user scrolls into a pre-defined region, making them more engaging and visually appealing.
- The technique involves using CSS transforms and CSS transitions, with jQuery used to detect when elements are visible and to add/remove appropriate classes. Considerations for this approach include browser compatibility and speed, with modern browsers supporting 2D and 3D transformations for smooth animations.
- The process involves detecting animation elements in view, hooking into the scroll event, handling resizing, and calculating the height and width of elements. The animations can be triggered when an element is within the viewport, allowing for additional transformations or effects to be chained for interactive interfaces.
- Examples of scroll animation include sliding in elements from the left, fading elements from the bottom upwards, and multi-step bouncing animation. These techniques can be adapted for various web projects, such as displaying staff profiles or course information.
Why Trigger Animations on Scroll?
The main reason we would want to trigger animations on scroll, is so that they activate just as the user scrolls an element into view.
We might want to fade elements in, or provide an interesting transformation and these would only make sense when the user can actually view them.
Animating with CSS or with jQuery?
There are pros and cons to each approach. jQuery (read JavaScript) allows you to animate things that CSS doesn’t (such as the scroll position, or an element’s attributes), whilst CSS animations can be very attractive for developers who prefer putting all of their animation and presentation logic in the CSS layer.
I will be using transformations via CSS, however there are always variables to consider depending on your situation. I would take the following factors into account:
Browser Compatibility
Since our solution will be based on transformations, our browser compatibility will be limited to those that support either 2D transformations or 3D transformations.
All modern browsers will support 3D transforms and several of the older legacy browser such as Internet Explorer 9 and Opera 11.5 will support 2D transforms. Overall support for both desktop and mobile browsers is comprehensive.
jQuery’s animate method works in any (sane) browser, provided you are using the 1.X version of the library. jQuery 2.X removed support for IE8 and below, so only use this if you don’t need to support legacy browsers (lucky you!).
Speed
We want fast and smooth animations, especially when it comes to mobile devices. As such its always best to use transitions and transformations where possible.
The examples will use 3D transforms with 2D fall-backs for older browsers. We want to force hardware acceleration for speed, so a 3D transformation is a must (we will be using translate3d along with other functions that cause GPU accelerated rendering).
jQuery’s animate method is considerably slower than a GPU assisted transformation, so we will just be using jQuery for our event handling / calculations, not for our animation itself (as we want them to be as smooth as possible).
Side Note
We all know that jQuery !== JavaScript, right? Well, it turns out that using vanilla JS for animations might not be such a bad an idea after all. Whilst that is beyond the scope of this tutorial, here are two excellent articles on the subject for those who are interested in finding out more:
Now back to the show …
Detecting Animation Elements in View
The overall point of this technique is to look through all of our elements we marked as animatable and then determine if they are currently within the viewport. Let’s step through how we will achieve this:
Selector Caching
Scrolling is an expensive business. If you attach an event listener to the scroll event, it will fire many times over whenever a user scrolls the page. As we will be calling our dimension / calculation functions whenever a user scrolls, it is a good idea to store the elements returned by our selectors in variables. This is known as selector caching and avoids us querying the DOM over and over again.
In our script we will be referencing both the window object and the collection of elements we want to animate.
//Cache reference to window and animation items
var $animation_elements = $('.animation-element');
var $window = $(window);
Notice the dollar sign in front of the variables. This is a convention to indicate that they hold a jQuery object, or collection of objects.
Hooking into the Scroll Event
Next, we create our event handler that listens for the scroll event. This will fire when we scroll the page. We pass it a reference to our check_if_in_view function (which we’ll get to in a minute). Every time the scroll event is fired, this function will be executed.
$window.on('scroll', check_if_in_view);Handling Resizing
Because we are calculating heights and widths we need to factor in orientation changes along with general resizing.
We can update our event handler to listen for both the scroll and resize events. This will enable our detection function to work when we resize or change orientation.
$window.on('scroll resize', check_if_in_view);In addition, we also use the jQuery trigger method to trigger a scroll event as soon as the DOM is ready. We do this so that if any of the elements which should be animated are within the viewport, they will be detected as in view and the animation applied as if we had scrolled.
$window.trigger('scroll');Scroll Position Detection
The actual detection portion of this example comes from the following script.
function check_if_in_view() {
  var window_height = $window.height();
  var window_top_position = $window.scrollTop();
  var window_bottom_position = (window_top_position + window_height);

  $.each($animation_elements, function() {
    var $element = $(this);
    var element_height = $element.outerHeight();
    var element_top_position = $element.offset().top;
    var element_bottom_position = (element_top_position + element_height);

    //check to see if this current container is within viewport
    if ((element_bottom_position >= window_top_position) &&
        (element_top_position <= window_bottom_position)) {
      $element.addClass('in-view');
    } else {
      $element.removeClass('in-view');
    }
  });
}
Lets break down what is happening here.
The check_if_in_view function is called initially when the DOM is ready and then every time we resize or scroll.
We get the current height of the window, along with its top and bottom position so we know what area we are looking at.
We go through and look for all items that will be animating in (saved in the $animation_elements variable). For each of these elements we collect its height along with its top and bottom position (so we know where it lives on the page).
We compare each item to see if its bottom position is greater than the top position of the window but also that the item’s top position is less than the bottom position of the window.
Here is a visual example

Calculating the Height and Width
In our detection function we need to get the heights and positions of various elements to calculate things correctly, this is where we have used jQuery’s height functions. It’s important to have a breakdown of how these height functions work
height() and width()
The height() and width() functions return the height or width of an element. They exclude all padding, borders and margins.
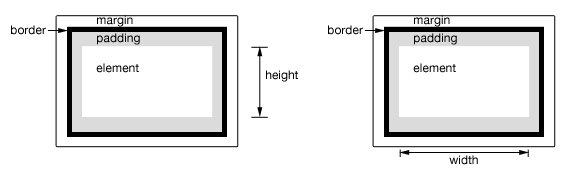
For a full breakdown visit the height or width documentation.
innerHeight() and innerWidth()
The innerHeight() and innerWidth() functions return the height or width of the element including its additional padding (however it excludes both borders and margins)
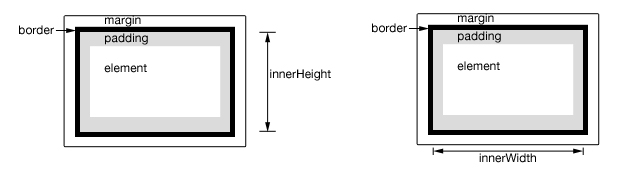
For a full breakdown visit the innerHeight or innerWidth documentation.
outerHeight() and outerWidth()
The outerHeight() and outerWidth() functions return the height or width of the element and include its padding and border.
In addition you can also specify to include its margins by passing a value of true to the function.
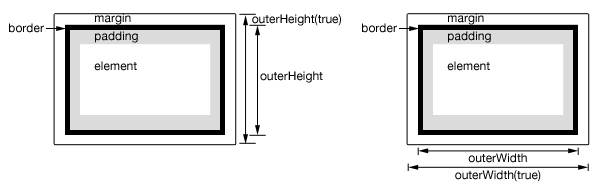
For a full breakdown visit the outerHeight or outerWidth documentation
Scroll Animation Examples
Listed below are a series of animations that use the basics of what we have discussed. These examples will look for animation elements and apply the active in-view class when they’re within the viewport.
Elements that you want to move should all have a standard class such as animation-element that sets its position to be relative or absolute. In addition, if you are going to create multiple effects you can create corresponding classes such as slide-left which can be combined with the in-view class. You should then apply the transformation to a class such as animation-element.slide-left.inview
Slide in from Left
For our first example we will be sliding in elements from the left when they enter the viewport. We achieve this by using a translate3d on our elements x axis.
See the Pen CSS Animations on Scroll – Slide in From Left by SitePoint (@SitePoint) on CodePen.
In this example we have used it to display staff profiles, but you can re-leverage the same functionality to slide in any elements you need.
Fade in from Bottom
This time we will be fading our elements from the bottom upwards as the user scrolls. We achieve this via a translate3d on the element’s y axis.
For this example I’ve listed course information about topics in a grid structure. When the user scrolls down, each card in view will fade in and move up, displaying information about the course.
See the Pen CSS Animations on Scroll – Fade From Bottom up by SitePoint (@SitePoint) on CodePen.
Multi-Step Bouncing Animation
For our final example we’ll use a multistage animation. To do this, we’ll define custom keyframe animations that combine a rotation with a translation. This type of animation can help showcase areas of your website (for this example we are showcasing staff member profiles).
See the Pen CSS Animations on Scroll – Multi Step Move by SitePoint (@SitePoint) on CodePen.
Where to from Here?
From here you can take the concepts you have learned and apply them to your projects.
Now that you can detect when an element is in view you can chain additional transformations or effects to create interactive interfaces. For example when an element enters the viewport (and after its transformation) you can then transform additional elements such as fading in a title, scaling in an image etc.
Are you already using these effects in your projects? Or do you think that animations are overused and detract from the user experience? Either way I’d love to hear from you in the comments.
Take your CSS skills to the next level with our book CSS Master, 2nd Edition by Tiffany B. Brown – covering CSS animations, transitions, transformations and much more.
Frequently Asked Questions (FAQs) about Scroll-Based Animations with jQuery and CSS3
What are the basic requirements for creating scroll-based animations using jQuery and CSS3?
To create scroll-based animations using jQuery and CSS3, you need a basic understanding of HTML, CSS, and JavaScript. You also need to have jQuery library included in your project. jQuery is a fast, small, and feature-rich JavaScript library that simplifies HTML document traversing, event handling, and animating. CSS3, on the other hand, is the latest evolution of the Cascading Style Sheets language and aims at extending CSS2.1. It brings a lot of long-awaited novelties, like rounded corners, shadows, gradients, transitions or animations.
How can I start creating scroll-based animations using jQuery and CSS3?
To start creating scroll-based animations, you first need to include the jQuery library in your HTML file. You can either download it from the jQuery website or include it directly from a Content Delivery Network (CDN). Once you have jQuery included, you can start writing your JavaScript code in a separate .js file or within script tags in your HTML file. You can then use jQuery’s .animate() method to create animations. For CSS3 animations, you can use keyframes and the animation property.
Can I control the speed of scroll-based animations in jQuery?
Yes, you can control the speed of scroll-based animations in jQuery. The .animate() method accepts a duration parameter, which determines how long the animation will run. The duration is specified in milliseconds; higher values indicate slower animations, not faster ones.
How can I make my scroll-based animations smoother?
To make your scroll-based animations smoother, you can use the ‘ease-in-out’ value of the CSS3 transition-timing-function property. This value specifies that the animation should start slowly, accelerate in the middle, and then slow down at the end. This can give a more natural and smooth feel to your animations.
How can I trigger an animation when the user scrolls to a certain point on the page?
You can use jQuery’s .scroll() method to trigger an event when the user scrolls to a certain point on the page. Inside the .scroll() method, you can use the .scrollTop() method to get the current vertical position of the scroll bar. You can then use an if statement to check if the scroll position is beyond a certain point, and if so, trigger the animation.
Can I use CSS3 animations without jQuery?
Yes, you can use CSS3 animations without jQuery. CSS3 introduces the @keyframes rule and the animation property, which allow you to create animations solely using CSS. However, jQuery can provide more control and flexibility over your animations, such as dynamically changing animation properties based on user interaction.
How can I stop or pause a scroll-based animation in jQuery?
You can stop a scroll-based animation in jQuery using the .stop() method. This method stops the currently running animation on the selected elements. To pause an animation, it’s a bit more complex as jQuery doesn’t natively support animation pausing. However, you can achieve this by using a plugin or by manually keeping track of the animation state and progress.
How can I create parallax scrolling effects using jQuery and CSS3?
Parallax scrolling is a technique where background images move slower than foreground images, creating an illusion of depth. You can achieve this effect using jQuery and CSS3 by changing the speed of the background image’s movement in relation to the speed of the page scroll.
Can I animate multiple CSS properties at once using jQuery?
Yes, you can animate multiple CSS properties at once using jQuery’s .animate() method. You just need to include the properties you want to animate as key-value pairs in the properties object parameter of the .animate() method.
How can I ensure my scroll-based animations work across different browsers?
To ensure your scroll-based animations work across different browsers, you should always use vendor prefixes for CSS3 properties. These prefixes ensure that the properties are recognized in all browsers, even if they’re still experimental. For jQuery animations, you don’t need to worry about browser compatibility as jQuery takes care of this for you.
 Simon Codrington
Full stack developer and overall web enthusiast. I love everything to do with web / design and my passion revolves around creating awesome websites. Focusing primarily on WordPress, I create themes, plugins and bespoke solutions.