


If you are an Android Developer and you need to detect if your phone is in idle state, off-hook (receiving state) or ringing state, this tutorial was created for you. The objective here is to show you how to implement phone callbacks in Android, allowing detection of calls to your phone.
Key Takeaways
- TelephonyManager and PhoneStateListener are key: TelephonyManager is crucial for accessing telephony services on Android devices, and PhoneStateListener is used to receive notifications of telephony service updates such as call state changes.
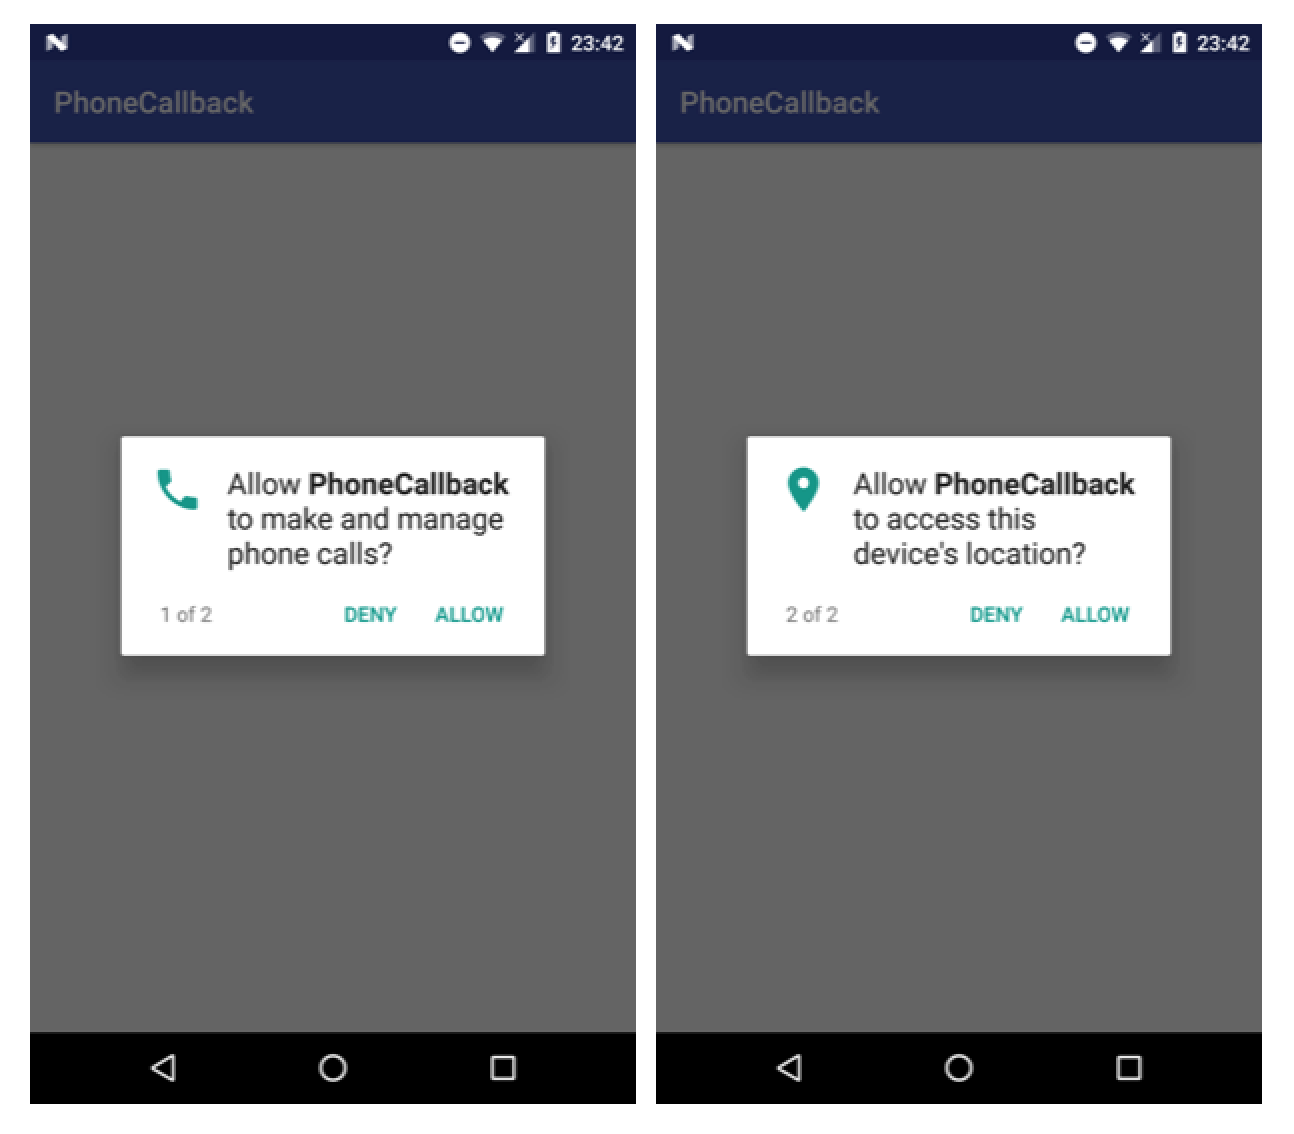
- Permissions are critical: The app requires permissions like READ_PHONE_STATE and ACCESS_COARSE_LOCATION, which must be declared in the AndroidManifest.xml and checked at runtime as per Android 6.0 (Marshmallow) and above.
- Custom PhoneStateListener class: By extending PhoneStateListener, specific methods such as onCallStateChanged can be overridden to perform actions based on the phone’s state changes, enhancing the app’s interactivity with phone calls.
- MainActivity orchestrates permissions and callbacks: It checks for necessary permissions and, upon approval, sets up the TelephonyManager to listen for various telephony states, making it the central component handling core functionalities.
- Emulator for testing: The tutorial includes instructions on how to simulate phone calls using an Android emulator, allowing developers to test the functionality of their applications in a controlled environment before deployment.
About Telephony Manager
In this topic, the most important class that will be talked about is the TelephonyManager. This class uses a listener called PhoneStateListener to listen for telephony service updates.
An object of type TelephonyManager will be instantiated, and it will listen for updates of Context.TELEPHONY_SERVICE. In order to monitor updates of telephony states like PhoneStateListener.LISTEN_DATA_CONNECTION_STATE, PhoneStateListener.LISTEN_CELL_INFO and others, a class called PhoneCallback will be created, extending from PhoneStateListener.
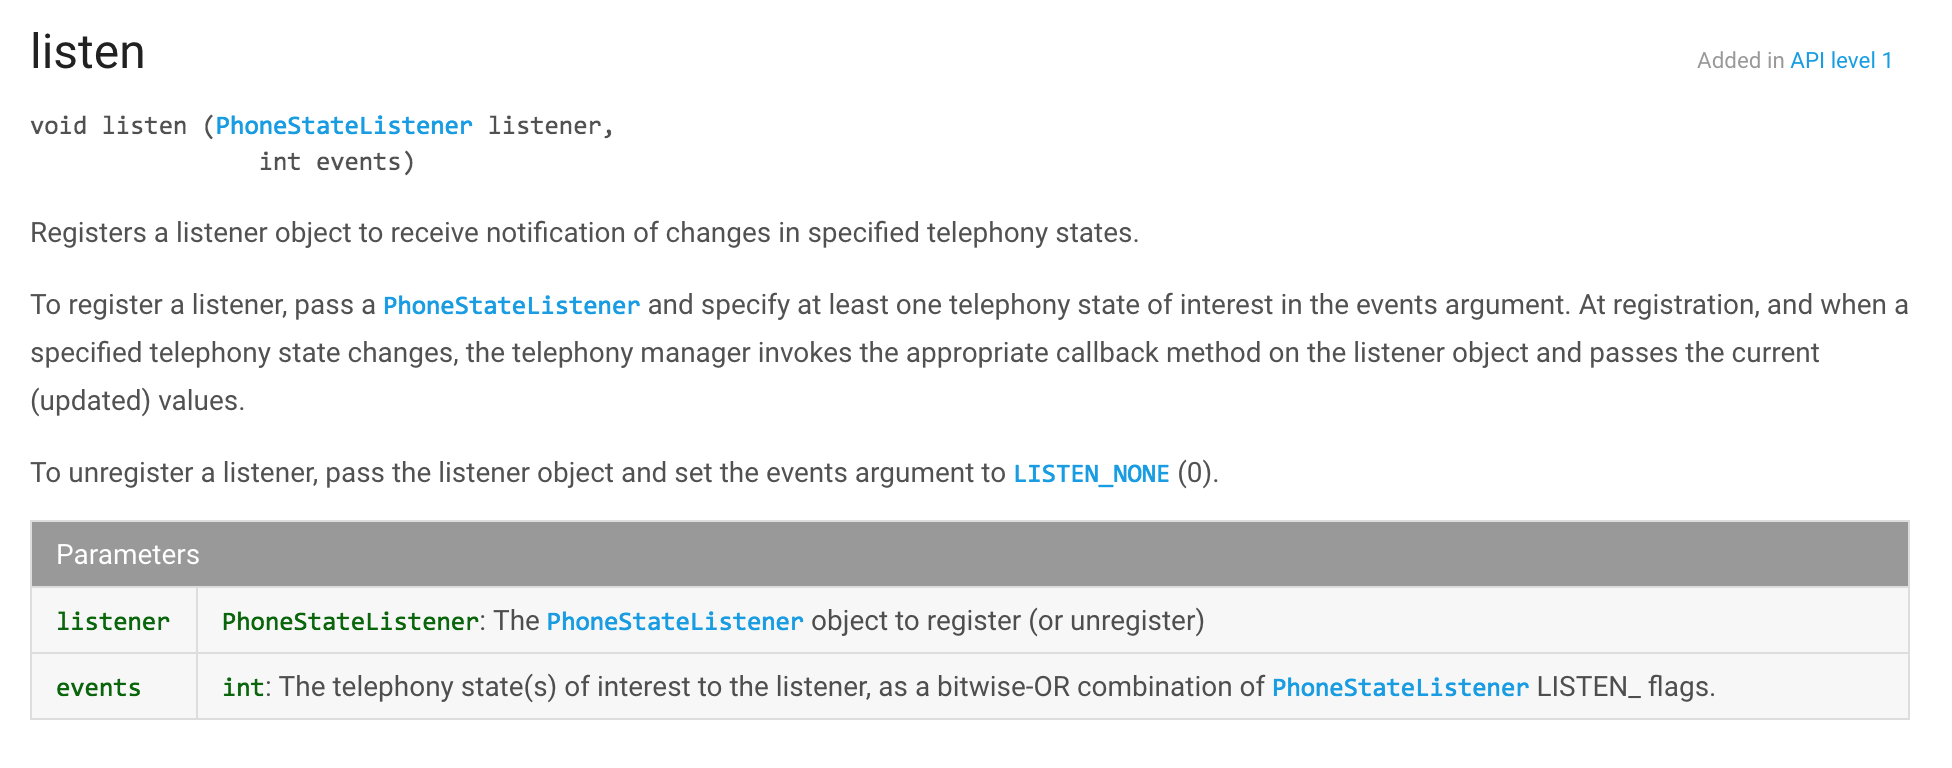
With TelephonyManager the telephony services of a device can be accessed and with the method TelephonyManager.listen(PhoneStateListener listener, int events) all information the telephone is receiving can be monitored.
The class PhoneStateListener receives callbacks when some event of TELEPHONY_SERVICE is observed. In this tutorial, the flag PhoneStateListener.LISTEN_CALL_STATE will be used. It will monitor and listen to the call state of the phone.
As can be read in the PhoneStateListener documentation (see section “Further Reading” below), there are other constants that can be set into the argument int events of the method TelephonyManager.listen. For instance: LISTEN_SIGNAL_STRENGTHS listens for changes to the network signal strengths (cellular). But in this tutorial, the flag LISTEN_CALL_STATE will be used, which listens for changes to the device call state.
Source code!
To show how these callbacks work an Android Application will be created. It will have a main Activity, a custom class to encapsulate the PhoneStateListener callback, and a class to manage the runtime permissions needed to be declared in Android version above 6.0 (Marshmallow).
First of all, it is necessary to declare the permissions to access the telephone state. Which ones will be used by this application? To know this, it is necessary to look at the class PhoneStateListener. The source code of this class is shown below (for API 25).
package android.telephony;

import android.telephony.CellInfo;
import android.telephony.CellLocation;
import android.telephony.ServiceState;
import android.telephony.SignalStrength;
import java.util.List;

public class PhoneStateListener {
    public static final int LISTEN_CALL_FORWARDING_INDICATOR = 8;
    public static final int LISTEN_CALL_STATE = 32;
    public static final int LISTEN_CELL_INFO = 1024;
    public static final int LISTEN_CELL_LOCATION = 16;
    public static final int LISTEN_DATA_ACTIVITY = 128;
    public static final int LISTEN_DATA_CONNECTION_STATE = 64;
    public static final int LISTEN_MESSAGE_WAITING_INDICATOR = 4;
    public static final int LISTEN_NONE = 0;
    public static final int LISTEN_SERVICE_STATE = 1;
    /** @deprecated */
    @Deprecated
    public static final int LISTEN_SIGNAL_STRENGTH = 2;
    public static final int LISTEN_SIGNAL_STRENGTHS = 256;

    public PhoneStateListener() {
        throw new RuntimeException("Stub!");
    }

    public void onServiceStateChanged(ServiceState serviceState) {
        throw new RuntimeException("Stub!");
    }

    /** @deprecated */
    @Deprecated
    public void onSignalStrengthChanged(int asu) {
        throw new RuntimeException("Stub!");
    }

    public void onMessageWaitingIndicatorChanged(boolean mwi) {
        throw new RuntimeException("Stub!");
    }

    public void onCallForwardingIndicatorChanged(boolean cfi) {
        throw new RuntimeException("Stub!");
    }

    public void onCellLocationChanged(CellLocation location) {
        throw new RuntimeException("Stub!");
    }

    public void onCallStateChanged(int state, String incomingNumber) {
        throw new RuntimeException("Stub!");
    }

    public void onDataConnectionStateChanged(int state) {
        throw new RuntimeException("Stub!");
    }

    public void onDataConnectionStateChanged(int state, int networkType) {
        throw new RuntimeException("Stub!");
    }

    public void onDataActivity(int direction) {
        throw new RuntimeException("Stub!");
    }

    public void onSignalStrengthsChanged(SignalStrength signalStrength) {
        throw new RuntimeException("Stub!");
    }

    public void onCellInfoChanged(List<CellInfo> cellInfo) {
        throw new RuntimeException("Stub!");
    }
}
Creating a custom class extending PhoneStateListener, some methods can be overridden. For instance:
public void onCallStateChanged(int state, String incomingNumber)-> Needs READ_PHONE_STATE permission.public void onCellLocationChanged(CellLocation location)-> Needs ACCESS_COARSE_LOCATION permission.public void onCallForwardingIndicatorChanged(boolean cfi)-> Needs READ_PHONE_STATE permission.public void onMessageWaitingIndicatorChanged(boolean mwi)-> Needs READ_PHONE_STATE permission.
Permissions
Above 2 permissions can be seen: READ_PHONE_STATE and ACCESS_COARSE_LOCATION. They will be declared in the AndroidManifest.xml file.
Note above the static permissions to be used in the app. But with API 23 (version 6.0 – Marshmallow), a new permissions scheme was created in Android. Now permissions must be checked at runtime. To do that a class will be created to encapsulate the runtime permissions needed. This class will be called PermissionUtils.
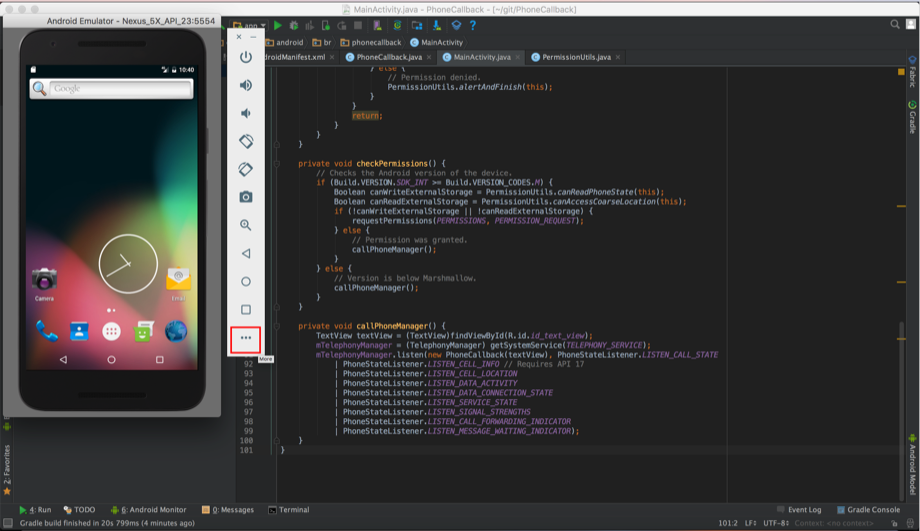
This class implements runtime checking of the two permissions declared at the file AndroidManifest.xml, at methods canAccessCoarseLocation() and canReadPhoneState() (using the method hasPermission() inside of them). Also, method alertAndFinish() closes the application if the user refuses to allow permissions for the application to run at runtime.
The image below shows how those permission are checked at runtime.
Custom PhoneStateListener class
In this class, all the magic happens. As said before, by extending the class PhoneStateListener, some methods can be overridden.
To show the content of each callback, we will use the class Log.
public class PhoneCallback extends PhoneStateListener {

    //--------------------------------------------------
    // Constants
    //--------------------------------------------------

    public static final String LOG_TAG = "PhoneCallback";

    //--------------------------------------------------
    // Attributes
    //--------------------------------------------------

    private final TextView mTextView;

    //--------------------------------------------------
    // Constructor
    //--------------------------------------------------

    public PhoneCallback(TextView textView) {
        mTextView = textView;
    }

    //--------------------------------------------------
    // Methods
    //--------------------------------------------------

    private String serviceStateToString(int serviceState) {
        switch (serviceState) {
            case ServiceState.STATE_IN_SERVICE:
                return "STATE_IN_SERVICE";
            case ServiceState.STATE_OUT_OF_SERVICE:
                return "STATE_OUT_OF_SERVICE";
            case ServiceState.STATE_EMERGENCY_ONLY:
                return "STATE_EMERGENCY_ONLY";
            case ServiceState.STATE_POWER_OFF:
                return "STATE_POWER_OFF";
            default:
                return "UNKNOWN_STATE";
        }
    }

    private String callStateToString(int state) {
        switch (state) {
            case TelephonyManager.CALL_STATE_IDLE:
                return "\nonCallStateChanged: CALL_STATE_IDLE, ";
            case TelephonyManager.CALL_STATE_RINGING:
                return "\nonCallStateChanged: CALL_STATE_RINGING, ";
            case TelephonyManager.CALL_STATE_OFFHOOK:
                return "\nonCallStateChanged: CALL_STATE_OFFHOOK, ";
            default:
                return "\nUNKNOWN_STATE: " + state + ", ";
        }
    }

    //--------------------------------------------------
    // PhoneStateListener
    //--------------------------------------------------

    @Override
    public void onCellInfoChanged(List<CellInfo> cellInfo) {
        super.onCellInfoChanged(cellInfo);
        Log.i(LOG_TAG, "onCellInfoChanged: " + cellInfo);
    }

    @Override
    public void onDataActivity(int direction) {
        super.onDataActivity(direction);
        switch (direction) {
            case TelephonyManager.DATA_ACTIVITY_NONE:
                Log.i(LOG_TAG, "onDataActivity: DATA_ACTIVITY_NONE");
                break;
            case TelephonyManager.DATA_ACTIVITY_IN:
                Log.i(LOG_TAG, "onDataActivity: DATA_ACTIVITY_IN");
                break;
            case TelephonyManager.DATA_ACTIVITY_OUT:
                Log.i(LOG_TAG, "onDataActivity: DATA_ACTIVITY_OUT");
                break;
            case TelephonyManager.DATA_ACTIVITY_INOUT:
                Log.i(LOG_TAG, "onDataActivity: DATA_ACTIVITY_INOUT");
                break;
            case TelephonyManager.DATA_ACTIVITY_DORMANT:
                Log.i(LOG_TAG, "onDataActivity: DATA_ACTIVITY_DORMANT");
                break;
            default:
                Log.w(LOG_TAG, "onDataActivity: UNKNOWN " + direction);
                break;
        }
    }

    @Override
    public void onServiceStateChanged(ServiceState serviceState) {
        super.onServiceStateChanged(serviceState);
        String message = "onServiceStateChanged: " + serviceState + "\n";
        message += "onServiceStateChanged: getOperatorAlphaLong " + serviceState.getOperatorAlphaLong() + "\n";
        message += "onServiceStateChanged: getOperatorAlphaShort " + serviceState.getOperatorAlphaShort() + "\n";
        message += "onServiceStateChanged: getOperatorNumeric " + serviceState.getOperatorNumeric() + "\n";
        message += "onServiceStateChanged: getIsManualSelection " + serviceState.getIsManualSelection() + "\n";
        message += "onServiceStateChanged: getRoaming " + serviceState.getRoaming() + "\n";
        message += "onServiceStateChanged: " + serviceStateToString(serviceState.getState());
        Log.i(LOG_TAG, message);
    }

    @Override
    public void onCallStateChanged(int state, String incomingNumber) {
        super.onCallStateChanged(state, incomingNumber);
        callStateToString(state);
        String message = callStateToString(state) + "incomingNumber: " + incomingNumber;
        mTextView.setText(message);
    }

    @Override
    public void onCellLocationChanged(CellLocation location) {
        super.onCellLocationChanged(location);
        String message = "";
        if (location instanceof GsmCellLocation) {
            GsmCellLocation gcLoc = (GsmCellLocation) location;
            message += "onCellLocationChanged: GsmCellLocation " + gcLoc + "\n";
            message += "onCellLocationChanged: GsmCellLocation getCid " + gcLoc.getCid() + "\n";
            message += "onCellLocationChanged: GsmCellLocation getLac " + gcLoc.getLac() + "\n";
            message += "onCellLocationChanged: GsmCellLocation getPsc" + gcLoc.getPsc(); // Requires min API 9
            Log.i(LOG_TAG, message);
        } else if (location instanceof CdmaCellLocation) {
            CdmaCellLocation ccLoc = (CdmaCellLocation) location;
            message += "onCellLocationChanged: CdmaCellLocation " + ccLoc + "\n";;
            message += "onCellLocationChanged: CdmaCellLocation getBaseStationId " + ccLoc.getBaseStationId() + "\n";;
            message += "onCellLocationChanged: CdmaCellLocation getBaseStationLatitude " + ccLoc.getBaseStationLatitude() + "\n";;
            message += "onCellLocationChanged: CdmaCellLocation getBaseStationLongitude" + ccLoc.getBaseStationLongitude() + "\n";;
            message += "onCellLocationChanged: CdmaCellLocation getNetworkId " + ccLoc.getNetworkId() + "\n";;
            message += "onCellLocationChanged: CdmaCellLocation getSystemId " + ccLoc.getSystemId();
            Log.i(LOG_TAG, message);
        } else {
            Log.i(LOG_TAG, "onCellLocationChanged: " + location);
        }
    }

    @Override
    public void onCallForwardingIndicatorChanged(boolean changed) {
        super.onCallForwardingIndicatorChanged(changed);
    }

    @Override
    public void onMessageWaitingIndicatorChanged(boolean changed) {
        super.onMessageWaitingIndicatorChanged(changed);
    }
}
The most important method implemented in this class is the method onCallStateChanged(). This method listens to the call state changes. For instance, when the phone starts ringing, call is put on hold or a call is ended. In this method is possible to detect the following states: TelephonyManager.CALL_STATE_IDLE, TelephonyManager.CALL_STATE_RINGING or TelephonyManager.CALL_STATE_OFFHOOK. Those are the states that can provide information about what is happening with the phone state.
MainActivity class
With permissions to read the phone state and with a custom class to listen to the phone states, the source code now just needs to call them together. This will be done at the MainActivity class.
public class MainActivity extends AppCompatActivity {
//--------------------------------------------------
// Constants
//--------------------------------------------------
private static final String[] PERMISSIONS = { Manifest.permission.READ_PHONE_STATE, Manifest.permission.ACCESS_COARSE_LOCATION };
private static final int PERMISSION_REQUEST = 100;
//--------------------------------------------------
// Attributes
//--------------------------------------------------
private TelephonyManager mTelephonyManager;
//--------------------------------------------------
// Activity Life Cycle
//--------------------------------------------------
@Override
protected void onCreate(Bundle savedInstanceState) {
super.onCreate(savedInstanceState);
setContentView(R.layout.activity_main);
checkPermissions();
}
//--------------------------------------------------
// Permissions
//--------------------------------------------------
@Override
public void onRequestPermissionsResult(int requestCode, String[] permissions, int[] grantResults) {
switch (requestCode) {
case PERMISSION_REQUEST: {
isPermissionGranted(grantResults);
return;
}
}
}
private void isPermissionGranted(int[] grantResults) {
if (grantResults.length > 0) {
Boolean permissionGranted = grantResults[0] == PackageManager.PERMISSION_GRANTED;
if (permissionGranted) {
callPhoneManager();
} else {
PermissionUtils.alertAndFinish(this);
}
}
}
private void checkPermissions() {
// Checks the Android version of the device.
if (Build.VERSION.SDK_INT >= Build.VERSION_CODES.M) {
Boolean canWriteExternalStorage = PermissionUtils.canReadPhoneState(this);
Boolean canReadExternalStorage = PermissionUtils.canAccessCoarseLocation(this);
if (!canWriteExternalStorage || !canReadExternalStorage) {
requestPermissions(PERMISSIONS, PERMISSION_REQUEST);
} else {
// Permission was granted.
callPhoneManager();
}
} else {
// Version is below Marshmallow.
callPhoneManager();
}
}
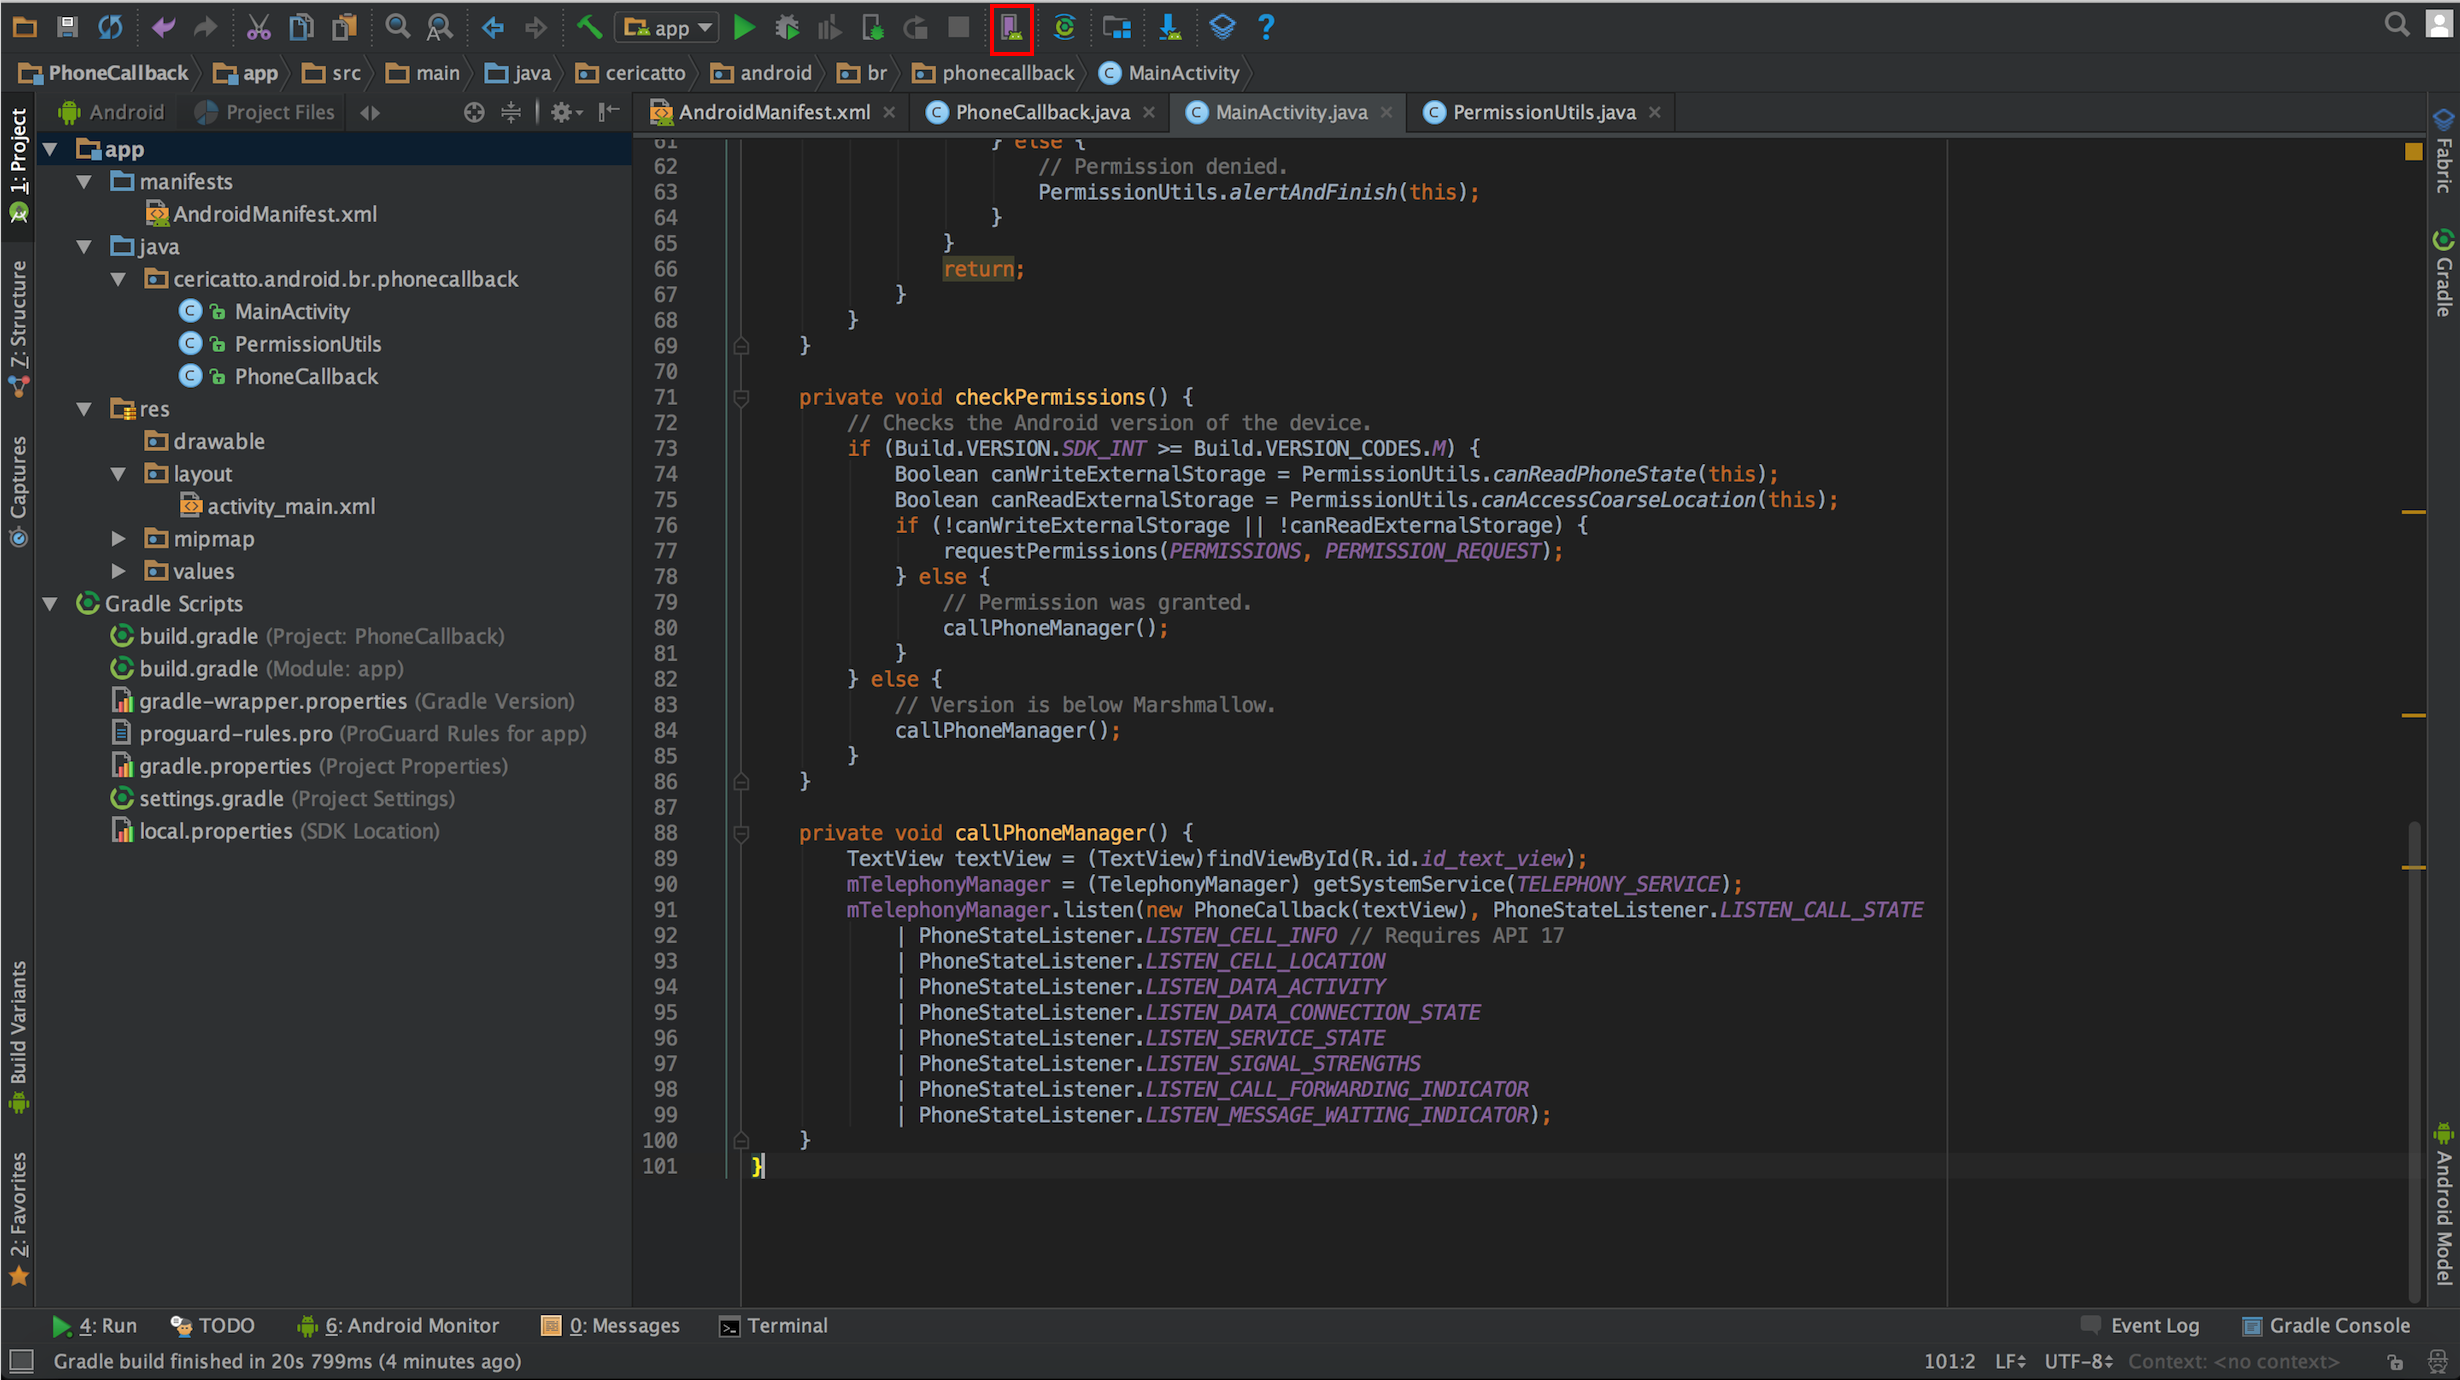
private void callPhoneManager() {
TextView textView = (TextView)findViewById(R.id.id_text_view);
mTelephonyManager = (TelephonyManager) getSystemService(TELEPHONY_SERVICE);
mTelephonyManager.listen(new PhoneCallback(textView), PhoneStateListener.LISTEN_CALL_STATE
| PhoneStateListener.LISTEN_CELL_INFO // Requires API 17
| PhoneStateListener.LISTEN_CELL_LOCATION
| PhoneStateListener.LISTEN_DATA_ACTIVITY
| PhoneStateListener.LISTEN_DATA_CONNECTION_STATE
| PhoneStateListener.LISTEN_SERVICE_STATE
| PhoneStateListener.LISTEN_SIGNAL_STRENGTHS
| PhoneStateListener.LISTEN_CALL_FORWARDING_INDICATOR
| PhoneStateListener.LISTEN_MESSAGE_WAITING_INDICATOR);
}
}In the onCreate() method, the method checkPermissions() will be called. In this method the permissions Manifest.permission.ACCESS_COARSE_LOCATION and Manifest.permission.READ_PHONE_STATE will be checked.
In the first execution of the app, if the app doesn’t have access to access those permissions, the method requestPermissions(PERMISSIONS, PERMISSION_REQUEST) will be called. If the app has access to those permissions, then the callPhoneManager() will be called.
The method requestPermissions(PERMISSIONS, PERMISSION_REQUEST) redirects the control flow to the onRequestPermissionsResult() method. This method will show a Dialog to the user, asking them to allow the app to access the requested permissions. If the user allows the permissions, the method callPhoneManager() is called. If not, PermissionUtils.alertAndFinish() will be called. This method shows a message for the user (telling the user that he must accept the permissions) and closes the app.
All this flow happens the first time the app is executed. But what happens the second time? If the user allowed permissions the first time, the permissions check won’t be done in the second time and the method callPhoneManager() will be called. If it wasn’t allowed, then this check won’t be done either, and PermissionUtils.alertAndFinish() will be called. If the user didn’t choose any of those options in the first execution, then the Dialog requesting permissions will be shown again.
Last but not least, if the user has allowed permissions, the method callPhoneManager() is called. This is the method that calls our phone state callback.
private void callPhoneManager() {
        TextView textView = (TextView)findViewById(R.id.id_text_view);
        mTelephonyManager = (TelephonyManager) getSystemService(TELEPHONY_SERVICE);
        mTelephonyManager.listen(new PhoneCallback(textView), PhoneStateListener.LISTEN_CALL_STATE
            | PhoneStateListener.LISTEN_CELL_INFO // Requires API 17
            | PhoneStateListener.LISTEN_CELL_LOCATION
            | PhoneStateListener.LISTEN_DATA_ACTIVITY
            | PhoneStateListener.LISTEN_DATA_CONNECTION_STATE
            | PhoneStateListener.LISTEN_SERVICE_STATE
            | PhoneStateListener.LISTEN_SIGNAL_STRENGTHS
            | PhoneStateListener.LISTEN_CALL_FORWARDING_INDICATOR
            | PhoneStateListener.LISTEN_MESSAGE_WAITING_INDICATOR);
    }
In this method the TelephonyManager is accessed, calling the listen() method. See the constructor of this method:
This method receives on its first parameter, a constructor with a TextView (that will be used to print the state of the phone). And on its second parameter, it receives all the events will be monitored by the phone call state.
Performing a call using the emulator
All the source code is ready. But not it is necessary to perform a call for the phone to activate the phone state callback.
This can be done calling the phone or simulating a call through the emulator. Let’s try to perform a call in the emulator:
To perform a call in the emulator:
1) Open the Android Virtual Devices
2) Choose the Emulator
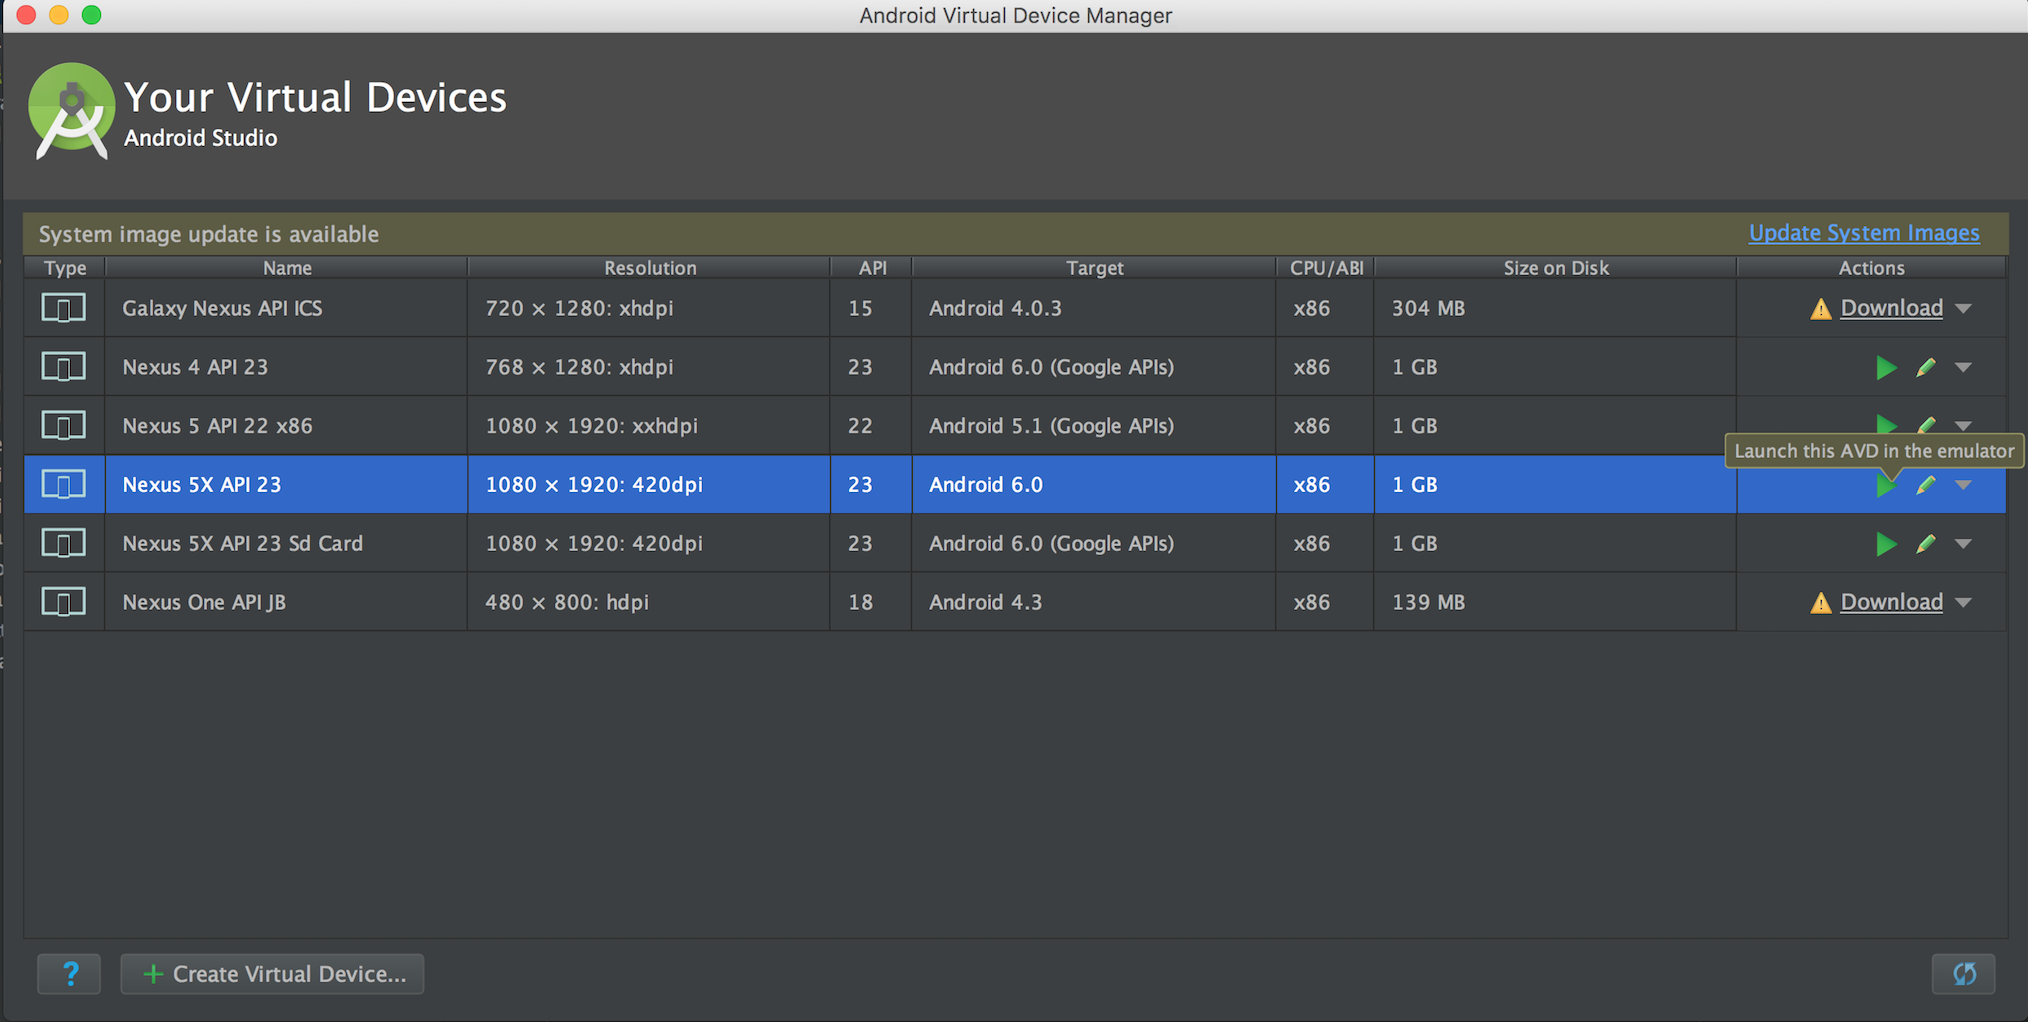
3) Open the Extended Controls
Below there is an image of the Extended Controls tab opened.
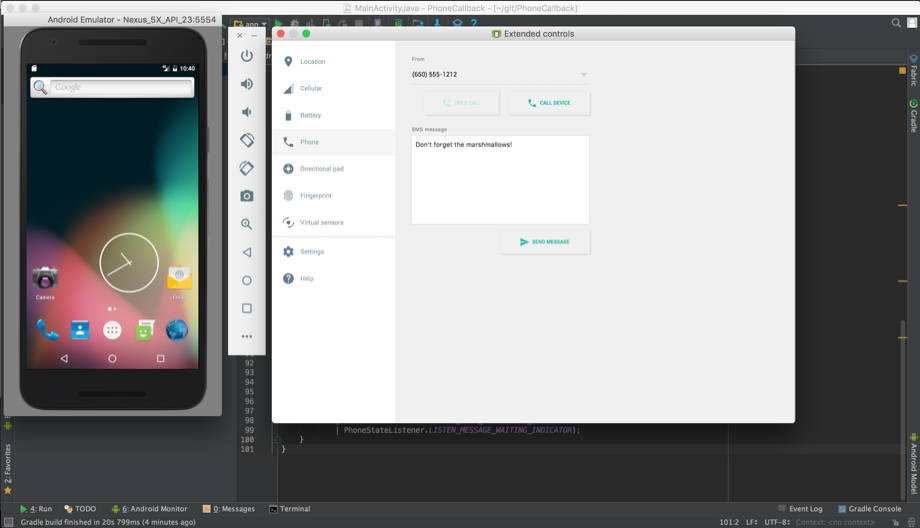
4) Execute the app into the Emulator
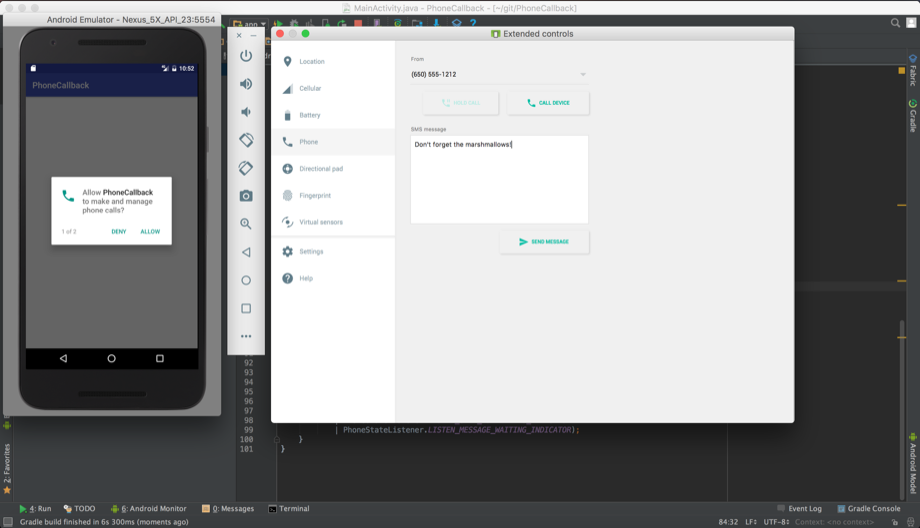
5) Perform the Call

Below there are the log messages after the call ends:

The log messages show that, by default, the phone state is in IDLE state. Then, when the call is made, the state changes to the RINGING state.
After the call ends, the OFF_HOOK state is active. And in all those states, the incoming number is shown.
Conclusion
This tutorial showed how to create an application to monitor the call state of a phone in Android. The basic concepts about phone call listeners were explained, as well the runtime permissions to monitor those listeners callbacks. The app source code was created part to part, and in the end, we saw how a call simulation can be done.
And that is all!
For more Android articles, take a look at the SitePoint website.
Further Reading
- Source code: https://github.com/sitepoint-editors/PhoneCallback
- PhoneStateListener Documentation: https://developer.android.com/reference/android/telephony/PhoneStateListener.html
Frequently Asked Questions (FAQs) about Phone Callbacks in Android using TelephonyManager
What is TelephonyManager in Android?
TelephonyManager is a class in Android that provides access to information about the telephony services on the device. It allows you to monitor the phone call states, data connection states, and other telephony-related information. You can use it to determine the current call status, whether the phone is in ringing, off-hook, or idle state. It’s a crucial component when you’re developing an application that needs to interact with the phone’s telephony services.
How do I use TelephonyManager to monitor phone call states?
To monitor phone call states using TelephonyManager, you need to create a PhoneStateListener and override its onCallStateChanged method. This method will be called whenever the phone call state changes. You can then use the state parameter to determine the current call state. Here’s a simple example:TelephonyManager telephonyManager = (TelephonyManager) getSystemService(TELEPHONY_SERVICE);telephonyManager.listen(new PhoneStateListener() {
@Override
public void onCallStateChanged(int state, String phoneNumber) {
switch (state) {
case TelephonyManager.CALL_STATE_RINGING:
// The phone is ringing
break;
case TelephonyManager.CALL_STATE_OFFHOOK:
// A call is currently active
break;
case TelephonyManager.CALL_STATE_IDLE:
// The phone is neither ringing nor in a call
break;
}
}}, PhoneStateListener.LISTEN_CALL_STATE);
Why is TelephonyManager.listen() deprecated in Android 12?
In Android 12, the TelephonyManager.listen() method is deprecated as part of the changes to enhance user privacy. Instead of using this method, you should now use the TelephonyCallback class to monitor phone call states. This class provides a more granular control over the callbacks that your application receives.
How do I use TelephonyCallback to monitor phone call states in Android 12?
To monitor phone call states using TelephonyCallback in Android 12, you need to create a TelephonyCallback.CallStateListener and override its onCallStateChanged method. This method will be called whenever the phone call state changes. Here’s a simple example:TelephonyManager telephonyManager = (TelephonyManager) getSystemService(TELEPHONY_SERVICE);telephonyManager.registerTelephonyCallback(Executors.newSingleThreadExecutor(), new TelephonyCallback.CallStateListener() {
@Override
public void onCallStateChanged(int state) {
switch (state) {
case TelephonyManager.CALL_STATE_RINGING:
// The phone is ringing
break;
case TelephonyManager.CALL_STATE_OFFHOOK:
// A call is currently active
break;
case TelephonyManager.CALL_STATE_IDLE:
// The phone is neither ringing nor in a call
break;
}
}});
How do I unregister a TelephonyCallback?
To unregister a TelephonyCallback, you can use the unregisterTelephonyCallback() method of the TelephonyManager class. This method takes a TelephonyCallback instance as its parameter. Here’s an example:TelephonyManager telephonyManager = (TelephonyManager) getSystemService(TELEPHONY_SERVICE);TelephonyCallback.CallStateListener callStateListener = new TelephonyCallback.CallStateListener() {
// ...};telephonyManager.unregisterTelephonyCallback(callStateListener);
Remember to unregister your callback when it’s no longer needed to prevent memory leaks.
Can I use TelephonyManager to monitor data connection states?
Yes, you can use TelephonyManager to monitor data connection states. You can create a PhoneStateListener and override its onDataConnectionStateChanged method. This method will be called whenever the data connection state changes. You can then use the state parameter to determine the current data connection state.
How do I get the phone number of an incoming call?
You can get the phone number of an incoming call in the onCallStateChanged method of your PhoneStateListener or TelephonyCallback.CallStateListener. The phoneNumber parameter of this method will contain the phone number of the incoming call when the phone is in the CALL_STATE_RINGING state.
Can I use TelephonyManager to make phone calls?
No, TelephonyManager cannot be used to make phone calls. It’s used to monitor the phone’s telephony services, not to initiate them. To make a phone call, you can use the ACTION_CALL intent along with the necessary permissions.
How do I get the SIM card information using TelephonyManager?
You can use the getSimSerialNumber(), getSimOperator(), getSimOperatorName(), and other similar methods of the TelephonyManager class to get the SIM card information. Note that you need the READ_PHONE_STATE permission to access this information.
Can I use TelephonyManager to send SMS messages?
No, TelephonyManager cannot be used to send SMS messages. It’s used to monitor the phone’s telephony services, not to initiate them. To send SMS messages, you can use the SmsManager class along with the necessary permissions.