

Key Takeaways
- Reverie is a WordPress starter theme based on ZURB’s Foundation framework, which provides a solid base for theme development, including a responsive grid, typography, button styles, and other components. It is designed to be lightweight and minimalistic, which can enhance website performance.
- Customizing Reverie can be done directly through modifying the CSS and PHP files, or using the WordPress Customizer for simpler changes. The theme supports child themes, allowing changes to be made without affecting the original theme files, making it easy to update the theme without losing customizations.
- Reverie is designed to be user-friendly for both developers and beginners comfortable with basic HTML and CSS. It supports WooCommerce out of the box, is translation-ready for multi-language sites, and is compatible with all modern browsers. The theme also supports custom post types and is regularly updated for compatibility with the latest version of WordPress and the Foundation framework.
Reverie is a popular WordPress starter theme, one that featured in my previous article ‘Getting Started with Foundation and WordPress‘.
Reverie is mainly based on ZURB’s Foundation framework, with a few added perks. You don’t have to go through the hassle of trying to mesh the Foundation framework with WordPress on your own. This is a great way to get up and running, if you want to dive straight into development.
When you work with an existing theme, even if it’s a framework and you’re going to customize it, it’s important to understand how to go about it, so that you streamline the process. Not taking the time to understand the framework or starter theme you’re using can end up costing you more time than if you just built everything from scratch.
Your First Major Decision
Whenever you customize any base or starter theme, you want to evaluate the need for a child theme. If you’re going to keep the theme updated, you’ll definitely want to go the route of using a child theme. The main reason for this is that when you update the main theme, you are likely to lose all of the changes you’ve made. This can easily be a disaster if you’re building the site for a client.
On the other hand, if you don’t want clients updating the theme by themselves and destroying all of your hard work, you can disable updates with a simple code snippet. This will make theme updates unavailable from the backend for that user. Updates to themes and plugins can end up breaking the whole site, so you can disable them by adding the following to the functions.php file.
function remove_core_updates() {

  global $wp_version;return(object) array('last_checked'=> time(),'version_checked'=> $wp_version,);

}

add_filter('pre_site_transient_update_core','remove_core_updates');

add_filter('pre_site_transient_update_plugins','remove_core_updates');

add_filter('pre_site_transient_update_themes','remove_core_updates');
After Your First Install
You can see from the screenshot that when you first install the Reverie theme, it comes with the Customize feature, which enables you to preview basic changes from the front end, such as background color, background image, and widgets. A lot of popular themes are customizing this area in detailed ways, down to font colors, font families and much more.
Setting up a Child Theme for Reverie
How a child theme works is that the files are kept in a separate folder, so when you update the main theme, the files in the separate folder aren’t touched. This means that all of your hard worked and custom designs aren’t erased every time you update the main theme.
Setting up a child theme for Reverie is done the same as any other theme, for the most part. In the themes directory, you need to create a folder that says reverie-child. Inside it, you need to place a style.css file and a functions.php file. This is typical for any child theme. If you want to add your own custom functionality, and you want to add your own custom styles, these files are necessary.
In the stylesheet in your child theme, all you need to do is follow the basic setup for a child theme CSS file.
/*

Theme Name: Reverie Child Theme

Description: Child theme for Reverie

Author: James George

Template: reverie

*/
@import url("../reverie/style.css");
/* Start child theme customization below *
Now, you’re all set to add your custom functions and styles to your new Reverie child theme.

This is typically what Reverie looks like right after installing it. If we want to customize the look, we’ll need to add custom CSS to the style.css file in our child theme folder.
The best way to do this is to open up the main-index.php file and the single-page.php file and look at the structure. It’s important to note any special classes you’ll want to pay attention to. For the most part, everything should be pretty straight forward.
The other method (and my method of choice) is to use the Firebug Inspector for Firefox and the Inspect tool in Chrome. It doesn’t matter which one you choose, they both do close to the same thing. My personal preference is Firefox’s Firebug. I can inspect an element, and it will tell me the div ID and any classes with attributes that are styling a particular element.

This is also a great way to see how things are built when you hover over an item in the breakdown at the top of Firebug’s window, it will highlight that element. You can see how divs are nested, which can help you narrow down any problems you’re trying to solve.
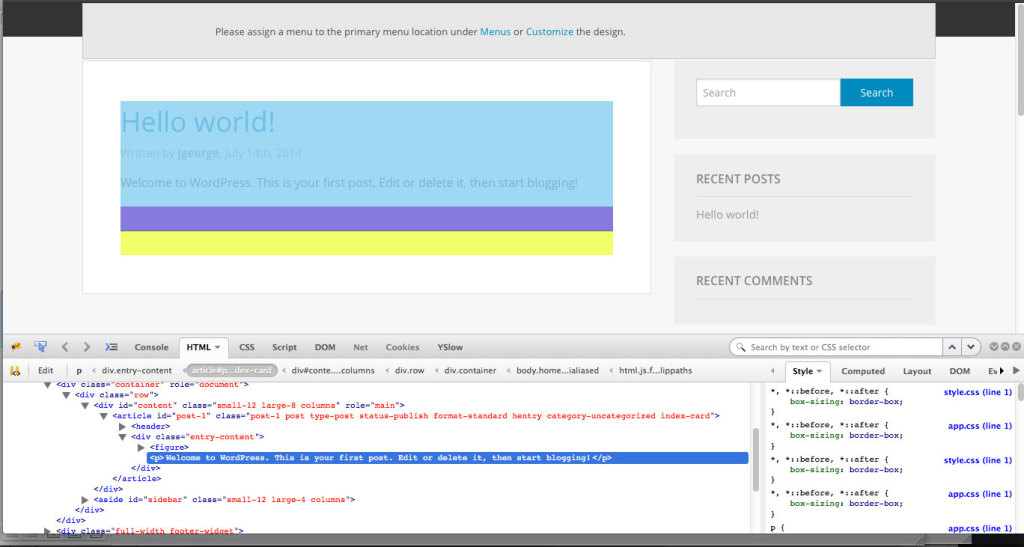
In the image above, you can see the area of code you are looking at is highlighted in a light blue. If there is a purple area, that represents any padding present. Yellow represents any margin values applied. This is a great way to fine tune any spacing issues and diagnose why your design isn’t structure how you want it to be.
In the example above, if I want to style the author name, changing its color, I can hover over it with my mouse, right-click, and select inspect element. Then, in the code below, you can see the div and class name, which is actually a span class of byline author.
Since the author name is a link, I can do add an a to the end, selecting the active element:
.byline.author a{color: #F90;}

This changes the author link to orange. It’s simple, but these are the fundamentals of styling your theme. Also, it’s much easier that staring with a page of PHP, div’s and classes – and trying to sort it all out in your head.
In the next article in the series, we’ll look at adding functionality to the Reverie theme. There’s a lot of flexibility here, and the sky is the limit. Understanding the overall structure of the Reverie theme and how to manipulate its look will help you to understand how to build upon it successfully.
Frequently Asked Questions about Reverie: A Foundation-Based WordPress Starter Theme
What makes Reverie different from other WordPress starter themes?
Reverie stands out from other WordPress starter themes due to its integration with the Foundation framework. This means it comes with a responsive grid, typography, button styles, and other components that are ready to use. It also includes custom navigation menus, widget areas, and page templates, providing a solid base for theme development. Unlike many other starter themes, Reverie is designed to be lightweight and minimalistic, which can help improve your website’s performance.
How can I customize the Reverie theme?
Reverie is highly customizable. You can modify the CSS and PHP files directly, or use the WordPress Customizer for simpler changes. The theme also supports child themes, which allow you to make changes without affecting the original theme files. This makes it easy to update the theme without losing your customizations.
Is Reverie suitable for beginners?
While Reverie is designed with developers in mind, it’s also suitable for beginners who are comfortable with basic HTML and CSS. The theme’s clean, well-commented code makes it easy to understand how it works, and the integration with the Foundation framework provides a wealth of resources for learning more about web development.
Does Reverie support WooCommerce?
Yes, Reverie supports WooCommerce out of the box. This means you can easily set up an online store on your website without needing to install additional plugins or themes. The theme also includes several custom templates for WooCommerce pages, providing a consistent look and feel across your site.
How does Reverie’s performance compare to other starter themes?
Reverie is designed to be lightweight and fast, which can help improve your website’s loading times and overall performance. The theme’s minimalistic design means it doesn’t include unnecessary features or bloated code, which can slow down your site. This makes it a great choice for developers who prioritize performance.
Can I use Reverie for a multi-language site?
Yes, Reverie is translation-ready and supports multi-language sites. The theme includes .po and .mo files, which you can use to translate the theme into any language. It also supports the WPML plugin, which makes it easy to manage and switch between different languages on your site.
Is Reverie compatible with all browsers?
Reverie is designed to be compatible with all modern browsers, including Chrome, Firefox, Safari, and Edge. The theme uses progressive enhancement to ensure that it works well even on older browsers, although some advanced features may not be available.
Does Reverie support custom post types?
Yes, Reverie supports custom post types. This means you can create different types of content on your site, such as blog posts, products, reviews, and more. The theme also includes several custom templates for displaying different post types, providing a consistent look and feel across your site.
How often is Reverie updated?
Reverie is regularly updated to ensure compatibility with the latest version of WordPress and the Foundation framework. These updates also include bug fixes, performance improvements, and new features based on user feedback.
Is there any support available for Reverie?
Yes, Reverie offers support through its GitHub repository. You can report issues, request features, or contribute to the theme’s development. There’s also a wealth of documentation and tutorials available on the theme’s website, as well as a community of users who can help answer questions and provide advice.

