
This article on retrofitting your website as a progressive web app is included in our anthology, Modern JavaScript. If you want everything in one place to get up to speed on modern JavaScript, sign up for SitePoint Premium and download yourself a copy.
There’s been a lot of buzz around Progressive Web Apps (PWAs) lately, with many people questioning whether they represent the future of the (mobile) web.
I’m not going to get into the whole native app vs PWA debate, but one thing’s for sure: they go a long way to enhancing mobile and improving its user experience.
With mobile web access destined to surpass that of all other devices combined, can you afford to ignore this trend?

The good news is that making a PWA is not hard. In fact, it’s quite possible to take an existing website and convert it into a PWA. And that’s exactly what I’ll be doing in this tutorial. By the time you’re finished, you’ll have a website that behaves like a native web app. It will work offline and have its own home-screen icon.
Key Takeaways
- Enable HTTPS: Essential for security and a fundamental requirement for service workers in PWAs, ensuring safe data exchanges over the web.
- Create a Web App Manifest: This JSON file is crucial for defining how the app appears on the user’s device and includes details like name, start URL, and icons, making the web app installable.
- Implement a Service Worker: Acts as a network proxy to enable offline capabilities, caching, and background updates, significantly enhancing app reliability and performance.
- Develop an Offline Strategy: Use service workers to specify caching strategies for offline access, ensuring that the app remains functional without an internet connection.
- Optimize User Engagement: PWAs can be added to the home screen, work offline, and load quickly, improving user experience and engagement.
- Maintain and Update Your PWA: Regular updates and maintenance through service workers allow PWAs to stay current and performant without manual user intervention.
Table of Contents
- What Are Progressive Web Apps?
- Progressive Web Apps are Progressive Enhancements
- It’s Not Just Apps
- Demonstration Code
- Connect a Device
- Step 1: Enable HTTPS
- Step 2: Create a Web App Manifest
- Step 3: Create a Service Worker
- Install Event
- Activate Event
- Fetch Event
- Bonus Step 4: Create a Useful Offline Page
- Development Tools
- PWA Gotchas
- URL Hiding
- Cache Overload
- Cache Refreshing
- Useful Links
- Comments
What Are Progressive Web Apps?
Progressive Web Apps (referred to as PWAs) are an exciting innovation in web technology. PWAs comprise a mixture of technologies to make a web app function like a native mobile app. The benefits for developers and users overcome the constraints imposed by web-only and native-only solutions:
- You only need one app developed with open, standard W3C web technologies. There’s no need to develop separate native codebases.
- Users can discover and try your app before installation.
- There’s no need to use an AppStore, abide with arcane rules or pay fees. Application updates occur automatically without user interaction.
- Users are prompted to “install”, which adds an icon to their home screen.
- When launched, the PWA displays an attractive splash screen.
- The browser chrome options can be modified if necessary to provide a full-screen experience.
- Essential files are cached locally so PWAs respond faster than standard web apps. (They can even be faster than native apps.)
- Installation is lightweight — perhaps a few hundred KB of cached data.
- All data exchanges must occur over a secure HTTPS connection.
- PWAs function offline and can synchronize data when the connection returns.
It’s early days, but case studies are positive. Flipkart, India’s largest ecommerce site, experienced a 70% increase in sales conversions and trebled on-site time when they abandoned their native app for a PWA. Alibaba, the world’s largest business trading platform, experienced a similar conversion rate increase of 76%.
Solid PWA technology support is available in Firefox, Chrome and the other Blink-based browsers. Microsoft is working on an Edge implementation. Apple remains silent, although there are promising comments in the WebKit five-year plan. Fortunately, browser support is mostly irrelevant …
Progressive Web Apps are Progressive Enhancements
Your app will still run in browsers that don’t support PWA technology. The user won’t get the benefits of offline functionality, but everything will continue to work as before. Given the cost-to-benefit rewards, there’s little reason not to add PWA technologies to your system.
It’s Not Just Apps
Google has led the PWA movement, so most tutorials describe how to build a Chrome-based, native-looking mobile app from the ground up. However, you don’t need a special single-page app or have to follow material interface design guidelines. Most websites can be PWA-ized within a few hours. That includes your WordPress or static site.
Demonstration Code
Demonstration code is available from GitHub.
It provides a simple, four-page website with a few images, one stylesheet and a single main JavaScript file. The site works in all modern browsers (IE10+). If the browser supports PWA technologies, the user can read previously viewed pages when they’re offline.
To run the code, ensure Node.js is installed, then start the provided web server in your terminal with:
node ./server.js [port]
In the above code, [port] is optional, and defaults to 8888. Open Chrome or another Blink-based browser such as Opera or Vivaldi, then navigate to http://localhost:8888/ (or whichever port you specified). You can also open the Developer Tools (F12 or Cmd/Ctrl + Shift + I) to view various console messages.
View the home page, and perhaps one other, then go offline by either:
- stopping the web server with Cmd/Ctrl + C, or
- check the Offline checkbox in the Network or Application – Service Workers tab of the Developer Tools.
Revisit any of the pages you viewed earlier and they’ll still load. Visit a page you’ve not seen to be presented with a “you’re offline” page containing a list of viewable pages:

Connect a Device
You can also view the demonstration page on an Android smartphone connected to your PC/Mac via USB. Open the Remote devices panel from More tools in the top-left three-dot menu.
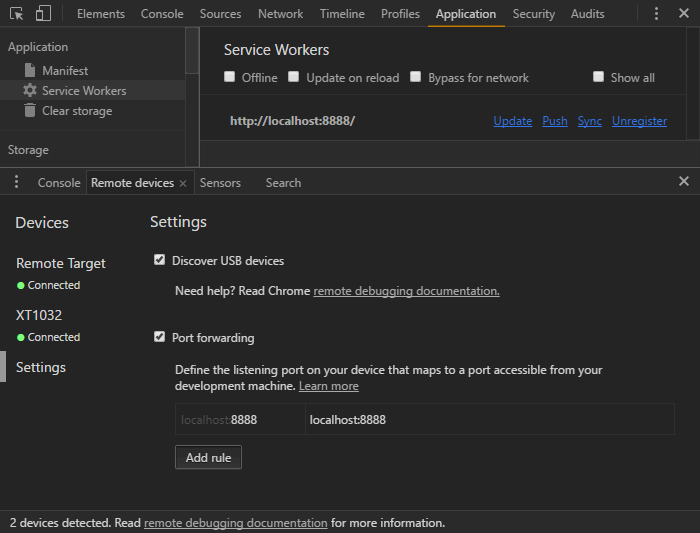
Select Settings on the left and click Add Rule to forward port 8888 to localhost:8888. You can now open Chrome on the smartphone and navigate to http://localhost:8888/.
You can use the browser menu to “Add to Home screen”. Make a couple of visits and the browser should prompt you to “install”. Both options create a new icon on your home screen. Browse a few pages, then close Chrome and disconnect your device. You can then launch the PWA Website app. You’ll see a splash screen and be able to view pages you read previously, despite having no connection to the server.
There are three essential steps to transform your website into a Progressive Web App …
Step 1: Enable HTTPS
PWAs require an HTTPS connection, for reasons that will become apparent shortly. Prices and processes will differ across hosts, but it’s worth the cost and effort, given that Google search is ranking secure sites higher.
HTTPS is not necessary for the demonstration above because Chrome permits the use of localhost or any 127.x.x.x address for testing. You can also test PWA technology on HTTP sites if you launch Chrome with the following command line flags:
--user-data-dir--unsafety-treat-insecure-origin-as-secure
Step 2: Create a Web App Manifest
The web app manifest provides information about the application such as the name, description and images, which are used by the OS to configure home screen icons, splash pages and the viewport. In essence, the manifest is a single file alternative to the numerous vendor-specific icon and theme meta tags you may already have in your pages.
The manifest is a JSON text file in the root of your app. It must be served with a Content-Type: application/manifest+json or Content-Type: application/json HTTP header. The file can be called anything but has been named /manifest.json in the demonstration code:
{
  "name"              : "PWA Website",
  "short_name"        : "PWA",
  "description"       : "An example PWA website",
  "start_url"         : "/",
  "display"           : "standalone",
  "orientation"       : "any",
  "background_color"  : "#ACE",
  "theme_color"       : "#ACE",
  "icons": [
    {
      "src"           : "/images/logo/logo072.png",
      "sizes"         : "72x72",
      "type"          : "image/png"
    },
    {
      "src"           : "/images/logo/logo152.png",
      "sizes"         : "152x152",
      "type"          : "image/png"
    },
    {
      "src"           : "/images/logo/logo192.png",
      "sizes"         : "192x192",
      "type"          : "image/png"
    },
    {
      "src"           : "/images/logo/logo256.png",
      "sizes"         : "256x256",
      "type"          : "image/png"
    },
    {
      "src"           : "/images/logo/logo512.png",
      "sizes"         : "512x512",
      "type"          : "image/png"
    }
  ]
}
A link to this file is required in the <head> of all your pages:
<link rel="manifest" href="/manifest.json">
The main manifest properties are:
- name: the full name of the application to be displayed to the user
- short_name: the short name for situations where there is insufficient space for the full name
- description: a long description of the application
- start_url: the relative URL to start the application (typically
/) - scope: the navigation scope — for example, a scope of
/app/would restrict the app to that folder - background_color: the background color used for splash screens and browser chrome (if required)
- theme_color: the application’s color, typically the same as the background, which can affect how the app is displayed
- orientation: the preferred orientation —
any,natural,landscape,landscape-primary,landscape-secondary,portrait,portrait-primary, andportrait-secondary - display: the preferred view —
fullscreen(no chrome),standalone(looks like a native app),minimal-ui(a small set of UI controls) andbrowser(a conventional browser tab) - icons: an array of image objects defining the
srcURL,sizesandtype(a range of icons should be defined).
MDN provides a full list of Web App Manifest properties.
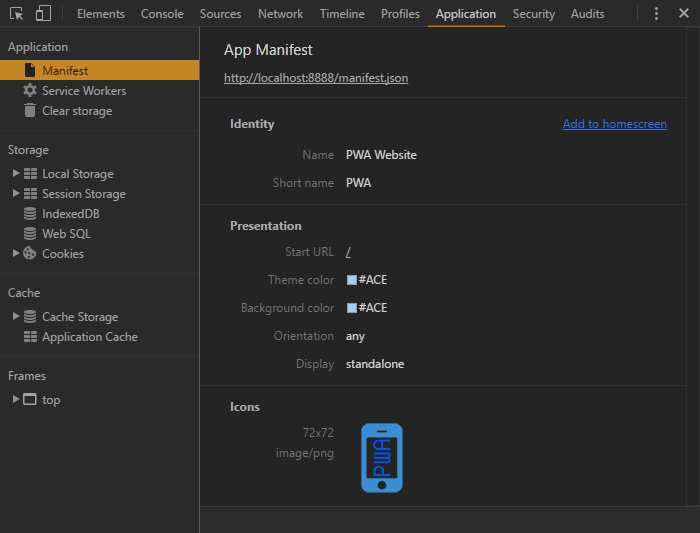
The Manifest section of Chrome’s Development Tools Application tab validates your manifest JSON and provides an “Add to homescreen” link, which functions on desktop devices:
Step 3: Create a Service Worker
Service Workers are programmable proxies which can intercept and respond to network requests. They’re a single JavaScript file which resides in the application root.
Your page JavaScript (/js/main.js in the demonstration code) can check for service worker support and register the file:
if ('serviceWorker' in navigator) {

  // register service worker
  navigator.serviceWorker.register('/service-worker.js');

}
If you don’t need offline capabilities, simply create an empty /service-worker.js file. Users will be prompted to install your app!
Service workers can be bewildering, but you should be able to adapt the demonstration code for your own purposes. It’s a standard web worker script that the browser downloads (when possible) and runs on a separate thread. It has no access to the DOM or other page APIs, but will intercept network requests triggered by page changes, asset downloads, and Ajax calls.
This is the primary reason your site requires HTTPS. Imagine the chaos if a third-party script could inject its own service worker from another domain. It would be able to examine and modify all data exchanges between the client and server!
Service workers react to three primary events: install, activate and fetch.
Install Event
This occurs when the application is installed. It’s typically used to cache essential files using the Cache API.
First, we’ll define some configuration variables for:
- The cache name (
CACHE) and version (version). Your application can have multiple cache stores, but we only require one. A version number is applied, so if we make significant changes, a new cache will be used and all previously cached files are ignored. - An offline page URL (
offlineURL). This is a page which will be presented when the user is offline and attempts to load a page they haven’t visited before. - An array of essential files to install, which ensure the site functions offline (
installFilesEssential). This should include assets such as CSS and JavaScript, but I’ve also included the home page (/) and logo. You should also include variations such as/and/index.htmlif URLs can be addressed in more than one way. Note thatofflineURLis added to this array. - Optionally, an array of desirable files (
installFilesDesirable). These will be downloaded, if possible, but won’t make the installation abort on failure.
// configuration
const
  version = '1.0.0',
  CACHE = version + '::PWAsite',
  offlineURL = '/offline/',
  installFilesEssential = [
    '/',
    '/manifest.json',
    '/css/styles.css',
    '/js/main.js',
    '/js/offlinepage.js',
    '/images/logo/logo152.png'
  ].concat(offlineURL),
  installFilesDesirable = [
    '/favicon.ico',
    '/images/logo/logo016.png',
    '/images/hero/power-pv.jpg',
    '/images/hero/power-lo.jpg',
    '/images/hero/power-hi.jpg'
  ];
The installStaticFiles() function adds files to the cache using the promise-based Cache API. A return value is only generated when the essential files are cached:
// install static assets
function installStaticFiles() {

  return caches.open(CACHE)
    .then(cache => {

      // cache desirable files
      cache.addAll(installFilesDesirable);

      // cache essential files
      return cache.addAll(installFilesEssential);

    });

}
Finally, we add an install event listener. The waitUntil method ensures the service worker won’t install until all enclosed code has executed. It runs installStaticFiles() then self.skipWaiting() to make the service worker active:
// application installation
self.addEventListener('install', event => {

  console.log('service worker: install');

  // cache core files
  event.waitUntil(
    installStaticFiles()
    .then(() => self.skipWaiting())
  );

});
Activate Event
This occurs when the service worker is activated, either immediately after installation or on return. You may not require this handler, but the demonstration code uses one to delete old caches when they exist:
// clear old caches
function clearOldCaches() {

  return caches.keys()
    .then(keylist => {

      return Promise.all(
        keylist
          .filter(key => key !== CACHE)
          .map(key => caches.delete(key))
      );

    });

}

// application activated
self.addEventListener('activate', event => {

  console.log('service worker: activate');

    // delete old caches
  event.waitUntil(
    clearOldCaches()
    .then(() => self.clients.claim())
    );

});
Note the final self.clients.claim() call sets this service worker as the active worker for the site.
Fetch Event
This occurs whenever a network request is made. It calls the respondWith() method to hijack GET requests and return:
- An asset from the cache.
- If #1 fails, the asset is loaded from the network using the Fetch API) (unrelated to the service worker fetch event). That asset is then added to the cache.
- If #1 and #2 fail, an appropriate response is returned.
// application fetch network data
self.addEventListener('fetch', event => {

  // abandon non-GET requests
  if (event.request.method !== 'GET') return;

  let url = event.request.url;

  event.respondWith(

    caches.open(CACHE)
      .then(cache => {

        return cache.match(event.request)
          .then(response => {

            if (response) {
              // return cached file
              console.log('cache fetch: ' + url);
              return response;
            }

            // make network request
            return fetch(event.request)
              .then(newreq => {

                console.log('network fetch: ' + url);
                if (newreq.ok) cache.put(event.request, newreq.clone());
                return newreq;

              })
              // app is offline
              .catch(() => offlineAsset(url));

          });

      })

  );

});
The final call to offlineAsset(url) returns an appropriate response using a couple of helper functions:
// is image URL?
let iExt = ['png', 'jpg', 'jpeg', 'gif', 'webp', 'bmp'].map(f => '.' + f);
function isImage(url) {

  return iExt.reduce((ret, ext) => ret || url.endsWith(ext), false);

}


// return offline asset
function offlineAsset(url) {

  if (isImage(url)) {

    // return image
    return new Response(
      '<svg role="img" viewBox="0 0 400 300" xmlns="https://www.w3.org/2000/svg"><title>offline</title><path d="M0 0h400v300H0z" fill="#eee" /><text x="200" y="150" text-anchor="middle" dominant-baseline="middle" font-family="sans-serif" font-size="50" fill="#ccc">offline</text></svg>',
      { headers: {
        'Content-Type': 'image/svg+xml',
        'Cache-Control': 'no-store'
      }}
    );

  }
  else {

    // return page
    return caches.match(offlineURL);

  }

}
The offlineAsset() function checks whether the request is for an image and returns an SVG containing the text “offline”. All other requests return the offlineURL page.
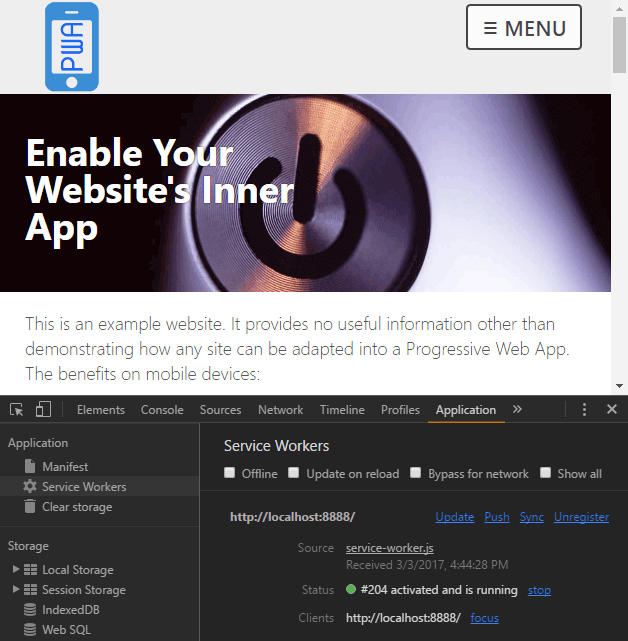
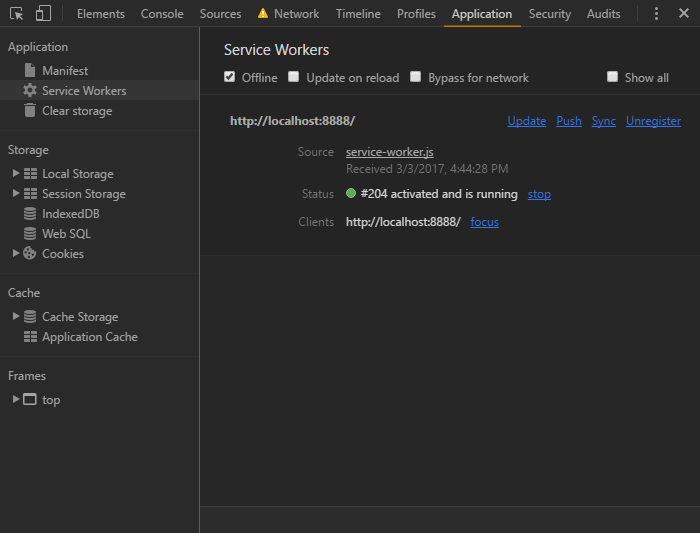
The Service Worker section of Chrome’s Development Tools Application tab provides information about your workers, with errors and facilities to force reload and make the browser go offline:
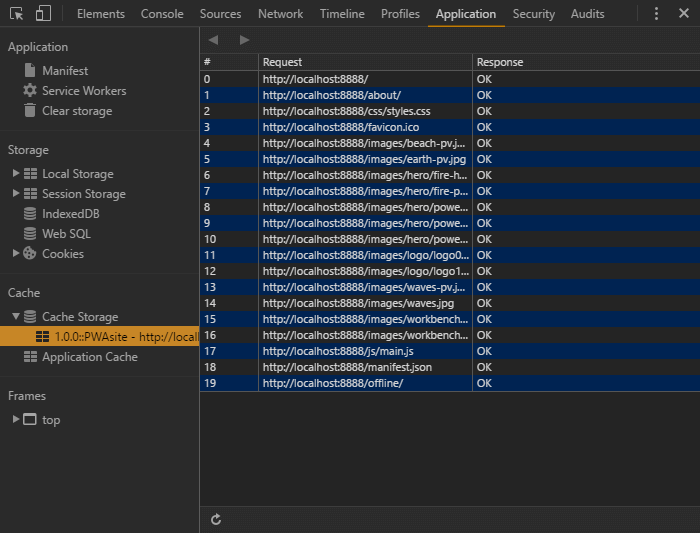
The Cache Storage section lists all caches within the current scope and the cached assets they contain. You may need to click the refresh button when the cache is updated:
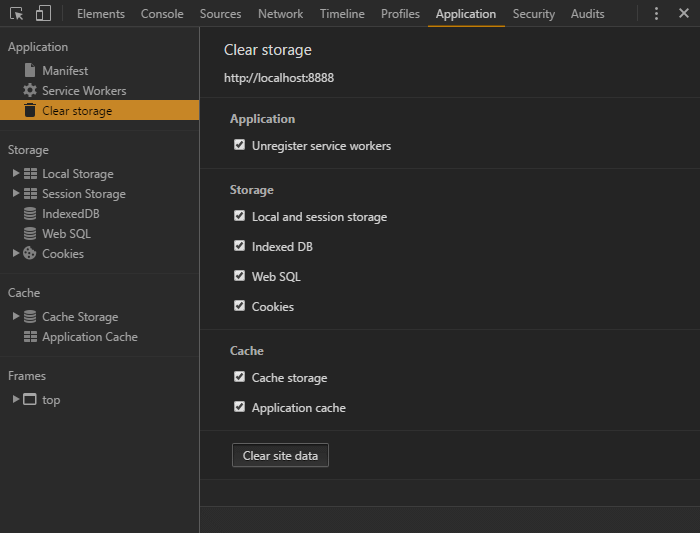
Unsurprisingly, the Clear storage section can delete your service worker and caches:
Bonus Step 4: Create a Useful Offline Page
The offline page can be static HTML informing the user that the page they requested is not available offline. However, we can also provide a list of page URLs that are available to read.
The Cache API can be accessed within our main.js script. However, the API uses promises that fail in unsupported browsers and will cause all JavaScript to halt execution. To avoid this, we’ll add code that checks whether the offline list element and the Caches API is available before loading another /js/offlinepage.js JavaScript file (which must be present in the installFilesEssential array above):
// load script to populate offline page list
if (document.getElementById('cachedpagelist') && 'caches' in window) {
  var scr = document.createElement('script');
  scr.src = '/js/offlinepage.js';
  scr.async = 1;
  document.head.appendChild(scr);
}
/js/offlinepage.js locates the most recent cache by version name, gets a list of all URL keys, removes non-page URLs, sorts the list and appends it to the DOM node with the ID cachedpagelist:
// cache name
const
  CACHE = '::PWAsite',
  offlineURL = '/offline/',
  list = document.getElementById('cachedpagelist');

// fetch all caches
window.caches.keys()
  .then(cacheList => {

    // find caches by and order by most recent
    cacheList = cacheList
      .filter(cName => cName.includes(CACHE))
      .sort((a, b) => a - b);

    // open first cache
    caches.open(cacheList[0])
      .then(cache => {

        // fetch cached pages
        cache.keys()
          .then(reqList => {

            let frag = document.createDocumentFragment();

            reqList
              .map(req => req.url)
              .filter(req => (req.endsWith('/') || req.endsWith('.html')) && !req.endsWith(offlineURL))
              .sort()
              .forEach(req => {
                let
                  li = document.createElement('li'),
                  a = li.appendChild(document.createElement('a'));
                  a.setAttribute('href', req);
                  a.textContent = a.pathname;
                  frag.appendChild(li);
              });

            if (list) list.appendChild(frag);

          });

      })

  });
Development Tools
If you think JavaScript debugging is tough, service workers won’t be much fun! Chrome’s Application tab of the Developer Tools provides a solid set of features and logging statements are also output to the console.
You should consider running your app in an Incognito window during development, since cached files are not retained after you close the tab.
Firefox offers a JavaScript debugger accessed from the Service Workers option of the tools menu. Better facilities are promised soon.
Finally, the Lighthouse extension for Chrome also provides useful information about your PWA’s implementation.
PWA Gotchas
Progressive Web Apps require new technologies, so some caution is advised. That said, they’re an enhancement of your existing website which should take no longer than a few hours and have no negative effect on unsupported browsers.
Developer opinions vary, but there are several points to consider …
URL Hiding
The demonstration site hides the URL bar, which I would not recommend unless you have a single-URL app such as a game. The manifest options display: minimal-ui or display: browser are possibly best for most sites.
Cache Overload
You could cache every page and asset on your site. That’s fine for small sites, but would it be practical for those with thousands of pages? No one is likely to be interested in all your content, and device storage limits could be exceeded. Even if you only store visited pages and assets like the demonstration, the cache could grow excessively.
Perhaps consider:
- only caching important pages such as the home, contact, and the most recent articles
- not caching images, videos and other large files
- regularly wiping older cached files
- providing a “store this page for offline reading” button so the user can choose what to cache.
Cache Refreshing
The demonstration looks for assets in the cache before loading from the network. That’s great when users are offline, but means they could be viewing old pages even when they’re online.
URLs for assets such as images and videos should never change, so long-term caching is rarely a problem. You can ensure they remain cached for at least a year (31,536,000 seconds) with the Cache-Control HTTP header:
Cache-Control: max-age=31536000
Pages, CSS and script files can change more frequently, so you could set a shorter expiry of 24 hours and ensure it is validated against the server version when online:
Cache-Control: must-revalidate, max-age=86400
You could also consider cache-busting techniques to ensure older assets cannot be used — for example, naming your CSS file styles-abc123.css and changing the hash on every release.
Caching can become complex, so I’d recommend you read Jake Archibold’s Caching best practices & max-age gotchas.
Useful Links
The following resources are useful if you want to know more about Progressive Web Apps:
- PWA.rocks example applications
- Progressive Web Apps
- Your First PWA
- Mozilla Service Worker Cookbook
- MDN Using Service Workers
There are also many articles online that influenced how I approached this demonstration code. Feel free to adapt the code and let me know how it went. Best of luck!
This article was peer reviewed by AJ Latour, Panayiotis «pvgr» Velisarakos and Dave Maxwell. Thanks to all of SitePoint’s peer reviewers for making SitePoint content the best it can be!
Frequently Asked Questions (FAQs) about Retrofitting Your Website as a Progressive Web App
What is a Progressive Web App (PWA) and why should I retrofit my website into one?
A Progressive Web App (PWA) is a type of web application that uses modern web capabilities to deliver an app-like experience to users. Retrofitting your website into a PWA can significantly enhance user experience. PWAs are reliable, fast, and engaging. They load instantly, even in uncertain network conditions, respond quickly to user interactions, and feel like a natural app on the device, with an immersive user interface.
How does a PWA differ from a traditional web application?
Unlike traditional web applications, PWAs can work offline, are installable, and can even send push notifications. They combine the best of both web and mobile apps. They are built using standard web technologies, including HTML, CSS, and JavaScript, but behave and feel like a native app.
What are the key components of a PWA?
The key components of a PWA are the web app manifest and the service worker. The web app manifest is a simple JSON file that controls how your app appears to the user and ensures your app can be ‘installed’ on the user’s home screen. The service worker is a JavaScript file that works independently from the web page and enables features like offline functionality and push notifications.
How can I retrofit my existing website into a PWA?
Retrofitting your existing website into a PWA involves a few steps. First, you need to create a web app manifest and link it to your HTML. Then, you need to register a service worker and handle the install and activation events. Finally, you need to fetch resources through the service worker, enabling offline functionality.
What are the benefits of retrofitting my website into a PWA?
Retrofitting your website into a PWA can significantly improve user engagement and conversion rates. PWAs are fast, reliable, and engaging. They can work offline, are installable, and can even send push notifications. This can lead to increased user retention and a higher conversion rate.
Can PWAs be used on all browsers and devices?
PWAs are designed to work on any browser that is compliant with the appropriate web standards. As of today, they are supported by Chrome, Firefox, Edge, and Safari browsers. They are also designed to be responsive and compatible with any device, be it a desktop, mobile, or tablet.
How does a PWA improve performance?
PWAs improve performance by loading instantly, even under uncertain network conditions, and responding quickly to user interactions. This is achieved through the use of service workers, which enable features like offline functionality and resource caching.
Can a PWA be discovered by search engines?
Yes, unlike native apps, PWAs are discoverable by search engines. This is because they are built and served via the web, so they are indexed by search engines just like any other web page.
How does a PWA handle updates?
Updates to a PWA are handled by the service worker. When changes are made to the web app, the service worker downloads the updated files in the background. The next time the user opens the app, the new version is displayed.
Can a PWA access device features?
Yes, PWAs can access many device features such as the camera, geolocation, and even push notifications. However, the level of access depends on the browser and the user’s permission settings.