
In this series, we’ve been building out the functionality needed to create amazing, real-time graphs. Up to this point we’ve done the following:
Key Takeaways
- The tutorial demonstrates how to create a form in WordPress for data collection, using a simple workout tracker as an example. The form includes fields for the number of pushups, the date of the workout, and the current user’s login details.
- The tutorial also explains how to create a script for connecting to a database, which allows for faster access to database credentials across multiple files. This script is then used to create a new PHP file that processes the form data and converts it into a format that can be digested by the database.
- The final part of the tutorial provides instructions for checking the work done so far, including how to troubleshoot potential issues. The author emphasizes the importance of patience and persistence when dealing with errors, and encourages readers to seek help from online resources and community forums.
Part 1
- We loaded a base plugin that loads our graph libraries
- We uploaded a blank PHP file via FTP
- We told WP how to find our custom PHP files
- We familiarized ourselves with the admin functions for beginners
Part 2
- We created a blank post with a placeholder shortcode
- We told WordPress about your shortcode
- We created a database table for collecting data
In this part of the series, will create a form to start collecting data. If you already have a lot of data in your database, you still may want to review this part simply to skip ahead to the next part of the series, where we query a database and format the data for our graph plugin.
For beginners, this article will be an excellent resource for you as you start to pump data into your database. I’m sticking with a simple workout tracker for educational purposes, but this can be adapted to anything.
Step 1: Create a Form for Pushups
Now, you might be a bit shaky after that last step if you’ve never worked with phpMyAdmin or any other database before. Well, it’s to be expected. But, you have to push yourself and keep learning! As of now, you’ve got nothing but a blank shortcode and an empty database table. But, you’re so close to having those real-time graphs and you don’t even know it! So, let’s knock out a simple form for creating a pushups workout record.
Open up that custom-workout.php in “Plugins” > “Editor.” We’re going to add some functionality to our pushups function. If you’ve been following along, right now we only have one statement within our pushups function. I want you to replace all the contents of the file with this code:
[sourcecode language=”php”]
<?php
function pushups (){
get_currentuserinfo();
$current_user = wp_get_current_user();
$wpuser = $current_user->user_login;
$currentpage = $_SERVER[‘REQUEST_URI’];
echo ‘<a href=”‘. wp_login_url() . ‘”>Login</a> to start adding pushups!’;
echo ‘<p><a href=”‘ . home_url() . ‘/wp-register.php”>Register</a> if you have not already.</p>’;
echo ‘<form action=”‘ . plugins_url( $path ) . ‘/flot-for-wp/flot/add_pushups.php” method=”get” id=”add_pushups”>’;
echo ‘<label>Number of Pushups: </label><input type=”text” name=”pushups_count” /><br />’;
echo ‘<label>Date of Workout: </label><input type=”date” name=”pushups_date” /><br />’;
echo ‘<input type=”hidden” value=”‘ . $wpuser . ‘” name=”pushups_wpuser” />’;
echo ‘<input type=”hidden” value=”‘ . $currentpage . ‘” name=”current_page” />’;
echo ‘<input type=”submit” value=”Add Pushups” form=”add_pushups” /></form><hr />’;
// Our shortcode that you place in posts = [pushups_sc]
add_shortcode( ‘pushups_sc’, ‘pushups’ );
?>
[/sourcecode]
Because we’re working with PHP, I’m using echo to print the form HTML to the page. All we’ve done is add a form to the “Add Pushups” post that we created in the last part of this series, where the post only contains the shortcode [pushups_sc] in the body. Go to your WordPress site and navigate to your “Add Pushups” post. Here’s what mine looks like:
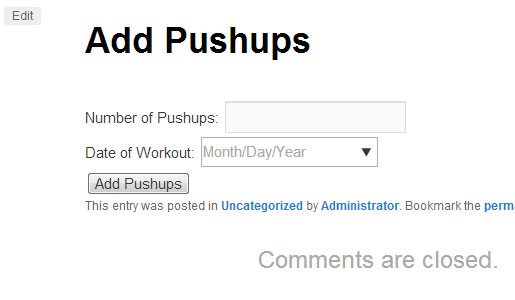
Note: You may have to go to “Settings” > “WP-Cache,” delete the cache, and disable it to see any changes. No matter how much you refresh the dang page, if your WP-Cache is on, you won’t see changes for a very, very long time.
We now have a form! Go ahead and submit some information. It won’t work, but it’s useful to see how this form sends data to the next step of the process.
And, I know it’s not pretty yet. You can always go back and stylize the forms to your satisfaction. Right now, we’re learning the hard stuff, so let’s continue with the form processing.
Step 2: Create a Script for Database Info
One best practice that I like to incorporate into my plugins is to separate my database credentials from my scripts. For one, it makes it a lot faster if you have dozens of files that access your database. Normally, you might put your database credentials in every file. But, you can always use PHP’s include() function to access your database info.
Create a new, blank file called connect_to_db.php. Paste this code and update what’s in the brackets to be your own database credentials. You may have to log into your domain hosting provider and get this information:
[sourcecode language=”php”]
<?php
/*
Put your db connect details right here so you don’t
have to keep updating them all the time. This also
makes it a lot faster if you want to use all your
settings on a different site.
*/
function connect_to_db (){
$username=”{username}”;
$password=”{password}”;
$hostname =”{hostname}”;
$dbname = “{database_name}”;
mysql_connect ($hostname,$username,$password) or die (mysql_error());
mysql_select_db ($dbname);
}
?>
[/sourcecode]
What we have here is a simple function that you can call at any time to create a database connection. We’ll need to do this to send data and retrieve data from that table we created earlier. Upload this file to the plugins/flot-for-wp/flot folder, and you’re set.
Step 3: Add a PHP file for Processing the Form Data
If you tried to submit your form, you probably got a 404 error, but in your browser bar, you had a bunch of extra information. That’s the information we’ll be using to update the pushups table that you created in your database in Step 1. To make these updates, we need a function for converting the data into something your database can digest.
Create another new, blank PHP file. Paste the following code and name it add_pushups.php
[sourcecode language=”php”]
<?php
// Get the db connection
include (“connect_to_db.php”);
connect_to_db();
$pushups_count = $_GET[‘pushups_count’];
$pushups_date = strtotime($_GET[‘pushups_date’])*1000; //Converts to Unix Timestamp
$pushups_wpuser = $_GET[‘pushups_wpuser’];
$currentpage = $_GET[‘current_page’];
$query = “INSERT INTO pushups (pushups_count, pushups_date, pushups_wpuser, active)
VALUES (‘$pushups_count’,’$pushups_date’,’$pushups_wpuser’,1)”;
mysql_query($query);
/*
If you’re not getting the results you want, comment out
header(“Location:$currentpage” ); below and
uncomment out the echo code below. This will display
the data sent to the form. If all the fields have data,
then you likely have a database connection issue.
echo ‘<p>Query: ‘ . $query . ‘</p>’;
echo ‘<p>Pushups: ‘ . $pushups_count . ‘</p>’;
echo ‘<p>Date: ‘ . $pushups_date . ‘</p>’;
echo ‘<p>WP USer: ‘ . $pushups_wpuser . ‘</p>’;
echo ‘<p>URL: ‘ . $current_page . ‘</p>’;
*/
header(“Location:$currentpage” );
mysql_close();
?>
[/sourcecode]
Okay, so there’s a lot going on here. If you’re brand new to MySQL, then this may be complete mumbo-jumbo, and that’s okay. You have to start somewhere.
At the beginning of the file is where we use the connect_to_db.php file we created in step 3. Then, we GET all the information from our form. When users click “Submit,” the information in the form is “pasted” into the URL string. Using $_GET, we can then tell our add_pushups.php file what to do with this information.
I also want to explain what’s going on with the $pushups_date. The graphing library that we will use in the next part of this tutorial requires that your time be in Unix timestamps. Don’t worry if you’re not familiar with these. I took care of the problem within the code.
Upload this file using FTP to the plugins/flot-for-wp/flot folder. This is where we told your “Add Pushups” post to send the information.
Checking Your Work
Go to your “Add Pushups” post on your site and enter some information. You should be automatically redirected to your “Add Pushups” page. If not, carefully comb through your code. I have some basic error checking code in place, but you will have to manually comment out the header line and uncomment the echo codes. You can’t keep both the header and the echo codes working at the same time or you’ll get a PHP error.
Most of your problems will be in either simple typos to the database connections section or your header location (at the bottom) syntax is off.
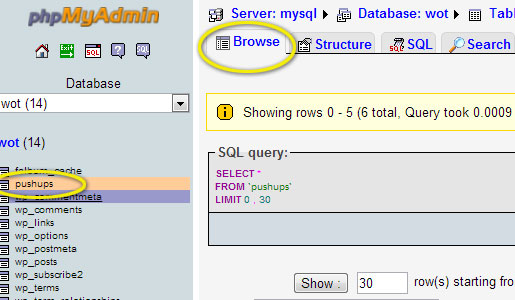
After you’ve successfully added some data to your site, log back into your phpMyAdmin account and cruise on over to the pushups table. Click the “Browse” tab and feast your eyes upon the data!
Troubleshooting
No matter how methodically I code this, there are going to be plenty of folks that run into problems. Troubleshooting is a normal part of the process, and you just have to be patient as you work through errors. Frustration is to be expected; that’s how we learn.
If you do run into errors, there are dozens of amazing sites you can reference from StackOverflow.com to just typing the error into Google. Don’t be afraid to ask questions in the comments below, as there are many talented developers here that can help, as well as myself.
Recap
So, let’s take a look at what we’ve accomplished in this part of the tutorial. We’ve done a lot together! In fact, I think I’m getting to know you a bit too well. But hang in there — we’re about to get to the fun stuff.
- We created a form using PHP to our Add Pushups post on our site.
- Next, we created a script for connecting to our database.
- Then, we uploaded a PHP document that took the data from our form and inserted it into our database.
- Finally, we checked our results to see that our data is being collected in our database.
In the next part of this series, we will use a library of code already built to create a responsive graph tool that automagically extracts our pushup data into a big, beautiful graph. You’re getting so close, so hang in there with me!